background image


January 2019 

32/34 

www.trackthestars.com 

Appendix B 

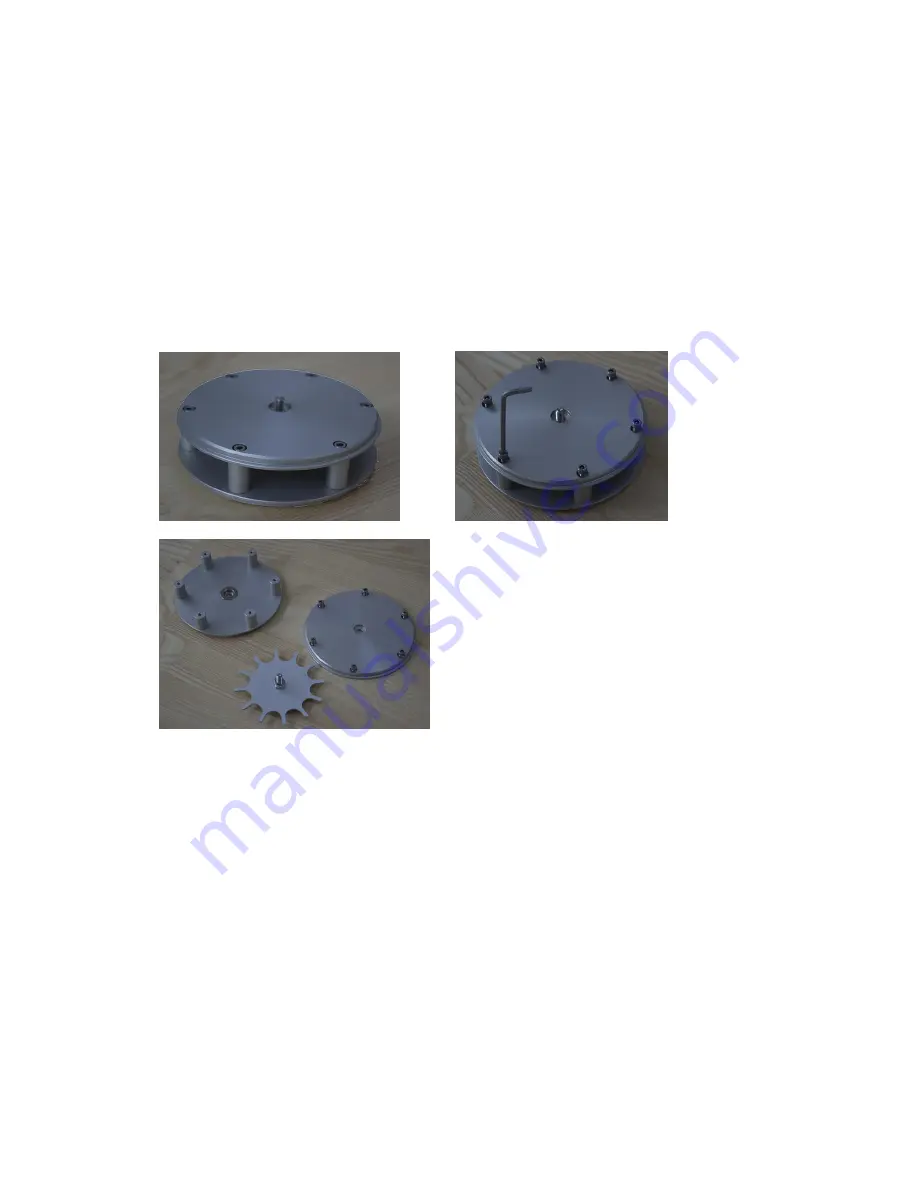
Mounting the Pier adapter on the Mount Head 


1.


Remove bottom adapter base plate 


Place the adapter on a flat table with the magnetic spring loaded threaded 
rod upwards. Unscrew the 6 screws and remove the base plate and the star 
shaped handle plate. 


2.


Mount Pier Adapter top baseplate on TTS-160 Mounting Head


The altitude clutches on the Mounting Head is locked firmly. Place the Mounting 
Head on a stable table upside down on the Telescope Saddle plate. 
 

Summary of Contents for TTS-160

Page 1: ...January 2019 1 34 www trackthestars com User manual ...

Page 2: ...trol 15 Operation screen 15 Menu system navigation 17 Data input 17 TTS 160 control software 19 Menu tree TTS 160 19 Main menu 20 Align menu 20 Align mount menu 21 Operation menu 25 Goto Object menu 26 Control via PC IPAD Mobile device 27 Connecting the PC 27 Wifi adapter like SCi Fi works equally well 28 Using the PC control 28 Maintenance 28 Cleaning 28 Appendix A 29 Wire connections for the ser...

Page 3: ...full aperture solar filter Do never look in the eyepiece when the mounting is slewing during daytime as the telescope might pass the sun Always setup the mounting on a level surface so that it cannot fall over The mounting consists of heavy parts be careful not to drop these Always keep a hand on the telescope when the dovetail adapter is not tightened for balancing etc All dovetails must have a s...

Page 4: ... the legs and place the pier base on the ground The ground must be approximately horizontal 2 Setup the pier tube The pier is placed on the pier base Position the slots above the legs Raise and extend the three tension rods Tilt the pier tube a little and insert two of the hooks in the slots in the pier tube Extend the third tension rod by turning the hook until it can be inserted into the slot If...

Page 5: ...he pier When the mounting head is placed on the top of the pier the locking screw of the pier adapter automatically catch the threaded hole in the top of the pier WARNING Be careful not to tilt the mounting head before the locking screw is tightened The mounting head and the pier are locked together by tightening the locking screw with the handle inside the pier adapter Do not over tighten the scr...

Page 6: ...ck it there with the handle Mounting the telescope 5 Mount the telescope Loosen the two bat screws at the dovetail saddle until the two brass pins can be pushed all the way in The dovetail on the telescope is inserted into the saddle in the side opposite to the locking screws Tilt the dovetail into the bottom of the saddle and lock the two locking screws NOTICE Before letting go try to lift the te...

Page 7: ...re tightened before letting go of the telescope Now the counter weights are balanced Loosen the altitude hand screws and point the telescope 60 80 degrees upwards Now the counter weights can be positioned where the balance is right Place the two counter weights in approximately the same height Place the telescope pointing approx 45 degrees up and lock the altitude hand screws The setup is now comp...

Page 8: ...de knobs Rotating any of the two knobs adjusts movement in altitude direction or scrolls in the menus Pushing the left knob toggles between the operation screen and the menu system Pushing the right knob stops both motors except tracking Azimuth knob Rotating the knob adjust movement in azimuth direction Pushing the knob switches between two movement principles when in the operation screen or work...

Page 9: ...ion locations Pick the location to be edited The following information must be input Name Spell the location name by scrolling the alphabet and select the letter by pressing ENTER When the name is completed press NEXT left knob to leave the field Latitude Enter latitude in degrees arcminutes and arcseconds Northern latitudes are positive Longitude Enter longitude in degrees arcminutes and arcsecon...

Page 10: ...itude the mount will goto automatically Can be left unchanged at 0o Stellar Alignment Solar Alignment Instant Tracking 9 Aligning the mounting using just one object Instant Tracking The hand pad starts up with the text Track The Stars Press ENTER to go to the Align menu Select line Align mount Select line 1 Not aligned Select line Bright Stars or Planets Look at the sky and select a bright star ap...

Page 11: ...ow completed The resulting latitude is based on the latitude of the selected location in the setup menu The mount will immediately start to track the selected object The tracking is based on that the mount is setup vertically For visual observations and for imaging the sun the moon or the planets alignment on one object is normally enough jump to point 11 10 Aligning the mount on a second star for...

Page 12: ...to account if the mount pier is not vertical The mounting is now tracking alignment star 2 If a wrong alignment star is selected in the sky the mount will show Aligment failed In this case restart the alignment process point 9 Goto object 11 Goto selected object Ensure the hand pad is in the operation screen by pressing the menu knob left knob Press the menu knob to open the operation menu Select ...

Page 13: ...160 Panther Mount is constructed to be driven by the internal motors and not pushed by hand If it is a wish to move the mount manually by hand it is necessary first to loosen the Azimuth friction drive Please see Appendix A You have now completed the Quick Start guide and should be able to find and observe objects More detailed description of the mounts features follows in the next sections ...

Page 14: ...e knobs moves with small clicks The knobs are named Adjustment of display brightness When the mount is powered up the text Track The Stars is displayed At this point the display brightness can be adjusted by turning the Altitude knobs Press ENTER Azimuth knob to continue Daytime use of Handpad For daytime use the red glass in front of the display can be removed It s held by four magnets and can be...

Page 15: ...s Each click from a rotational knob changes the speed one step up or down The motor is stopped by turning the knob until speed step zero is reached or easier by turning one click on the knob that controls the other motor NOTICE The mount continues to slew until the motor is stopped An arrow in the top right corner is shown when the mount is moving Distance Mode In distance mode the mount moves a c...

Page 16: ...con Empty field No alignment 2 3 star alignment completed Tracking status icon Dot is running when tracking Speed distance Mode icon Speed Mode chosen Distance Mode chosen Movement indication icon Arrow indicates that the mounting is moving in the shown direction Object number Battery status Alignment status Tracking Status Speed Distance mode Movement indication Object description Coordinates Dec...

Page 17: ...knob To leave the menu system press the MENU knob The menu system displays one menu item per line One of the lines is highlighted Turn the altitude knobs to scroll and select by pressing the ENTER knob Data input Data input takes place when an object catalog is used a GOTO to a set of coordinates is performed editing location information setting date and time setting up basic mount parameters When...

Page 18: ... 89 89 Each main part is selected by pressing ENTER When editing locations the location name is entered scrolling one letter at a time and confirmed by pressing ENTER When the name is completed the NEXT knob left knob is pressed Other location data is input as described above ...

Page 19: ...describes the software in details It is suited for looking up specific functions Menu tree TTS 160 The lines written in italic bring you to another menu The other lines select a function performing an action Menu points in red are special setup functions not needed described here ...

Page 20: ...n menu Align mount Select this to align mount on one star planet sun or to add a second or third alignment star to a previous completed 1 or 2 star alignment Load last alignment Quickstart Loads the last parked alignment If the mount was parked before being powered down it is possible to load the last alignment and continue with that This demands the mount telescope has not been moved since it was...

Page 21: ...The menu contains one line per alignment star When no alignment has been performed all lines says Not aligned When a star or planet sun has been selected and alignment on the star has been made the line shows Aligned Note that the alignment stars must be selected in ascending order 1 star alignment procedure Select first alignment star in the menu 1 not aligned Select Bright stars to pick a star f...

Page 22: ... planet 2 star alignment higher precision For higher precision alignment recommen ded when doing long exposure astrophoto graphy a second alignment star must be added This will take the exact angle of the pier into the equations So there is no need to spend time levelling the pier exactly Select alignment star 2 and align as alignment star 1 When alignment star 2 is aligned the system calculates t...

Page 23: ...ted when OK is pressed for the input seconds TTS 160 stores the time in a Real Time Clock with battery backup This means that time is kept also when the mounting is switched off Date and Time must be correct for the mount to work best Select location This function sets the active location from the already stored locations There are 5 available locations Locations that have not been defined by the ...

Page 24: ...ylight saving time when entering the time zone The time zone is positive east of Greenwich Examples of time zones Berlin København Paris 1 2 if daylight saving time London 0 Moscow 3 New York 5 4 if daylight saving time Los Angeles 8 Sydney 11 Tokyo 9 Local horizon Enter the wanted local horizon This is the lowest altitude the mount will goto automatically Select language Use this function to sele...

Page 25: ...s used like this If an object is not precisely centered after a GOTO center it manually using the hand pad When the object is centered select the Synchronize function Now the mounting coordinates match the sky exactly Performing a synchronization will improve GOTO accuracy in the part of the sky where the synchronization is made It is not certain that GOTO to other far parts of the sky will be imp...

Page 26: ... photographical exposures that can be made without field rotation being visible in the single exposures When field rotation is selected the optional telescope rOTAtor is active To turn off the rOTAtor select another coordinate display See rOTAtor user manual for details Main Menu Select this function to return to the main menu Goto Object menu The Goto object menu is used to make a GOTO to an obje...

Page 27: ...will GOTO the object Planets When this function is selected a list with the planets is displayed Select a planet When selected it is checked if the planet is above the defined local horizon If so the mounting will GOTO the planet Otherwise a message is given that the planet is below the local horizon The local horizon is setup under location Operation menu Select this function to return to the ope...

Page 28: ...he following parameters Speed 9600 baud Data bits 8 Parity N Stop bits 1 Open the connection to the telescope This completes the setup of the connection The telescope position can now be shown on the sky map and GOTO s can be made directly by picking objects from the software The mounting hand pad can be used normally at the same time Maintenance All parts of the mounting is constructed and built ...

Page 29: ...ng Extra cables can be supplied Wire connections for autoguider interface The connector for autoguider has the following connections Cables for autoguiders can be supplied Updating the firmware Updating the firmware is done through the PC interface Updating files and instructions is e mailed directly to registered users Updating software is available for Windows Mac OS and Linux 1 5V 2 Ground 3 Az...

Page 30: ... the internal motors This gives the most precise and stable tracking needed for astro imaging If you want to be able to turn the telescope by hand it s necessary to loosen the friction drive 1 Place the mount head upside down on the telescope dovetail saddle on a solid table WARNING Be sure to lock the Altitude screws well first 2 Remove the pier adapter from the mount head See Appendix B 3 Remove...

Page 31: ...f you still can rotate the mount housing by hand Adjust the screws until the housing feels fairly hard to rotate 7 Insert the plastic caps and mount the pier adapter 8 Setup the pier and install the mount head counter weight and telescope 9 Now try gently to rotate the telescope in azimuth by hand feeling the friction drive sliding If it feels to hard or to loose repeat the adjustment process 10 I...

Page 32: ...n a flat table with the magnetic spring loaded threaded rod upwards Unscrew the 6 screws and remove the base plate and the star shaped handle plate 2 Mount Pier Adapter top baseplate on TTS 160 Mounting Head The altitude clutches on the Mounting Head is locked firmly Place the Mounting Head on a stable table upside down on the Telescope Saddle plate ...

Page 33: ...to knock over the head Place the Pier adapter top plate on the mount head and fix with screw Metric ø8mm x 20mm Tighten firmly with enclosed Allan Key do not over tighten 3 Mount Pier Adapter lower baseplate Mount the lower base plate of the Pier adapter with the 6 screws Remember to insert the star shaped handle plate as shown ...

Page 34: ...ww trackthestars com Tighten the screws with the enclosed Allan key The mount head with the Pier adapter is now ready for use on the Pier NOTICE The Pier Adapter stays on the Mounting Head It will fit in the transport bag ...

Reviews: