background image

13

DISPLAY INDICATORS

BEFORE USING

12

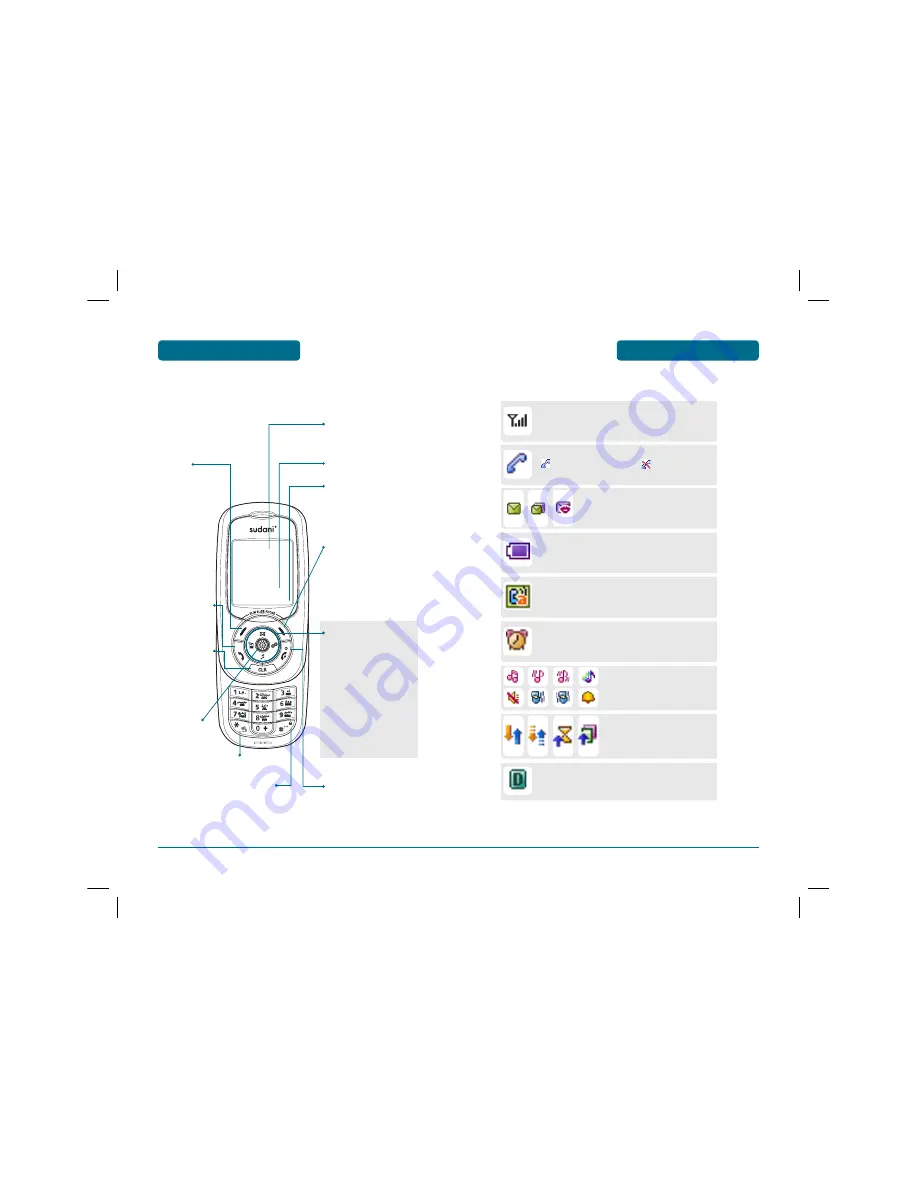
HANDSET DESCRIPTION

BEFORE USING

H

THE FUNCTION KEYS

Display Indicators

See page 13 for a list of icons.

Text & Graphic area

Soft Key Indications

Shows the functions
currently assigned to each 
soft key and displays some 
icons.

Press to turn the phone 
on/off, to terminate a call 
or to return to the initial 
page.  


Press and hold to enter 
Phone lock mode.

To select an 
option.

Press to make or 
receive a call.    

Menu

(Left Soft Key) 
Press to access the 
menu or function 
displayed on 
bottom line.

Press and hold to enter 
Etiquette mode.

Find

(Right Soft Key) Press to 
access the Find menu or 
to return to the previous 
page.
Function displayed on
bottom line.

H

DISPLAY INDICATORS

Digital Mode 

Phone is in the digital service area.

Auto Answer  


Phone is in answering machine mode.
(when connected Earpiece, it operates.) 


Signal Strength  


Current signal strength: the more lines,
the stronger the signal.  


Alarm  


Appears when either an event or an alarm is set. 

Messages     

New text or  Voice message.

Battery  


Battery charging level – the more blocks,
the stronger the charge. 

Service Indicator  


    Indicates call is in progress, 

indicates the 

phone cannot receive a signal from the system. 

Data Call 


Data call is in progress. 

Ring Type  


Appears when a ringer is set as a 
ringer Type.  

THE FUNCTION KEYS

In Idle Mode 

Press Up for Message, 
Down for Ring Tone, Right 
for Profiles and Left for 
Memo.

Inside the menu

Within a menu, use to scroll 
through menu options, or 
to select a function
displayed on the screen.

CLEAR & BACK

Press to clear a 
digit from the
display or to 
return to the 
previous page. 

PS-300_060602.indd 12-13

PS-300_060602.indd   12-13

2006.6.2 5:36:17 PM

2006.6.2   5:36:17 PM

Summary of Contents for PS-300

Page 1: ...5 2 6 WWW PANTECH COM WWW SUDANI SD 53 2 5...

Page 2: ...User Guide PS 300 PS 300_060602 indd 1 PS 300_060602 indd 1 2006 6 2 5 36 14 PM 2006 6 2 5 36 14 PM...

Page 3: ...m through Qualcomm manufactured MSM6025 chips and CDMA technologies This product allows for high speed communication services data fax services and a GUI animation menu T9 input mode makes it much eas...

Page 4: ...DATE 78 TIME 78 4 TABLE OF CONTENTS PHONE INFO 34 MAKING AN EMERGENCY CALL 35 EMERGENCY NUMBER IN LOCK MODE 35 EMERGENCY NUMBER USING ANY AVAILABLE SYSTEM 36 CHAPTER 3 MEMORY FUNCTION 37 STORING A PH...

Page 5: ...HONE NUMBER TO MSG GROUP 107 CHANGE MSG GROUP NAME 108 SEND MSG 108 DELETE MSG GROUP 109 DELETE ALL 109 MSG COPY 110 PHONE TO UIM 110 UIM TO PHONE 110 6 TABLE OF CONTENTS EVENT 78 SETTING 78 RINGER 79...

Page 6: ...129 AIRCRAFT 129 BLASTING AREAS 129 POTENTIALLY EXPLOSIVE ATMOSPHERES 129 PRECAUTIONS 130 SAFETY INFORMATION FOR FCC RF EXPOSURE 131 CAUTIONS 131 BODY WORN OPERATION 132 VEHICLE MOUNTED EXTERNAL ANTE...

Page 7: ...l cellular telephone The PS 300 90g without battery And the dimensions are 10 9cm X 4 65cm X 1 96cm 11 HANDSET DESCRIPTION BEFORE USING 10 INSIDE THE PACKAGE BEFORE USING Handset Standard Battery AC C...

Page 8: ...service area Auto Answer Phone is in answering machine mode when connected Earpiece it operates Signal Strength Current signal strength the more lines the stronger the signal Alarm Appears when eithe...

Page 9: ...nit Press the battery cover case until the sound of a click is heard If the battery is not correctly placed in the compartment the handset will not turn on and or the battery may detach during use Eti...

Page 10: ...ttery before use It is more efficient to charge the battery with the handset powered off The battery must be connected to the phone in order to charge it Battery operating time gradually decreases ove...

Page 11: ...one to four days to completely drain Store the discharged battery in a cool dark and dry place Purchase a new battery when its operating time gradually decreases after fully charging Properly dispose...

Page 12: ...res of your cellular telephone including TURNING THE PHONE ON OFF ACCESSING THE MENU MENU SUMMARY BASIC FUNCTIONS DURING A CALL MAKING AN EMERGENCY CALL CHAPTER 2 BASIC OPERATION 20 MEMO PS 300_060602...

Page 13: ...phone can be customized via the menu Each function can be accessed by scrolling with the Navigation key or by pressing the number that corresponds with the menu item 22 TURNING THE PHONE ON OFF BASIC...

Page 14: ...2 UIM to Phone 2 7 1 1 Phone 2 7 1 2 UIM 2 8 2 1 Inbox 2 8 2 2 Outbox MAIN MENU 2ND DEPTH 3RD DEPTH 4TH DEPTH 3 Call History 4 Profiles 5 Display 6 Settings 3 1 Missed 3 2 Received 3 3 Dialled 3 4 Cal...

Page 15: ...peed 6 2 1 3 Port 6 3 3 1 UIM Lock 6 3 3 2 PIN Code Change 6 3 4 1 Phone Book 6 3 4 2 Call History 6 3 4 3 Outgoing Call 6 3 4 4 Messages 6 3 4 5 Camera 6 3 7 1 Reset 6 3 7 2 Clear Memory Reset MAIN M...

Page 16: ...ERATION H PAUSE FEATURE Pauses are used for automated systems i e voice mail calling cards Insert a pause after a phone number then enter another group of numbers The second set of numbers is dialed a...

Page 17: ...elect one of the following Adjust volume then press to save it To adjust earpiece volume during a call move the Navigation Key up or down Ring Type Ring Tone Ringer Volume Key Volume 30 BASIC FUNCTION...

Page 18: ...ad tones Press OPTIONS To deactivate press OPTIONS The phone will automatically unmute in Emergency Call or Callback mode Press OPTIONS to deactivate it 32 DURING A CALL BASIC OPERATION H MESSAGES Ena...

Page 19: ...he Emergency Call Mode when you dial the preprogrammed emergency numbers 120 666 999 It also operates in the lock mode and out of the service area H EMERGENCY NUMBER IN LOCK MODE The Emergency number...

Page 20: ...ode While the phone is in the emergency mode the phone can receive an incoming call from any available system However it can t make a call 36 MAKING AN EMERGENCY CALL BASIC OPERATION CHAPTER 3 MEMORY...

Page 21: ...of icons The name of the icon is displayed above the list Use the Navigation key to choose the type of you re adding as indicated by the icon Press to select Enter a name and press Please refer to pa...

Page 22: ...character to the left of the cursor 40 ENTERING LETTERS NUMBERS SYMBOLS MEMORY FUNCTION The input mode Alpha editor will be automatically activated when necessary to enter letters and numbers As shown...

Page 23: ...git keys to enter letters numbers and characters Enter letters using the key pad as follows Abc mode Key Pad 1 time Repetitions 2 times Repetitions 3 times Repetitions 4 times Repetitions 5 times A 2A...

Page 24: ...ode press Abc To enter a space press The cursor will automatically move to the next column Repeat until letters are entered To delete one digit press CLEAR To delete the entire entry press and hold CL...

Page 25: ...be entered more quickly by pressing a key once per character Select the T9 Abc mode by pressing Abc Press a digit key once to enter the character you want and enter all the characters to input the wo...

Page 26: ...For a 2 digit location number press the first number then press and hold the second number You can setting up speed dial entries from saved in your phone s memory To assign a phone number to a locatio...

Page 27: ...M 5 Delete To call the selected number press 50 PHONE BOOK MENU FUNCTION HADD NAME Adds a new entry PHONE To add a new entry to the phone s memory To enter a name or number use the Navigation Key to s...

Page 28: ...MENU FUNCTION 53 52 PHONE BOOK MENU FUNCTION BY NUMBER Press MENU The list of phone numbers saved in your phone book will be displayed in numeric order Enter the phone number or scroll through the lis...

Page 29: ...select the location then press SET Select the entry with the Navigation Key and press 54 PHONE BOOK MENU FUNCTION HGROUP Phone entries into groups Existing groups include No Group Family Relatives Fr...

Page 30: ...history 56 PHONE BOOK MENU FUNCTION HPHONEBOOK COPY Allows you to copy the number to another location either Phone or UIM PHONE TO UIM Press MENU You can copy all of the names stored on the phone s me...

Page 31: ...number Delete To delete missed calls list Delete All To delete all missed calls list H DIALLED Displays information about the 30 most recently Dialled calls Place a call to a outgoing call number by...

Page 32: ...ation left or right key to change the mode All dialled calls Last dialled call or All calls LAST DIALLED CALL Displays information of last call Press navigation left or right key to change the mode Al...

Page 33: ...le 1 Profile 2 General Outdoor and Meeting mode can be edited 1 Press and hold the star key to change to the vibrate only mode Messages Sets the tone of the text message Tone 1 5 Voce mail Sets the to...

Page 34: ...ed to your phone To save it press RECEIVED CALL Press MENU Select Default to choose a pre installed display or Downloads or Saved to Phone to choose a display you have downloaded to your phone To save...

Page 35: ...the screen Press MENU CALL FORWARDING This network service enables incoming calls to be rerouted to a number that you specify Press MENU 67 Enable If you select enable you can accept a waiting receivi...

Page 36: ...END Key and OK Key Slide Open Set the phone to answer a call with slide open SETTINGS MENU FUNCTION VOICE PRIVACY The voice Privacy feature encrypts the voice channel so that no one can eavesdrop on y...

Page 37: ...t MINUTE ALERT Set the phone to beep every minute during a call Press MENU Minute Alert Select On or Off with the Navigation Key then press to save it 70 SETTINGS MENU FUNCTION SIGNAL FADE ALERT Press...

Page 38: ...LOCK Prevents the phone from being used without entering the password first Press MENU then enter Password The default password is the last 4 digits of your phone number Press then select Lock Now Loc...

Page 39: ...MENU FUNCTION CALL HISTORY Blocks access to call history Press MENU then enter Password Press then select Allow or Restrict with the Navigation Key and press OUTGOING CALL Blocks all outgoing Calls ex...

Page 40: ...se the numbers are saved Allow Allow access to camera Restrict Restrict access to camera 76 SETTINGS MENU FUNCTION DELETE ALL Clears all phone book downloads and photo gallery entries Press MENU then...

Page 41: ...rm using the Navigation Key 78 ORGANISER MENU FUNCTION ORGANISER MENU FUNCTION RINGER To set a Ringer press OPTIONS then select Default or Change using the Navigation Key To save it press To save it p...

Page 42: ...ime Mon Fri Weekly Select Monday Tuesday Wednesday Thursday Friday Saturday Sunday Monthly Select 1 31 80 ORGANISER MENU FUNCTION Default To set default ringer type Change To set custom ringer type RI...

Page 43: ...aper Pattern Sea Sky Flower White then press 82 ORGANISER MENU FUNCTION H CALCULATOR To access the calculator Press MENU Follow the instructions below to calculate 8 6 4 2 5 To reset press RESET x Res...

Page 44: ...ss MENU To measure a time period 1 To start the stop watch press START 2 To pause it press STOP 3 To resume it press to return to the previous page press BACK To time up to Five events at once 1 To st...

Page 45: ...ess CAMERA KEY and then OPTIONS Select one of the following options Resolution works to 128X128 in case of Frame mode setting High Normal Low 160X120 320X240 640X480 CAMERA MENU FUNCTION 86 ORGANISER...

Page 46: ...TI SHOT Press CAMERA KEY and then OPTIONS Select one of the following options TIMER Press CAMERA KEY and then OPTIONS Select one of the following options CONTRAST Press CAMERA KEY and then OPTIONS Sel...

Page 47: ...Power On Power Off Received Call and Dialled Call image Press CAMERA KEY and then OPTIONS SET PHONEBOOK Press CAMERA KEY and then OPTIONS DELETE To delete a picture Press CAMERA KEY and then OPTIONS...

Page 48: ...addresses Voice Mail and Text Messaging or Picture message functions including WHEN A NEW MESSAGE ARRIVES WRITE INBOX OUTBOX VOICE MAIL DRAFTS TEMPLATES DELETE ALL SETTINGS MSG GROUP MSG COPY 92 MEMO...

Page 49: ...screen you can choose from the following 1 Insert Template Insert Templates 2 Save to Templates Save Templates 94 H TEXT MESSAGE TEXT MESSAGE The display appears when a new message arrives To display...

Page 50: ...to unlock the message then press It is not displayed for stored message on UIM 96 HINBOX Press MENU or press Select a Phone or UIM Select a message then press The message is displayed To delete a mess...

Page 51: ...To save the text message to draft select Save to Drafts DETAIL To detail this message select Detail COPY TO UIM To copy the messages select COPY TO UIM You can copy the messages stored on the phone s...

Page 52: ...sage 2 Save to Phonebook Save the number to Phone book 3 Lock Unlock To Lock or Unlock the text message 4 Delete To delete this message LOCK UNLOCK To lock or unlock the text message select Lock Unloc...

Page 53: ...ge from the list Press OPTIONS To add a new template message select Add New To edit the template message you have selected select Edit To delete the saved template message select Delete HDELETE ALL Pr...

Page 54: ...attach your name phone number a simple memo or tag line as a signature Press MENU or press Select On or Off with the Navigation Key and press DIRECT VIEW If the Direct View is set to on the user will...

Page 55: ...gn phone numbers to a Msg Group select the Msg Group and press Then unassigned locations appear Select a location and press OPTIONS to access the Find menu Please refer to page 51 for more details Sel...

Page 56: ...put a new group name Press to save it There is a 16 letter limit SEND MESSAGE Press MENU Select an existing group name Press OPTIONS then select 3 Send Message Scroll to Message field and enter your m...

Page 57: ...You can copy all of the messages stored on the UIM card to the phone s memory VOICE MAIL AND TEXT MESSAGE CHAPTER 6 PACKET DATA SERVICE CHAPTER 6 PACKET DATA SERVICE Abstract This Document is describe...

Page 58: ...ly designed and should not be substituted by other modem cable 112 PACKET DATA SERVICE H SETTING UP PC Before getting started with Data Services you must have PC setup as appropriate otherwise do the...

Page 59: ...NNECTION Connect PS 300 to PC using USB cable as shown in the figure 1 Open Control Panel and Double click Network and Dial up Connections icon Double click Make New Connection icon and do the followi...

Page 60: ...one dial up device on your computer select the device that is connected to PS 300 with USB Cable Curitel Packet Service COM 116 PACKET DATA SERVICE 117 3 3 Enter any arbitrary number in Telephone num...

Page 61: ...er Click Connect PACKET DATA SERVICE 3 4 Click Finish when the setup is completed DIAL UP NETWORKING Go to Start e Settings e Control Panel e Network and Dial up Connections Double click Dial up Conne...

Page 62: ...115200 on General tab Set Extra initialization commands with AT CRM 150 on Advanced tab Dial up Connection PACKET DATA SERVICE PACKET DATA SERVICE 121 2 1 Click the right button of mouse on Dial up Co...

Page 63: ...e AT CRM 1 Enter User name and Password as appropriate Enter any arbitrary number in Phone Number User name and Password are given by your local service provider If you do not have appropriate user na...

Page 64: ...ty details This chapter contains the terms and conditions of services and the warranty for your cellular telephone Please review them thoroughly SAFETY INFORMATION FOR WIRELESS HANDHELD PHONES SAFETY...

Page 65: ...SAFETY INFORMATION FOR WIRELESS HANDHELD PHONES EXPOSURE TO RADIO FREQUENCY SIGNALS Your wireless handheld portable telephone is a low power radio transmitter and receiver When it is ON it receives a...

Page 66: ...onic equipment is shielded from RF energy However certain electronic equipment may not be shielded against the RF signals from your wireless phone PACEMAKERS The Health Industry Manufacturers Associat...

Page 67: ...cautionary markings on 1 AC Adaptor 2 Battery and 3 Product Using Battery DO NOT use this equipment in an extreme environment where high temperature or high humidity exists DO NOT abuse the equipment...

Page 68: ...e while operating can be well below the maximum value This is because the phone is designed to operate at multiple power levels so as to use only the power required to reach the network In general the...

Page 69: ...equirement for safe exposure The tests are performed in positions and locations e g at the ear and worn on the body as required by the FCC for each model The highest SAR value for this model phone whe...

Page 70: ...d warp or melt certain plastics Do not store the phone in cold areas When the phone warms up to its normal operating temperature moisture can form inside the phone which may damage the phone s electro...

Page 71: ...to mute therefore activate unmute by pressing the ok key When battery lifetime becomes shorter than usual this may happen when you are in an area with low signal strength turn off your mobile phone w...

Page 72: ...your product 140 When your phone does not turn on make sure your battery is charged check to see if your phone works while recharging the battery When you are unable to send a message either you have...

Page 73: ...PANTECH s option the Product or any relevant parts thereof in the event that the Product is found to be Defective The repaired Product or the Product part provided as a replacement for a Defective Pro...

Page 74: ...ronic equipment may be shielded against RF signal from you wireless phone pacemakers Hearing Aids and so on Turn your phone OFF in health c are facilities when any regulations posted in these areas in...

Page 75: ...e determined by turning the equipment off and on the user is encouraged to try to correct the interference by one or more of the following measures Reorient or relocate the receiving antenna Increase...

Reviews: