1. Introduction
4
The DMM antenna is a 2x2 MIMO (multiple input multiple output) / diversity capable accessory antenna
designed to improve reception for 2G / 3G/ 4G and some 5G modem devices.
2.1. Desk mounting
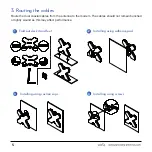
The DMM can mounted to any non-conductive surface using the supplied adhesive pad see fig. 2.
Ensure the area where you wish to mount the antenna is flat and level and free of grease and dirt. The
adhesive pad should be placed centrally and can be fitted on either side of the antenna by removing the
carrier film and pressing firmly. Once mounted to the antenna follow the same process to mount to the
mounting panel. For optimal pad adhesion the ambient temperature should be 10°C - 30°C (50°F -86°F).
2.2. Adhesive pad mounting
The DMM can be suction mounted to a window or other smooth surface utilising the supplied suction cup.
Simply screw the suction cup to the top most mounting position as shown in fig. 3. Proceed to mount the
antenna by pressing it firmly onto the desired surface until a firm grip is acheived. To dismount the
antenna hold the antenna firmly and unscrew the antenna from the suction cup. The suction cup can
then be removed from the mounting surface with ease.
2.3. Suction cup mounting
The DMM can be easily desk mounted using the integrated fold out feet as shown at fig. 1. Simply fold
out both feet and position the antenna as desired. The feet can then be re-stowed for transport.
2. Positioning the Antenna
The DMM is designed to operate with MIMO enabled modems which are able to take advantage of the
scattered signal paths which exist in everyday indoor environments. For this reason the user can be
very flexible about where they position the antenna. The antenna is omni-directional and does not need
to be facing any particular direction to operate. The antenna should not be positioned too close to metal
objects as this may affect performance.
2.4. Screw mounting
The antenna can be mounted to appropriate surfaces using the supplied self-tapping screws and wall
plugs as per fig. 4. Check for obstructions under the mounting panel and then drill appropriate holes using
the antenna as a template if required. Take care not to over-tighten screws when mounting as this may
break the mounting tabs- using the supplied spacers will help avoid over tightening.


