background image


BA_PH_BSB-400-900_EN_44-21.docx


12


4.1.4


Residual Risks 

The machine is built according to the latest state of the art and the recognised safety rules. Nevertheless, the 
use of the machine may cause danger to life and limb of the user or third parties or damage to the machine and 
other equipment. Due to the construction of the machine, the following residual risks can occur even when used 
as intended and despite compliance with all relevant safety regulations: 


Reading and applying the operating manual is mandatory for the operating personnel. 


Be alert to possible crushing hazards:  
a) when transporting the machine by forklift truck 

 between forks & pallet / machine 

b) when picking up the machine 

 between machine / pallet and floor 

c) when lowering the machine 

  between machine and fixed equipment 


Be alert to possible crushing hazards when lowering the machine (from the cargo pallet to the 
floor) with a forklift truck or overhead crane.


Make sure that no objects fall from the forklift truck / crane.  
Do not leave any objects / tools on the machine.


It is strictly prohibited to ride on the machine during a lifting operation (with the indoor crane or 
forklift). There is a danger of falling!


Unauthorised persons are not allowed to enter the installation area of the machine  
(responsibility of the operator).


Be aware of possible tripping and slipping hazards on the floor. Prevent possible hazards by keep-
ing the floor dry and clean and by using anti-slip floor coverings around the machine. 


Be aware of the danger from falling objects such as workpieces, tools or similar. Therefore, wear 
safety shoes, especially when transporting and setting down the machine.  


Pay attention to the existing danger of being cut by the bandsaw blade. Never reach into the run-
ning bandsaw blade! Use pushing devices for short and thin workpieces. Wear protective gloves 
when changing the saw blade. 


Be aware of the danger of snow from chips and splinters and never remove them from the danger 
area by hand. Use suitable aids, e.g. hand brushes. 


Danger of cutting and drawing in! Do not clean the bandsaw blade or bandsaw roller with a brush 
or scraper held in your hand while the machine is running. 


Danger of cutting and drawing in! In case of a broken bandsaw blade or belt, wait until the machine 
has come to a complete standstill and only then open the separating safety device. 


Be aware of a possible danger of being drawn in by moving machine parts or tools. This can cause 
pieces of clothing or hair to be caught. Always wear tight-fitting clothing and a hair net if necessary. 
Generally avoid jewellery, loose clothing and untied long hair.


Danger from electric shock! There are hazards when working on the electrical system.  
This work must only be carried out by qualified personnel! 


Danger from electric shock! It is strictly forbidden to bypass safety devices (e.g. safety switches).


Electrical equipment must be maintained and cleaned regularly. 


Pay attention to the danger of crushing on workpiece guides and moving machine parts.


Make sure that no unauthorised persons are in the area of the machine. 


Be aware of the risk of injury from flying tool parts in the event of tool breakage. 
Therefore wear protective goggles. 


Be aware of the risk of injury from flying workpiece parts and chips, splinters and dust coming out 
of the machine. Therefore wear protective goggles. 


Be aware of the increased noise emission and wear hearing protection. 


Be aware of the increased dust generation. Use the extraction system and wear a dust mask if  
necessary. 

Summary of Contents for BSB 400

Page 1: ...f Stauffenberg Kaserne Binger Str 28 Halle 120 DE 72488 Sigmaringen Tel 49 07571 755 0 E Mail info hokubema panhans de Web https hokubema panhans de Operating Manual Bandsaw Machines PANHANS BSB 400 5...

Page 2: ...to the Machine 11 4 1 3 Connection to a Central Emergency Stop Switch 11 4 1 4 Residual Risks 12 4 1 5 Observe the Environmental Protection Regulations 13 4 1 6 Organisational Measures 13 4 1 7 Person...

Page 3: ...e Extraction Unit 24 6 8 Electrical Connections 25 7 Components and Controls 26 8 Commissioning 27 8 1 Switching ON and OFF 27 8 1 1 Switch on 2 2 kW Models 27 8 1 2 Switch on 3 0 7 5 kW Models 27 8 1...

Page 4: ...he Machine 46 15 3 Maintenance and Lubrication of the APA Saw Blade Guides 46 15 4 Bandsaw Roll Coating 46 15 5 Replacing the Bandsaw Blade 46 15 6 Retension the V belt s 47 15 7 Replacing the V belt...

Page 5: ...w blade 31 Figure 26 Bandsaw wheel adjustment 32 Figure 27 Lever for height adjustment 32 Figure 28 Adjust table inclination 32 Figure 29 APA Structure and components 33 Figure 30 Adjusting the guides...

Page 6: ...of pro duction waste and maintenance during maintenance servicing inspection repair and or during transport Apart from the operating manual and the legally binding accident prevention provisions appl...

Page 7: ...ce to the obligation to wear protective goggles Non observance of these instructions may result in personal injury Reference to the obligation to wear a respiratory protection mask Non observance of t...

Page 8: ...d saw blade guard is done manually via a 3 arm lever see section 9 5 An emergency stop is installed in the control panel 3 2 Target Group and Previous Experience This operating manual is intended for...

Page 9: ...afety and monitoring devices must be regularly checked and maintained by the operator Only instructed trained or qualified persons may work on this machine Maintenance work must be carried out and doc...

Page 10: ...Swivelling table up to 45 Replaceable table insert Fence ruler can be used to the left and right of the saw blade fence profile can be folded over Dynamically balanced bandsaw wheels with vulcanised...

Page 11: ...processing of other materials requires prior consultation with the manufacturer and his approval Improper use can lead to danger to persons and to a defect or damage to the machine Only lades recomme...

Page 12: ...ttention to the existing danger of being cut by the bandsaw blade Never reach into the run ning bandsaw blade Use pushing devices for short and thin workpieces Wear protective gloves when changing the...

Page 13: ...ting manual with further instructions including supervisory and reporting duties to take account of special operational features e g with regard to work organisation work processes per sonnel employed...

Page 14: ...t lighting at least 500 lux around the machine must be ensured 4 2 1 Before starting Work Only use sharp crack free and sufficiently set bandsaw blades Check that the saw blade is correctly aligned on...

Page 15: ...t interruptions Never leave the machine running unattended When the work is finished Release the saw blade tension and provide the machine with a warning sign Lower the saw blade guard to table height...

Page 16: ...time 10 s despite readjustment the customer service must be informed 4 2 5 Safety Equipment The machine is equipped with the following necessary safety devices Complete protection of the saw blade al...

Page 17: ...ring operation it is strictly forbidden for the operator as well as any helpers and possible observers to stay in this area Figure 3 Danger zone around the machine The operator of the machine must gen...

Page 18: ...0 7571 755 2 22 Series Figure 5 Series BSB 400 900 Expandability The machine is designed for the later expansion of op tional accessories see chapter 17 from the extensive manufacturer s range If you...

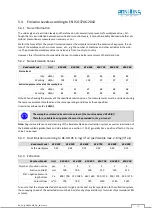
Page 19: ...990 760 x 1145 835 x 1280 Weight kg 130 220 280 430 550 700 For special applications the machines can also be supplied with more powerful engines The nameplate of the machine see Figure 4 shows the mo...

Page 20: ...fied emission values the measurements must be carried out using the same measurement method and the same operating conditions as those specified Uncertainty allowance K 4 dB A The workplace related no...

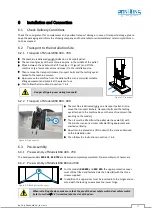
Page 21: ...sport 6 2 2 Transport of Models BSB 800 900 Figure 8 Crane eyelet The machine is delivered lying on a transport pallet First re move the transport timbers transport bolts and the lashing eye attached...

Page 22: ...mporary Storage If the machine is not put into operation immediately after delivery it must be stored carefully in a protected place Carefully cover the entire machine so that neither dust nor moistur...

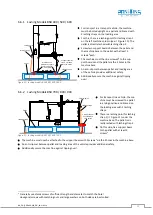
Page 23: ...800 900 For transport in a vehicle the ma chine must be screwed to a pallet in a lying position and braced on the loading area with 2 lashing straps There is a lashing point for lashing strap 1 Figur...

Page 24: ...rotary cam switch S2 BSB 900 163 164 of contactor K1 only available with optional 2 2 kW motor Installation only by a qualified electrician The air speed must be set in such a way that with the extra...

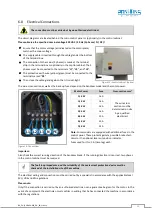
Page 25: ...igure 14 Connections Motor Power Fuse Cross section mm 1 1 KW 16 A The wire cross section must be determined on site by a qualified electrician 1 5 KW 16 A 2 2 KW 16 A 3 0 KW 16 A 4 0 KW 20 A 5 5 KW 2...

Page 26: ...de 11 Indicator for saw blade tension 3b Clamping wheel for height adjustment lever 3a 12 Wheel for upper wheel inclination 4 Fence 13 Clamping lever for adjusting wheel 12 5 Clamping for table fence...

Page 27: ...tighten if necessary Make sure that there are no objects on the machine the doors are closed and the safety switches refer to section 9 2 are locked Switching ON Turn main switch 1 to position I Switc...

Page 28: ...e releases control lamp 3 lights up 8 1 3 Switch on Machines with Electric Brake 8 1 3 1 1 1 1 5 kW Models with Push Button Unit Option Figure 19 Push button unit 1 1 1 5 kW Check saw blade tension ti...

Page 29: ...hts up in the event of a fault on the frequency inverter If this occurs please contact our customer service Danger from electric shock at the frequency inverter After switching off the main switch wai...

Page 30: ...e resulting damage is invali dated in this respect 9 2 Door Interlock with Safety Switches To prevent unintentional door opening during operation and the associated dangers the machine is equipped wit...

Page 31: ...chip catcher S by pulling it out Loosen the handwheel 10 for the band tension and remove the old bandsaw blade if necessary Place the new blade on the wheels teeth pointing outwards and pretension sli...

Page 32: ...w blade guide are a maximum of 4 5 mm above the workpiece The height adjustment of the upper saw blade guide incl saw blade guard is done via the 3 arm lever7 3a and the star knob 3b which is used onl...

Page 33: ...s The procedure for adjustment is identical for the upper and lower saw blade guides Figure 30 Adjusting the guides Loosen the back roller with the tommy screw K2 and move it all the way back by pulli...

Page 34: ...nt area The opening angles between the side rollers and the saw blade must be the same on both sides Figure 31 bottom right Both guides must be exactly vertical After the basic adjustment has been mad...

Page 35: ...inside on the back roller Check basic adjustment Figure 31 and readjust if necessary see section 9 7 2 The running surface of the back roller wears more on the outside than on the inside Saw blade run...

Page 36: ...Fence turned to flat position 10 1 Convert the Fence to the Right of the Saw Blade Figure 36 Converting the fence for left handers To be able to use the fence on the right of the saw blade the followi...

Page 37: ...tly dependent on the saw blade They are not caused by the machine provided it is set according to the operating manual and has not been changed Chapter 14 Troubleshooting lists the main causes and sug...

Page 38: ...l cutting by means of a fixture Use a push stick at the end of the cut Tenon cutting If a tenoning machine is not available tenons can also be cut safely with a bandsaw Figure 38 Table extensions and...

Page 39: ...pecially the lower one are always free of chips a functioning scraper brush is present the chip catcher is attached to the lower bandsaw wheel and is not damaged blurred or damaged bandsaw blades are...

Page 40: ...wait at least 15 minutes before working on the unit Models with this option are additionally equipped with a wear free electric motor brake 13 2 Measurement Scale on the Table Figure 40 Measurement s...

Page 41: ...ally which ensures a small space requirement when folded Art No and further accessories see chapter 17 13 6 Kreisfix for Circular Cuts Figure 44 Kreisfix for circular cuts The Kreisfix is a practical...

Page 42: ...led behind the saw blade guard and tilted in the direction of the machine Figure 47 Laser cutting edge The laser beam projects the exact cutting edge onto the workpiece and thus provides valuable supp...

Page 43: ...2 Motor becomes very hot Overload or defective motor Contact customer service Brake motor no longer brakes within 10 sec a Brake needs to be readjusted b Brake pads are worn c The brake is defective...

Page 44: ...t Replace saw blade Saw blade torn or teeth burnt due to incorrect grinding Regrind or replace Resin residues or similar on the saw blade Clean the saw blade and the wheel bandages Saw blade badly gro...

Page 45: ...signifi cant modifications The function of the gas springs should be checked occasionally If it takes a lot of force to open the protec tive cover the gas springs must be replaced Do not use the mach...

Page 46: ...he O rings in the side bearing sleeves should occasionally be lubri cated with a little acid free grease preferably Vaseline Oil Back Roller Unscrew the sealing cap from the back roller bearing Figure...

Page 47: ...1475 Li A58 1452 mm 3 BSB 600 13 1100 Li A43 1130 mm 1 BSB 900 SPZ 1400 LP 1400 mm 4 Switch off the machine during maintenance and repair work and secure it against being switched on again unexpected...

Page 48: ...djusted too excessively If the brake is dragging the readjustment made must be minimally reversed again Cutting hazard Wear protective gloves when handling the bandsaw blade Now turn the brake release...

Page 49: ...ion laws in force at the place of use regarding the disposal of industrial solid waste toxic and hazardous waste Hoses and plastic parts as well as other components that are not made of metal must be...

Page 50: ...1002 3783 20G 3300 mm 15 0 45 mm 6 1002 3783 15G 3300 mm 10 0 40 mm 6 1002 3783 10G 17 2 BSB 400 Options Accessories Article Description Art No MOVING TROLLEY With 2 swivel castors with brakes and 2 f...

Page 51: ...Only for column left version 4360 T SLOT IN MACHINE TABLE Including basic mitre fence 5190 STRONGER MOTOR 2 2 KW 400 V 50 HZ Instead of standard motor 1 5 kW 5129 SPECIAL VOLTAGE 220 V 50 HZ up to 4...

Page 52: ...HZ Instead of standard motor 2 2 kW with rotary cam switch 5130 PUSH SWITCH UNIT WITH DIRECT START UP For 2 2 kW motor instead of rotary cam switch with wear free electric motor brake 5275 PUSH SWITCH...

Page 53: ...c mitre fence 5191 STRONGER MOTOR 4 0 KW 400 V 50 HZ Instead of standard motor 3 0 kW with rotary cam switch 5131 PUSH SWITCH UNIT With automatic star delta starter 5276 VARIABLE SAW BLADE SPEED CONTR...

Page 54: ...1 T SLOT IN MACHINE TABLE Including basic mitre fence 5191 STRONGER MOTOR 5 5 KW 400 V 50 HZ Instead of standard motor 4 0 kW with rotary cam switch 5132 PUSH SWITCH UNIT With automatic star delta sta...

Page 55: ...MOTOR 7 5 KW 400 V 50 HZ Instead of standard motor 5 5 kW with rotary cam switch 5133 PUSH SWITCH UNIT With automatic star delta starter 5276 VARIABLE SAW BLADE SPEED CONTROL From approx 360 2160 m mi...

Page 56: ...re in the version provided complies with the following directives Machinery Directive 2006 42 EG EMC Directive 2004 108 EG Harmonised standards applied in particular EN 1807 1 The notified body 0392 D...

Reviews: