background image

Installation Guide

AT-OMNI-121

4

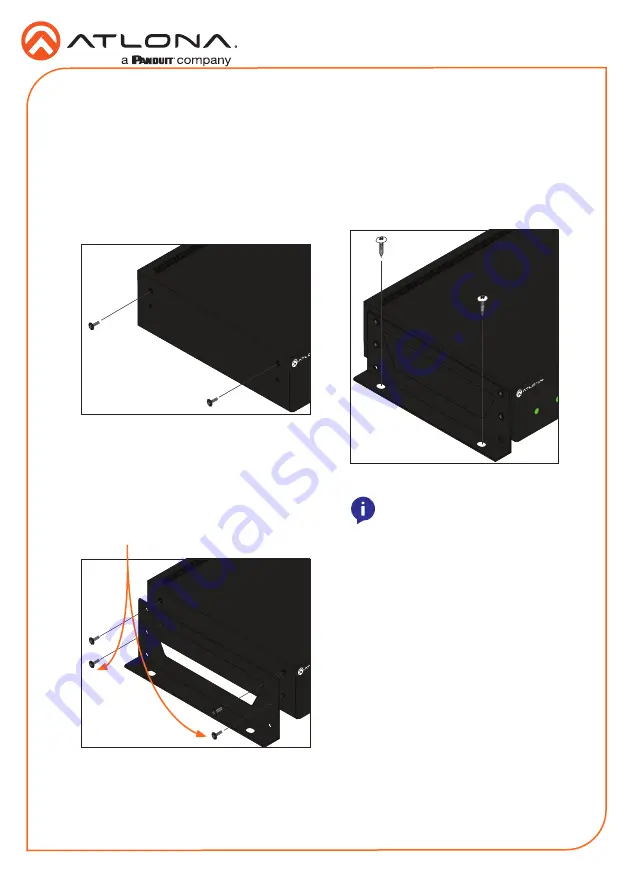
The AT-OMNI-121 decoder includes two 

mounting brackets and four mounting screws, 

which can be used to attach the unit to any flat 

surface.

1. 

Using a small Phillips screwdriver, remove 

the two screws from the left side of the 

enclosure. 


2.  Position one of the mounting brackets, as 

shown below, aligning the holes on the 

side of the enclosure with one set of holes 

on the mounting bracket.

3. 

Use the enclosure screws to secure the 

mounting bracket to the enclosure. 


4. 

To provide added stability to the mounting 

bracket, use two of the included screws 

and attach them to the two holes, directly 

below the enclosure screws, as shown 

above.

5. 

Repeat steps 1 through 4 to attach the 

second mounting bracket to the opposite 

side of the unit.

6. 

Mount the unit using the oval-shaped 

holes, on each mounting bracket.  If using 

a drywall surface, a #6 drywall screw is 

recommended. 


1

2

HDMI

PWR

1

2

LINK

DISPLA

Y

INPUT

ID

VOLUME

AT-OMNI-112

1

2

HDMI

PWR

1

2

LINK

DISPLA

Y

INPUT

ID

VOLUME

AT-OMNI-112

1

2

HDMI

PWR

1

2

LINK

DISPLA

Y

INPUT

ID

VOLUME

AT-OMNI-112

Included screws

NOTE:

 Mounting brackets can 

also be inverted to mount the 

unit under a table or other flat 

surface.

Mounting Instructions


Summary of Contents for Atlona OmniStream 121

Page 1: ...lly lossless video decoding technology with user selectable video quality optimization engines designed for computer generated imaging or motion video content The Atlona OmniStream 121 achieves extrem...

Page 2: ...web site at http atlona com product at sw ams This product includes a built in web interface which can be used to manage and configure this device OmniStream uses mDNS as the discovery mechanism In or...

Page 3: ...o a UHD HD display 5 ETHERNET Connect an Ethernet cable from this port to the Local Area Network LAN 6 RS 232 Use the included captive screw connector to connect an RS 232 device to this port 7 AUDIO...

Page 4: ...provide added stability to the mounting bracket use two of the included screws and attach them to the two holes directly below the enclosure screws as shown above 5 Repeat steps 1 through 4 to attach...

Page 5: ...powered using either PoE or the optional 48V DC power supply not included the LED initially turns red After a few moments it will turn amber and finally green Installation The AT OMNI 121 is powered b...

Page 6: ...RTANT Audio embedding and de embedding using the analog audio outputs requires the optional OmniStream power supply AT PS 48083 C The AT OMNI 121 provides transport of RS 232 protocol over IP which al...

Page 7: ...e NOTE Unbalanced XLR audio requires Pin 1 and Pin 3 to be connected The same wiring applies to both captive screw and push spring connectors ETHERNET RS 232 AUDIO OUT IN L R DC 48V RX TX 1 Push tab t...

Page 8: ...to the AMS User Manual for more information on these topics If a DHCP server is not found within 60 seconds the decoder will be placed in Auto IP mode and assigned an IP address within the range of 1...

Page 9: ...AUD IO OUT AUD IO IN ETH ERN ET 2 3 4 VIDE O OUT 48V DC FAC TOR Y RES ET Audio Control Control Ethernet OmniStream 122 Decoder Audio Display Automation Control System LAN OR Video DEVIC E STATU S PRE...

Page 10: ...hernet cable for possible damage or loose connections OmniStream decoders are not displayed in AMS Verify that AMS and the decoder are on the same network If a DHCP server is not found within 60 secon...

Page 11: ...Installation Guide AT OMNI 121 11 Notes...

Page 12: ...na Inc All other brand names and trademarks or registered trademarks are the property of their respective owners Pricing specifications and availability subject to change without notice Actual product...

Reviews: