Atlona Manuals
Switchers
AT-HDVS-210U-TX-WP
Two-Input Wallplate Switcher for HDMI and USB-C
with HDBaseT
™
Output
4K / UHD
Page 1: ...AtlonaManuals Switchers AT HDVS 210U TX WP Two Input Wallplate Switcher for HDMI and USB C with HDBaseT Output 4K UHD ...
Page 2: ...rsion Release Date Notes 1 Dec 2017 Initial release 2 Feb 2018 f w 1 0 10 added InputStatus and InputBroadcast commands 3 Mar 2018 Commands moved to separate API document 4 Jun 2019 1 0 31 web GUI updates refer to Introduction to Web GUI page 17 ...
Page 3: ...voluntary and failure to register will not affect the product warranty To register your product go to http www atlona com registration Sales Marketing and Customer Support Welcome to Atlona Operating Notes IMPORTANT Visit http www atlona com product AT HDVS 210U TX WP for the latest firmware updates and User Manual Main Office Atlona Incorporated 70 Daggett Drive San Jose CA 95134 United States Of...
Page 4: ... Product Warranty Terms New Products 10 years from proof of purchase date for hardware electronics products purchased on or after June 1 2013 3 years from proof of purchase date for hardware electronics products purchased before June 1 2013 Lifetime Limited Product Warranty for all cable products Limited Product Warranty Terms Refurbished B Stock Products 3 years from proof of purchase date for al...
Page 5: ...ricts or states do not allow the exclusion or limitation of relief special incidental consequential or indirect damages or the limitation of liability to specified amounts so the above limitations or exclusions may not apply to you Exclusive Remedy To the maximum extent permitted by law this limited product warranty and the remedies set forth above are exclusive and in lieu of all other warranties...
Page 6: ...ns 5 Do not use this product near water 6 Clean only with a dry cloth 7 Do not block any ventilation openings Install in accordance with the manufacturer s instructions 8 Do not install or place this product near any heat sources such as radiators heat registers stoves or other apparatus including amplifiers that produce heat 9 Do not defeat the safety purpose of a polarized or grounding type plug...
Page 7: ...ing the IP Address Using Commands 15 Setting the IP Address using the Web GUI 15 Resetting to Factory Default Settings 16 The Web GUI 17 Introduction to Web GUI 17 Menu Bar 19 Toggles 19 Buttons 20 Info page 21 A V Settings page 22 Display page 24 RS 232 page 27 EDID page 28 Config page 29 System page 30 HDBT page 32 Appendix 33 Updating the Firmware 33 Using the Web GUI 33 Using USB 34 Default Se...
Page 8: ...tomatic input selection and display control It is remotely powered by the UHD EX 100CE RX PSE or other Atlona HDBaseT equipped devices through Power over Ethernet PoE Introduction Features Package Contents US one gang enclosure for Decora style wallplate openings interchangeable as black or white 2 1 HDBaseT switcher with HDMI and USB C inputs HDBaseT transmitter for AV power and control up to 330...
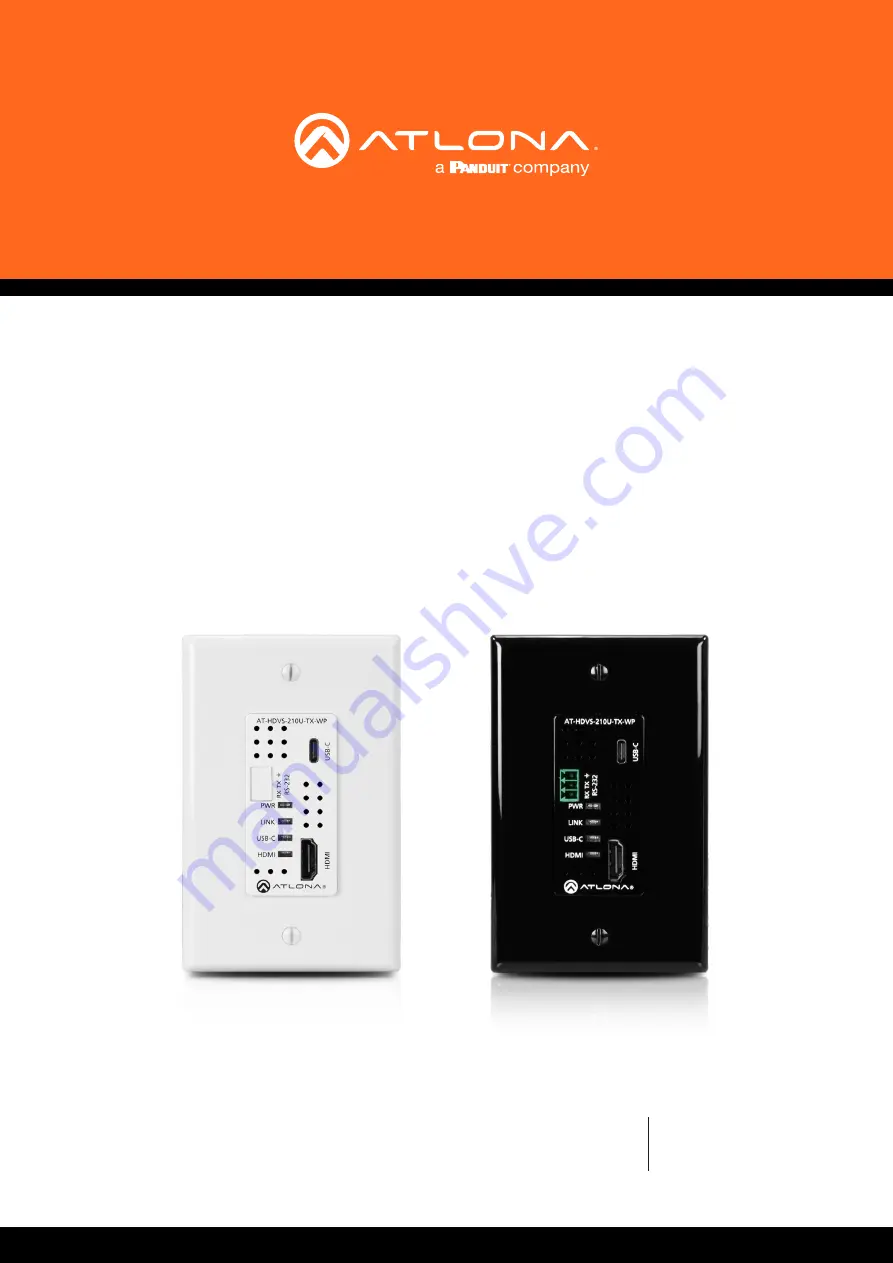
Page 9: ...icator glows solid green to indicate the presence of a stable A V signal 4 USB C This LED indicator glows solid green when the USB C port is the currently selected port This port does not support charging of external devices 5 HDMI This LED indicator glows solid green when the HDMI port is the currently selected port 6 HDMI Connect an HDMI cable from this port to a UHD HD source 7 USB C Connect an...
Page 10: ...onal 1 Remove the small plate covering the RS 232 port on the faceplate 2 Use wire strippers to remove a portion of the cable jacket 3 Remove at least 3 16 5 mm from the insulation of the RX TX and GND wires 4 Insert the TX RX and GND wires into correct terminal using the included 3 pin captive screw connector RS 232 Connector GND RX TX small plate USB C HDMI LINK USB C HDMI PWR RS 232 RX TX AT HD...
Page 11: ...based on environmental factors Connection Instructions Core Shielding CAT5e CAT6 CAT6a CAT7 Solid UTP unshielded N A STP sheilded Performance Rating MHz 350 500 600 800 Cable Max Distance 4K Max Distance 1080p CAT5e CAT6 230 feet 70 meters 330 feet 100 meters CAT6a CAT7 330 feet 100 meters 330 feet 100 meters Installation 3 Complete the installation of the AT HDVS 210U TX WP into the electrical bo...
Page 12: ...ptop USB C HDMI Control Laptop AT HDVS 210U TX WP UHD HD Display White Decora style wallplate included AT HDV S 2 10U TX W P USB C HDMI LIN K US B C HD MI PW R RS 232 RX TX 1 gang electrical box or mud ring Wall cross section AT PS POE H D B a s e T H D M I Laptop U S B C H D B a s e T Laptop AT HDVS 210U TX WP Projector White Decora style wallplate included AT HDV S 2 10U TX W P HD Bas eT IN PoE ...
Page 13: ...commended that the Ethernet cable connected to the HDBaseT OUT port be disconnected from the unit to allow for easy installation of the faceplate 2 Remove the four screws holding the faceplate to the assembly using a Phillips screwdriver Once the screws are removed gently remove the faceplate by pulling it toward you 3 Attach the new faceplate and secure it using the four Phillips head screws 4 In...
Page 14: ...T HDVS 210U TX WP is unable to detect a DHCP server within 15 seconds then the unit will set all IP settings to zero 1 Make sure the AT HDVS 210U TX WP is powered by connecting an Ethernet cable between a PoE compatible receiver such as the AT HDVS 200 RX and the HDBaseT OUT port on the unit Power is supplied by the receiver over HDBaseT 2 Remove the faceplate Refer to Faceplate Removal and Assemb...
Page 15: ... line execute the IPDHCP command using the on argument as shown All characters are case sensitive IPDHCP on Once DHCP is enabled the unit will be assigned an IP address by the DHCP server if present The System page page 30 in the web GUI allows the AT HDVS 210U TX WP to use either DHCP or static IP mode In order to access the web GUI the IP address of the AT HDVS 210U TX WP must be known Refer to ...
Page 16: ...the AT HDVS 210U TX WP 2 Press and hold the Reset button for 15 seconds 3 Release the Reset button During the reboot process the PWR LED indicator will glow red The unit will be operational when the PWR LED indicator glows blue 4 Reassemble the faceplate to the front of the AT HDVS 210U TX WP and reinstall into the electrical box or mud ring Resetting to Factory Default Settings Reset button PWR L...
Page 17: ...ck the link for the AT HDVS 210U TX WP as shown b Use an IP scanner to locate the IP address of the AT HDVS 210U TX WP on the network The MAC address on the back of the unit can be used to identify the unit with the IP address The Address Resolution Protocol executed from the command line can also be used as shown in the example below This command will provide a listing of all devices that are con...
Page 18: ...ord The password field is case sensitive When the password is entered it will be masked The password can be changed if desired Refer to the Config page page 29 for more information 6 Click the Submit button or press the ENTER key on the keyboard The Web GUI 7 The Info page will be displayed 8 Click Logout on the far right side of the menu bar to log out of the web GUI and return to the Login page ...
Page 19: ...V Settings in the menu bar will display the A V Settings page Several settings within the Web GUI use toggles which enable disable or assign one of two settings Generally when the toggle is blue it means that the feature is enabled or ON If a feature is disabled then the toggle will appear gray and be labeled as OFF Toggle buttons may also indicate its current setting and when enabled or set to a ...
Page 20: ...setting Several pages within the Web GUI include a Save button Clicking the Save button will apply and save all settings in the current page Other buttons such as the Factory Default button under the System page reset the AT HDVS 210U TX WP to factory default settings Buttons ...
Page 21: ...F command will not reset this field RX Type Displays the model of the receiver unit if connected If no receiver is connected then UNKNOWN will be displayed Active Input The currently selected input Refer to the A V Settings page page 22 for information on changing the input Signal Type Displays the input resolution of the source device Video Format Displays the video format Aspect Displays the asp...
Page 22: ...witch feature Auto Switch Click this toggle switch to enable or disable auto switching When enabled the AT HDVS 210U TX will automatically switch to the another port if the signal is disrupted on the currently active input The port to be switched to is defined in the Fallback Input drop down list Fallback Input Click this drop down list to select the fallback port If the source is disconnected fro...
Page 23: ...s Note that setting this value to OFF will not decrypt HDCP content Output Mutes or un mutes the audio output Set the Output toggle to OFF to disable audio on the output The default setting is ON Setting Description ON HDCP content is always transmitted by the source OFF Instructs the source to send non HDCP content if possible NOTE Setting this feature to OFF for any source does not provide decry...
Page 24: ...or will not accept any power on or power off commands until the last power off command has been processed and the projector lamp has completed the cool down cycle Range 0 to 300 Consumer Electronics Control CEC Atlona has confirmed proper CEC functionality with several current models of Samsung Panasonic and Sony displays However it is not guaranteed that CEC will work with all displays Many manuf...
Page 25: ...this feature The following options are available Setting Description On This is the default setting The AT HDVS 210U TX WP will make four attempts to send the command if the feedback string is not acknowledged After the fourth attempt the process will fail Off Sends the command and ignores the feedback string Display Mode Click this drop down list to select the behavior of the display when a sourc...
Page 26: ...y format for the commands in the web GUI In Hex mode non valid characters are not accepted Options ASCII Hex On Off Volume Volume Mute Set command Enter the command in this field Feedback Enter the feedback string in this field CR LF Click this drop down list to select the desired end of line characters to be sent Test Click this button to test the command line and or feedback Save Click this butt...
Page 27: ...DVS 210U TX WP is connected to another HDBaseT device such as the AT UHD CLSO 824 each of these drop down list boxes can be set to the baud rate of the HDBaseT RS 232 settings on the corresponding device Click the Save button to accept the settings Setting Description Baud rate Sets the baud rate The following options are available 2400 9600 19200 38400 56000 57600 115200 Data bit Sets the number ...
Page 28: ...lect the memory location to save the downstream EDID Eight memory locations are available Once an EDID is saved to a memory location it can be access from the EDID Settings drop down lists Available EDID Selections Default 1080p 3D MCH 1366x768 2CH 3840x2160 60 4 2 0 MCH 1080p 2CH 1080p 3D DD 1080p DVI 3840x2160 30 4 4 4 2CH 1080p MCH 720p 2CH 1280x800 DVI 3840x2160 60 4 4 4 MCH 1080p DD 720p DD 1...
Page 29: ...New Password Enter the new password fro the root username in this field Confirm New Password Verify the new password by retyping it in this field All User Login Settings Username Displays the username Password Displays the password for the associated username Edit Click the Add button in this column to edit the username and password in the row Del Click the Remove button to delete the user in the ...
Page 30: ...listening port in this field Telnet Login Mode Click this toggle to set the login mode to either ON or OFF If this feature is set to ON then the AT HDVS 210U TX WP will prompt for both the username and password at the start of a Telnet session Use the same credentials as the web GUI Telnet Timeout Click this drop down list to select the timeout interval in seconds before the Telnet connection is a...
Page 31: ...and PWON commands can also be used to control the power state Reset to Default Click the Factory Default button to set the AT HDVS 210U TX WP to factory default settings Firmware Update Click the Choose File button to select the firmware file when upgrading the firmware on the AT HDVS 210U TX WP Once the firmware file is selected click the Update button Refer to Updating the Firmware page 33 for m...
Page 32: ... The version of the Valens chip on the receiver TMDS Clock Displays the pixel clock speed If no source is connected then this field will display as None Cable length Estimated This field indicates the approximate length of the Ethernet cable connected between the HDBaseT ports on the transmitter and the receiver If the cable length is less than 15 feet then this value will be displayed as 0 zero V...
Page 33: ... USB mini B cable Using the Web GUI Requirements AT HDVS 210U TX WP Firmware file Computer 1 Connect an Ethernet cable from the computer containing the firmware to the same network where the AT HDVS 210U TX WP is connected 2 Go to the System page page 30 in the web GUI 3 Click the Choose File button under the Firmware Update section 4 Browse to the location of the firmware file select it and click...
Page 34: ... port on the unit 2 Remove the wall plate from the AT HDVS 210U TX WP Refer to Faceplate Removal and Assembly page 13 if necessary 3 Locate the firmware port 6 The following message box will be displayed 7 Click the OK button to begin the firmware update process Click the Cancel button to cancel the process 8 After the firmware update process is complete the Login screen will be displayed Appendix...
Page 35: ...yed If this folder is not displayed automatically select the USB UPDATE drive from Windows Explorer 6 Delete all files from the USB UPDATE drive if any are present 7 Drag and drop the firmware file to the drive 8 After the file has been copied disconnect the USB cable from both the computer and the AT HDVS 210U TX WP 9 The firmware update process is complete 10 Reconnect the Ethernet cable to the ...
Page 36: ...ispSW AVon Non Login 255 255 255 255 65535 RS 232 Zone Baud rate Data bit Parity Stop bit TX RS 232 Baud rate Data bit Parity Stop bit RX RS 232 Zone 1 Baud rate Data bit Parity Stop bit 115200 8 None 1 115200 8 None 1 9600 8 None 1 EDID Input 1 Input 2 Output Default 1920x1080p 60 Hz Default 1920x1080p 60 Hz Config Username default Password default root Atlona System IP Mode Static IP Address def...
Page 37: ...1366 768 1360 768 1280 1024 1280 800 1280 768 1152 768 1024 768 800 600 640 480 Color Space YUV RGB Chroma Subsampling 4 4 4 4 2 2 4 2 0 Color Depth 8 bit 10 bit 12 bit Audio HDMI IN HDBaseT OUT PCM 2Ch LPCM 5 1 LPCM 7 1 Dolby Digital DTS 5 1 Dolby Digital Plus Dolby TrueHD DTS HD Master Audio Sample Rate 32 kHz 44 1 kHz 48 kHz 88 2 kHz 96 kHz 176 4 kHz 192 kHz Bit Rate 24 bit max Resolution Dista...
Page 38: ...AT HDVS 210U TX WP 38 Appendix Dimensions Wall 1 gang Weight Pounds Kilograms Device 0 4 lbs 0 18 kg Certification Unit CE FCC ...
Page 39: ...ory default setting resetting 16 FCC statement 6 Features 8 Firmware updating using the web GUI 33 using USB 34 H HDBT testing 32 I Input selecting 22 Installation 10 IP configuration 14 30 O Operating notes 3 P Panel descriptions 9 Password default 18 PoE compatible receiver 11 power injector 11 R RS 232 settings 27 S Safety information 6 Settings auto switching 22 HDCP 23 Specifications 37 T Tim...
Page 40: ...d names and trademarks or registered trademarks are the property of their respective owners Pricing specifications and availability subject to change without notice Actual products product images and online product images may vary from images shown here Toll free US International atlona com 877 536 3976 41 43 508 4321 ...