Pandigital PAN80XXT User Manual Download Page 12


screen.    There under the “Network Photo” icon you should see the 
network you are connected to. 


Note: The “+” and “-“ keys are used to toggle between Capital and lower 
case letters on the virtual keyboard. 
 
Step 2: Setting up your Picasa User ID and Password on the DPF. 
 

a. 

From Home screen, select the “Network Photo” icon and press ENTER. 

b. 

Press SETUP to get to the Google Account Page. 

c. 

Select “User ID” and press ENTER.    Type your Picasa User ID and then 
the “Done” key. 

d. 

At the bottom left of the screen the “Password” field is highlighted in 
Yellow, indicating for you to enter your Picasa account password. 

e. 

Type in your Picasa account password and then the “Done” key to return 
to the Google Account Screen. 

f. 

Select “Connect” and press ENTER. 

g. 

When you are connected you will see the folders you created in Picasa 

 
Note: Step 2 assumes that you have already gone to 

http://Picasa.Google.com

 and setup your User ID and Password and have 

successfully uploaded pictures to that account. 
 
Viewing Pictures Stored on Picasa 
 

a.  From the “Picasa Web Albums” page, select the folder you wish to view 

and press ENTER to see thumbnails of all the pictures in that folder. 

b.  Pressing ENTER on a thumbnail will display the picture in single picture 

mode. 

c.  Pressing SLIDESHOW will slideshow all the pictures in that folder. 
d.  Pressing EXIT will in either single picture mode or slideshow mode will 

return you to the thumbnail screen. 

e.  Functions like zoom, rotate, and copy are all available and behave in the 

same manner as described in the user guide.   

Changing the Decorative Frame 

Depending on the model, your Digital Photo Frame may come with 
interchangeable decorative frames.   

1.  To change the frame, remove four screws on the back of the frame and lift 

the unit from the frame.   

2.  Place the unit into the new frame, replace the screws, and finger-tighten.   

Copying Files from a Computer or Flash Drive 

You can connect the Digital Photo Frame to a Windows or Macintosh computer 
to copy files to the built-in memory. You can also connect a USB flash drive to 
the frame to copy files. 

Connect to a Windows Computer   

To copy files from between your computer and the Digital Photo Frame do the 
following:  

1.  Plug in and turn on the Digital Photo Frame.   

2.  Connect the small end of the USB cable to the Mini USB port on the Digital 

Photo Frame.   

3.  Connect the Larger end of the USB cable to a USB port on your computer.   

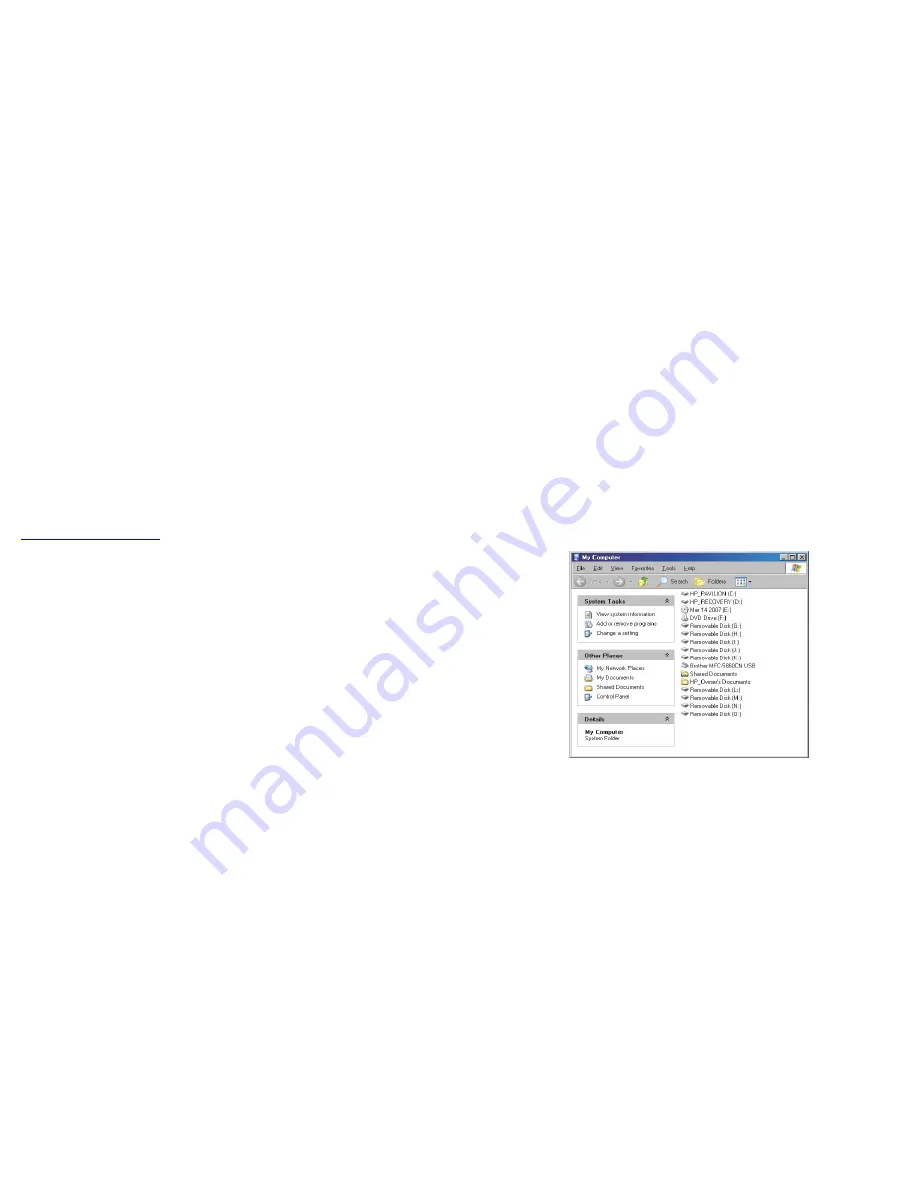
4.  Open My Computer on your Desktop. A window showing all drives connected 

to your computer opens. (It will look similar to the screen shown below.)   


5.  Each memory card inserted in the Photo Frame and the built-in memory is 

associated with one disk drive on your computer.   

6.  Double-click the desired drive to display the files on the card. The example 

below shows a card with several JPG images on it. 

22 

23 

Summary of Contents for PAN80XXT

Page 1: ...Pandigital Digital Photo Frame User Guide PAN80XXT English...

Page 2: ...hoto Copy Method Options 14 Changing the Photo Copy Method 14 Copying Photos from a Memory Card to Built in Memory 14 Copy a Single Photo 14 Copy Several Photos 15 Deleting Photos from the Built in Me...

Page 3: ...e Pandigital Multimedia Photo Frame Now you can display your digital photos directly from your memory card no computer is necessary Simply insert a memory card into the Digital Photo Frame and turn on...

Page 4: ...u can use all of the Digital Photo Frame s features with either the PanTouch buttons on top of the frame or using the remote control Use the PanTouch Buttons The PanTouch buttons are located on top of...

Page 5: ...stream photos to your DPF 1 Press the Left and Right arrows on the Remote Control or the Digital Photo Frame to select Photo Music Video File Clock or Network Photo press ENTER to make the selection 2...

Page 6: ...tton and on the Remote Control The photo will be rotated by 90 degrees clockwise in each press of the ROTATE button Enlarge a Photo on the Full Screen You can magnify a displayed photo on the full scr...

Page 7: ...s MUSIC ON button again to turn on music Control the Volume Use the PanTouch or Remote Control to adjust the volume on the Digital Photo Frame when playing MP3 files Press the VOL and VOL buttons to a...

Page 8: ...EXIT button until the HOME screen displayed press SETUP to choose Select Media option then press ENTER 2 Use the Arrow buttons to highlight the desired media source 3 Press the ENTER button to select...

Page 9: ...Press ENTER to delete the displayed photo 4 Press EXIT to close the menu Use the PanTouch menu to delete 1 With the photo displayed on the screen press the PanTouch point to activate the sensor 2 Pre...

Page 10: ...hed before sending photos to DPF a Search and Select the Available Device to connect from the list You should see Pandigital appears in the list Authentication Code is 1234 default value Select Pandig...

Page 11: ...on to choose AM or PM 5 Set the time you want the slideshow to end turn off at in the same manner 6 Press the Enter button when Always OFF is highlighted if you don t want to play scheduled slideshows...

Page 12: ...d Pressing EXIT will in either single picture mode or slideshow mode will return you to the thumbnail screen e Functions like zoom rotate and copy are all available and behave in the same manner as d...

Page 13: ...the memory card or computer to the built in memory It can seriously damage the memory 1 In Windows XP left click on the icon and select the correct storage device 2 Click OK A final dialog box opens...

Page 14: ...u choose between all available memory cards and built in memory Q Does the Digital Photo Frame have built in memory A Yes It has built in of memory The memory size depends on your model Q Does the Dig...

Page 15: ...or its suppliers and is protected by United States and international copyright laws or other intellectual property laws and treaties Said content shall not be reproduced or used without express writte...

Page 16: ...Pandigital Cadre Photo Num rique User Guide PAN80XXT French...

Page 17: ...thode de copie de photos 15 Copie de photos partir d une carte m moire vers la m moire int gr e 15 Copie d une seule photo 16 Copie de plusieurs photos 17 Suppression de photos partir de la m moire in...

Page 18: ...idifiez le chiffon nettoyant avec le liquide avant de proc der au nettoyage de l cran ACL Nettoyez la surface ext rieure du Cadre pour photo num rique excluant l cran l aide d un chiffon doux humidifi...

Page 19: ...iaporama des photos enregistr es sur la carte Faites glisser la touche POWER vers le bas pour la mise hors tension 4 Pour afficher les photos individuellement appuyez sur la touche EXIT sur la t l com...

Page 20: ...nez la t l commande avec les touches de contr le tourn es face vers le sol 2 Tout en appuyant sur la partie cannel e du couvercle de la pile tirez le plateau vers l ext rieur 3 Placez une pile au lith...

Page 21: ...Cet cran est d crit plus loin 3 Si vous s lectionnez Music un cran s ouvre et affiche un r pertoire de tous les fichiers musicaux Si vous s lectionnez Video un cran s ouvre et affiche un r pertoire de...

Page 22: ...sections qui ne sont pas visibles autrement D marrage et personnalisation des diaporamas Le Cadre pour photo num rique peut inclure toutes les photos enregistr es sur la source de m moire dans le dia...

Page 23: ...z le fichier d sir et appuyez sur View actuellement sur le Menu PanTouch cette touche devrait s appeler PLAY Le Cadre pour photo num rique proc de alors la lecture de la vid o 5 Vous pouvez ajuster le...

Page 24: ...Lorsque le processus de copie est termin le message Finished s affiche dans le coin inf rieur droit Copie de plusieurs photos Utilisez la t l commande ou les touches du menu PanTouch pour copier plus...

Page 25: ...n inf rieur droit Suppression de plusieurs ou de toutes les photos dans la m moire int gr e Vous pouvez utiliser la t l commande pour supprimer plusieurs ou toutes les photos enregistr es dans la m mo...

Page 26: ...la t l commande Vous pouvez afficher le menu de configuration de l cran en tout temps en appuyant sur la touche Setup Seules les options de configuration disponibles seront affich es sur chacun des c...

Page 27: ...heure laquelle vous voulez que le diaporama prenne fin turn off at 6 Appuyez sur la touche Enter lorsque l option Always OFF est mise en relief si vous ne voulez pas afficher les diaporamas programm s...

Page 28: ...sa Remarque Nous pr sumons l tape 2 que vous tes d j all sur le site Web de Picasa au http Picasa Google com que vous y avez configur votre nom d utilisateur et mot de passe et que vous avez t l charg...

Page 29: ...ateur vers la m moire int gr e vous copiez puis collez vers le lecteur de disques correspondant la carte m moire Remarque Si votre PC est branch des lecteurs de r seau local ou si vous avez plusieurs...

Page 30: ...une prise murale ordinaire Ins rez une carte m moire dans la fente appropri e situ e sur le c t du Cadre pour photo num rique et mettez le sous tension Votre premier diaporama d marrera automatiqueme...

Page 31: ...ommables tels que les fusibles et les piles Cette garantie est valide uniquement aux tats Unis Le produit doit tre accompagn d une copie du bon d achat original Si aucune preuve d achat n est incluse...

Page 32: ...s n auront pas lieu au sein d une installation particuli re Si cet quipement g n re des brouillages nuisibles la r ception des radios ou des t l viseurs ce qui peut tre d termin par la mise sous tensi...

Reviews: