background image

 1

 14

 15

 18

 20

 21

 22

 23

 16

 24

 2

 4
 5

 6

 19

 10

 3

 17

 7

 8

 9

 11

 12

 13

10

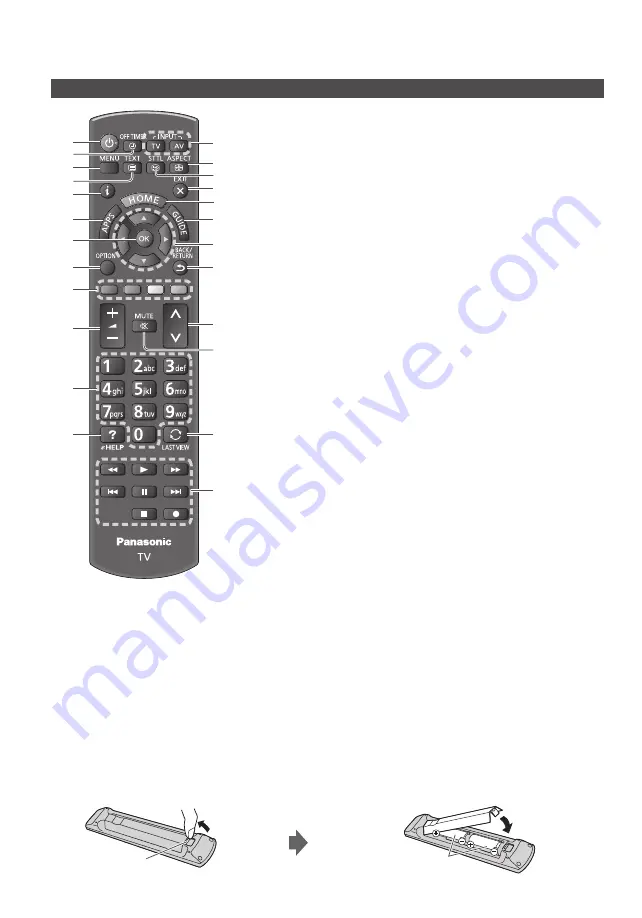
  Identifying Controls

  Remote Control

 1

 Standby On / Off switch

 2

 Off Timer


 Sets the time for the TV to automatically turn off.

 3

 [Main Menu]


 Press to access Picture, Sound, Network, Timer, 
Setup and Help Menus.

 4

 Text service button

 5

 Information


 Displays channel and programme information.

 6

 APPS


 Displays [APPS List] (applications list).

 7

 OK


 Confirms selections and choices.


 Press after selecting channel positions to quickly 
change channel.

 8

 [Option Menu]


 Easy optional setting for viewing, sound, etc.

 9

 Coloured buttons
 (red-green-yellow-blue)


 Used for the selection, navigation and operation of 
various functions.

 10

 Volume Up / Down

 11

 Numeric buttons


 Changes channel and teletext pages.


 Sets characters.


 When in Standby mode, switches TV on.

 12

 [eHELP]


 Displays [eHELP] (Built-in Operating Instructions).

 13

 Input mode selection


 TV - switches to DVB / Analogue mode.


 AV - switches to AV input mode from Input 
Selection list.

 14

 Aspect


 Changes aspect ratio.

 15

 Subtitles


 Displays subtitles.

 16

 Exit


 Returns to [Home Screen].

 17

 HOME


 Displays [Home Screen].

 18

 TV Guide


 Displays Electronic Programme Guide.

 19

 Cursor buttons


 Makes selections and adjustments.

 20

 Return


 Returns to the previous menu / page.

 21

 Channel Up / Down

 22

 Sound Mute On / Off

 23

 Last view


 Switches to previously viewed channel or input 
mode.

 24

 Operations for contents, connected equipment, 
etc.


  Installing / Removing batteries


 Pull open

 Hook


 Note the correct polarity 

(+ or -)

 Close

Summary of Contents for VIERA TX-L32BL6B

Page 1: ...for illustrative purposes only For more detailed instructions refer to eHELP Built in Operating Instructions How to use eHELP p 14 Contents Be Sure to Read Important Notice 2 Safety Precautions 2 Qui...

Page 2: ...er licensed to provide AVC Video No license is granted or shall be implied for any other use Additional information may be obtained from MPEG LA LLC See http www mpegla com Rovi Corporation and or its...

Page 3: ...Do not touch the mains plug with wet hands Do not damage the mains lead Do not place a heavy object on the lead Do not place the lead near a high temperature object Do not pull on the lead Hold onto...

Page 4: ...Off switch then turn it on again Additional information for the wireless LAN and access point may be on the following website http panasonic net viera support Ventilation Caution Allow sufficient spac...

Page 5: ...on of optional accessories refer to eHELP Support Optional accessories Assembling Removing the pedestal Assembly screw 4 M5 15 Bracket Assembly screw 4 M4 12 Base Assembling the pedestal 1 A C D B 2 3...

Page 6: ...tion of image sound may occur or operation of other equipment may be interfered Also read the manual of the equipment being connected Terminals 8 7 9 4 6 5 2 1 3 1 CI slot p 9 2 Headphone jack p 8 3 U...

Page 7: ...e functions you need to connect the TV to a broadband network environment If you do not have any broadband network services please consult your retailer for assistance Prepare the internet environment...

Page 8: ...Use HDMI2 for connecting an amplifier This connection is applicable when using an amplifier that has ARC Audio Return Channel function As for an amplifier without ARC function use DIGITAL AUDIO To en...

Page 9: ...provider For more information refer to eHELP Functions Common Interface read the manual of the CI module or check with the content provider Types of connectable equipment to each terminal Features Ter...

Page 10: ...d operation of various functions 10 Volume Up Down 11 Numeric buttons Changes channel and teletext pages Sets characters When in Standby mode switches TV on 12 eHELP Displays eHELP Built in Operating...

Page 11: ...main menu Move the cursor select from a range of options select the menu item up and down only adjust levels left and right only Access the menu store settings after adjustments have been made or opti...

Page 12: ...k connection Select your country Select your region 3 Select the type of Home Screen The demonstration to explain how to use my Home Screen is displayed Confirm the demonstration by following the on s...

Page 13: ...efault Home Screen etc For details follow the on screen instructions or refer to eHELP Watching my Home Screen Watching TV 1 Select the TV viewer from Home Screen select access 2 Select DVB or Analogu...

Page 14: ...egory field Item field Sub item field Description select category access select item access select sub item access To return to the previous field To scroll the description if more than 1 page While t...

Page 15: ...e to time How do I re tune my Freeview TV This is a quick reference If you have any problems check the Operating Instructions or ask a friend or family member to show you how Alternatively go to your...

Page 16: ...2 3 input TYPE A Connectors HDMI1 3 Content Type HDMI2 Content Type Audio Return Channel This TV supports HDAVI Control 5 function Card slot Common Interface slot complies with CI Plus 1 ETHERNET RJ45...

Page 17: ...dealer to purchase the recommended wall hanging bracket 32 inch model a 200 mm b 100 mm 39 inch model a 200 mm b 200 mm 50 inch model a 400 mm b 400 mm Rear of the TV Holes for wall hanging bracket in...

Page 18: ......

Page 19: ......

Page 20: ...orrect method of disposal Note for the battery symbol bottom two symbol examples This symbol might be used in combination with a chemical symbol In this case it complies with the requirement set by th...

Reviews: