background image

English

37


[Timer Programming]

 Select the forthcoming programme

 select

 access

● 

To check / change / cancel a timer event   

(p. 39)


To return to TV

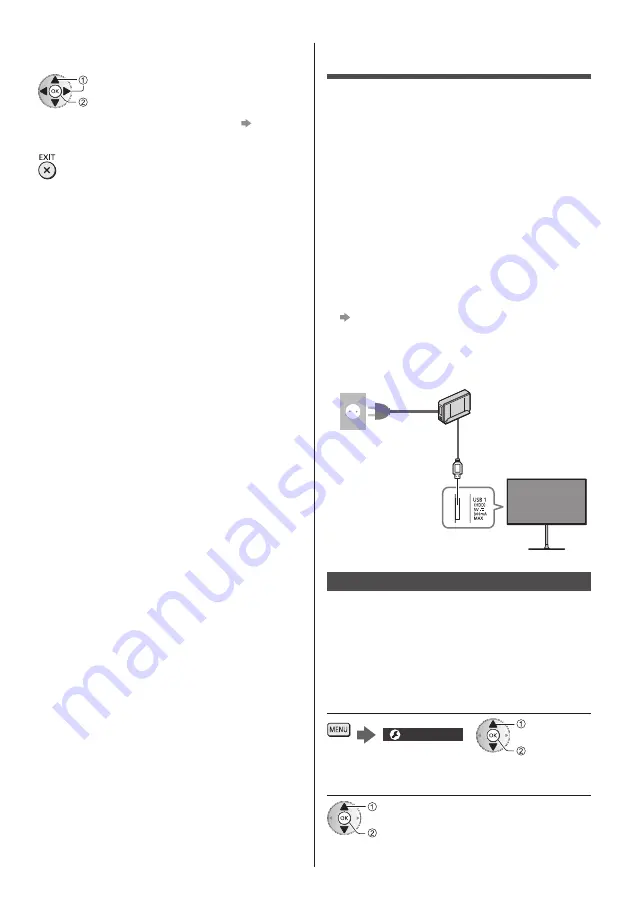
USB HDD Recording

You can record the digital TV programmes to the 

connected USB HDD and enjoy playing back in various 

ways.

● 

For details, refer to [eHELP] (Search by Purpose > 

Recording).


Preparation

Connect the USB HDD to the USB 1 port with the USB 

cable.

● 

Be sure to remove the cable cover before connecting 

or disconnecting cables.

● 

Prepare the USB HDD for the exclusive use of 

recording with this TV.

● 

Be sure to connect the USB HDD to the mains 

socket.

● 

To remove the USB HDD safely from the TV  

   [Safely remove USB] in [USB Device Setup] 

(Setup Menu)

● 

Check the terminal type and cable plugs are correct 

for connection.
Mains socket

USB HDD

USB cable

Setting for USB HDD

Format and set up the USB HDD with this TV in order to 

use it for recording.

● 

Please note that USB HDD will be formatted and all 

data in it will be erased after this setup.

● 

Before setting, connect the USB HDD and be sure to 

turn on the USB HDD.

1

  Display the menu and select [Setup]

Setup

 select

 access

2

  Select [USB Device Setup]

 select

 access

Summary of Contents for VIERA TX-50EXX789

Page 1: ...ference Please carefully read the Safety Precautions of this manual before use The images shown in this manual are for illustrative purposes only Please refer to Pan European Guarantee Card if you nee...

Page 2: ...rom Setup Menu 30 Tuning and Editing Channels 31 Multi Window 33 Child Lock 34 Watching External Inputs 34 Viewing Teletext 35 Using TV Guide 36 USB HDD Recording 37 Timer Programming 39 Using Media P...

Page 3: ...ty or damage arising from operation and or performance from usage of such other maker s peripheral devices The recording and playback of content on this or any other device may require permission from...

Page 4: ...accessible and risk of electric shock when they are removed There are no user serviceable parts inside Do not expose the TV to rain or excessive moisture This TV must not be exposed to dripping or spl...

Page 5: ...make sure that all screws are securely tightened Ensure that the TV does not suffer any impact during installation of the pedestal Ensure that children do not climb onto the pedestal Install or remov...

Page 6: ...olume from the headphones Irreversible damage can be caused If you hear a drumming noise in your ears turn down the volume or temporarily stop using the headphones Battery for the Remote Control Cauti...

Page 7: ...25 Hamburg Germany This TV is intended to be used in the following countries Albania Andorra Austria Belgium Bulgaria Croatia Cyprus Czech Republic Denmark Estonia Finland France Germany Greece Hungar...

Page 8: ...Bluetooth wireless technology for active shutter 3D For information about 3D Eyewear English only http panasonic jp support global cs tv Assembling Removing the pedestal Assembly screw 10 M4 12 Assem...

Page 9: ...For each dimension refer to Specifications p 44 High Low Preparations Take out the pedestal and the TV from the packing case and put the TV onto a work table with the screen panel down on the clean an...

Page 10: ...English 10 D 2 High Low E A 3 A E D A 4...

Page 11: ...pull out the pole from the base 4 Put the TV onto a work table with the screen panel down on the clean and soft cloth 5 Remove the assembly screws from the support bracket 6 Pull out the pole from the...

Page 12: ...English 12 Assembling the pedestal 65 inch model A C 1 D 2 3 A E E A...

Page 13: ...English 13 4 A F 5 B 6...

Page 14: ...from the base 4 Put the TV onto a work table with the screen panel down on the clean and soft cloth 5 Remove the assembly screws from the support bracket 6 Pull out the pole from the main bracket 7 Re...

Page 15: ...equipment may be affected Please also read the manual of the equipment being connected Removing the cable cover terminal cover from the TV Be sure to remove the cable cover terminal cover before conn...

Page 16: ...r local dealer Also consult the received satellite broadcasting companies for details DVB via IP server connection This TV can be configured as a DVB via IP server to provide broadcast streaming to an...

Page 17: ...Terrestrial aerial Satellite dish Wireless connection Cable Built in wireless LAN Access point DVB via IP server RF cable Terrestrial aerial Satellite dish This function may not be available dependin...

Page 18: ...cable and you can watch content in 4K format HDMI Auto Setting Setup Menu Reproduces the image more precisely with the expanded colour gamut when connecting the 4K compatible equipment Select the mode...

Page 19: ...sert or remove the CI module completely in the correct direction as shown Normally encrypted channels will appear Viewable channels and their features depend on the CI module If encrypted channels do...

Page 20: ...ps Snaps Fixing the cables using the cable tie 50 inch model 58 inch model 65 inch model Attach the cable tie Insert the cable tie in a hole Hole Bundle the cables Hooks Set the tip in the hooks To lo...

Page 21: ...oad to the cable cover terminal cover Be careful not to nip the cables between the TV and the cable cover terminal cover When using USB 2 port USB 3 port or HDMI4 terminal you cannot attach the cable...

Page 22: ...button 11 Volume Up Down 12 Numeric buttons Changes channel and teletext pages Sets characters When in Standby mode switches TV on 13 eHELP Displays eHELP Built in Operating Instructions 14 My App Ass...

Page 23: ...ote control 2 Ambient sensor Senses brightness to adjust picture quality when Ambient Sensor in the Picture Menu is set to On 3 Power LED Red Standby Green On Orange Standby with some functions record...

Page 24: ...Depending on the country you select select your Region or store the Child Lock PIN number 0000 cannot be stored Tick the TV signal mode to tune and then select Start Auto Setup tune search for the ava...

Page 25: ...ow to Use eHELP eHELP is the detailed operating instructions built into the TV and gives a more detailed explanation for a better understanding of the operation of each feature 1 Display eHELP or Help...

Page 26: ...eless technology for active shutter 3D Playing back 3D compatible Blu ray disc Frame Sequential format Connect the 3D compatible player via a fully wired HDMI compliant cable If you use the non 3D com...

Page 27: ...TV The range may be shortened depending on the obstacles between the TV and the 3D Eyewear or the surrounding environment When viewing 3D images make sure your eyes are in a horizontal position where...

Page 28: ...lternatives Screen Display On Off select store Adjust using the slide bar 50 Sharpness Moved change store Go to the next screen Child Lock access Enter characters by free input menu You can enter name...

Page 29: ...Frame Creation Clear Motion You can set Viewing Mode in 2D and 3D mode for each For information about the other items refer to eHELP Search by Purpose Settings Picture To reset the current Viewing Mo...

Page 30: ...Tuner Mode and set to On to use dual tuner function 3 Set LNB and Satellite Select IN 1 IN 2 in Signal Input to set for each tuner 4 Store 5 Select Auto Setup select access 6 Set Search Mode Scan Mod...

Page 31: ...fer to eHELP Search by Purpose Watching Tuning and editing channels 1 Select the mode 2 Display the menu and select Setup Setup select access 3 Select DVB S Tuning Menu DVB C Tuning Menu DVB T Tuning...

Page 32: ...tor List favourite DVB channels Create your favourite channel lists from various broadcasters up to 4 Favourites 1 to 4 The favourites lists are available from Category in the information banner and t...

Page 33: ...ting the DVB channel list you can add new channels delete removed channels or change channel names and positions automatically The channel list is updated while keeping your settings in Favourites Edi...

Page 34: ...when the channel input is locked To lock all green To cancel all locks yellow To sort channel names in alphabetical order red To jump to the head of the next channel input group blue Watching External...

Page 35: ...the screen Available page up down red green To select among subject blocks blue To select next subject within the subject block After the last subject it moves to the next subject block yellow FLOF F...

Page 36: ...IP 2 Display TV Guide To change the layout Landscape Portrait View Landscape to see several channels View Portrait to see one channel by time The availability of this function depends on the country...

Page 37: ...pare the USB HDD for the exclusive use of recording with this TV Be sure to connect the USB HDD to the mains socket To remove the USB HDD safely from the TV Safely remove USB in USB Device Setup Setup...

Page 38: ...matically This recording may not start if another recording is in progress TV signal condition is bad or there are no images displayed To operate REW LIVE TV To pause To search backward up to 90 minut...

Page 39: ...p BBC ONE 1 Guide Timer Programming Function No Date Start End Channel Name Wed 19 10 2016 10 46 USB HDD Rec USB HDD Rec Wed 19 10 2016 60 min 120 min Thu 20 10 2016 TIMER Function USB HDD Rec TV mode...

Page 40: ...the USB 1 2 or 3 port To remove the USB Flash Memory safely from the TV Safely remove USB in USB Device Setup Setup Menu Check the terminal type and devices are correct for connection For the USB HDD...

Page 41: ...onnections Wireless connection For DLNA and internet service Internet environment Built in wireless LAN Access point Smartphone etc Hub Router DLNA Certified media server PC etc Wired connection For D...

Page 42: ...der before selecting the file To display hide information of the highlighted file Note Non playable files are also listed but cannot be selected You can use the following buttons during playback Confi...

Page 43: ...ains socket Check the correct input mode is selected Check the setting of AV COMPONENT VIDEO in Input Selection to match the signal being output by the external equipment Is Backlight Contrast Brightn...

Page 44: ...damaged Take care not to tap or scratch the surface with your fingernail or other hard objects Do not allow the cabinet and pedestal to make contact with a rubber or PVC substance for a long time Thi...

Page 45: ...Hi Speed USB USB 2 0 DIGITAL AUDIO output PCM Dolby Digital Fibre optic Receiving systems Band name DVB S S2 Digital satellite services MPEG2 MPEG4 AVC H 264 and MPEG HEVC H 265 Receiver frequency ra...

Page 46: ...le with this TV Up to 5 devices can be used simultaneously except the 3D Eyewear Note Design and Specifications are subject to change without notice Mass and Dimensions shown are approximate For infor...

Page 47: ...t s performance and safety be absolutely sure to ask your dealer or a licensed contractor to secure the wall hanging brackets Any damage caused by installing without a qualified installer will void yo...

Page 48: ...al municipality Penalties may be applicable for incorrect disposal of this waste in accordance with national legislation Note for the battery symbol bottom symbol This symbol might be used in combinat...

Reviews: