background image

Main Menu

VIERA Link

Picture

Sound

Setup

1/2

Child Lock

Off Timer

Teletext

TOP

Tuning Menu

       Setup Menu

DVB Profile Edit

Access

Link Settings

Language

Off

Analogue Service List

Access

DVB Service List

Access

OPTION SD CARD

EXIT

INPUT

TV

RETURN

MENU

26

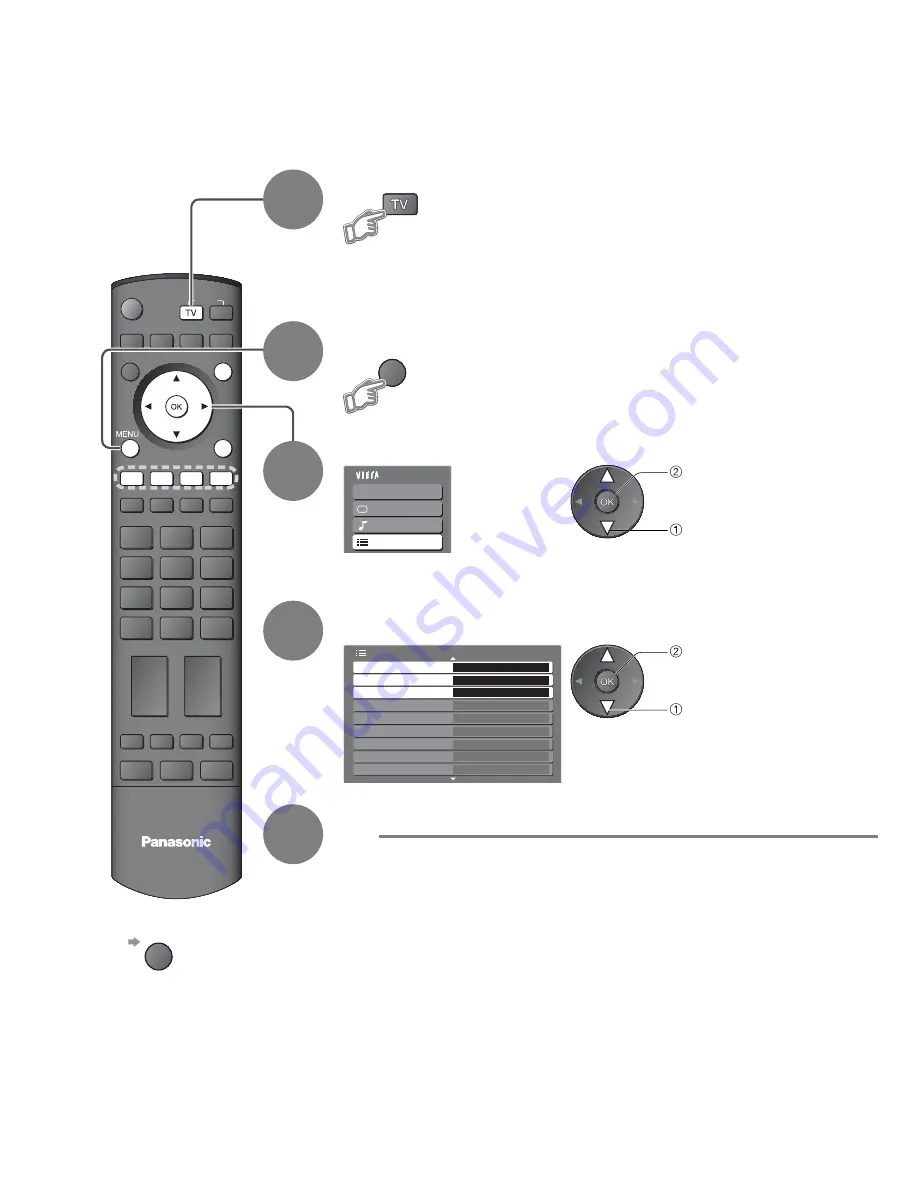
Editing Programmes

Select “Setup”

Select “DVB Profile Edit”, “DVB Service List” or 
“Analogue Service List”

4

3

Display the menu

You can make your favourite programme lists and skip unwanted programmes, etc.

Ŷ

To return to TV

EXIT

1

Select DVB or Analogue

2

“DVB Profi le Edit” and “DVB Service List” are available in DVB mode only.

“Analogue Service List” is available in Analogue mode only.

 access

 select

 access

 select

5

Set

Summary of Contents for Viera TX-32LZD85F

Page 1: ...n them for future reference The images shown in this manual are for illustrative purposes only Please refer to Pan European Guarantee Card if you need to contact your local Panasonic dealer for assistance Operating Instructions LCD Television Model No TX 32LZD85F TX 37LZD85F ...

Page 2: ...o Broadcasting will work in areas where DVB T MPEG2 digital terrestrial broadcasting are received Consult your local Panasonic dealer with coverage areas DVB functions may not be available in some countries Some functions may not be available in some countries This TV has the capability for DVB specifications But future DVB services cannot be guaranteed ...

Page 3: ...lity etc DVB Settings DVB 24 pay TV software update time adjustment Editing Programmes 26 Tuning Programmes 28 Control Programme Audience 30 Restore Settings 31 Input Labels 32 Displaying PC Screen on TV 33 Viewing from SD Card Photos 34 Link Functions 36 Q Link VIERA Link External Equipment 42 FAQs etc Technical Information 44 FAQs 48 Licence 50 Specifications 51 Up to 60 000 hours LCD Panel Lifet...

Page 4: ...e of candle or naked flame on top or near the TV Power source This TV is designed to operate on 220 240 V 50 60 Hz AC Do not place foreign objects inside the TV Do not allow any objects to drop into the TV through the air vents fire or electrical shock may result Do not place the TV on sloped or unstable surfaces The TV may fall off or tip over Keep liquids away from the TV To prevent damage which m...

Page 5: ... cleaning the TV remove the mains plug Cleaning an energized TV may cause electrical shock ŶWhen the TV is not going to be used for a long period of time remove the mains plug This TV will still consume some power even in the Off mode as long as the mains plug is still connected to a live socket outlet ŶAllow sufficient space around the TV for radiated heat 10 10 10 10 cm Minimum distance When usin...

Page 6: ... from not having a professional installer mount your unit will void your warranty Always be sure to ask a qualified technician to carry out set up Incorrect fitting may cause equipment to fall resulting in injury and product damage Do not mount the unit directly below ceiling lights such as spotlights floodlights or halogen lights which typically give off high heat Doing so may warp or damage plastic...

Page 7: ... Option Menu p 13 Easy setting for viewing and sound options Main Menu p 20 Press to access VIERA Link Picture Sound and Setup Menus Subtitles p 12 Displays subtitles Surround p 22 Switches Surround sound Input mode selection TV switches DVB Analogue mode p 12 AV switches to AV input mode from Input Selection list p 18 SD Card p 34 Switches to SD Card viewing mode Return Returns to the previous me...

Page 8: ...ent and cables shown are not supplied with this TV Please ensure that the unit is disconnected from the mains socket before attaching or disconnecting any leads RF cable RF cable TV only TV DVD Recorder or VCR AC 220 240 V 50 60 Hz AC 220 240 V 50 60 Hz Note Connect to AV1 AV2 for a DVD Recorder VCR supporting Q Link p 37 For HDMI compatible equipment possible to connect to HDMI terminals HDMI1 HD...

Page 9: ...T RF IN RF IN RF OUT RF IN Basic Connection DVD Recorder or VCR Aerial Mains lead Rear of the TV Set top box AC 220 240 V 50 60 Hz RF cable RF cable TV DVD Recorder VCR and Set top box SCART cable fully wired SCART cable fully wired RF cable RF cable Example 3 Connecting DVD Recorder VCR and Set top box Fully wired HDMI compliant cable ...

Page 10: ... environment Home Shop Plug the TV into mains socket and switch On Takes a few seconds to be displayed 1 Auto Setup Auto Setup is now complete and your TV is ready for viewing You can now use the remote control to turn On the TV or turn the TV to standby mode Power LED On To edit programmes Editing Programmes p 26 4 Start Auto Setup If Q Link VIERA Link or similar technology p 36 compatible record...

Page 11: ...control Using the On Screen Displays MENU Open the main menu Move the cursor select the menu Move the cursor adjust levels select from a range of options Access the menu store settings after adjustments have been made or options have been set RETURN Return to the previous menu EXIT Exit the menu system and return to the normal viewing screen Note If tuning has failed Auto Setup p 29 If downloading...

Page 12: ...witch should be On p 7 down or 1 Also possible to select the mode using the TV button on the side panel of the TV p 7 To select the two or three digit programme number e g 39 in a short time Display Information banner if it is not displayed While the banner is displayed select the programme Possible to set display timeout in Banner Display Timeout p 23 ŶSelect a programme using Programme Guide p 1...

Page 13: ...er remaining time For settings see below To confirm another tuned programme name To watch the programme listed in the banner To change the category blue To hide EXIT Information on the next event DVB mode To set display timeout Banner Display Timeout p 23 Extra information press again to hide the banner DVB mode Display Information banner Also appears when changing a programme 1 ZDF 23 35 Radio Cor...

Page 14: ...istortion Displays a 16 9 letterbox anamorphic image full screen without distortion Zoom3 Displays a 2 35 1 letterbox anamorphic image full screen without distortion At 16 9 displays the image at its maximum with slight enlargement Select Change EXIT RETURN Aspect selection 16 9 Just 14 9 4 3 Full 4 3 Zoom1 Zoom2 Zoom3 Auto Change the aspect ratio Enjoy viewing the picture at its optimum size and ...

Page 15: ...g Type All Types Type list select type view ŶTo view a programme list of the selected category blue All Services Free Services Pay Services All DVB Services All Analogue Services Radio TV Information Profile 1 Profile 2 Profile 3 Profile 4 Category All Services Category list select category view Only Analogue TV programmes are listed To list favourite programmes p 27 Using Programme Guide Using Pr...

Page 16: ...loured subjects are situated at the bottom of the screen To access more information about one of these subjects press the appropriately coloured button This facility enables fast access to information on the subjects shown What is TOP mode in case of TOP text broadcasting TOP is a particular improvement of the standard teletext service that results in an easier search and effective guide Fast over...

Page 17: ... ŶTo change stored pages press and hold Enter new page number Colour button you want to change View sub page Sub pages The number of sub pages varies depending on the broadcasters up to 79 pages It may take some time for searching during which time you can watch TV Enter the 4 digit number example P6 Appears at top of the screen ŶTo view specific sub page MENU blue View sub page Only when teletext ...

Page 18: ...Display the Input select menu Displays the selected mode 1 Turn the TV on ŶWhen connecting with SCART as example 2 or 3 p 8 and p 9 Receives input signals automatically when playback starts Input signals are automatically identified by the SCART pin 8 terminal This function is also available for HDMI connections p 42 ŶIf input mode is not switched automatically Perform and Dependant on the setup of...

Page 19: ...o play at slow speed Programme Up Down Select programme Record Start recording Panasonic equipment connected to the TV can be directly operated with the remote control Setting your remote control to operate Panasonic VCR DVD etc Set the VCR DVD switch to the appropriate position Press and hold during the following operations Enter the appropriate code for the equipment to be controlled see table b...

Page 20: ...access select Adjust or select change example Picture Menu example Picture Menu store or access Required by some functions 1 select ŶChoose from among alternatives ŶTo reset the settings To reset the picture settings only Reset to Default in Picture Menu p 22 To reset the sound settings only Reset to Default in Sound Menu p 22 To reset the picture and sound settings together N Also volume level an...

Page 21: ...on Link Set Download Access Q Link AV2 AV2 out TV VIERA Link On p 23 Tuning Menu Auto Setup Access DVB Manual Tuning Analogue Manual Tuning Access Add New DVB Services Access Access New Service Message DVB Signal Condition Access On p 28 Only available items can be selected 1 3 AV Colour System Auto Child Lock Access Tuning Menu Off Timer Off Language Teletext TOP Access Access Setup Menu DVB Prof...

Page 22: ...imulated Surround Provides a dynamic enhancer to simulate improved spatial effects BBE ViVA BBE ViVA HD3D High Definition 3D Sound provides musically accurate natural 3D image with Hi Fi sound The clarity of the sound is improved by BBE while the width depth and height of sound image are expanded by BBE s proprietary 3D sound process BBE ViVA HD3D Sound is compatible with all TV programmes includin...

Page 23: ...he GUIDE Plus system Postcode Sets your postcode for using the GUIDE Plus system p 15 System Information Displays the system information of the GUIDE Plus system Off Timer Sets the time the TV automatically turns Off Off 15 30 45 60 75 90 minutes Language OSD Language Changes language for on screen displays Preferred Audio 1 2 Selects the preferred language for DVB multi audio depending on the bro...

Page 24: ...conds Time Zone Auto Setup Menu On System Information Software License OPTION SDCARD RETURN EXIT INPUT TV MENU 24 DVB Settings DVB mode 4 3 5 Select Setup Select Common Interface System Update or Time Zone Display the menu Set ŶTo return to TV EXIT 1 If in Analogue mode Select DVB DVB Settings provide access to various advanced features 2 access select access select ...

Page 25: ...s software system System Update The Common Interface Module menu provides access to software contained on Common Interface CI Modules This TV receiver works only Pay TV modules complying with CI standard Common Interface Slot 1 Module inserted Access Common Interface Follow the on screen instructions example select go Coloured characters red green yellow blue On screen operation guide may not corr...

Page 26: ...INPUT TV RETURN MENU 26 Editing Programmes Select Setup Select DVB Profile Edit DVB Service List or Analogue Service List 4 3 Display the menu You can make your favourite programme lists and skip unwanted programmes etc ŶTo return to TV EXIT 1 Select DVB or Analogue 2 DVB Profile Edit and DVB Service List are available in DVB mode only Analogue Service List is available in Analogue mode only access...

Page 27: ...an change the programme name and programme position for Analogue programmes This function is available in Analogue mode If a VCR is connected only with the RF cable edit VCR Select the programme to edit BBC1 Analogue Service List 1 2 3 4 5 6 7 select Programme position Name Edit ŶTo change the name displayed when selecting programmes Select Rename green Set characters Edit Service Name Name A B C ...

Page 28: ...Select Setup 3 Select Tuning Menu 4 Display the menu Select a function 5 You can retune all the TV programmes when moving house or search for new services which may have recently started broadcasting ŶTo return to TV EXIT 2 access select access select access select 1 Select DVB or Analogue DVB Manual Tuning Add New DVB Services New Service Message and DVB Signal Condition are available in DVB mode...

Page 29: ...red Set all DVB or Analogue programmes automatically Auto Setup DVB Signal Condition DVB Programme CH70 CBBC Channel Signal Quality Signal Strength 0 10 0 10 Selects a programme and checks the DVB signal condition To change the programme A good Signal Strength is not an indication of suitable signal for DVB reception Please use the Signal Quality indicator as follows Signal Quality Green bar Good ...

Page 30: ...N Entry Please enter new PIN PIN Child Lock Child Lock List Change PIN Access Child Lock List Services and AV BBC One Wales Name 1 BBC THREE 7 E4 14 VCR BBC1 1 2 AV1 AV2 S Lock Free TV Free TV Free TV Analogue Analogue Analogue AV AV Type ŶTo change the PIN number Select Change PIN in and enter a new PIN number twice Appears when the programme input is locked Enter the PIN number 4 digits Select C...

Page 31: ...cally start when Mains power On Off switch is next turned On p 10 ŶTo retune TV programmes only e g after moving house Auto Setup p 29 3 2 4 Select Setup Select Shipping Condition Display the menu Set ŶTo return to TV EXIT Restore Settings Resets the TV to its original condition i e no programmes tuned in All settings programmes picture sound quality etc are reset 1 access select All tuning data w...

Page 32: ...rminal and set ŶTo return to TV EXIT For easier identification and selection of the input mode you can label each input terminals or skip terminal that is not connected to any equipment To select the input mode p 18 set select 1 The labels you set will be displayed in Input Selection menu p 18 or banner If Skip is selected you cannot select the mode access select access select ŶUser input You can n...

Page 33: ...o the minimum level if noise occurs Sync Chooses another synchronous signal if the image is distorted H V On G H V by the horizontal and vertical signals from your PC On G by the green signal from your PC if available Reset to Default Press the OK button to reset to the default Setup settings Other items p 22 and p 23 OPTION SDCARD EXIT RETURN INPUT Input Selection AV1 AV2 S AV3 S COMPONENT PC HDM...

Page 34: ... Rotate 90 anti clockwise To the next photo Rotate 90 clockwise 2 Enter SD mode Photo View Mode select view Operation guide Thumbnail Caution During the operation no signals are output from the monitor output terminals ŶTo return to TV EXIT or SDCARD Error display images that could not be loaded etc Selected photo information is displayed The maximum number of characters for Filename is 8 The phot...

Page 35: ...n step or ŶSlide show settings operate in step or Slide show Select the photo for the first view Start Slide show Display the menu Select Viewing Setup Select the items and set access Picture Menu p 22 Menu Item Adjustments Configurations alternatives Viewing Setup Interval Select slide show interval 5 10 15 30 60 90 120 seconds Repeat Slide show repeat Off On set select To pause To return to Sing...

Page 36: ...k to the TV s AV1 or AV2 terminal via a fully wired SCART cable ŶVIERA Link Connect the equipment supporting VIERA Link to the TV s AV1 AV2 HDMI1 HDMI2 or HDMI3 terminals via fully wired SCART and HDMI cables together Some functions are available only with HDMI cable connection But use both HDMI and SCART cables to support many features normally SCART cable DVD Recorder VCR with Q Link function Fo...

Page 37: ...onnection p 36 Set up the DVD Recorder VCR Read the manual of the equipment Q Link terminal setup in Setup Menu Q Link p 23 AV1 AV2 out p 23 Download preset programme language country region setting Preset download Download p 23 or Auto Setup p 29 or Auto Setup when first using the TV p 10 ŶFeatures available Some recorders are not applicable Read the manual of the recorder Direct TV Recording Wha...

Page 38: ...might be required For details read the manual of the recorder Download preset programme language country region setting Preset download Download p 23 or Auto Setup p 29 or Auto Setup when first using the TV p 10 Set VIERA Link On in Setup Menu VIERA Link p 23 Set up the TV After connection turn the equipment on and then switch the TV on Select the input mode to HDMI1 HDMI2 or HDMI3 p 18 and make s...

Page 39: ...programme HDAVIControl3 and RecorderwithHDD Pause Live TV Direct TV Recording What you see is What you record HDAVI Control 3 Direct TV Rec Recording the current programme in DIGA Recorder immediately This function is available with DIGA Recorder which has HDAVI Control 3 function Connect DIGA Recorder with both HDMI and SCART cables to use this function If you cannot operate check the settings an...

Page 40: ...played But you cannot access it Use its own remote control to operate the equipment Direct TV Rec Speaker Selection VIERA Link Menu Home Cinema Start VIERA Link Control Speaker Selection Home Cinema Others Pause Live TV When the equipment of other types or manufacturers is connected Others Others is displayed You cannot access it Use its own remote control to operate the equipment Direct TV Rec Sp...

Page 41: ...or the first few seconds when Input mode is switched Volume function will be displayed when adjusting the volume of the equipment Easy playback is also available by using the remote control for Amplifier or Player theatre Read the manual of the equipment About HDMI cable for connecting Panasonic HD Video Camera read the manual of the equipment If more than one equipment of the same type are connecte...

Page 42: ...r recommendations for how to connect the TV to your various equipment For other connections consult the instructions for each piece of equipment the table below and the specifications p 51 S VIDEO or VIDEO AUDIO Headphones Camcorder Game equipment ŶTo adjust volume Headphone Volume in the Sound Menu p 22 M3 stereo mini plug To watch DVDs DVD Recorder Viewing Listening Fully wired HDMI compliant cab...

Page 43: ... L R L R RGB VIDEO RGB AV1 AV2 VIDEO S VIDEO 43 External Equipment Computer PC Set top box DVD Recorder VCR SCART cable RF cable SCART cable To watch satellite broadcasts To record playback or Amplifier with speaker system To listen with speakers or Viewing Listening RCA cable Optical digital audio cable Conversion adapter if necessary ...

Page 44: ...can enjoy finer images p 14 ŶAuto Auto aspect determines the best aspect ratio to use to fill your screen It does this using a four step process to determine if the picture being viewed is a widescreen picture If Auto aspect detects a widescreen signal it switches into the appropriate 16 9 or 14 9 widescreen mode If Auto aspect does not detect a widescreen signal then this advanced TV enhances the p...

Page 45: ...ting the TV and the equipment HDMI compatible equipment 1 with an HDMI or DVI output terminal such as a set top box or a DVD player can be connected to the HDMI terminal using an HDMI compliant fully wired cable About connections see External Equipment p 42 Note HDMI is the world s first complete digital consumer AV interface complying with a non compression standard If the external equipment has o...

Page 46: ...blished by Japan Electronics and Information Technology Industries Association JEITA SCART S VIDEO and HDMI terminal information ŶAV1 SCART terminal RGB VIDEO Q Link Suitable inputs for AV1 include RGB Red Green Blue Chrominance in Luminance in Chrominance earth Luminance earth ŶAV3 S VIDEO 4 pin terminal ŶHDMI terminal ŶAV2 SCART terminal RGB VIDEO S VIDEO Q Link AV2 Pins 15 and 20 are dependent ...

Page 47: ...80 1 024 60 Hz 63 98 60 02 1 366 768 60 Hz 48 39 60 04 Macintosh13 640 480 35 00 66 67 Macintosh16 832 624 49 73 74 55 Macintosh21 1 152 870 68 68 75 06 COMPONENT Y PB PR HDMI Mark Applicable input signal PC D sub 15P PC connection A PC may be connected to this TV so that the PC screen is displayed and sound is heard from the TV PC signals that can be inputted Horizontal scanning frequency 31 to 6...

Page 48: ...work Please confirm SCART cable and connection Also please set AV1 AV2 out in the Setup Menu p 23 VIERA Link function does not work and an error message appears Confirm the connection Turn the connected equipment on and then switch the TV on p 38 Recording does not start immediately Check the settings of the recorder For details read the manual of the recorder There may be red spots blue spots green...

Page 49: ... the TV and equipment then turn them On again Check an input signal from the equipment p 47 Use an equipment compliant with EIA CEA 861 861B Unusual image is displayed Turn off the TV with Mains power On Off switch then turn it On again TV goes into Standby mode Off Timer function is activated The TV enters Standby mode about 30 mins after analogue broadcasting ends The remote control does not wor...

Page 50: ...e following US patents 5510752 5736897 BBE and BBE symbol are registered trademarks of BBE Sound Inc GUIDE Plus is 1 a registered trademark or trademark of 2 manufactured under license from and 3 subject of various international patents and patent applications owned by or licensed to Gemstar TV Guide International Inc and or its related affiliates GEMSTAR TV GUIDE INTERNATIONAL INC AND OR ITS RELAT...

Page 51: ...ed in some areas Aerial Rear VHF UHF Operating Conditions Temperature 0 C 35 C Humidity 20 80 RH non condensing Connection Terminals AV1 Scart terminal 21 Pin terminal Audio Video in Audio Video out RGB in Q Link AV2 Scart terminal 21 Pin terminal Audio Video in Audio Video out RGB in S Video in Q Link AV3 VIDEO RCA PIN Type 1 1 0 V p p 75 S VIDEO Mini DIN 4 pin Y 1 0 V p p 75 C 0 286 V p p 75 AUD...

Page 52: ...ction point Penalties may be applicable for incorrect disposal of this waste in accordance with national legislation For business users in the European Union If you wish to discard electrical and electronic equipment please contact your dealer or supplier for further information Information on Disposal in other Countries outside the European Union This symbol is only valid in the European Union If...

Reviews: