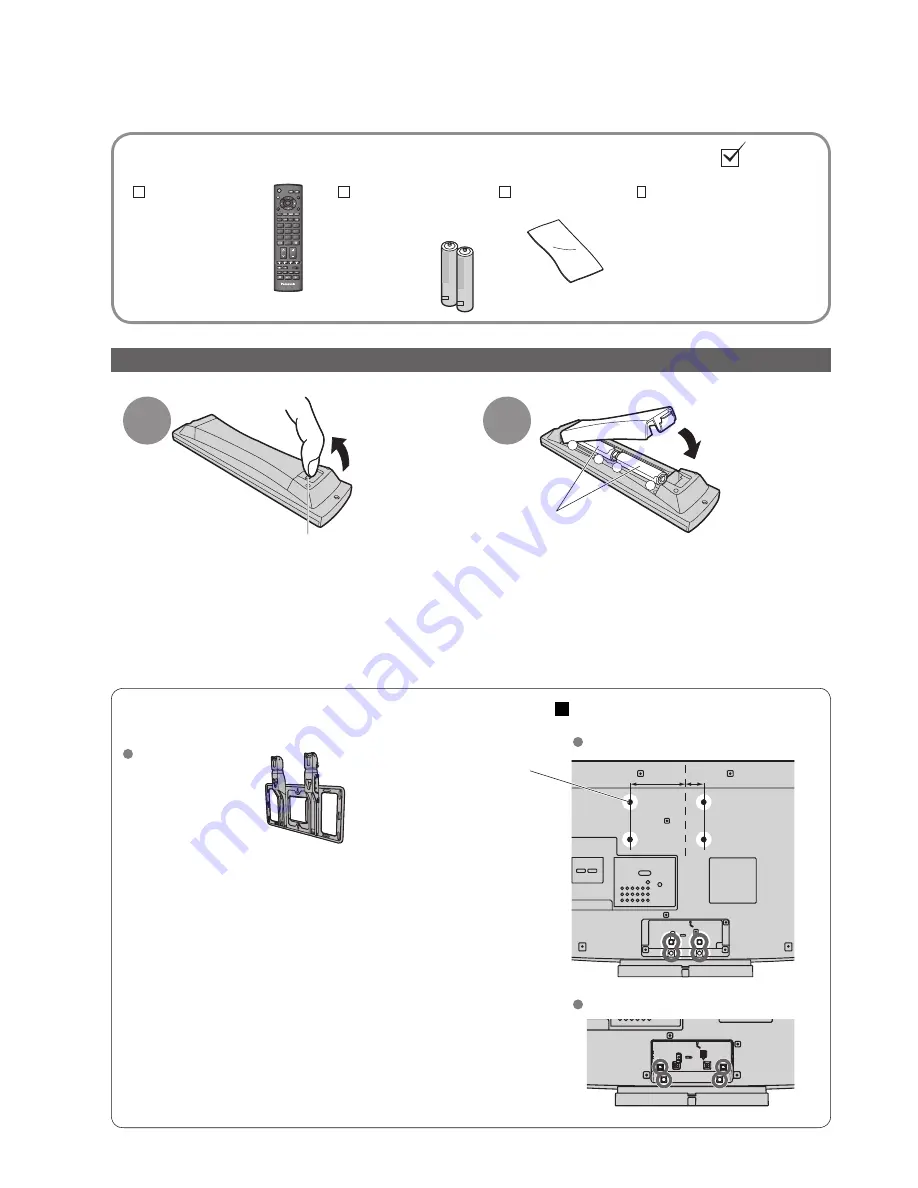
Panasonic Viera TX-32LX800A Operating Instructions Manual Download Page 6

6

150 mm

150 mm

50 mm

50 mm

150 mm

50 mm

centre

centre

centre

TV

OK

1

3

2

4

6

5

7

9

8

0

VOL

+

-

-

+

Accessories / Options


Remote Control 

Transmitter

• 

N2QAYB000226

Standard accessories

Check that you have the accessories and items shown

Installing remote’s batteries

• 

Incorrect installation may cause battery leakage and corrosion, resulting in damage to the remote control.

Do not mix old and new batteries.

Do not mix different battery types (such as alkaline and manganese batteries).

Do not use rechargeable (Ni-Cd) batteries.

• 

Do not burn or breakup batteries.

Batteries must not be exposed to excessive heat such as sunshine, 

fi

 re or the like.

Optional accessories

Wall-hanging bracket

TY-WK32LR2W

WARNING!

• 

Failure to use a Panasonic bracket or choosing to mount the 

unit yourself will be done at the risk of the consumer.

  Any damage resulting from not having a professional installer 

mount your unit will void your warranty.

• 

Always be sure to ask a quali

fi

 ed technician to carry out set-up.

 Incorrect 

fi

 tting may cause equipment to fall, resulting in injury 

and product damage.

• 

Do not mount the unit directly below ceiling lights (such as 

spotlights, 

fl

 oodlights or halogen lights) which typically give off 

high heat. Doing so may warp or damage plastic cabinet parts.


How to remove the TV Stand

Remove four screws.

TX-32LX800A

Rear of the TV

Please contact your nearest 

Panasonic dealer to purchase the 

recommended wall-hanging bracket. 

For additional details, please refer to 

the wall-hanging bracket installation 

manual.


Operating Instructions

1

Pull open

Hook

2

Note the correct

polarity (+ or -)

Close

TX-37LX800A

Rear of the TV


Cleaning cloth


Batteries for the 

Remote Control 

Transmitter 

(2)

• 

R6 (AA)

Holes for wall-hanging 

bracket installation

Please note the holes for 

TX-32LX800A are off-

centred to the left by 50 

mm, as shown on the 

diagram.

Summary of Contents for Viera TX-32LX800A

Page 1: ...structions before operating your set and retain them for future reference The images shown in this manual are for illustrative purposes only English TQB4GC0014 Operating Instructions LCD TV Model No TX 32LX800A TX 37LX800A ...

Page 2: ...2 Turn your own living room into a movie theatre Experience an amazing level of multi ...

Page 3: ...d quality etc Editing Programmes 22 Tuning Programmes 24 Control Programme Audience 26 Restore Settings 27 Input Labels 28 Displaying PC Screen on TV 29 Viewing from SD Card Photos 30 VIERA Link HDAVI ControlTM 32 External Equipment 36 Basic Features Watching TV 12 Watching Videos and DVDs 14 Viewing Teletext 16 Enjoy your TV Technical Information 38 FAQs 41 Specifications 43 Licence 44 FAQs etc A...

Page 4: ...he mains lead A damaged lead may cause fire or electrical shock Do not move the TV with the lead plugged in the socket outlet Do not place a heavy object on the lead or place the lead near a high temperature object Do not twist the lead bend it excessively or stretch it Do not pull on the lead Hold onto the mains plug body when disconnecting lead Do not use a damaged mains plug or socket outlet Wa...

Page 5: ...e paint Do not allow the cabinet to make contact with a rubber or PVC substance for a long time Electronic equipment In particular do not place video equipment near the TV electromagnetic interference may distort images sound Equipment with an infrared sensor This TV also emits infrared rays this may affect operation of other equipment Keep the TV away from these equipment Adjust the LCD panel to ...

Page 6: ...Any damage resulting from not having a professional installer mount your unit will void your warranty Always be sure to ask a qualified technician to carry out set up Incorrect fitting may cause equipment to fall resulting in injury and product damage Do not mount the unit directly below ceiling lights such as spotlights floodlights or halogen lights which typically give off high heat Doing so may...

Page 7: ... teletext mode VIERA Link Menu p 33 Press to access VIERA Link Menu directly Main Menu p 18 Press to access VIERA Link Picture Sound and Setup Menus Option Menu p 12 Easy setting for viewing and sound options SD Card p 30 Switches to SD Card viewing mode Favourite Page p 17 Calls up the teletext page stored in blue button Input mode selection TV switches to TV mode p 14 AV switches to AV input mod...

Page 8: ...l the correct cable 75 Ω coaxial and the correct terminating plug are required If a communal Aerial system is used you may require the correct connection cable and plug between the wall Aerial socket and the TV Your local Television Service Centre or dealer may be able to assist you in obtaining the correct Aerial system for your particular area and the accessories required Any matters regarding A...

Page 9: ...setup has been completed by your local dealer Auto Tuning is now complete and your TV is ready for viewing You can now use the remote control to turn On the TV or turn the TV to standby mode Power LED On To edit channels Editing Programmes p 22 4 Start Auto Tuning Note If tuning have failed Auto Tuning p 25 If you turned the TV Off during Standby mode last time the TV will be in Standby mode when ...

Page 10: ...age English Français Access 1 2 Service List Edit Child Lock Tuning Menu Off Timer Off OSD Language Teletext TOP Access Teletext Character Set Shipping Condition Input Labels Setup Menu English Access Language Setting You can change language for on screen displays 1 Display the menu 2 Select Set up 4 Select the language access select store change 3 Select OSD Language access select ...

Page 11: ... ON SCREEN HELP Instructions box Open the main menu Return to the previous menu Move the cursor select the menu Move the cursor adjust levels select from a range of options Access the menu store settings after adjustments have been made or options have been set Many features available on this TV can be accessed via the On Screen Display menu How to use remote control Language Setting Using the On ...

Page 12: ...imeout in Banner Display Timeout p 21 select programme watch HOLD Freeze unfreeze picture Hold Other useful functions Display the selectable settings for the current programme OPTION Check or change the current programme status instantly To change CH Colour Set Adjusts the colour density Picture Menu p 20 Teletext Character Set Sets the teletext language Setup Menu p 21 Volume Correction Adjusts v...

Page 13: ...4 3 without distortion Displays a 4 3 image enlarged horizontally to fit the screen HD signal only Zoom1 Zoom2 Displays a 16 9 letterbox or 4 3 image without distortion Displays a 16 9 letterbox anamorphic image full screen without distortion Zoom3 Displays a 2 35 1 letterbox anamorphic image full screen without distortion At 16 9 displays the image at its maximum with slight enlargement Select Ch...

Page 14: ...ment Select the input mode connected to the equipment Note If the external equipment has an aspect adjustment function set to 16 9 For details see the manual of the equipment or ask your local dealer To return to TV Display the Input select menu Displays the selected mode You can also select the input using the AV button on the remote control or the side panel of the TV Press the button repeatedly...

Page 15: ...eed PROGRAMME Programme Up Down Select programme REC Record Start recording Panasonic equipment connected to the TV can be directly operated with the remote control Setting your remote control to operate Panasonic VCR DVD etc Set the VCR DVD switch to the appropriate position VCR DVD Press and hold POWER during the following operations Enter the appropriate code for the equipment to be controlled ...

Page 16: ...ects are situated at the bottom of the screen To access more information about one of these subjects press the appropriately coloured button This facility enables fast access to information on the subjects shown What is TOP mode in case of TOP text broadcasting TOP is a particular improvement of the standard teletext service that results in an easier search and effective guide Fast overview of the...

Page 17: ... you can watch TV Enter the 4 digit number example P6 Appears at top of the screen To view specific sub page MENU B View sub page Only when teletext is more than one page Watch TV while waiting for update P108 MENU Y Y Appears when updating is completed You cannot change the programme Teletext automatically updates itself when new information becomes available The news page provides a function tha...

Page 18: ... to the input signal Select the menu Select the item example Picture Menu Adjust or select example Picture Menu example Picture Menu 1 select access select change store or access Required by some functions To return to TV at any time EXIT To return to the previous screen RETURN To change menu pages CH up down Changed Number and positions of alternatives Moved Choose from among alternatives Adjust ...

Page 19: ...Menu Off Timer Off Teletext Teletext Character Set English Shipping Condition Access Input Labels Access Service List Edit Access OSD Language Access TOP Picture Overscan On 2 2 VIERA Link Settings System Information Access Software Licence Access Access Setup Menu 3 seconds Banner Display Timeout p 21 Depending on the received signals available items are varied 2 2 3D COMB On Reset to Default Set...

Page 20: ...ure Noise Reduction Automatically reduces unwanted picture noise and flicker noise in the contoured parts of a picture Off Weak Mid Strong Not valid on PC signal 3D COMB Occasionally whilst viewing still or slow moving pictures colour patterning may be seen Set to On to display sharper and more accurate colours Off On For PAL or NTSC signal reception only Not valid on S Video Component PC HDMI and...

Page 21: ...Teletext display mode TOP FASTEXT List p 16 Teletext Character Set Select teletext language English CIS E Europe Persian Shipping Condition Resets all settings for example when moving house p 27 Picture Overscan Selects the screen area displaying the image Off On On Enlarged the image to hide the edge of the image Off Displayed the image in the original size Set to On if noise is generated on the ...

Page 22: ...r Set Off Service List Edit Access English PROGRAMME REC VCR DVD TEXT F P INDEX HOLD OPTION DIRECTTV REC ASPECT 1 3 2 4 6 5 7 9 8 0 INPUT TV R G Y B EXIT MENU OK RETURN CH MENU 22 Editing Programmes Select Setup Select Service List Edit 3 2 Display the menu You can skip unwanted programmes or edit programmes To return to TV EXIT 1 access select access select 4 Set ...

Page 23: ...o retune each programme Manual Tuning R p 25 BBC1 Service List Editor 1 2 3 4 5 6 7 select Programme position Name Edit To change the name displayed when selecting programmes Select Rename G Set characters Edit service name Name A B C D E F G H I J K L M N U V W X Y Z 0 1 2 3 4 5 6 a b c d e f g h i j k l m n u v w x y z _ O P Q R S T 7 8 9 o p q r s t set select maximum five characters Store RETU...

Page 24: ...etext Character Set English Shipping Condition Access Setup Menu Input Labels Access Tuning Menu Auto Tuning Access Channel Selection Manual Tuning Access Position MENU 24 Tuning Programmes 3 4 5 You can retune all the TV programmes when moving house or search for new services which may have recently started broadcasting To return to TV EXIT 2 1 Select Setup Select Tuning Menu Display the menu Sel...

Page 25: ...programme position 1 will be displayed If tuning has not been done completely Manual Tuning Automatically retune all programmes received in the area If a Child Lock PIN number p 26 has been set it must be entered Select the Channel Selection method Position Direct Position Direct Example When Channel Selection is on Position and Auto Tuning is performed the TV memorises the programmes tuned in ord...

Page 26: ...ch it To return to TV EXIT Child Lock PIN Entry Please enter new PIN PIN Child Lock Child Lock List Change PIN Access Child Lock List Services and AV Name AV1 AV2 Lock TV TV TV TV TV TV AV AV Type BBC 1 THREE 7 E4 14 CBBC 70 Nwk 72 BBCi 80 1 3 2 4 6 5 7 9 8 0 To change the PIN number Select Change PIN in and enter a new PIN number twice Appears when the programme input is locked Enter the PIN numb...

Page 27: ...reen instructions Auto Tuning will automatically start when Mains power On Off switch is next turned On p 9 To retune TV programmes only e g after moving house Auto Tuning p 25 3 2 4 Select Setup Select Shipping Condition Display the menu Set To return to TV EXIT Restore Settings Resets the TV to its original condition i e no programmes tuned in All settings programmes picture sound quality etc ar...

Page 28: ...the menu Select a input terminal and set To return to TV EXIT For easier identification and selection of the input mode you can label each input terminals or skip terminal that is not connected to any equipment To select the input mode p 14 1 The labels you set will be displayed in Input Selection menu p 14 or banner If Skip is selected you cannot select the mode select access select access select...

Page 29: ...et to the minimum level if noise occurs Sync PC sync signal type H V On G H V Horizontal and Vertical sync from your PC Most common sync format On G Sync on Green sync from your PC Reset to Default Press the OK button to reset to the default Setup settings Other items p 20 and p 21 ASPECT RETURN EXIT MENU OPTION DIRECTTV REC VCR 1 3 2 4 6 5 7 9 8 0 INPUT OK Input Selection AV1 AV2 AV3 AV4 PC HDMI1...

Page 30: ...layed one at a time To the previous photo Rotate 90 anti clockwise To the next photo Rotate 90 clockwise 1 2 Enter SD mode Photo View Mode select view Operation guide Thumbnail Caution During the operation no signals are output from the monitor output terminals To return to TV EXIT or SDCARD Error display images that could not be loaded etc Selected photo information is displayed The maximum numbe...

Page 31: ...ide show settings operate in step or Slide show Select the photo for the first view Start Slide show Display the menu Select Card Setup Menu Select the items and set access Picture Menu p 20 Menu Item Adjustments Configurations alternatives Card Setup Menu Interval Select slide show interval 5 10 15 30 60 90 120 seconds Repeat Slide show repeat Off On set select To pause To return to Single view G...

Page 32: ...igator function menu for the equipment are activated the TV is automatically turned on Only when TV is in Standby mode Power off link Set Power off Link Set in Setup Menu to use this function Power off Link p 18 19 21 When TV is set to Standby mode the connected equipment is also automatically set to Standby This function will work even if the TV enters standby mode automatically by Off Timer func...

Page 33: ...mode change the programme If you cancel pause or resumed playback the recorded programme will be deleted from HDD Display VIERA Link Menu select pause select resume Pause Live TV programme HDAVIControl3 and RecorderwithHDD Pause Live TV Direct TV Recording What you see is What you record HDAVI Control 3 Direct TV Rec R G B Y GUIDE POWER RETURN EXIT 1 3 2 4 6 5 7 9 8 MENU OPTION SD CARD ASPECT INPU...

Page 34: ...eo Camera The type of the connected equipment is displayed But you cannot access it Use its own remote control to operate the equipment Direct TV Rec Speaker Selection VIERA Link Menu Home Cinema Start VIERA Link Control Speaker Selection Home Cinema Others Pause Live TV When the equipment of other types or manufacturers is connected Others Others is displayed You cannot access it Use its own remo...

Page 35: ...ute MUTE The sound of TV speakers is mute When the equipment is turned off TV speakers will be active TV TV speakers are active Select Speaker Selection This function may not work properly depending on the connected equipment Image or sound may not be available for the first few seconds when the playback starts Image or sound may not be available for the first few seconds when Input mode is switch...

Page 36: ...system VIERA Link AV4 IN S VIDEO VIDEO AUDIO L R AV IN 1 2 36 These diagrams show our recommendations for how to connect the TV to your various equipment For other connections consult the instructions for each piece of equipment the table below and the specifications p 43 Recommended Connection Types of connectable equipment to each terminal External Equipment VIDEO or S VIDEO AUDIO Headphones Cam...

Page 37: ... but N C on device 12 TMDS Clock 10 TMDS Clock 8 TMDS Data0 Shield 6 TMDS Data1 4 TMDS Data1 2 TMDS Data2 Shield HDMI terminal Connect the S VIDEO or VIDEO terminal when using AV3 AV4 IN terminals Connect the COMPONENT or VIDEO terminal when using AV1 AV2 IN terminals Amplifier with speaker system PC Viewing Listening To listen with speakers Set top box DVD Recorder VCR RF cable To watch satellite...

Page 38: ...1 21 62 63 69 21 62 63 69 62 63 69 62 63 62 C13 70 73 74 75 76 77 78 79 S 1 S 2 S 3 S 1 S 2 S 3 S 1 S 2 S 3 32 41 S 1 S 1 S 2 S 3 80 81 89 Z1 Z9 S1 S2 S10 S1 S2 S10 S1 S2 S10 42 51 S1 S2 S10 S1 S2 S10 90 91 92 93 94 95 96 97 98 99 Z10 Z11 Z12 Z13 Z14 Z15 Z16 Z17 Z18 Z19 S11 S12 S13 S14 S15 S16 S17 S18 S19 S20 S11 S12 S13 S14 S15 S16 S17 S18 S19 S20 S11 S12 S13 S14 S15 S16 S17 S18 S19 S20 52 61 S11...

Page 39: ...listening will be easier if the mode is set to the MONO position using the stereo bilingual sound selection button DUAL also known as DUAL MONO or as BILINGUAL is not currently transmitted in some countries When you receive the stereo bilingual sound system sound output modes can be selected by pressing the Stereo Bilingual Sound Selection button NICAM Used in New Zealand Singapore Hong Kong etc A...

Page 40: ...ignal that can be displayed Note Signals other than above may not be displayed properly The above signals are reformatted for optimal viewing on your display Applicable input signal for PC is basically compatible to VESA standard timing PC signal is magnified or compressed for display so that it may not be possible to show fine detail with sufficient clarity COMPONENT Y PB CB PR CR HDMI Mark Appli...

Page 41: ...volume An error message appears Follow the message s instructions If the problem persists contact the authorized Service Centre VIERA Link function does not work and an error message appears Confirm the connection Turn the connected equipment on and then switch the TV on p 32 Permanently lit spots on screen Due to production process involved in this technology this may result in some pixels which ...

Page 42: ...tandby mode about 30 mins after broadcasting ends The remote control does not work Are the batteries installed correctly p 6 Has the TV been switched On No sound is produced Is Sound mute active p 7 Is the volume set to the minimum Sound level is low or sound is distorted Sound signal reception may be deteriorated Check Sound system p 25 Chaotic image noisy Set P NR in the Picture Menu to remove n...

Page 43: ...EO Mini DIN 4 pin Y 1 0 V p p 75 Ω C 0 286 V p p 75 Ω Others HDMI1 2 Input TYPE A Connectors This TV supports HDAVI Control 3 function PC Input HIGH DENSITY D SUB 15PIN R G B 0 7 V p p 75 Ω HD VD TTL Level 2 0 5 0 V p p high impedance Card slot SD CARD slot 1 Monitor Output AUDIO L R RCA PIN Type 2 0 5 V rms high impedance VIDEO RCA PIN Type 1 1 0 V p p 75 Ω Dimensions W H D 821 mm 580 mm 225 mm W...

Page 44: ...acintosh is a registered trademark of Apple Computer USA S VGA is a registered trademark of the Video Electronics Standard Association Even if no special notation has been made of company or product trademarks these trademarks have been fully respected SDHC Logo is a trademark HDMI the HDMI Logo and High Definition Multimedia Interface are trademarks or registered trademarks of HDMI Licensing LLC ...

Reviews: