8
9
Quick Start Guide
TV
Exit
Adjust
Select
Return
Bass
Treble
Balance
Headphone volume
MPX
Mode
SRS TruSurround XT
Sound menu
No service
Music
Off
DOWNLOAD IN PROGRESS
PLEASE WAIT
Programme : 63
Remote control unavailable
Suchlauf
Start ATP
Abbruch
Deutschland
Österreich
France
Italia
España
Portugal
Nederland
Danmark
Sverige
Norge
Suomi
Belgien
Schweiz
ELLADA
Polska
Česká republika
Magyarország
E.Eu
Land
AUTO SETUP IN PROGRESS
SEARCHING : PLEASE WAIT
02 78:01 41
CH12
Exit
red
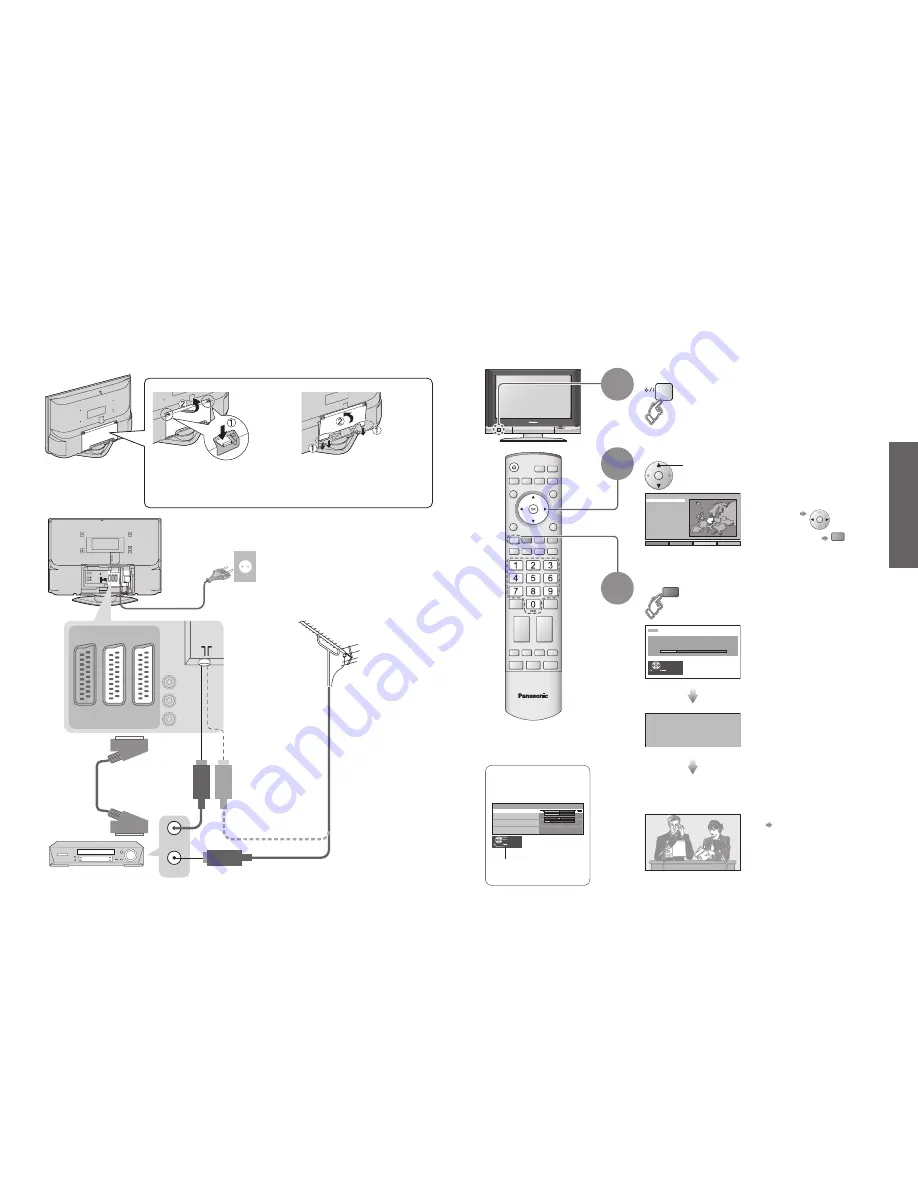
Turn the TV On with the On / Off switch
1
Need help
with operations?
(example: Sound menu)
On-screen operation
guide will help you.
Auto Setup
•
For Belgium, Switzerland
and E.Eu, select the desired
language
Connection
Search and store TV channels automatically.
These steps are not necessary if the setup has been completed by your local dealer.
Auto Setup is now
complete and your
TV is ready for viewing.
•
You can now use the remote
control to turn On the TV or
turn the TV to standby mode.
(Power lamp: On)
2
External equipments and cables shown in this manual are not supplied with this TV.
Please ensure that the unit is disconnected from the mains before attaching or disconnecting any leads.
•
If Q-Link (p. 26) equipment is
connected, channel information
is automatically downloaded to
the equipment.
•
To edit channels
"Programme edit" (p. 18)
•
Auto Setup
•
Connection
Select your country
select
•
To set manually
green
(p. 20)
3
Start Auto Setup
•
Auto Setup will start to search
for TV channels and store them.
COMPONENT
RGB
VIDEO
S VIDEO
VIDEO
S VIDEO
RGB
VIDEO
AV3
(Q-Link)
AV2
(Q-Link)
AV1
RF OUT
RF IN
SCART cable
(fully wired)
RF cable
Rear of the TV
•
Connect to
AV2 or AV3
for a unit
supporting
Q-Link
(p. 26).
VHF / UHF aerial
■
Watching TV
■
To record TV
programmes
DVD Recorder or VCR
Rear terminal portion
(enlarged view)
Mains lead
(Connect after all the other connections.)
1. Insert the claws (at 3 points) at
the bottom end.
2. Push until it clicks.
Removal
Fitting
1. Push down hooks and pull the
cover slightly towards yourself to
disengage the claws (at 3 points).
2. Slowly pull out in the downward
direction.
■
Cable cover removal and
fi
tting


