background image

11

English

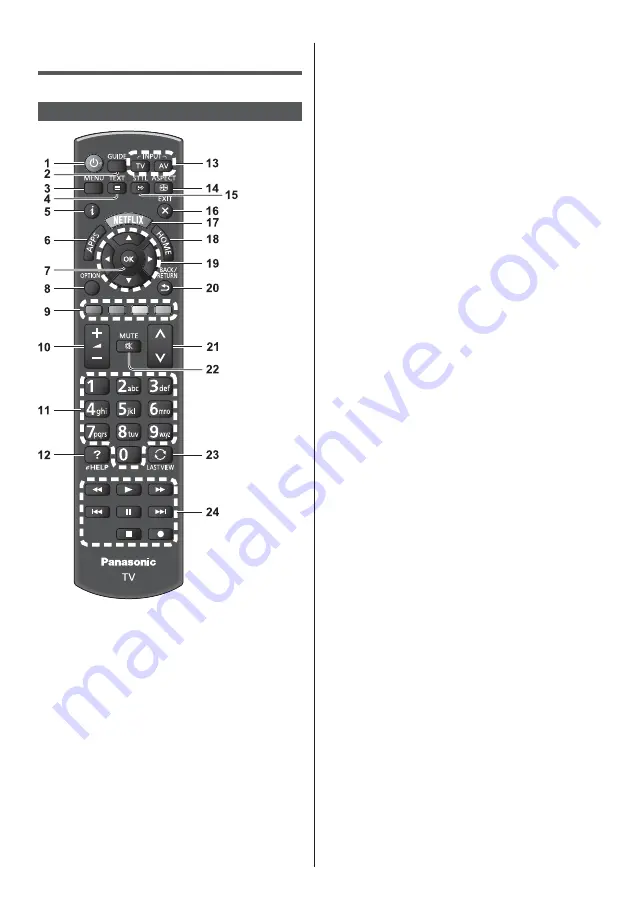
9 Coloured buttons

(red-green-yellow-blue)

Used for the selection, navigation and operation of 
various functions.

10 Volume Up / Down

11 Numeric buttons

Changes channel and teletext pages.

Sets characters.

When in Standby mode, switches TV on.

12 [eHELP]

Displays [eHELP] (Built-in Operating Instructions).

13 Input mode selection

TV - switches to DVB / Analogue mode.

AV - switches to AV input mode from Input 
Selection list.

14 Aspect

Changes aspect ratio.

15 Subtitles

Displays subtitles.

16 Exit

Returns to [Home Screen].

17 Netflix

Accesses NETFLIX service directly.

A broadband network environment is required to be 
able to use this function fully.

This service may be stopped or changed without 
notice.

18 HOME

Displays [Home Screen].

19 Cursor buttons

Makes selections and adjustments.

20 Return

Returns to the previous menu / page.

21 Channel Up / Down

22 Sound Mute On / Off

23 Last view

Switches to previously viewed channel or input 
mode.

24 Operations for contents, connected equipment, 

etc.

Identifying Controls

Remote Control

1  Standby On / Off switch

2 TV Guide

Displays Electronic Programme Guide.

3 [Main Menu]

Press to access Picture, Sound, Network, Timer, 
Setup and Help Menus, etc.

4  Text service button

5 Information

Displays channel and programme information.

6 APPS

Displays [APPS List] (applications list).

7 OK

Confirms selections and choices.

Press after selecting channel positions to quickly 
change channel.

8 [Option Menu]

Easy optional setting for viewing, sound, etc.

Summary of Contents for Viera TX-24CS500B

Page 1: ...for future reference Please carefully read the Safety Precautions of this manual before use The images shown in this manual are for illustrative purposes only English For more detailed instructions please refer to eHELP Built in Operating Instructions How to use eHELP p 15 Model No TX 24CS500B M0315 0 English Operating Instructions LCD Television ...

Page 2: ...rt Licence Contents Be Sure to Read Important Notice 3 Safety Precautions 4 Quick Start Guide Accessories 7 Connections 8 Identifying Controls 11 First time Auto Setup 13 Using your VIERA Operation 14 How to Use eHELP 15 Others FAQs 16 Maintenance 17 Specifications 18 ...

Page 3: ...l devices made by other manufacturers and we disclaim any liability or damage arising from operation and or performance from usage of such other maker s peripheral devices This product is licensed under the AVC patent portfolio license for the personal and non commercial use of a consumer to i encode video in compliance with the AVC Standard AVC Video and or ii decode AVC Video that was encoded by...

Page 4: ...ons To help avoid risk of electrical shock fire damage or injury please follow the warnings and cautions below Mains plug and lead Warning If you detect anything unusual immediately switch off the mains supply switch and remove the mains plug IMPORTANT THE MOULDED MAINS PLUG FOR YOUR SAFETY PLEASE READ THE FOLLOWING TEXT CAREFULLY This TV is supplied with a moulded 3 pin mains plug for your safety...

Page 5: ... or not always ensure the vents at the bottom of the TV are not blocked and there is sufficient space to enable adequate ventilation Do not expose the TV to direct sunlight and other sources of heat To prevent the spread of fire keep candles or other open flames away from this product at all times Suffocation Choking Hazard Warning The packaging of this product may cause suffocation and some of th...

Page 6: ...g as the mains plug is still connected to a live mains socket Remove the mains plug from the wall socket when the TV is not in use for a prolonged period of time Excessive volume Caution Do not expose your ears to excessive volume from the headphones Irreversible damage can be caused If you hear a drumming noise in your ears turn down the volume or temporarily stop using the headphones Battery for...

Page 7: ...et or repacking the TV 1 Remove the assembly screws from the TV 2 Pull out the pedestal from the TV Accessories Remote Control p 11 N2QAYB001009 Pedestal p 7 Mains lead p 8 Batteries 2 R6 p 12 Operating Instructions Product Registration Leaflet Accessories may not be placed all together Take care not to throw them away unintentionally For information about the optional accessories refer to eHELP S...

Page 8: ...e mains socket before attaching or disconnecting any cables Check the terminal type and cable plugs are correct for connection Use a fully wired HDMI compliant cable Use a fully wired SCART cable Keep the TV away from electronic equipment video equipment etc or equipment with an infrared sensor otherwise distortion of image sound may occur or operation of other equipment may be affected Please als...

Page 9: ...he equipment to the amplifier For information about the connections read the manuals of the equipment and amplifier SCART cable RF cable DVD Recorder VCR Terrestrial aerial DVD Recorder VCR Satellite receiver TV SCART cable RF cable HDMI cable Terrestrial aerial Satellite dish DVD Recorder VCR Satellite receiver Network A broadband network environment is required to be able to use internet service...

Page 10: ...e Insert or remove the CI module completely in the correct direction as shown Normally encrypted channels will appear Viewable channels and their features depend on the CI module If encrypted channels do not appear Common Interface in the Setup Menu There might be some CI modules in the market with older firmware versions that do not work fully interoperable with this new CI v1 3 TV In this case p...

Page 11: ...function fully This service may be stopped or changed without notice 18 HOME Displays Home Screen 19 Cursor buttons Makes selections and adjustments 20 Return Returns to the previous menu page 21 Channel Up Down 22 Sound Mute On Off 23 Last view Switches to previously viewed channel or input mode 24 Operations for contents connected equipment etc Identifying Controls Remote Control 1 Standby On Of...

Page 12: ...remote control signal receiver and remote control 2 Ambient sensor Senses brightness to adjust picture quality when Ambient Sensor in the Picture Menu is set to On 3 Power LED Red Standby Green On Orange Standby with some functions network function etc active The LED blinks when the TV receives a command from the remote control 4 Input mode selection Press repeatedly until you reach the desired mo...

Page 13: ...Shipping Condition in System Menu Setup Menu First time Auto Setup When the TV is turned on for the first time it will automatically search for available TV channels and give options to set up the TV These steps are not necessary if the setup has been completed by your local dealer Please complete connections p 8 10 and settings if necessary of the connected equipment before starting Auto Setup Fo...

Page 14: ...eration Turn power on TV or Remote Control Mains power On Off switch should be on p 12 The last viewed Home Screen is displayed Example TV Home Screen Example Selected content screen To return to Home Screen at any time The Home Screen can be set up to display desired information to access specific features easily to select the default Home Screen etc For details follow the on screen instructions ...

Page 15: ...the TV was turned on the confirmation screen is displayed to select whether to go to the First page or to the Last viewed page 2 Select the category and item Category field Item field select category access select item access select sub item access Sub item field Description To return to the previous field To scroll the description if more than 1 page While the description is highlighted To displa...

Page 16: ...s displayed This TV has a built in Self Test Makes a diagnosis of picture or sound problems TV Self Test Help Menu Turn the TV off with Mains power On Off switch then turn it on again If the problem persists initialise all settings Shipping Condition in System Menu Setup Menu Parts of the TV become hot Parts of the TV may become hot These temperature rises do not pose any problems in terms of perf...

Page 17: ...he stubborn dirt 5 Finally wipe away all the moisture Caution Do not use a hard cloth or rub the surface too hard otherwise this may cause scratches on the surface Take care not to subject the surfaces to insect repellent solvent thinner or other volatile substances This may degrade surface quality or cause peeling of the paint The surface of the display panel is specially treated and may be easil...

Page 18: ... C 35 C Humidity 20 80 RH non condensing Built in wireless LAN Standard compliance and Frequency range IEEE802 11a n 5 180 GHz 5 320 GHz 5 500 GHz 5 580 GHz 5 660 GHz 5 700 GHz Specifications TV Model No TX 24CS500B Dimensions W H D 562 mm 409 mm 180 mm With Pedestal 562 mm 344 mm 59 mm TV only Mass 5 0 kg Net With Pedestal 4 5 kg Net TV only Power source AC 220 240 V 50 60 Hz Panel LED LCD panel ...

Page 19: ... the TV IEEE802 11b g n 2 412 GHz 2 472 GHz Security WPA2 PSK TKIP AES WPA PSK TKIP AES WEP 64 bit 128 bit The frequency and channel differ depending on the country Note Design and Specifications are subject to change without notice Mass and Dimensions shown are approximate For information about the power consumption display resolution etc please refer to Product fiche For information about the op...

Page 20: ...ccordance with national legislation Note for the battery symbol bottom symbol This symbol might be used in combination with a chemical symbol In this case it complies with the requirement set by the Directive for the chemical involved Sales and Support Information Customer Communications Centre For customers within the UK 0344 844 3899 For customers within Ireland 01289 8333 www panasonic co uk Di...

Reviews: