ヵヷ
モヷ
16
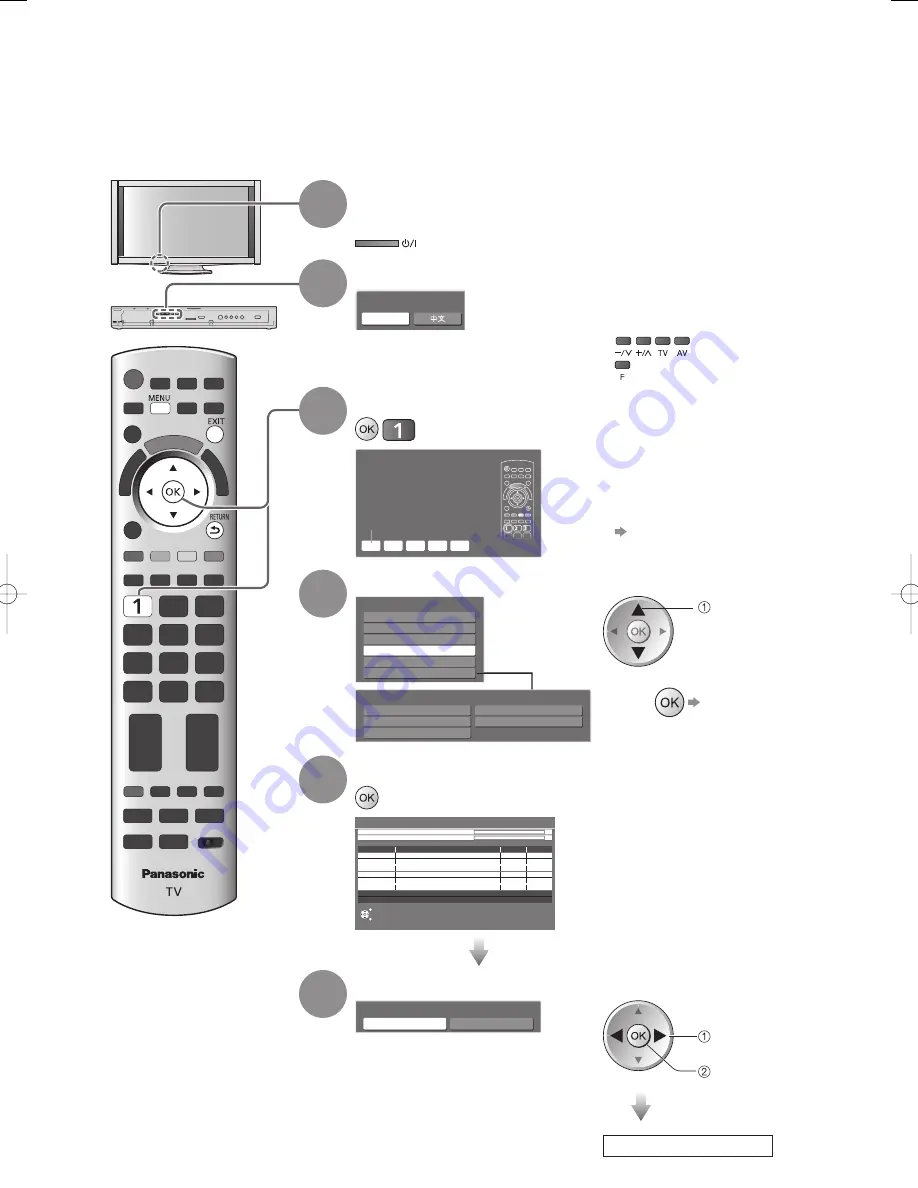
Auto Tuning
Search and store TV channels automatically.
These steps are not necessary if the setup has been completed by your local dealer.
Please complete preparations and setup of all units before starting Auto Tuning. (p. 8 - 13)
Please complete connections (p. 12 and p. 13) and settings (if necessary) of the connected equipment before
starting Auto Tuning. For details of settings for the connected equipment, read the manual of the equipment.
●
●
1
Plug the display unit and tuner box into mains
socket, and turn on the display unit
It takes a few seconds to start.
●
2
Select your language
Chinese
OSD Language
English
The remote is not available in this step.
Use the buttons on the front of the
tuner box to select.
(select)
(set)
●
3
Pair the remote control with the TV
(simultaneously)
Remote Pairing
Press both "OK" and "1" button for
about 3 seconds until this screen will
disappear
RETURN
Press “OK” and “1” simultaneously
for more than 3 seconds to make
the remote control usable.
You can pair the remote control
again after Auto Tuning.
“Pairing Remote Control”
(p. 41)
●
●
4
Select your area
Analogue TV Channel Plan
Hong Kong
CIS/E.Europe
China
Asia/W.Europe
NZ/Indonesia
CATV/Other
Japan
Analogue TV Channel Plan - CATV/Other -
Japan
American System
Indian CATV
American CATV
South Africa
select
(
)
CATV/Other :
Press
displays sub
menu
●
5
Start Auto Tuning
Auto Tuning
This will take about 10 minutes.
EXIT
RETURN
62
CH
CBBC Channel
Digital TV
10
62
BBC Radio Wales
Digital TV
10
62
E4
Digital TV
10
62
Cartoon Nwk
Digital TV
10
29
Analogue TV
-
33
Digital TV: 4
Analogue TV: 2
Searching
Analogue TV -
Analogue TV Scan
CH 1
120
Digital TV Scan
CH C1
69
Channel Name
Type
Quality
Auto Tuning will start to search for
TV channels and store them.
The sorted channel order
depends upon the TV signal,
the broadcasting system and
reception conditions.
●
6
Select the viewing environment
Please select your viewing environment.
Home
Shop
“Home” is the recommended mode for
viewing at home. Select “Home” for
optimal picture / power consumption.
“Shop” is for in-store display.
Home: “Viewing Mode” is set as
“Normal”. (p. 30)
Shop: “Viewing Mode” is set as
“Dynamic”. (p. 30)
●
select
set
Auto Tuning is complete
th̲p54z10h̲Eng̲qbc2506.indb 16
th̲p54z10h̲Eng̲qbc2506.indb 16
2009/07/13 11:04:56
2009/07/13 11:04:56
Summary of Contents for Viera TH-P54Z10H
Page 63: ...Licence Technical 63 MEMO ...


