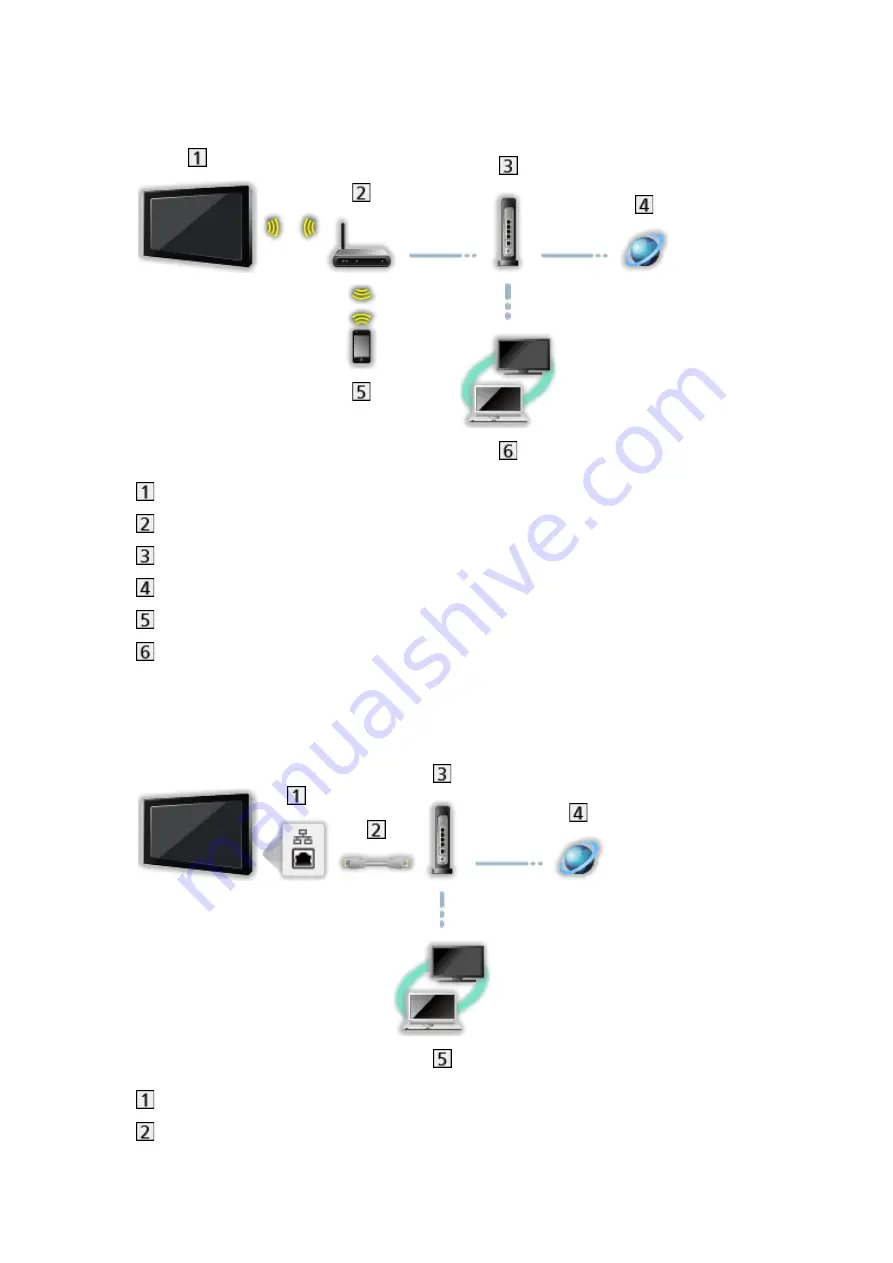
background image

- 63 -


Wireless connection (For DLNA and internet service)

  Built-in wireless LAN (Rear of the TV)
  Access point
  Hub or Router
  Internet environment
 Smartphone
  DLNA Certified media server


Wired connection (For DLNA and internet service)

  ETHERNET terminal
  LAN cable (Shielded)


Use the Shielded Twist Pair (STP) LAN cable.

Summary of Contents for Viera TH-L50E6A

Page 1: ...eHELP English TH L42E6A TH L50E6A...

Page 2: ...view 19 Adjusting time 19 External equipment External connection 20 Watching external input 22 Operating with TV s remote control 23 HDMI features 24 Valid input signals 25 For best picture Viewing Mo...

Page 3: ...cording USB HDD setup Preparations 40 Setting for USB HDD 41 Recording current programme One Touch Recording 42 REW LIVE TV 43 Timer Programming Setting timer programming 44 Editing timer programming...

Page 4: ...network DLNA Information 59 Using DLNA 61 Network connections DLNA connection 62 Note 64 Network settings Network Connection 64 Custom Wireless 66 Custom Wired 68 Custom Wireless Access Point 69 Netw...

Page 5: ...format 80 Video format 81 Music format 83 Media Player Using Media Player Information 84 Selecting device mode 85 Photo mode Selecting file 87 Viewing photo 87 Sorting photos 88 Using slideshow 88 Vi...

Page 6: ...handling caution 101 USB devices 102 Photo format 103 Video format 103 Music format 105 Functions APPS list Information 107 How to use 107 Settings 108 VIERA Link HDAVI Control Summary of VIERA Link...

Page 7: ...119 Setting characters Using numeric buttons 119 Keyboard Gamepad Keyboard 120 Gamepad 120 Settings Setting menu How to use 122 Picture Viewing Mode 123 Basic settings 124 Ambient Sensor 124 Noise re...

Page 8: ...work Link Settings 132 Other settings 132 Timer Off Timer 133 Timer Programming 133 Clock Settings 133 Auto Standby 134 No signal Power off 134 Setup Eco Navigation 134 USB Device Setup 134 Recording...

Page 9: ...ional accessories Communication Camera 145 Wall hanging bracket 146 Licence Licence 146 OK Letters enclosed in a box indicate remote control buttons Menu Letters in cyan indicate on screen display ite...

Page 10: ...s games communication tools etc as shown below example HOME OK OK HOME Home Screen Selected content screen TV application etc Home Screen Selection Your preferred Home Screen can be selected or added...

Page 11: ...atching my Home Screen Settings 2 Select a feature with and press OK to access To watch full screen TV 1 Select the TV viewer with Example 2 Press OK to watch Example Also refer to Tutorial from the t...

Page 12: ...screen to personalise Settings You can customise any Home Screen For example changing the wallpaper renaming freely editing applications setting the screen launched when the TV is turned on etc 1 Sel...

Page 13: ...s lead to avoid and minimise mains interference pickup Do not place the RF cable under the TV An aerial correct cable 75 coaxial and correct terminating plug are required to obtain optimum quality pic...

Page 14: ...x Satellite dish For VIERA Link connections Functions VIERA Link HDAVI Control Summary of VIERA Link Note External equipment and cables shown are not supplied with this TV Please also read the manual...

Page 15: ...ith 2 or more digit e g 399 press To select a channel from the channel list 1 Display the channel list with OK 2 Select a channel from the list with and press OK to watch To select a channel using inf...

Page 16: ...available message meanings Sound mute is on Rating Rating information Functions Child Lock Parental Rating Bad signal Poor quality TV signal Subtitle service available Multiple image or audio availab...

Page 17: ...avourite list Digital TV blue If the favourite list is created in Favourites Edit Watching Tuning and editing channels Favourites Edit To adjust banner timeout set Banner Display Timeout Settings Setu...

Page 18: ...al Audio Selects stereo monaural if available For Digital TV MPX Selects multiplex sound mode if available Settings Sound Advanced settings For Analogue TV Volume Correction Adjusts the volume of each...

Page 19: ...time Base on GMT 1 Display the menu with MENU 2 Select Timer Clock Settings Region Select with and press OK to access 3 Select the region with and press OK to set NSW ACT Victoria Queensland South Au...

Page 20: ...or other connections consult the instructions for each piece of equipment For basic connection Watching Basic Basic connection Check the terminal type and cable plugs are correct when connecting HDMI...

Page 21: ...ayer AV IN VIDEO terminal Composite cables Camcorder Game equipment USB devices USB port USB cable USB HDD Communication Camera Note It is recommended to connect the devices to the TV s USB ports dire...

Page 22: ...equipment and amplifier Watching external input Connect the external equipment VCRs DVD equipment etc and you can watch through the input 1 Display the input selection menu with AV 2 Select the input...

Page 23: ...Rewind view the picture rapidly in reverse VCR Skip to the previous track title or chapter DVD video content Rewind view the picture rapidly in reverse VCR Search backward DVD video content Fast forw...

Page 24: ...ilable depending on the equipment HDMI features HDMI high definition multimedia interface is the world s first complete digital consumer AV interface complying with a non compression standard HDMI all...

Page 25: ...nals Enquire HDMI adaptor cable at your local digital equipment retailer shop Note Audio settings can be made on HDMI1 2 3 Input in the Sound Menu Settings Sound Advanced settings If the connected equ...

Page 26: ...t room Normal Normal use for viewing in a normal lighting condition Cinema Improves the performance of contrast black and colour reproduction for watching movies in a darkened room True Cinema Reprodu...

Page 27: ...Standby is set to On Settings Timer Auto Standby No signal is received and no operation is performed for 10 minutes while No signal Power off is set to On Settings Timer No signal Power off Note This...

Page 28: ...ls Sidecut Zoom Displays a 16 9 letterbox anamorphic image full screen without distortion For HD High definition signals Note Display the image TV external input etc full screen to use this function c...

Page 29: ...to Off Black Expander Black Expander Gradually adjusts the shades of black Clear White Effect Clear White Effect Makes the white area clearer White Balance R Gain G Gain B Gain Adjusts the white bala...

Page 30: ...B Hue B Saturation B Luminance Adjusts the picture hue saturation luminance of blue areas Reset Colour Management Press OK to reset to the default Colour Management Gamma Gamma 2 6 2 4 2 2 2 0 1 8 Swi...

Page 31: ...o copy to with and press OK to set 4 Select Copy Start with and press OK to copy 5 When the confirmation screen is displayed select Yes with and press OK to set Note Option Settings and Screen Setting...

Page 32: ...s TV Guide Using TV Guide TV Guide Electronic Programme Guide EPG provides an on screen listing of the programmes currently broadcast and the forthcoming broadcasts over the next seven days depending...

Page 33: ...editing channels Favourites Edit To view more details of the programme Digital TV 1 Select the programme with 2 Press INFO to view Press again to return to TV Guide To exit TV Guide EXIT Note When thi...

Page 34: ...rmation is received via the signal from the broadcaster or service provider No other channels can be selected while the recording of Timer Programming is in progress When recording programmes to the U...

Page 35: ...o list from all Digital TV channels with appears when the channel is encrypted To display other Favourites green 3 Press OK to add it to Favourite List To add all channels to the list yellow 4 Press R...

Page 36: ...nnels The hidden channels cannot be displayed except in this function 1 Select Channel List with and press OK to access 2 Select a channel with 3 Press OK to set Reveal Hide skip Reveal Hide skip To r...

Page 37: ...al Tuning 1 Select Auto Tuning with and press OK to access 2 The confirmation screen is displayed and press OK to start Auto Tuning Settings are made automatically When the operation is completed the...

Page 38: ...ess OK to set If a VCR is connected only with the RF cable select channel position 0 Update Channel List By updating the Digital TV channel list you can add new channels delete removed channels or cha...

Page 39: ...s a channel and checks the signal condition A good Signal Strength is not an indication of suitable signal for Digital TV reception Use the Signal Quality indicator as follows Green bar Good Yellow ba...

Page 40: ...USB HDD will be erased in the following cases When formatting the USB HDD with this TV Recording USB HDD setup Setting for USB HDD When formatting the USB HDD to use on PC etc When the TV is repaired...

Page 41: ...recording All the USB devices recognised as a mass storage device will be listed Please note that USB HDD will be formatted and all data in it will be erased after this setup Before setting connect t...

Page 42: ...ding The USB HDD is available for playing back To change the mode OK To edit USB HDD name green To format red To remove the USB HDD safely from the TV yellow Note You can only select one USB HDD for r...

Page 43: ...Touch Recording is in progress you can play back all the contents Depending on the USB HDD playback may not be possible or the recording may not work properly during playback REW LIVE TV Records the...

Page 44: ...ed content for REW LIVE TV will be deleted REW LIVE TV will be stopped and the recorded content will be deleted automatically in the following conditions Even if REW LIVE TV stops for the following co...

Page 45: ...B HDD When the start time comes the channel will be switched automatically and the video and audio signals will be output 2 minutes before the starting time a reminder message appears if you are watch...

Page 46: ...ame time on the same day every week Starting time Ending time Duration automatic display 4 Store with OK Editing timer programming 1 Display the menu with MENU 2 Select Timer Timer Programming with an...

Page 47: ...d contents TV programmes recorded on the USB HDD with this TV can be played back in Media Player 1 Display icons of the feature with APPS 2 Select Recorded TV with and press OK to access Media Player...

Page 48: ...mmed The next event can then start The recording of Timer Programming will automatically change the channel to the programmed channel a few seconds before the starting time The recording of Timer Prog...

Page 49: ...ccessing data Otherwise this can damage the device or TV Do not touch the pins on the device Do not subject the device to a high pressure or impact Insert the device in the correct direction Otherwise...

Page 50: ...settings are completed Internet service Network connections Internet service Network settings Selecting internet content 1 Display APPS list with APPS For details of APPS list Functions APPS list Depe...

Page 51: ...are operated by their respective service providers and such service may be discontinued either temporarily or permanently without notice Therefore Panasonic will make no warranty for the contents or...

Page 52: ...n ETHERNET terminal LAN cable Shielded Use the Shielded Twist Pair STP LAN cable Internet environment Note Ensure to use a LAN straight cable Set up and connect equipment required for the network envi...

Page 53: ...MENU 2 Select Network Network Connection with and press OK to access Confirm the encryption key settings and position of your access point before starting setup For details read the manual of the acc...

Page 54: ...ervice Network settings Network Status 5 Select Exit with and press OK to set To set manually Internet service Network settings Custom Wired Custom Wireless Ensure the connections are completed before...

Page 55: ...you use 11n 5 GHz for the wireless system between the built in wireless LAN and access point select AES for the encryption type To search access points again blue To display hide information of the h...

Page 56: ...ss with or numeric buttons and press OK to set 3 Press RETURN to store Proxy Port This number is also specified by the provider with the Proxy address 1 Select Proxy Port with 2 Enter the number with...

Page 57: ...may not be available depending on the proxy settings Proxy This is the address of the relay server connected between the browser and the target server and sends data to the browser 1 Select Proxy with...

Page 58: ...Settings Sets to control the TV with any VIERA remote connected to your network Home network Network settings VIERA remote Settings Network Link Settings Sets to control the TV with devices connected...

Page 59: ...talled DIGA Recorder etc connected to your home network And then you can enjoy these contents on this TV Example For watching and operating contents on this TV Home network DLNA Using DLNA For support...

Page 60: ...can control it as one of the media servers Please read the manual of your DIGA Recorder to check if the recorder is compatible with DLNA Playback of sharing contents on this TV with the DMC Digital Me...

Page 61: ...hen the broadcast prohibits the output of video and audio Note To use this function turn this TV on This function is available only with 1 piece of other equipment This function may not be available i...

Page 62: ...t cannot be selected You can use the following buttons during playback Confirm the remote control code is 73 Watching External equipment Operating with TV s remote control Network connections DLNA con...

Page 63: ...e Built in wireless LAN Rear of the TV Access point Hub or Router Internet environment Smartphone DLNA Certified media server Wired connection For DLNA and internet service ETHERNET terminal LAN cable...

Page 64: ...cable Set up and connect equipment required for the network environment You cannot make such settings on this TV Read the manual of the equipment If you use the equipment compatible only with 100BASE...

Page 65: ...access 2 Press the WPS button on the access point until the light flashes 3 Connect the TV with the access point with OK WPS Wi Fi Protected Setup If the connection has failed check the settings and...

Page 66: ...elect your desired access point with and press OK to access Available Wireless Networks are displayed automatically Encrypted access point For WPS Push button 1 Press red 2 Press the WPS button on the...

Page 67: ...vourite name for this TV This name will be used as the name of this TV on the screen of the other network equipment Acquire IP Address Acquire DNS Address Auto is recommended Available settings are di...

Page 68: ...network setup Home network Network connections 1 Display the menu with MENU 2 Select Network Network Connection Custom Wired with and press OK to access 3 The VIERA Name IP DNS Settings screen is disp...

Page 69: ...4 Select Network Status with and press OK to access Home network Network settings Network Status 5 Select Exit with and press OK to set Custom Wireless Access Point You can use the TV as a wireless ac...

Page 70: ...But the transfer rate will vary according to communication environment or the numbers of connected equipment To confirm the current network settings Home network Network settings Network Status Ensure...

Page 71: ...of the application Device to upload contents Selects device to upload contents from the network equipment smartphone etc Note Depending on the area this function may not be available For details consu...

Page 72: ...ists the equipment accessible to this TV on the home network Note Depending on the area this function may not be available For details consult your local Panasonic dealer Software Update Accesses the...

Page 73: ...a server list To display hide information of the highlighted media server INFO 4 Select the file with and press OK to access Depending on the condition of media server you may need to select the folde...

Page 74: ...return to Single view OK To return to list RETURN Slideshow Settings Set up the settings for photo file operations on this TV 1 Display the option menu with OPTION 2 Select Slideshow Settings with an...

Page 75: ...of the media servers with and press OK to access For the operations to access another TV select the name of another TV from the displayed media server list To display hide information of the highlight...

Page 76: ...To display hide the operation guide and information banner INFO To the previous content red To the next content green To change aspect 1 Display Aspect Selection list with ASPECT 2 Select the mode wi...

Page 77: ...view Images may not be displayed for an instant in the thumbnail view Set the preview Off to solve this Audio Selection Dual Audio Dual Mono Audio Selects for selectable sound tracks if available It...

Page 78: ...output signal is fixed to PCM Music Selecting file Ensure the preparations of the media server network connections and network settings are completed Home network DLNA Information Home network Network...

Page 79: ...playback Rewind Fast forward Stop OK Pause Playback To display hide the operation guide INFO To the previous track red To the next track green To return to list RETURN Music Setup Set up the settings...

Page 80: ...lect DIGA with and press OK to access 4 The screen of the DIGA Recorder will be displayed You can control the functions of the DIGA Recorder with this TV s remote control according to the operation gu...

Page 81: ...ital Dolby Digital Plus DTS core HE AAC LPCM MPEG Audio MP3 WMA Some subtitles or chapter functions may not be available WMA Pro and WMA Lossless are not supported MKV mkv Video codec H 264 BP MP HP M...

Page 82: ...3GPP 3gp 3g2 Video codec H 264 BP MP HP MPEG4 SP ASP Audio codec AAC HE AAC PS mod mpg mpeg vob vro Video codec MPEG1 MPEG2 Audio codec Dolby Digital LPCM MPEG Audio TS mts m2ts tp trp ts tts Video co...

Page 83: ...hanged Supported Video formats are different in Media Player and media server Media Player Technical information Video format Music format Supported Music formats MP3 mp3 AAC m4a Copy protected files...

Page 84: ...During operation audio signals are output from DIGITAL AUDIO OUT and HDMI2 ARC function terminals however no video signals are output To use HDMI2 with ARC function connect an amplifier that has ARC...

Page 85: ...ing For the information of the devices Media Player Technical information For supported file formats Media Player Technical information Selecting device mode 1 Insert the USB Flash Memory to the TV Me...

Page 86: ...ate device and content for playing back each file You can use the following buttons during playback Confirm the remote control code is 73 Watching External equipment Operating with TV s remote control...

Page 87: ...view with and press OK to start playback Error display To change the size of photos in the thumbnail view 1 Display the option menu with OPTION 2 Select Change Size with and press OK to change For sup...

Page 88: ...by folder Files which are not in a folder will be collected to the folder named Sort by Date Sort by Month Displays the thumbnail grouped by the same date or month The group of the photos without a re...

Page 89: ...4 Set with and press OK to store Frame Off Multi Collage Drift calendar Drift Gallery calendar Gallery Cinema Selects the frame type of the slideshow Multi 9 photos are displayed orderly at once Colla...

Page 90: ...Depending on the photo size the photo may not be fully enlarged to fill the screen e g portrait style picture Burst Playback On Off Selects whether to display burst photos in a fast paced slideshow m...

Page 91: ...set File The selected music file will be registered Folder All the music files in the folder which contains the selected music file will be registered Note Picture quality may be degraded depending on...

Page 92: ...ue Watching video Playback To operate playback Rewind Fast forward Stop OK Pause displays the time seek bar Playback To jump to the specified time point 1 Display the time seek bar with OK 2 While the...

Page 93: ...de 1 Display the option menu with OPTION 2 Select Video Setup with OK 3 Select one of the following items with and press OK to access Video Preview Audio Selection Dual Mono Audio Subtitle Subtitle Te...

Page 94: ...DIGITAL AUDIO OUT or HDMI2 ARC function terminal To confirm or change the current sound status Media Player Video mode Video Setup 1 Display the menu with MENU 2 Select Sound SPDIF Selection with and...

Page 95: ...you play back the content this icon will disappear Protected content cannot be deleted Content under recording You can play back this content even if under recording Two or more contents are grouped...

Page 96: ...ime point with OK To display hide the operation guide and information banner INFO To repeat between the starting point A and finishing point B blue Set A and B in order The points will be reset by pre...

Page 97: ...ontents at once tick all the desired contents Change Protect Status Select the content to protect from deletion and then select Change Protect Status Perform the same way to cancel the protection To c...

Page 98: ...OUT or HDMI2 ARC function terminal To confirm or change the current sound status Media Player Video mode Video Setup 1 Display the menu with MENU 2 Select Sound SPDIF Selection with and press OK to ac...

Page 99: ...o change the device yellow To change the contents blue Playing music Playback of the selected file in the folder 1 Select the folder with and press OK to access 2 Select the file with 3 Start playback...

Page 100: ...SB Flash Memory which contains the data to be copied Destination drive The device USB Flash Memory which you copy to 1 Display APPS list with APPS 2 Select USB Sharing with and press OK to access 3 Se...

Page 101: ...to access 4 When the confirmation screen is displayed select Yes with and press OK to delete Note Some files may not be copied properly Please note there may be a risk of file corruption due to power...

Page 102: ...a USB card reader Additional information for the devices may be found on the following website English only http panasonic net viera support USB Flash Memory for playing back in Media Player USB Flash...

Page 103: ...al codes for file names Connected devices may become unusable with this TV if the file or folder names are changed Video format Supported Video formats AVI avi Video codec H 264 BP MP HP MPEG1 MPEG2 M...

Page 104: ...ack WMA Pro and WMA Lossless are not supported MP4 f4v m4v mp4 Video codec H 264 BP MP HP MPEG1 MPEG2 MPEG4 SP ASP Audio codec AAC Dolby Digital Dolby Digital Plus HE AAC MPEG Audio MP3 This TV suppor...

Page 105: ...es text files inside the same folder they are displayed in the following order of priority srt sub txt Note Some files may not be played back even if they fulfil these conditions Do not use two byte c...

Page 106: ...ome files may not be played back even if they fulfil these conditions Do not use two byte characters or other special codes for file names Connected devices may become unusable with this TV if the fil...

Page 107: ...notice How to use You can access special features such as internet contents network contents Media Player etc from APPS list 1 Display APPS list with APPS Example To exit APPS list EXIT 2 Select an i...

Page 108: ...quipment DVD Recorder HD Video Camera Player theatre Amplifier etc with HDMI cables allow you to interface them automatically These features are limited to models incorporating HDAVI Control and VIERA...

Page 109: ...read the manual of the equipment HDMI terminal HDMI cable Equipment with VIERA Link function DIGA Recorder DVD Player Blu ray Disc Player HD Video Camera LUMIX Camera Available features HDMI connecti...

Page 110: ...I terminal HDMI cable HD Video Camera LUMIX Camera with VIERA Link function HDMI terminal DIGITAL AUDIO OUT HDMI cable Optical digital audio cable Player theatre Blu ray Disc theatre with VIERA Link f...

Page 111: ...uto Standby Speaker Selection For equipment which has HDAVI Control 2 or later function For equipment which has HDAVI Control 4 or later function While playing a disc Except for watching a disc VIERA...

Page 112: ...in the Setup Menu Settings Setup VIERA Link Settings Set up the TV After connection turn the equipment on and then switch the TV on Select the HDMI input from Input Selection with AV and make sure tha...

Page 113: ...in Standby mode but the power consumption is increased to start the connected equipment fast This function is effective if the connected equipment can change the power consumption in Standby mode and...

Page 114: ...the connected equipment If multiple recorders or players are connected Each recorder player is numbered The number is given from the TV s lower number of HDMI terminal connected to the same type of e...

Page 115: ...button and MUTE TV TV speakers are active Multi channel sound If you want to enjoy the multi channel sound e g Dolby Digital 5 1ch via an Amplifier connect it with an HDMI cable and Optical digital a...

Page 116: ...2 Select Setup Child Lock with and press OK to access 3 Enter the PIN number 4 digits with the numeric buttons Enter the PIN number twice at first setting Make a note of the PIN number in case you fo...

Page 117: ...an age for the restriction of programmes with and press OK to set Meaning of rating No Block Not classified R Restricted 18 AV 15 Adult strong Violence 15 MA 15 Mature Adult 15 M Mature PG Parental Gu...

Page 118: ...n message is displayed To download OK Press EXIT when not downloading Auto update You can update new software automatically 1 Display the menu with MENU 2 Select Setup System Menu System Update Auto U...

Page 119: ...Update Search Now with and press OK to access 3 Searches for an update for several minutes and displays a corresponding message if any 4 Download with OK Note Download may take a few hours During soft...

Page 120: ...epending on the connected keyboard Some of the keys of keyboards may correspond to the operation of the remote control Keyboard Remote Control Enter OK Backspace RETURN Esc EXIT 0 9 Character Numeric...

Page 121: ...121 Volume Up Down Channel Up Down GUIDE OK RETURN HOME APPS EXIT AV MENU...

Page 122: ...r with and press OK to set You can go to the next screen with OK You can enter names or numbers freely for some items 1 Enter characters one by one with and press OK to set You can set characters usin...

Page 123: ...ccess the menu store settings after adjustments have been made or options have been set with INPUT OK HOLD for MENU button Picture Viewing Mode Selects your favourite picture mode for each input Dynam...

Page 124: ...according to your personal preference Colour Temperature Cool2 Cool1 Normal Warm1 Warm2 Sets the overall colour tone of the picture bluer redder Vivid Colour On Off Automatically adjusts colours to vi...

Page 125: ...laced signals except in Network services 1080p Pixel Direct On Off Reproduces the original image quality in detail for 1080p HDMI input signal HDMI Content Type Graphics Photos Auto Off Adjusts the pi...

Page 126: ...o On if noise occurs on the edge of the screen This function can be memorised for SD Standard definition and HD High definition signals respectively Not valid in Network services H Size H Size1 H Size...

Page 127: ...ech Improves sound quality for watching news drama etc User Adjusts the sounds manually by using the equaliser to suit your favourite sound quality In each mode Bass Treble and Surround can be adjuste...

Page 128: ...ttings Auto Gain Control On Off Automatically regulates large sound level differences between channels and inputs Volume Correction Adjusts the volume of each individual channel or input mode Speaker...

Page 129: ...red users Set to Auto to activate the narration sound track when available on the broadcast The availability of audio description sound track is indicated by AD in the information banner For Digital T...

Page 130: ...lia Malaysia etc Regular broadcast Standard Audio No Indicator BILINGUAL or DUAL MONO MAIN I SUB II STEREO Note If the stereo signal is poor or the receiving conditions are not optimum or if STEREO MO...

Page 131: ...io transfer file format Auto Dolby Digital Plus Dolby Digital and HE AAC multi channel are output as Dolby Digital Bitstream MPEG is output as PCM DTS is output as DTS for video contents of Media Play...

Page 132: ...ERA remote Settings Sets to control the TV from network equipment smartphone etc Home network Network settings VIERA remote Settings Network Link Settings Sets to control the TV with devices connected...

Page 133: ...s TV Set to Auto to adjust the time automatically using the time information from the digital broadcast Set to Manual to adjust manually Date Sets the current date manually Time Sets the current time...

Page 134: ...operation is performed for 10 minutes On Off The notification message will appear 3 minutes before going into Standby mode Setup Eco Navigation Automatically sets the TV to the most suitable energy sa...

Page 135: ...nual Tuning Update Channel List Updates the channel list while keeping your settings Watching Tuning and editing channels Update Channel List For Digital TV New Channel Message On Off Selects whether...

Page 136: ...r banner Watching External equipment Watching external input To name each input mode freely select User input and set characters maximum 10 characters To skip the input mode select Skip Banner Display...

Page 137: ...dby On Off Makes non watched or non used connected equipment go into Standby mode to reduce the power consumption Functions VIERA Link HDAVI Control Intelligent Auto Standby This function is available...

Page 138: ...cal equipment car motorcycle fluorescent lamp Blurry or distorted image no sound or low volume Reset channels Watching Tuning and editing channels Auto Tuning White spots or shadow images noise Check...

Page 139: ...es such as DTV recorder PVR VCR etc that also require an antenna connection to the digital television To maintain optimum antenna signal quality use an F type TV signal splitter when connecting two or...

Page 140: ...o the selected channel to generate a viewable picture If the problem persists consult your local TV aerial installer Interference from household appliances known as impulse noise such as light switche...

Page 141: ...mute on or off Is the volume set to the minimum Sound level is low or sound is distorted Sound signal reception may be poor Set MPX in the Sound Menu to Mono Analogue TV Settings Sound Advanced settin...

Page 142: ...Internet service Network connections Home network Network connections Check the connections and settings Internet service Network settings Home network Network connections Home network Network setting...

Page 143: ...till persists please contact your local Panasonic dealer for assistance VIERA Link function does not work and an error message appears Check the connections Functions VIERA Link HDAVI Control Summary...

Page 144: ...or fingerprints For stubborn dirt First clean the dust on the surface Dampen a soft cloth with clean water or diluted neutral detergent 1 part detergent to 100 parts water Wring the cloth and wipe the...

Page 145: ...with and press OK to access TV Self Test Makes a diagnosis of picture or sound problems Follow the on screen instructions System Information Displays the system information of this TV Device Informat...

Page 146: ...bracket is not electrically grounded to metal wall studs Always ensure that there are no electrical cables pipes etc in the wall before you begin the wall bracket installation To prevent fall and inju...

Page 147: ...gy to protect their intellectual property including copyrighted content This device uses PlayReady technology to access PlayReady protected content and or WMDRM protected content If the device fails t...

Page 148: ...o any third party who contacts us at the contact information provided below for a charge no more than our cost of physically performing source code distribution a complete machine readable copy of the...

Page 149: ...Ver 2 00...

Reviews: