background image

VIERA

 Link Functions

44

 VIERA Link “HDAVI Control™”

Enjoy additional HDMI interoperability with Panasonic products which have “HDAVI Control” function.
This TV supports “HDAVI Control 5” function.
Connections to equipment with HDMI cable such as a DIGA Recorder, HD Video Camera, Player theatre, Amplifier, 
etc., allow you to interface to them automatically.
These features are limited to models incorporating “HDAVI Control” and “VIERA Link”.


Some functions are not available depending on the equipment’s version of HDAVI Control. Please confirm the 
connected equipment’s version of HDAVI Control.


VIERA Link “HDAVI Control”, based on the control functions provided by HDMI which is an industry standard known 
as HDMI CEC (Consumer Electronics Control), is a unique function that we have developed and added. As such, its 
operation with other manufacturers’ equipment that supports HDMI CEC cannot be guaranteed.


Please refer to individual manuals for the external equipment. About applicable Panasonic equipment, consult your 
local Panasonic dealer.

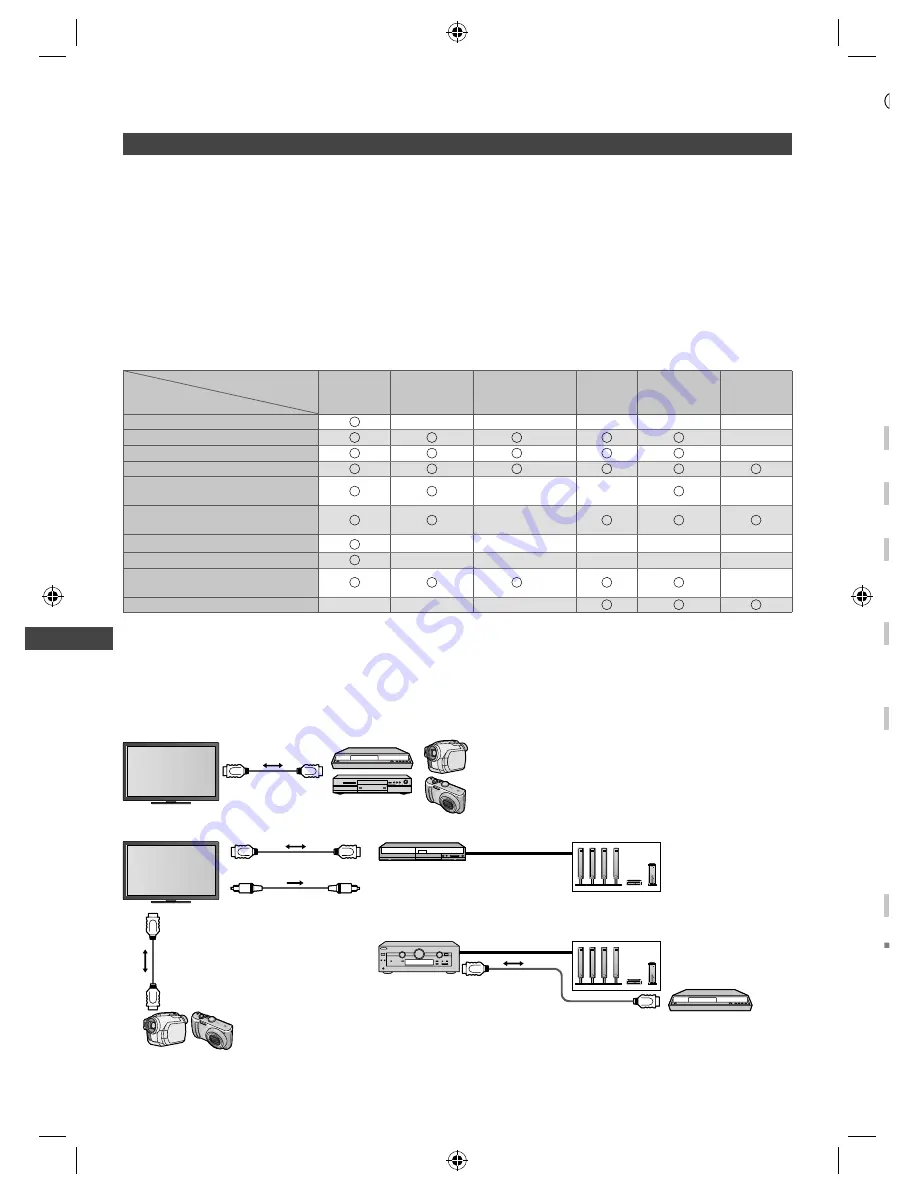
 Summary of features

Connected equipment with 

VIERA Link function

Features

DIGA 

Recorder

1

DVD Player / 

Blu-ray Disc 

Player

1

HD Video Camera / 

LUMIX Camera

1

Player 

theatre

2

Blu-ray Disc 

theatre

2

Amplifier

2

Channel download

4

Easy playback

7

7

Power on link

Power off link
Reduce unnecessary power 
consumption in standby

5

5

5

Auto standby for unnecessary 
equipment

3

3

3

8

3

8

3

Pause Live TV programme

6

Direct TV Recording

4

Control the menu of the connected 
equipment by VIERA remote control

3

3

3

3

3

Speaker control

1: HDMI Connection only

2: HDMI and Audio out connections

3:  available with equipment which has “HDAVI Control 2 or later” 

function

4:  available with equipment which has “HDAVI Control 3 or later” 

function

5:  available with the equipment which has 

“HDAVI Control 4 or later” function

6:  available with DIGA Recorder which has 

HDD

7: while playing a disc

8: except for watching a disc

 Connection


To use DIGA Recorder / DVD Player / Blu-ray Disc Player / HD Video Camera / LUMIX Camera:


HDMI cable

DIGA Recorder / 
DVD Player / Blu-ray Disc Player / 
HD Video Camera / LUMIX Camera 
with VIERA Link function

HDMI cable

HDMI cable

Optical digital 

audio cable

9

HDMI 
cable

Player theatre / 
Blu-ray Disc theatre with 
VIERA Link function

Amplifier with 
VIERA Link function

DIGA Recorder with 
VIERA Link function

HD Video Camera / LUMIX Camera 
with VIERA Link function

Speaker system

Speaker system


To use Player theatre / Blu-ray Disc theatre:


To use Amplifier:

9:  If the connected equipment has “HDAVI Control 5” function, you do not have to use this audio cable (Optical digital 

audio cable). In this case, connect the equipment to the TV’s HDMI2 terminal via an HDMI cable.

 VIERA Link Functions

 P


F

C

A

S

W
T

S

W

S

T
w
W
c
W
to

S

W
th
c


TH-L32_39EM5Z.indb   44

TH-L32_39EM5Z.indb   44

7/3/2012   6:47:56 PM

7/3/2012   6:47:56 PM

Summary of Contents for Viera TH-L39EM5Z

Page 1: ...hasing this Panasonic product Please read these instructions before operating your set and retain them for future reference The images shown in this manual are for illustrative purposes only CFB TQB4G...

Page 2: ...Logo and High Definition Multimedia Interface are trademarks or registered trademarks of HDMI Licensing LLC in the United States and other countries Windows is a registered trademark of Microsoft Cor...

Page 3: ...put Labels 35 Shipping Condition Reset settings 36 Updating the TV Software 37 Using Media Player 38 VIERA Link Functions 44 External Equipment 49 Others Technical Information 52 FAQs 56 Maintenance 5...

Page 4: ...to direct sunlight and other sources of heat Avoid exposing the TV to direct sunlight and other sources of heat To prevent the spread of fire keep candles or other open flames away from this product a...

Page 5: ...its controls When cleaning the TV remove the mains plug Cleaning an energised TV may cause electric shock Remove the mains plug from the wall socket when the TV is not in use for a prolonged period o...

Page 6: ...t to fall resulting in injury and product damage Any such damage will void your warranty TY WK3L2RW for 32 class only The angle of wall hanging bracket can be adjusted in zero tilting vertical and 5 o...

Page 7: ...two or more people are not present the TV may be dropped and personal injury may result When removing the pedestal from the TV do not remove the pedestal by the methods other than the specified proced...

Page 8: ...Caution Incorrect installation may cause battery leakage and corrosion resulting in damage to the remote control Do not mix old and new batteries Replace only with same or equivalent type Do not mix d...

Page 9: ...ge programme 9 Option Menu p 17 Easy optional setting for viewing sound etc 10 Teletext p 20 Switches to teletext mode 11 Subtitles p 15 Displays subtitles 12 Numeric buttons Changes channel and telet...

Page 10: ...ive in the Setup Menu p 15 No operation is performed for the period selected in Auto Standby p 29 1 Function select Volume Contrast Brightness Colour Sharpness Tint NTSC signal Bass Treble Balance Dig...

Page 11: ...socket before attaching or disconnecting any leads Terminals PC AUDIO via AV1 USB VIDEO AUDIO R L AV 2 IN SD CARD 4 5 3 1 2 8 7 6 1 PC p 51 5 USB port p 38 51 2 AV1 IN p 50 51 6 HDMI 1 2 p 13 50 3 AV2...

Page 12: ...in optimum quality picture and sound an aerial the correct cable 75 coaxial and the correct terminating plug are required If a communal aerial system is used you may require the correct connection cab...

Page 13: ...pment being connected Keep the TV away from electronic equipment video equipment etc or equipment with an infrared sensor Otherwise distortion of image sound may occur or operation of other equipment...

Page 14: ...he TV into mains socket and switch On You can now use the remote control to turn On the TV or switch the TV to Standby mode Power LED On 2 Start Auto Tuning D A TV Signal Selection Digital TV Analogue...

Page 15: ...t time If one or two digit channel number e g 39 def wxyz quickly changes the channel To select from the Channel List All Digital Channels Cartoon Nwk BBC Radio Wales BBC Radio Cymru BBC ONE Wales BBC...

Page 16: ...signal Poor TV signal quality Digital TV mode Teletext service available Encrypted Scrambled programme Digital TV mode II Audio mode p 52 Analogue TV mode AD Audio Description service available This...

Page 17: ...tal TV mode Allows you to select the language in which subtitles should appear if available MPX Analogue TV mode Selects multiplex sound if available Sound Menu p 27 Volume Correction Adjusts the volu...

Page 18: ...the left and right edges 4 3 4 3 Full Zoom1 Displays the image at the standard 4 3 without distortion Displays a 4 3 image enlarged horizontally to fit the screen HD signal only Displays a 16 9 lette...

Page 19: ...t channel s programme listing Current day date Programme currently viewed Parental rating captioning information Description Example Freeview Guide Listing To the previous day Y To the next day B To s...

Page 20: ...jk l ghi mno tuv pqrs wxyz R G Y B CH 1 Switch to Teletext 01 02 03 04 05 06 07 TELETEXT INFORMATION 17 51 28 Feb Time date Sub page number Colour bar Current page number Displays the index page cont...

Page 21: ...d View sub page View sub page Only when teletext is more than one page Appears at top of the screen To view specific sub page MENU B Enter the 4 digit number example P6 mno Sub pages The number of sub...

Page 22: ...remote control or the TV p 10 Press the button repeatedly until the desired input is selected You can label or skip each input mode Input Labels p 35 Skipped inputs will not be displayed when the AV b...

Page 23: ...d a selection screen will be displayed Please select the correct description and access Photo Photo mode p 40 Music Music mode p 43 When two or more available devices are connected a selection screen...

Page 24: ...Colour Balance Normal Adjust using the slide bar Moved Sharpness 56 Go to the next screen Displays the next screen Child Lock Access Enter characters by free input menu You can enter names or numbers...

Page 25: ...ure hue can be adjusted to suit your taste For NTSC signal Component or HDMI input Colour Balance Cool Normal Warm Allows you to set the overall colour tone of the picture Not valid when Viewing Mode...

Page 26: ...Mode Music Speech User Selects basic sound mode The selected mode affects all input signals Music Improves sound quality for watching music videos etc Speech Improves sound quality for watching news...

Page 27: ...ries Apart from stereo 2ch audio these signals can be multi channel audio HE AAC is a perceptual coding method used to compress digital audio for efficient storage and transmission MPEG1 Layer 2 is an...

Page 28: ...5 30 45 60 75 90 minutes Sets the time until the TV automatically goes to Standby mode Eco Navigation Automatically sets the TV to the most suitable energy saving mode If you press the OK button the f...

Page 29: ...f the connected equipment to reduce the power consumption p 45 This function is available when VIERA Link is set to On and Power off Link is set to On Intelligent Auto Standby Off On With reminder On...

Page 30: ...ction Analogue TV Tuning Menu Channel List Auto Tuning Manual Tuning Access Access Access access select For details p 32 33 Digital TV Tuning Menu Favourites Edit List favourite channels Create your f...

Page 31: ...channels Y To retune each channel Manual Tuning R p 32 To swap the channel position You can also edit each channel in the Channel List 1 Select a channel to edit or CH Channel position 1 BBC ONE WALE...

Page 32: ...st Child Lock etc Depending on the signal condition the update may not work properly Signal Condition Check Digital TV signal Selects a channel and checks the Digital TV signal condition These bars sh...

Page 33: ...RF Ch Channel Name This will take about 3 minutes Analogue TV 0 Scan CH1 120 Automatically retune all Analogue TV channels received in the area All the previous tuning settings are erased When the ope...

Page 34: ...gital TV Digital TV Digital TV Digital TV Digital TV Digital TV Digital TV Digital TV Digital TV Digital TV External AV External AV Type 1 2 7 101 E4 14 Appears when the channel input is locked lock s...

Page 35: ...Settings Input Labels AV1 AV2 PC HDMI1 HDMI2 Digital TV Analogue TV DVD AV2 PC HDMI1 HDMI2 Digital TV Analogue TV set select The labels you set will be displayed in Input Selection menu p 22 or banner...

Page 36: ...access select Shipping Condition Restore Settings 1 Check the message and reset 2 Follow the on screen instructions Shipping Condition All tuning data will be erased Are you sure Are you sure Confirm...

Page 37: ...ate is performed the software will be updated it may change TV functions If you do not wish to do so set Auto Update Search in Standby to Off To search for new software version 1 Select System Update...

Page 38: ...cord of the date is shown The picture may not appear correctly on this TV depending on the recording equipment used Display may take some time when there are many files and folders Partly degraded fil...

Page 39: ...ode directly by using VIERA TOOLS How to Use VIERA TOOLS p 23 5 Enjoy Media Player Example Thumbnail All photos OPTION SD Card EXIT Select RETURN Media Player Photo All photos Slideshow View Select Dr...

Page 40: ...by Month access select Folder view Displays the thumbnail grouped by folder The files which are not into a folder will be collected to the folder named Sort by Date Displays the thumbnail grouped by t...

Page 41: ...or the first view 2 Start Slideshow R select To display hide the operation guide To pause return to Single view To return to thumbnail INFO RETURN Photo Setup Setup the settings for Photo mode 1 Displ...

Page 42: ...n is not available when Frame is set to Collage Drift Gallery or Cinema This function is not available when Transition Effect is set to Motion Depending on the photo size the photo may not be enlarged...

Page 43: ...rive Select Media Player Music Folder view My Music_1 Play My Song_1 My Song_8 My Song_2 My Song_9 My Song_3 My Song_10 My Song_4 My Song_11 My Song_5 My Song_6 My Song_7 select R To display the infor...

Page 44: ...y power consumption in standby 5 5 5 Auto standby for unnecessary equipment 3 3 3 8 3 8 3 Pause Live TV programme 4 6 Direct TV Recording 4 Control the menu of the connected equipment by VIERA remote...

Page 45: ...et Power off Link On in the Setup Menu to use this function Power off Link p 29 When the TV is set to Standby mode the connected equipment is also automatically set to Standby This function will work...

Page 46: ...ayback stop Operations may be different depending on the recorder In this case follow the operation guide or read the manual of the recorder To return to Live TV stop playback of Pause Live TV cancel...

Page 47: ...r theatre Other means Tuner set top box The menu of the accessed equipment Input mode will be changed automatically 4 Operate the connected equipment To display the operation guide OPTION Store set ac...

Page 48: ...ulti channel sound e g Dolby Digital 5 1ch via an Amplifier connect with HDMI cable and Optical digital audio cable p 44 and then select Home Cinema If your Amplifier has HDAVI Control 5 function you...

Page 49: ...layer To watch camcorder images Video camera To play games Game equipment To use amplifier with speaker system 2 VIERA Link Recommended Connection 1 Only for DVD Recorder 2 Use HDMI2 for connecting an...

Page 50: ...lifier with speaker system or 2 If the connected equipment has HDAVI Control 5 function you do not have to use this audio cable Optical digital audio cable In this case connect the equipment to the TV...

Page 51: ...Rear of the TV PC AUDIO via AV1 USB devices Camcorder Game equipment Viewing Listening Camcorder Game equipment PC Listening Viewing Computer Conversion adaptor if necessary TH L32_39EM5Z indb 51 TH L...

Page 52: ...broadcast Standard Audio BILINGUAL or DUAL MONO MAIN I SUB II STEREO Mode Indicator No Indicator If the stereo signal is poor or the receiving conditions are not optimum or if STEREO MONO automatic s...

Page 53: ...Note Audio settings can be made on the HDMI1 2 Input in the Sound Menu p 27 If the connected equipment has an aspect adjustment function set the aspect ratio to 16 9 These HDMI connectors are type A T...

Page 54: ...Hz 48 36 60 00 1 024 768 70 Hz 56 48 70 07 1 024 768 75 Hz 60 02 75 03 1 024 768 85 Hz 68 68 85 00 1 280 1 024 60 Hz 63 98 60 02 1 280 768 60 Hz 47 70 60 00 1 366 768 60 Hz 48 39 60 04 Macintosh13 64...

Page 55: ...y deterioration or damage of recorded data 24 mm 32 mm 2 1 mm USB Flash Memory Format FAT16 FAT32 or exFAT On screen messages Message Meaning Action Cannot read file The file is broken or unreadable T...

Page 56: ...truction of these panels there are a number of allowable pixel subpixel failures that still allow the panel to be defined as a good panel It is not possible to guarantee absolutely no pixel loss Probl...

Page 57: ...a noisy ignition system Older style antenna cabling loose fitting corroded wall socket connections terminals etc Picture regularly pixelates on some channels or No Signal message Check Signal Conditio...

Page 58: ...eck foreign objects are not inside the USB port An error message appears Follow the message s instructions If the problem persists contact your local Panasonic dealer or the authorised service centre...

Page 59: ...L Video recorders VCR M NTSC Playback from M NTSC Video recorders VCR NTSC Playback from NTSC Video recorders VCR Aerial Rear Standard Belling Lee connector Operating Conditions Temperature 0 C 35 C H...

Page 60: ...s Model Number Serial Number Information on Disposal in other Countries outside the European Union This symbol is only valid in the European Union If you wish to discard this product please contact yo...

Reviews: