background image

34

VIERA Link “

 Control

TM

Features available 

(Using VIERA Link Menu)

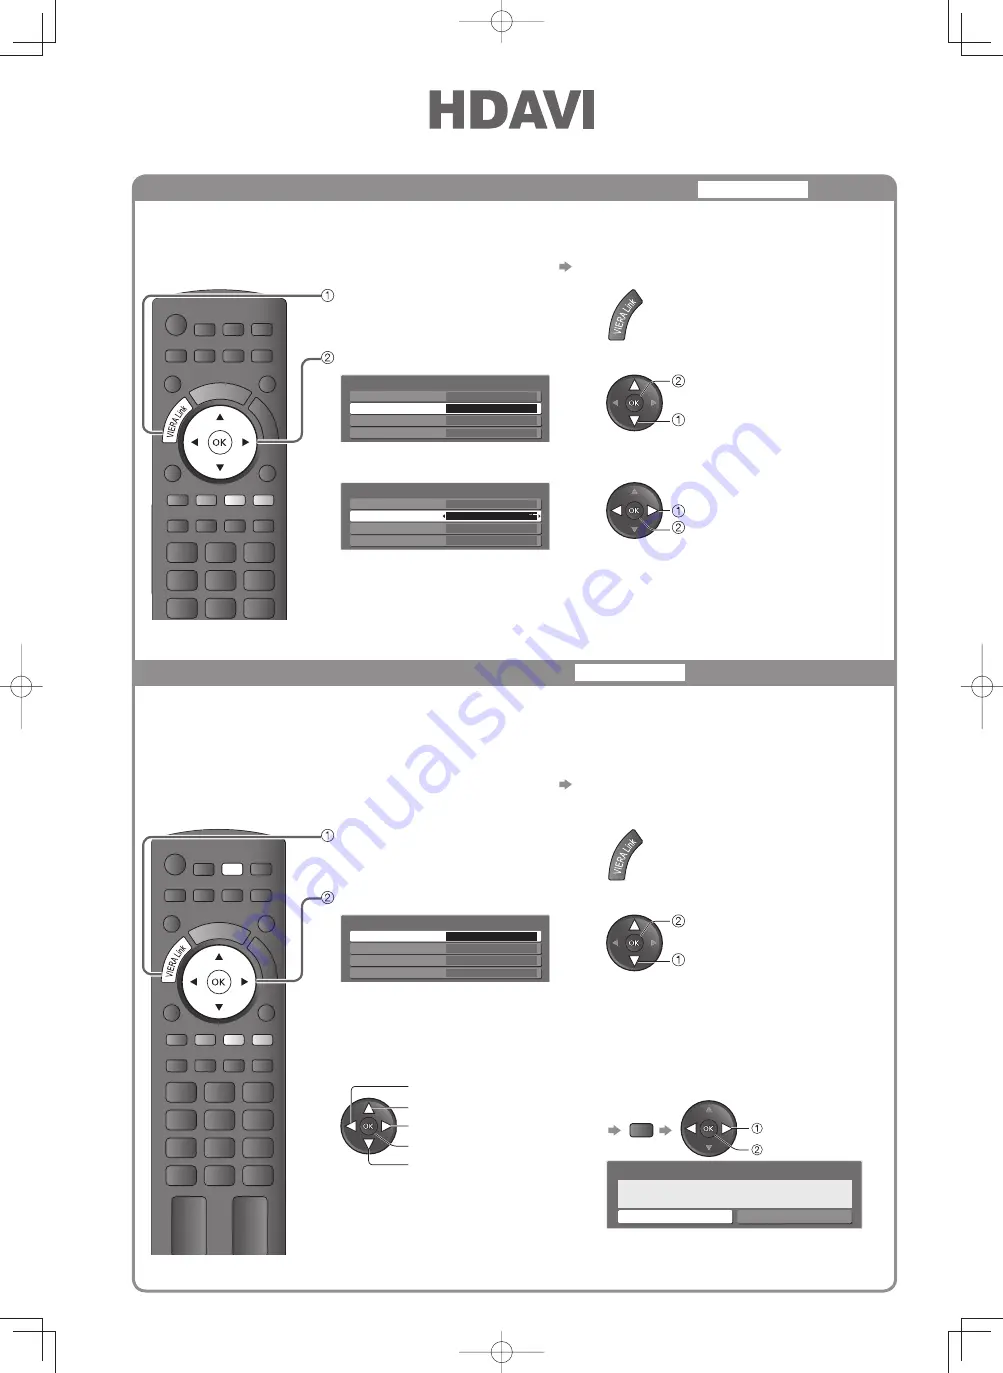
Direct TV Recording - What you see is What you record 

Direct TV Rec

Recording the current programme in DIGA Recorder immediately.

If you connect several recorders including other manufacturers’ recorders at the same time, please connect 

DIGA Recorder to the TV’s lower HDMI terminal number.

If you cannot operate, check the settings and the equipment    “VIERA Link features and connections” (p. 32)


REC

EXIT

INDEX HOLD

TEXT

TV

AV

OPTION

R

G

Y

B

POWER

INPUT

PC

MENU SURROUND OFF TIMER

ASPECT

RETURN

F.P.

 Display “VIERA Link Menu”

 Select “Direct TV Rec” and start recording

Direct TV Rec

Speaker Selection

VIERA Link Menu

Home Cinema

Start

VIERA Link Control
Speaker Selection

Home Cinema

Recorder

Pause Live TV

Start

 select

 start

To stop recording

Select “Stop” in “Direct TV Rec” and access

Direct TV Rec

Speaker Selection

VIERA Link Menu

Home Cinema

Stop

VIERA Link Control
Speaker Selection

Home Cinema

Recorder

Pause Live TV

Start

 stop

 select

Pause Live TV programme 

Pause Live TV

You can pause the live TV programme and resume later.

Live TV programme will be recorded on HDD of the connected DIGA Recorder.

This function is available with DIGA Recorder which has HDD.

If you connect several recorders including other manufacturers’ recorders at the same time, please connect 

DIGA Recorder which has HDD to the TV’s lower HDMI terminal number.

If you cannot operate, check the settings and the equipment   “VIERA Link features and connections” (p. 32)

Access and pause the live TV programme


INDEX HOLD

TEXT

AV

MUTE

R

G

Y

B

POWER

INPUT

PC

MENU SURROUND OFF TIMER

EXIT

ASPECT

RETURN

F.P.

RECALL

OPTION

TV

 Display “VIERA Link Menu”

 Select “Pause Live TV” and pause

Direct TV Rec
Speaker Selection

VIERA Link Menu

Home Cinema

Start

VIERA Link Control
Speaker Selection

Home Cinema

Recorder

Pause Live TV

Start

 select

 pause

TV picture will be paused.

Live TV programme is recorded on HDD from where it was paused.

Follow the operation guide to operate Pause Live TV function.

To operate Pause Live TV

To return to Live TV

(stop playback of Pause Live TV / cancel pause)

search backward
pause
search forward
playback
stop

Select “Yes”

TV

 select
 stop

Pause Live TV

Stop Pause Live TV?

Yes

No

If you stop playback or cancel pause, 

the recorded programme will be deleted 

from HDD.

th̲l37g10k̲m̲r̲x̲Eng̲4gc0234-1.i34   34

th̲l37g10k̲m̲r̲x̲Eng̲4gc0234-1.i34   34

2009/09/03   10:25:03

2009/09/03   10:25:03

Summary of Contents for Viera TH-L37G10K

Page 1: ... read these instructions before operating your set and retain them for future reference The images shown in this manual are for illustrative purposes only TQB4GC0234 1 English th l37g10k m r x Eng 4gc0234 1 i1 1 th l37g10k m r x Eng 4gc0234 1 i1 1 2009 09 03 10 24 37 2009 09 03 10 24 37 UG ...

Page 2: ...an amazing level of multi Sharp pictures with HDMI terminal Create home theatre and DVD recorder link ups with VIERA Link without complicated settings th l37g10k m r x Eng 4gc0234 1 i2 2 th l37g10k m r x Eng 4gc0234 1 i2 2 2009 09 03 10 24 38 2009 09 03 10 24 38 ...

Page 3: ...12 Viewing Teletext 14 Watching Videos and DVDs 16 Advanced Features How to Use Menu Functions 18 picture sound quality etc Input Labels 22 Control Channel Audience 23 Editing Channels 24 Tuning Channels 25 Restore Settings 27 Displaying PC Screen on TV 28 Viewing from SD Card VIERA IMAGE VIEWER 29 VIERA Link HDAVI ControlTM 32 VIERA Tools 37 External Equipment 38 Technical Features Technical Info...

Page 4: ...hock Have the TV checked adjusted or repaired at your local Panasonic dealer Keep liquids away from the TV To prevent damage which may result in fire or shock hazard do not expose this appliance to dripping or splashing Do not place containers with water flower vase cups cosmetics etc above the TV including on shelves above etc Do not expose to direct sunlight and other sources of heat Avoid expos...

Page 5: ...l rotation range Maintenance First remove the mains plug from the socket outlet Display panel Regular care Gently wipe the surface clean of dirt by using a soft cloth Major contamination Wipe the surface clean using a soft cloth dampened with clean water or diluted neutral detergent 1 part detergent to 100 parts water Then using a soft dry cloth evenly wipe the surface clean until it is dry Cautio...

Page 6: ... breakup batteries Batteries must not be exposed to excessive heat such as sunshine fire or the like Wall hanging bracket TY WK3L2RW Please contact your nearest Panasonic dealer to purchase the recommended wall hanging bracket For additional details please refer to the wall hanging bracket installation manual View from the side Rear of the TV Holes for wall hanging bracket installation Depth of sc...

Page 7: ...pedestal installation Warning Do not disassemble or modify the pedestal Otherwise the TV may fall over and become damaged and personal injury may result Caution Do not use any other TV and displays Otherwise the TV may fall over and become damaged and personal injury may result Do not use the pedestal if it becomes warped or physically damaged If you use the pedestal while it is physically damaged...

Page 8: ...pment and SD card OK Confirms selections and choices Press after selecting channel positions to quickly change programme Option Menu p 13 Easy setting for viewing and sound options Coloured buttons Used for the selection navigation and operation of various functions Teletext p 14 Switches to teletext mode Viewing a favourite teletext channel p 15 Numeric buttons Changes channel and teletext pages ...

Page 9: ...l and the correct terminating plug are required If a communal Aerial system is used you may require the correct connection cable and plug between the wall Aerial socket and the TV Your local Television Service Centre or dealer may be able to assist you in obtaining the correct Aerial system for your particular area and the accessories required Any matters regarding Aerial installation upgrading of...

Page 10: ...ited Arab Emirates Saudi Arabia Iran etc CIS E Europe CIS Countries Viet Nam etc 4 Start Auto Tuning Auto Tuning 2 Scan 1 120 CH4 EXIT RETURN Auto Tuning will start to search for TV channels and store them The sorted channel order depends upon the TV signal the broadcasting system and reception conditions 5 Select the viewing environment Please select your viewing environment Home Shop Home is the...

Page 11: ...u Move the cursor select the menu Move the cursor adjust levels select from a range of options Access the menu store settings after adjustments have been made or options have been set RETURN Return to the previous menu EXIT Exit the menu system and return to the normal viewing screen PROGRAMME INDEX HOLD TEXT TV AV REC MUTE R G Y B POWER POWER INPUT PC SURROUND OFF TIMER ASPECT OPTION RECALL F P E...

Page 12: ... Also appears when changing channels Sound mute On I II Audio mode p 41 1 90 Off Timer remaining time For settings See below TV 10 CH08 5 5MHz PAL 16 9 Input mode Channel position Channel number Sound system Colour system Aspect ratio Channel name PROGRAMME INDEX TEXT TV AV MUTE R G Y B INPUT PC SURROUND RETURN F P POWER HOLD OPTION MENU OFF TIMER EXIT ASPECT RECALL 12 Other useful functions 1 Tur...

Page 13: ...oom2 Zoom3 Displays a 16 9 letterbox anamorphic image full screen without distortion Displays a 2 35 1 letterbox anamorphic image full screen without distortion At 16 9 displays the image at its maximum with slight enlargement Note Only 16 9 and 4 3 are available in PC mode Only 16 9 is available when Viewing Mode is set to Game Not available in teletext mode Aspect mode can be memorized separatel...

Page 14: ...ge status information at the bottom of the screen Available page up down R G To select among subject blocks B To select next subject within the subject block After the last subject it moves to the next subject block Y What is List mode In List mode four differently coloured page numbers are situated at the bottom of the screen Each of these numbers can be altered and stored in the TV s memory Stor...

Page 15: ...hange Enter new page number press and hold View sub page Only when teletext is more than one page Appears at top of the screen To view specific sub page MENU B example P6 Enter the 4 digit number Sub pages The number of sub pages varies depending on the broadcasters It may take some time for searching during which time you can watch TV View the TV picture while searching for a teletext page Telete...

Page 16: ...sired input is selected You can label or skip each input mode Input Labels p 22 3 View Displays the selected mode Note If the external equipment has an aspect adjustment function set to 16 9 For details see the manual of the equipment or ask your local dealer 16 Watching Videos and DVDs Connect the external equipment VCRs DVD equipment etc and you can watch the input To connect the equipment p 9 Y...

Page 17: ... directly operated with the remote control How to change the code for each equipment Each type of Panasonic equipment has its own remote control code Please change the code for each equipment you want to operate Press and hold POWER during the following operations Enter the appropriate code See table below Press Type of equipment Code DVD Recorder DVD Player 70 default Player theatre Blu ray Disc ...

Page 18: ...2 a b c 2 A B C 7 p q r s 7 P Q R S 3 d e f 3 D E F 8 t u v 8 T U V 4 g h i 4 G H I 9 w x y z 9 W X Y Z 5 j k l 5 J K L 0 Space 0 PROGRAMME INDEX HOLD TEXT TV AV REC OPTION MUTE G Y POWER POWER INPUT PC SURROUND OFF TIMER ASPECT F P RECALL MENU EXIT RETURN R B 18 How to Use Menu Functions 1 Display the menu MENU Displays the functions that can be set varies according to the input signal 2 Select t...

Page 19: ... On Playing Time Display Access Input Labels English Teletext Character Set TOP Teletext Banner Display Timeout 3 seconds p 21 Access VIERA Link Settings Power on Link Off VIERA Link Power off Link On On Access Standby Power Save Off Access Intelligent Auto Standby Off p 33 Tuning Menu Channel List Edit Access Auto Tuning Access Manual Tuning Access p 25 System Menu Access Software Licence Access ...

Page 20: ...l reception only Not valid on S Video Component PC HDMI and SD Card Advanced Settings Set for colour balance view and position p 28 Set for colour balance in Normal or Cinema viewing mode Reset to Defaults Press the OK button to reset the present Picture Menu to the default settings Sound Mode Basic sound mode Music Speech Set for each input signal Bass Increases or decreases level to enhance or m...

Page 21: ...o reminder p 33 System Menu Shipping Condition Resets all settings for example when moving house p 27 Software Licence Displays the software licence information System Information Displays the system information of this TV Other Settings AV Colour System Selects optimum colour system based on video signals in AV mode Auto PAL SECAM M NTSC NTSC Colour Matrix Available only with 480p or 576p input o...

Page 22: ...C HDMI1 HDMI1 HDMI2 HDMI2 HDMI3 HDMI3 HDMI3 HDMI3 HDMI4 HDMI4 select set The labels you set will be displayed in Input Selection menu p 16 or banner If Skip is selected you cannot select the mode For easier identification and selection of the input mode you can label each input terminals or skip terminal that is not connected to any equipment To select the input mode p 16 To return to TV EXIT User...

Page 23: ... PIN number 4 digits Child Lock PIN Entry Please enter new PIN PIN Enter the PIN number twice at first setting Make a note of the PIN number in case you forget it Select Child Lock List Child Lock Child Lock List Change PIN Access select access Select the channel input to be locked Child Lock List TV and AV Name AV1 AV2 Lock TV TV TV TV TV TV AV AV Type TV TV TV TV TV TV Input BBC 1 THREE 7 E4 14 ...

Page 24: ... cannot be displayed except in this function Use this function to skip unwanted channels Select a channel and add delete BBC1 Channel List Editor 1 2 3 4 5 6 7 add delete select add delete skip To retune each channel Manual Tuning p 26 R You can edit channels If a VCR is connected only with the RF cable edit VCR Select a channel to edit BBC1 Channel List Editor 1 2 3 4 5 6 7 select or Page up Page...

Page 25: ...ct 3 Select Tuning Menu Setup Menu VIERA Link Settings Display Settings System Menu Child Lock Off Timer Other Settings Tuning Menu OSD Language Off Access access select 4 Select a function Channel List Edit Auto Tuning Tuning Menu Manual Tuning Access Access access select 5 Set You can retune all the TV channels when moving house To return to TV EXIT th l37g10k m r x Eng 4gc0234 1 i25 25 th l37g1...

Page 26: ...anel of the TV p 7 Press repeatedly until Auto Tuning appears Access Auto Tuning Start Auto Tuning To return to TV Fine Tuning Use to make small adjustments to the tuning of an individual programme affected by weather conditions etc Manual Tuning Set programme manually after Auto Tuning Set Sound System and Colour System and then perform this function Normally set Colour System Auto If a VCR is co...

Page 27: ... System Information System Menu Shipping Condition Access access select 5 Set Resets the TV to its original condition i e no channels tuned in All settings channels picture sound quality etc are reset Restore Settings Shipping Condition To return to TV EXIT Check the message and reset EXIT RETURN Confirm All tuning data will be erased Are you sure Are you sure Shipping Condition Follow the on scre...

Page 28: ...s horizontal position V pos Adjusts vertical position Clock Phase Eliminates flicker and distortion Adjust after Clock adjustment Set to the minimum level if noise occurs Sync PC sync signal type H V On Green H V Horizontal and Vertical sync from your PC Most common sync format On Green Sync on Green sync from your PC Reset to Defaults Press the OK button to reset to the default Setup settings Oth...

Page 29: ...PANA 3 pictures 100_PANA 38 pictures Nature 14 pictures Fruit 18 pictures ROOM 1 picture 201_PANA 7 pictures Photo View Mode Folder view Select EXIT Select RETURN All pictures View Folder view select thumbnail The files which are not in a folder will be collected to the folder named To display all the photos p 30 4 Select a photo from the thumbnail to be viewed File name Date Pixel p1010001 1 38 2...

Page 30: ...elect EXIT Select RETURN All pictures View Folder view G File name Date Pixel p1010001 1 175 2008 10 23 1600 x 1200 p1010004 p1010003 p1010002 p1010001 p1010008 p1010007 p1010006 p1010005 p1010012 p1010011 p1010010 p1010009 Photo View Mode All pictures Slideshow Folder view Sort by Month Sort by Date Select EXIT Select RETURN View Thumbnail All pictures select single view To sort by date or month ...

Page 31: ...o the previous movie R To the next movie G To return to list stop To change aspect ratio only for the 4 3 movie content ASPECT To return to TV EXIT or To return to the previous screen RETURN Movie View You can enjoy the multi channel sound via an amplifier connected to DIGITAL AUDIO OUT terminal To confirm or change the current sound status during playback Audio output settings operate in step Dis...

Page 32: ... playback 7 7 Power on link Power off link Reduce unnecessary power consumption in standby 5 5 5 Auto standby for unnecessary equipment 3 3 3 8 3 8 3 Pause Live TV programme 4 6 Direct TV Recording 4 Control the menu of the connected equipment by VIERA remote control 3 3 3 3 3 Speaker control 1 HDMI Connection only 2 HDMI and Audio out connections 3 available with the equipment which has HDAVI Con...

Page 33: ...onnected equipment starts playback or direct navigator function menu for the equipment are activated the TV is automatically turned on Only when the TV is in Standby mode Power off link Set Power off Link On in Setup Menu to use this function Power off Link p 21 When the TV is set to Standby mode the connected equipment is also automatically set to Standby This function will work even if the TV en...

Page 34: ...l be recorded on HDD of the connected DIGA Recorder This function is available with DIGA Recorder which has HDD If you connect several recorders including other manufacturers recorders at the same time please connect DIGA Recorder which has HDD to the TV s lower HDMI terminal number If you cannot operate check the settings and the equipment VIERA Link features and connections p 32 Access and pause...

Page 35: ...1 Set the remote control code for TV p 17 2 Follow the operation guide To display the operation guide OPTION Store set access Move the cursor select the menu Return to the previous menu RETURN Move the cursor access adjust Exit the menu EXIT When the key words are displayed on colour bar R G Y B Note Some operations may not be available for some equipment If so use its own remote control If severa...

Page 36: ...olume of the equipment Mute MUTE The sound of TV speakers is mute When the equipment is turned off TV speakers will be active TV TV speakers are active Note If you wish to enjoy the multi channel sound e g Dolby Digital 5 1ch via an Amplifier connect with HDMI cable and Optical digital audio cable p 32 and then select Home Cinema To enjoy the sound from the DIGA Recorder in multi channel sound con...

Page 37: ... VIERA remote control When multiple devices are connected an indicator appears below the icon so that one device can be selected Pause Live TV Pause Live TV p 34 A live TV programme can be paused and resumed later Direct TV Rec Direct TV Rec p 34 What is on TV can be recorded immediately Speaker Selection Speaker Control p 36 Theatre speaker can be set Slideshow SD card slideshow p 30 Photo slides...

Page 38: ...nal Equipment These diagrams show our recommendations for how to connect the TV to your various equipment For other connections consult the instructions for each piece of equipment the table below and the specifications p 47 Amplifier with speaker system To listen with speakers Viewing Listening PC Headphones VIDEO or S VIDEO AUDIO To adjust volume Headphone Volume in the Sound Menu p 20 Camcorder...

Page 39: ...d 6 TMDS Data1 4 TMDS Data1 2 TMDS Data2 Shield HDMI terminal Connect the S VIDEO or VIDEO terminal when using AV3 IN terminal Connect the COMPONENT or VIDEO terminal when using AV1 AV2 IN terminals To watch satellite broadcasts Set top box To record playback DVD Recorder VCR Fully wired HDMI compliant cable or RF cable To watch DVDs DVD player Viewing HDMI equipment DVD Recorder HDMI connection p...

Page 40: ... 21 62 63 69 62 63 69 62 63 62 C13 70 73 74 75 76 77 78 79 S 1 S 2 S 3 S 1 S 1 S 2 S 3 S 1 S 2 S 3 32 41 S 1 S 2 S 3 80 81 89 S1 S2 S10 S1 S2 S10 Z1 Z9 S1 S2 S10 S1 S2 S10 42 51 S1 S2 S10 90 91 92 93 94 95 96 97 98 99 S11 S12 S13 S14 S15 S16 S17 S18 S19 S20 S11 S12 S13 S14 S15 S16 S17 S18 S19 S20 Z10 Z11 Z12 Z13 Z14 Z15 Z16 Z17 Z18 Z19 S11 S12 S13 S14 S15 S16 S17 S18 S19 S20 S11 S12 S13 S14 S15 S1...

Page 41: ... Regular broadcast Standard Audio BILINGUAL or DUAL MONO MAIN I SUB II STEREO Mode Indicator No Indicator I II If the stereo signal is poor or the receiving conditions are not optimum or if STEREO MONO automatic switching occurs it is recommended you switch from STEREO to MONO Even when the contents of the receiving signal undergo changes selection mode is kept intact When the receiving conditions...

Page 42: ...t the following website English only http panasonic co jp pavc global cs DCF Design rule for camera file system Unified standard established by Japan Electronics and Information Technology Industries Association JEITA Note Format the card with the recording equipment The picture may not appear correctly on this TV depending on the recording equipment used Display may take some time when there are ...

Page 43: ...Protection copyright protection An equipment having no digital output terminal may be connected to the input terminal of either COMPONENT S VIDEO or VIDEO to receive analogue signals The HDMI input terminal can be used with only the following image signals 480i 480p 576i 576p 720p 1080i and 1080p Match the output setting of the digital equipment For details of the applicable HDMI signals see p 44 ...

Page 44: ... 89 1 024 768 60 Hz 48 36 60 00 1 024 768 70 Hz 56 48 70 07 1 024 768 75 Hz 60 02 75 03 1 024 768 85 Hz 68 68 85 00 1 280 1 024 60 Hz 63 98 60 02 1 280 768 60 Hz 47 70 60 00 1 366 768 60 Hz 48 39 60 04 Macintosh13 640 480 35 00 66 67 Macintosh16 832 624 49 73 74 55 Macintosh21 1 152 870 68 68 75 06 Note Signals other than above may not be displayed properly The above signals are reformatted for op...

Page 45: ...e LCD panel moves slightly when it is pushed with a finger Clattered sound might be heard There are some looseness around the panel to prevent the damage to the panel The panel might move slightly when it is pushed with a finger and clattered sound might be heard This is not a malfunction There may be red spots blue spots green spots and black spots on the screen This is a characteristic of liquid...

Page 46: ... Set the sound setting of the connected equipment to 2ch L PCM Check the HDMI1 4 Input setting in the Sound Menu p 20 If digital sound connection has a problem select analogue sound connection p 32 43 Pictures from external equipment are unusual when the equipment is connected via HDMI Is the HDMI cable connected properly p 43 Turn Off the TV and equipment then turn them On again Check an input si...

Page 47: ... UHF BAND 21 69 PAL G H I SECAM G K K1 28 69 PAL B AUST 13 57 PAL D K 13 62 NTSC M Japan 14 69 NTSC M USA CATV S1 S20 OSCAR 1 125 USA CATV C13 C49 JAPAN S21 S41 HYPER Z1 Z37 CHINA 5A 9A AUST Aerial Rear VHF UHF Operating Conditions Temperature 0 C 40 C Humidity 20 80 RH non condensing Connection Terminals AV1 Input AUDIO L R RCA PIN Type 2 0 5 V rms VIDEO RCA PIN Type 1 1 0 V p p 75 Ω COMPONENT Y ...

Page 48: ...poration AVCHD and the AVCHD logo are trademarks of Panasonic Corporation and Sony Corporation Manufactured under license from Dolby Laboratories Dolby and the double D symbol are trademarks of Dolby Laboratories Macintosh is a registered trademark of Apple Inc USA Even if no special notation has been made of company or product trademarks these trademarks have been fully respected This product is ...

Reviews: