background image

17

V

iewing

 W
atching 

TV

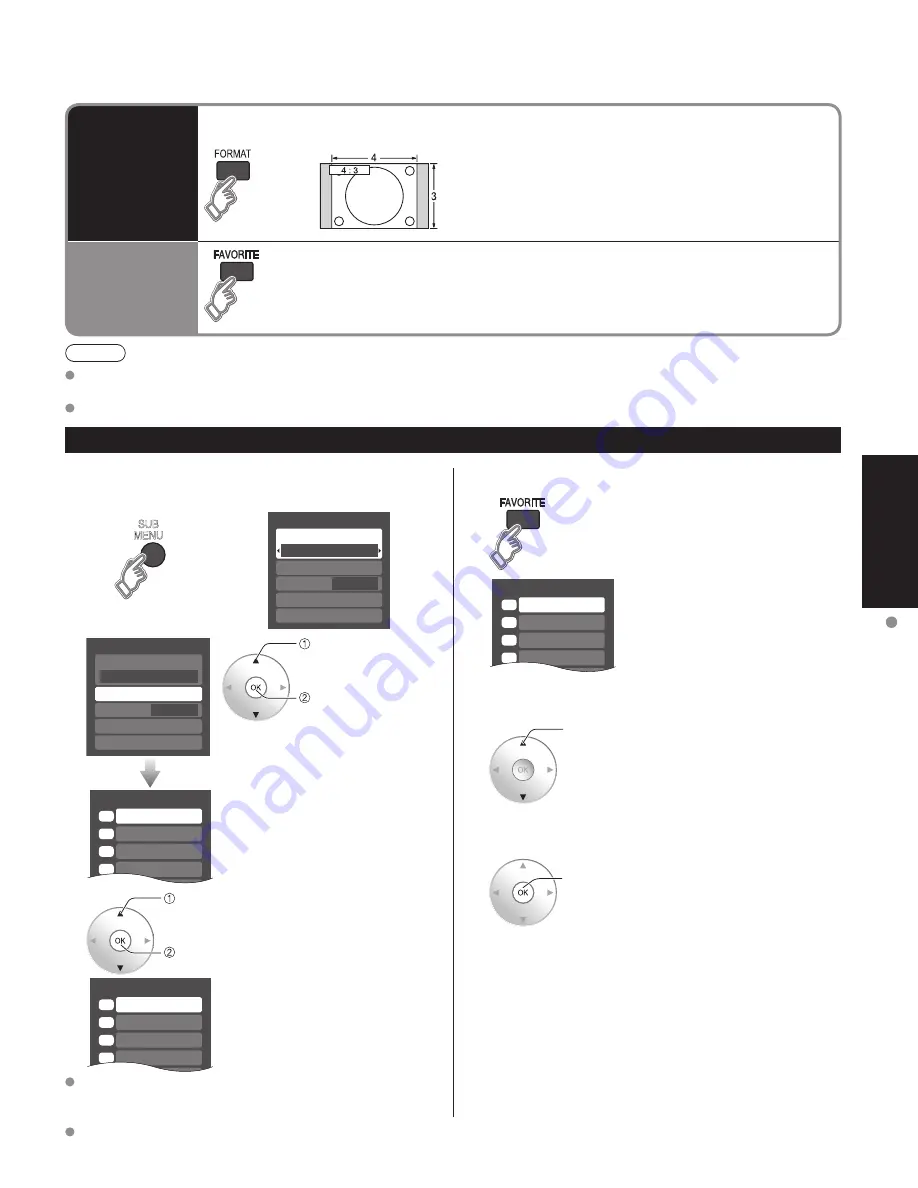
Set Favorite Feature

1

Display the SUB MENU.

SUB

MENU

Setup SUB MENU

Surf mode

Set favorite

Off

CC

Caption select
Signal meter

All

2

Setup SUB MENU

Surf mode

Set favorite

Off

CC

Caption select
Signal meter

All

 select 

 “Set 

favorite”

 ok

Set favorite

1/3

1
2
3

- - -
- - -
- - -
- - -

4

•  Press FAVORITE repeatedly to 

change between pages (1/3, 2/3, 
3/3, or exit). 

3

 select 

 ok

Press 

▲▼

to highlight a position on 

the list. 
Then, press OK to save the 
displayed channel in that position.

Set favorite

1/3

1
2
3
4

26-1

- - -

•  You can also use the NUMBER 

buttons (1-9 and 0) to select a 
list number (1-9 and 0). By doing 
so, the displayed channel will be 
saved on that list number without 
pressing OK.


To delete a favorite channel

   A saved channel can be removed from the list by holding 

down OK while its position is highlighted.

Note

 Reselect “Cable” or “Antenna” in “ANT in” of “Program channel” to switch the signal reception between cable TV 

and antenna. (p. 15, 35)

 The channel number and volume level remain the same even after the TV is turned off. 

Favorite Feature

Change
aspect
ratio


Press FORMAT to cycle through the aspect modes. 

(p. 46)

• 480i, 480p:  FULL/JUST/4:3/ZOOM
• 1080p, 1080i, 720p:  FULL/H-FILL/JUST/4:3/ZOOM

Call up
a favorite
channel


FAVORITE

  Channel numbers registered in Favorite are displayed on the favorite tune 

screen. Select the desired broadcast station with the cursor or use number 
buttons. (see below)


To change the page


Pressing 

 changes the page backward.   

Pressing 

 changes the page forward.

Use Favorite Feature

1

Press FAVORITE.
•  Press FAVORITE repeatedly to 

change between pages (1/3, 2/3, 
3/3, or exit). 

Favorite channels 1/3

1
2
3
4

26-1

- - -

2

select 

Press 

▲▼

 or a Numbered key (1-9 

and 0) to highlight a channel on the 
list.
•  Selecting a channel number from 

the list with the number button will 
display the channel directly.

3

ok 

Press OK to display the highlighted 
channel.

Summary of Contents for Viera TH-58PZ800

Page 1: ... utilizar su televisor y guárdelas para consultarlas en el futuro Las imágenes mostradas en este manual tienen solamente fines ilustrativos Quick Start Guide See page 6 15 Guía de inicio rápido vea la página 6 15 For assistance U S A please call 1 877 95 VIERA 958 4372 or visit us at www panasonic com contactinfo For assistance Puerto Rico please call 787 750 4300 or visit us at www panasonic com ...

Page 2: ...e antenna after the end of full power analog TV broadcasting in the United States as required by law on February 17 2009 Some older television receivers if they rely on a TV antenna will need a TV Converter to receive over the air digital programming but should continue to work as before for other purposes e g for watching low power TV stations still broadcasting in analog watching pre recorded mo...

Page 3: ...s Monitor Out 37 Using Timer 38 Programming the Remote to Operate Peripheral Equipment 39 Recommended AV Connections 40 Remote Control Operation Code List 42 Ratings List for Lock 45 Technical Information 46 FAQ 50 Care and Cleaning 52 Specifications 53 Limited Warranty for U S A 54 Customer Services Directory for U S A 55 Limited Warranty for Canada 56 Enjoy your TV Basic Features Advanced Featur...

Page 4: ...ts are designed to provide reasonable protection against harmful interference in a residential installation This equipment generates uses and can radiate radio frequency energy and if not installed and used in accordance with the instructions may cause harmful interference to radio communications However there is no guarantee that interference will not occur in a particular installation If this eq...

Page 5: ...he Plasma TV unplug the power cord immediately Continued use of the TV under these conditions might cause fire or permanent damage to the unit Have the TV evaluated at an Authorized Service Center Servicing of the TV by any unauthorized personnel is strongly discouraged due to its high voltage dangerous nature If water or foreign objects get inside the Plasma TV if the Plasma TV is dropped or if t...

Page 6: ...and new batteries Do not mix different battery types such as alkaline and manganese batteries Do not use rechargeable Ni Cd batteries Do not burn or break batteries Make a note of the remote control codes before changing batteries in case the codes are reset p 39 Optional Accessory Note In order to maintain the TV s performance and safety be absolutely sure to ask your dealer or a licensed contrac...

Page 7: ...rk Pole Hole for pedestal installation Pole Base Bottom view Warning Do not disassemble or modify the pedestal Otherwise the TV may fall over and become damaged and personal injury may result Caution Do not use any other TV and displays Otherwise the TV may fall over and become damaged and personal injury may result Do not use the pedestal if it becomes warped or damaged If you use the pedestal wh...

Page 8: ... cause distorted image Fasten the cables with the Cable clamper as necessary When using the options follow the option s assembly manual to fix cables Cable Binding Instructions Antenna terminal Pin terminals HDMI terminal green blue red green Firmly tighten by hand Match colors of plugs and terminals Insert firmly Insert firmly Reference of connection To attach To remove Insert it firmly until the...

Page 9: ...evision System Committee Conventional broadcasting ATSC Advanced Television Systems Committee Digital TV Standards include digital high definition television HDTV standard definition television SDTV data broadcasting multi channel surround sound audio and interactive television If no Cable Box AC Cord Connect after all the other connections have been made Back of the TV Cable TV AC 120 V 60 Hz VHF...

Page 10: ...VD Recorder If this source has higher resolution through interlace or progressive signal connection can be done with the use of Component Video or HDMI cable p 12 VCR Connection can be done with the use of an RF cable and Composite Video S Video cable p 12 VHF UHF Antenna TV AV Equipment e g DVD Recorder or VCR Back of the TV AC Cord AC 120 V 60 Hz VHF UHF Antenna AV Equipment e g DVD Recorder or ...

Page 11: ...g DVD recorder VCR and satellite receiver DVD Recorder or VCR Satellite Receiver TV VHF UHF Antenna You can enjoy high definition programming by subscribing to high definition satellite service Connection can be done with the use of HDMI or Component Video cable p 12 Note For details of external equipment connections please refer to the operating manuals for the equipment Satellite Receiver DVD Re...

Page 12: ... refer to p 41 B To use COMPONENT terminals COMPONENT IN VIDEO 1 1 2 R PR PB Y PR PB Y R L L L R Y PB PR COMPONENT VIDEO OUT AUDIO OUT white red green blue red white red green blue red white red green blue red e g Blu ray Disc player AV Equipment Recorders may also be connected to COMPOSITE or S VIDEO terminals see below C To use S VIDEO terminals L R TO VIDEO IN 1 2 S VIDEO PROG PR PB R R L L whi...

Page 13: ...rations VCRs DVDs etc p 20 VIERA Link menu p 30 31 Selects Audio Mode for TV viewing p 16 Displays Main Menu p 24 Exits from menu screen Selects OK Change Returns to previous menu Volume up down Displays or removes the channel banner p 16 Sound mute On Off Numeric keypad to select any channel p 16 or press to enter alphanumeric input in menus p 20 32 34 39 Direct channel access for DTV and DBS p 1...

Page 14: ...your viewing environment select ok Please confirm your selection Home before pressing OK button If you select Store by mistake in confirmation screen will be displayed Yes No You are selecting the mode for store demonstration select ok Select No and return to previous screen If you select Yes Screen enters store demonstration mode Displays Please select your viewing environment screen once again a...

Page 15: ... scanning the channels Available channels analog digital are automatically set All channels Scans digital and analog channels Analog only Scans Analog channels only Digital only Scans Digital channels only Confirm registered channels Caption Favorite Add Apply Cancel program Yes Yes Yes select Apply ok If OK is not pressed after selecting Apply the channels will not be saved The channel will be sa...

Page 16: ...ching TV Digital mode Press SAP to select the next audio track if available when receiving a digital channel Audio track 1 of 2 English Analog mode Press SAP to select the desired audio mode Each press of SAP will change the audio mode Stereo SAP Mono Display the SUB MENU Press SUB MENU to show sub menu screen p 26 This menu consists of shortcuts to convenient functions SUB MENU Setup SUB MENU Sur...

Page 17: ... or Antenna in ANT in of Program channel to switch the signal reception between cable TV and antenna p 15 35 The channel number and volume level remain the same even after the TV is turned off Favorite Feature Change aspect ratio Press FORMAT to cycle through the aspect modes p 46 480i 480p FULL JUST 4 3 ZOOM 1080p 1080i 720p FULL H FILL JUST 4 3 ZOOM Call up a favorite channel FAVORITE Channel nu...

Page 18: ...k Lock SD card or Select the data to be viewed Note Depending on the JPEG format Information contents may not be displayed correctly Refer to p 47 Data format for SD card browsing for details View Slide show R Y G B Next Rotate Prev RETURN Displays one at a time Navigation area Rotate 90 degrees counter clockwise To next photo Rotate 90 degrees clockwise To previous photo To display hide Navigatio...

Page 19: ...r than the number of seconds set To stop in mid cycle Press To adjust picture In or 1 Display Photo menu 2 Select picture Photo menu Picture Setup slide show select Picture ok 3 Select the item Picture menu p 24 Picture 1 2 Picture mode Picture Reset Brightness Vivid 0 0 select 4 Adjust or select Picture 1 2 Picture mode Picture Reset Brightness Vivid 0 0 Adjust or Select SD Card Insert the card R...

Page 20: ...e Label The terminal and label of the connected equipment are displayed To label each of the inputs please refer to p 37 Note The input label will be displayed on Input select screen if Input label is set on p 37 For front input terminals HDMI 4 Video 2 GAME input label is set as default Picture mode is set to Game refer to p 48 For more details for picture mode setting refer to p 48 For Input lab...

Page 21: ...tup Menu VIERA Link Lock Setup SD card CC select next Select VIERA Link setting Setup 2 2 VIERA Link setting Advanced setup About select next Select VIERA Link VIERA Link setting VIERA Link Power off link Power on link Default speakers On Set Set TV select Select On default is On change Now you can set each VIERA Link function according to your preference p 28 31 Note If no HDMI equipment is conne...

Page 22: ...listen to PC sound with the audio cable connected To connect PC p 40 Display the Input select menu Input select 2 3 4 5 8 TV Component 1 Component 2 HDMI 1 HDMI 2 7 HDMI 4 Video 2 8 Video 1 6 HDMI 3 GAME 1 AUX GAME 9 Video 2 GAME 0 PC GAME Select PC PC Displays PC screen Corresponding signals p 49 To return to TV ...

Page 23: ...on Adjusts the horizontal position V position Adjusts the vertical position Clock phase Alleviates the problem if the whole picture appears to flicker or is blurred First adjust the Dot Clock to get the best possible picture then adjust the Clock Phase so that a clear picture appears Note It may not be possible to display a clear picture due to poor input signals Input resolution Switches to wide ...

Page 24: ...u list How to Use Menu Functions Various menus allow you to make settings for the picture sound and other functions so that you can enjoy watching TV best suited for you Press to exit from a menu screen Press to return to the previous screen Display menu Displays the functions that can be set varies depending on the input signal Select the menu Menu Audio Lock Setup SD card CC Timer Picture VIERA ...

Page 25: ...n Off MPEG NR Off Selects Dark or Light Valid only for external input signals Dark Light Black level Light 48Hz Achieves more cinematic playback by reproducing the movie contents at twice the speed of 24 frames per second 60Hz 48Hz 24p Direct in 60 Hz Selects between 95 Size 1 or 100 Size 2 for the scanning area with High definition signal Size 1 Size 2 Select Size 1 if noise is generated on the e...

Page 26: ...nctions Menu list Sub menu list Various menus allow you to make settings for the picture sound and other functions so that you can enjoy watching TV best suited for you Press to exit from a menu screen Press to return to the previous screen Display menu Displays the functions that can be set varies according to the input signal Select Setup Menu Audio Lock Setup SD card CC Timer Picture VIERA Link...

Page 27: ... the cable box or a connected device is turned On No Set The Sleep timer On Off timer and First time setup will not function if Auto power on is set p 38 Auto power on No To conserve energy the TV automatically turns off when NO SIGNAL and NO OPERATION is performed for more than 10 minutes Set No Note Not in use when setting Auto power on On Off Timer Lock SD Mode or Digital channel No signal shut...

Page 28: ...and added As such its operation with other manufacturers equipment that supports HDMI CEC cannot be guaranteed Please refer to the individual manuals for other manufacturers equipment supporting the VIERA Link function For the first time When adding new equipment reconnecting equipment or changing the setup after the connection turn the equipment on and then switch the TV on Select the input mode ...

Page 29: ... is performed automatically Home Theater power switches On and playback begins TV power switches On and the playback screen is displayed Audio is muted on the TV and switches to the theater system The following information about the TV settings can be transmitted to each equipment Recorder Home theater Player that has HDAVI Control 3 function connected to a TV with HDMI piece of cable Transmittabl...

Page 30: ...n to the previous screen Display VIERA Link menu Menu Audio Lock SD card Timer Picture VIERA Link or Select the item Record now Stop recording Speaker output TV VIERA Link control Recorder select set or next Select Record now Stop recording Speaker output TV VIERA Link control Home theater change Set Speaker control VIERA Link Control only with the TV s remote control for HDAVI Control 2 or HDAVI ...

Page 31: ...ink Control Select the equipment you want to access Recorder Home theater Player Camcorder Available TV s remote control buttons Move the cursor Select Set Access Return to the previous menu SUB MENU Display the Functions menu on the equipment Available when the purpose of the keys is displayed on screen Record now Stop recording Speaker output TV VIERA Link control Recorder select change You can ...

Page 32: ...ou display the Lock menu Input your 4 digit password A 4 digit code must be entered to view a blocked program or change rating settings Create password Enter password 0 9 If it is your first time entering the password enter the password twice in order to register it Select the Lock mode Lock Mode Channel Game Program Off Off Off Off Change password set select Off Unlocks all the lock settings of C...

Page 33: ...s U S TV U S TV program ratings C E L R Canadian English ratings C F L R Canadian French ratings Select the rating to be locked select Example of MPAA U S movie ratings NR No rating G General Audience All ages admitted PG Parental Guidance Suggested PG 13 Parents Strongly Cautioned Inappropriate for children under 13 R Restricted Under 17 requires accompanying parent or adult guardian NC 17 No one...

Page 34: ...gram channel Setup 1 2 All Surf mode Language Clock Program channel External devices Anti image retention Reset next select Select the function Program channel Cable ANT in Auto Manual Signal meter next select Set Auto Set automatically Manual Set manually Signal meter Check signal strength To reset the settings of setup menu Select Reset in Setup menu and press OK Input your 4 digit password with...

Page 35: ...to tune to the channel Select Apply Caption Favorite Add Apply Cancel program Yes select Apply ok Select Edit Edit Cannnel Caption Favorite Add Apply Cancel Manual program 2 Yes 3 Yes 4 Yes 5 Yes select next Select the item to be edited Go back to previous page Edit Caption Favorite Add Apply Cancel Manual program 2 Yes Select OK RETURN Prev page R Next page G B Y 3 Yes 4 Yes 5 Yes 6 Yes 7 Yes 8 Y...

Page 36: ...ct the setting Primary Second Service 3 Service 4 Service 5 Service 6 The settings in Analog or Digital depend on the broadcaster To make more in depth display settings in digital programs Select Digital setting and press OK Select the item and set Digital setting Size Font Style Foreground Fore opacity Background Automatic Automatic Automatic Automatic Automatic Automatic Back opacity Outline Aut...

Page 37: ...n p 20 Monitor out Stop output of the picture and audio To prevent howling and image oscillation stops output of the pictures and audio specified in this menu p 27 Select the terminal and set Off Monitor out Component 1 Component 2 HDMI 1 HDMI 2 HDMI 3 Video 2 On On On On HDMI 4 On On On Video 1 Off select set Select Off to stop output of picture and audio Video 1 Video 2 Component 1 Component 2 H...

Page 38: ...a key is pressed Display menu Select Timer Menu Audio Lock SD card Timer Picture VIERA Link next select Select the timer to set Timer Sleep Timer 1 Timer 2 Timer 3 Timer 4 Timer 5 select next Set the timer To set Sleep Off Timer Set to shut the unit off after a pre selected amount of time Sleep Sleep 60 set 0 30 60 90 minutes To set Timer 1 5 On Off Timer Select the item and set Timer 1 Channel Da...

Page 39: ... 42 The external equipment turns On If the equipment does not operate with the remote control When your equipment has a single code Input the remote control code again When your equipment has multiple codes Change the code with above and test again Registration will fail if the wrong code is input or it takes more than 30 seconds to register To find a code not listed in the code list This procedur...

Page 40: ... terminals no video signals can be passed through PROG OUT terminal When receiving digital channel signals all digital formats are down converted to composite NTSC video to be output through the PROG OUT terminals Please see p 24 25 for setup when using an external analog audio cable with an HDMI to DVI cable AC 120 V 60 Hz AC Cord Connect after all the other connections are complete Back of the T...

Page 41: ... audio cables If audio cable is not connected you cannot listen to the TV program through the theater system Connecting this unit to a DVD recorder DIGA and AV amp When using an VIERA Link audio video amplifier and a compatible DVD recorder DIGA use a daisy chain connection as shown below One AV amp and one DVD recorder DIGA can be operated with this unit Refer to the diagram above when connecting...

Page 42: ...Channel Music PROG Sub Channel Page Down Up Page Down Up Skip Reverse Forward TV VCR Switch TV DBS Switch TV CBL Switch Rewind Fast Forward Rewind Fast Forward Rewind Fast Forward Reverse Forward VCR Record PVR Record 1 PVR Record 1 Record Stop Stop Stop Stop Pause Pause Pause Pause Play Play Play Play Remote Control Operation Code List The following explains how to operate external devices with t...

Page 43: ... 0807 0848 Shintom 0072 Shogun 0240 Singer 0072 Sonic Blue 0614 0616 1137 Sony 0000 0032 0033 0034 0035 0636 1032 1972 Stack 9 1972 STS 0042 Sylvania 0000 0035 0043 0081 0110 0593 1593 1781 Symphonic 0000 0593 1593 Systemax 1972 Tagar Systems 1972 Tashiko 0037 Tatung 0041 Teac 0000 0041 Technics 0035 0162 0246 Teknika 0000 0035 0037 Thomas 0000 Tivo 0618 0636 0739 1337 1996 TMK 0208 0240 Toshiba 0...

Page 44: ...ech 1402 Norcent 0872 1003 1107 1265 Nova 1517 Onkyo 0503 0627 0792 1769 Oppo 0575 1224 1525 OptoMedia Electronics 0896 Oritron 0651 Panasonic 0458 0490 0632 0703 1010 1011 1362 1462 1464 1490 1641 1762 1907 1908 1909 1910 1925 1986 1990 2017 2060 2061 2062 Philco 0675 Philips 0503 0539 0646 0675 1267 1340 1354 2056 2084 Pioneer 0142 0525 0571 0631 0632 1571 Polaroid 1020 1061 1086 1245 1316 1478 ...

Page 45: ...ogue with sexual content CANADIAN ENGLISH RATINGS C E L R E Exempt Exempt programming includes news sports documentaries and other information programming talk shows music videos and variety programming C Programming intended for children under age 8 No offensive language nudity or sexual content C8 Programming generally considered acceptable for children 8 years and over No profanity nudity or se...

Page 46: ...ts you choose the aspect depending on the format of the received signal and your preference p 17 e g in case of 4 3 image FULL JUST FULL JUST Enlarges the 4 3 image horizontally to the screen s side edges Recommended for anamorphic picture Stretches to justify the 4 3 image to the four corners of the screen Recommended for normal TV broadcast H FILL 4 3 H FILL Side bar Enlarges the 4 3 image horiz...

Page 47: ...he following website http panasonic co jp pavc global cs This site is in English only Cannot display image due to incorrect ID data There is a problem with your TV decoder If this message appears please contact Panasonic Service Center for assistance Refer to page 55 Customer Services Directory page 54 56 Limited Warranty Cannot display image on SD card There is a problem with the data Check the d...

Page 48: ...Hz 1 The HDMI logo is displayed on an HDMI compliant device 2 Enquire at your local digital equipment retailer shop Caution Use with a PC is not assumed All signals are reformatted before being displayed on the screen If the connected device has an aspect adjustment function set the aspect ratio to 16 9 These HDMI connectors are type A These HDMI connectors are compatible with HDCP High Bandwidth ...

Page 49: ... 23 98 1 125 1 080 24p 27 00 24 00 640 400 70 31 47 70 08 640 480 60 31 47 59 94 Macintosh13 640 480 35 00 66 67 640 480 75 37 50 75 00 852 480 60 31 47 59 94 800 600 60 37 88 60 32 800 600 75 46 88 75 00 800 600 85 53 67 85 08 Macintosh16 832 624 49 73 74 55 1 024 768 60 48 36 60 00 1 024 768 70 56 48 70 07 1 024 768 75 60 02 75 03 1 024 768 85 68 68 85 00 Macintosh 21 1 152 870 68 68 75 06 1 280...

Page 50: ...mittent sound Change the direction of antenna for digital channels Check Signal meter p 35 If the signal is weak check the antenna and consult your local dealer The remote control does not work Are the batteries installed correctly p 6 Are the batteries new Select the correct remote control mode p 13 20 Pictures from external equipment are distorted when the unit is connected via HDMI Is the HDMI ...

Page 51: ...the model number and serial number both found on the rear of the TV The function to prevent Image retention is activated Not a faulty symptom The screen saver is activated if the TV unit is not operated for a certain time in SD mode Image retention p 5 A pixel or luminescent spot can occasionally be missing in plasma displays Not a faulty symptom Check nearby electrical products car motorcycle flu...

Page 52: ...sh soap and then wring the cloth dry Use this cloth to wipe the cabinet and then wipe it dry with a dry cloth Do not allow any mild liquid dish soap to come into direct contact with the surface of the Plasma TV If water droplets get inside the unit operating problems may result Avoid contact with volatile substances such as insect sprays solvents and thinner otherwise the quality of the cabinet su...

Page 53: ... 75 Ω C 0 286 V p p 75 Ω AUDIO L R RCA PIN Type 2 0 5 V rms COMPONENT INPUT 1 2 Y 1 0 V p p including synchronization PB PR 0 35 V p p AUDIO L R RCA PIN Type 2 0 5 V rms HDMI 1 4 TYPE A Connector 4 This TV supports HDAVI Control 3 function PC D SUB 15PIN R G B 0 7 V p p 75 Ω HD VD 1 0 5 0 V p p high impedance AUDIO L R Stereo Mini Jack Ф3 5 mm 1 Card slot SD CARD slot 1 AV PROG OUT VIDEO RCA PIN T...

Page 54: ...O DOES NOT COVER damages which occurred in shipment or failures which are caused by products not supplied by the warrantor or failures which result from accidents misuse abuse neglect bug infestation mishandling misapplication alteration faulty installation set up adjustments misadjustment of consumer controls improper maintenance power line surge lightning damage modification or commercial use su...

Page 55: ...ng or speech impaired TTY users TTY 1 877 833 8855 Accessory Purchases Purchase Parts Accessories and Instruction Books on line for all Panasonic Products by visiting our Web Site at http www pstc panasonic com or send your request by E mail to npcparts us panasonic com You may also contact us directly at 1 800 332 5368 Phone 1 800 237 9080 Fax Only Monday Friday 9 am to 9 pm EST Panasonic Service...

Page 56: ...ANTIES OF MERCHANTABILITY AND FITNESS FOR A PARTICULAR PURPOSE IN NO EVENT WILL PANASONIC CANADA INC BE LIABLE FOR ANY SPECIAL INDIRECT OR CONSEQUENTIAL DAMAGES In certain instances some jurisdictions do not allow the exclusion or limitation of incidental or consequential damages or the exclusion of implied warranties so the above limitations and exclusions may not be applicable In home service re...

Page 57: ...57 FAQs etc Note Limited Warranty for Canada ...

Page 58: ...ual más el recibo de su compra como prueba permanente de su adquisición para que le sirva de ayuda al identificarlo en el caso de que le sea sustraído o lo pierda y también para disponer de los servicios que le ofrece la garantía Modelo Número de serie Panasonic Consumer Electronics Company Division of Panasonic Corporation of North America One Panasonic Way Secaucus New Jersey 07094 U S A Panason...

Reviews: