background image

English

15


 For the information of the camera operation, refer 
to [eHELP] (Functions > Built-in Camera).

 2 Lens part
 3 Angle adjuster


 Adjusts the angle of lens.

 4  Remote control signal receiver


 Do not place any objects between the TV remote 
control signal receiver and remote control.

 5 Ambient sensor


 Senses brightness to adjust picture quality when 
[Ambient Sensor] in the Picture Menu is set to 
[On].

 6 Power LED

 Red:

 Standby

 Green:

 On


Orange: 

 Standby with Recording / Standby with 
Timer Programming On / Standby with 
Info Bar On


 The LED blinks when the TV receives a command 
from the remote control.

 7  Human activity sensor


 For the information of the sensor operation, refer to 
[eHELP] (Functions > Info Bar).

 8  Input mode selection


 Press repeatedly until you reach the desired mode.

 [Main Menu]


 Press and hold for about 3 seconds to display main 
menu.

 OK

 (when in the menu system)

 9 

Channel Up / Down
 Cursor Up / Down (when in the menu system)

 10 

Volume Up / Down
 Cursor Left / Right (when in the menu system)

  11 Mains power On / Off switch


 Use to switch the mains power.


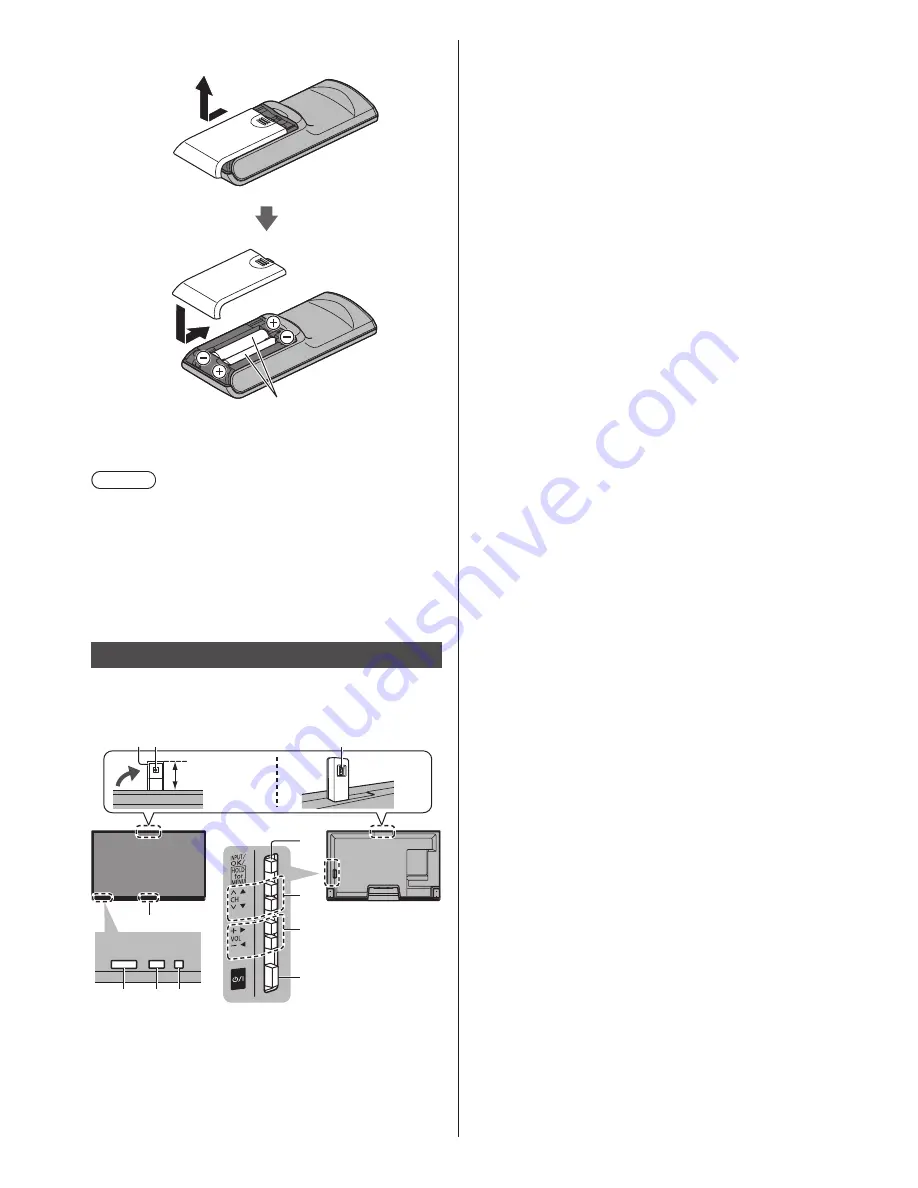
  Installing / Removing batteries


 Slide open


 Note the correct 
polarity (+ or -)

 Close

 Note


 It is recommended to hold Touch Pad Controller with 
your hand when using.


 The battery power will be used whenever you use 
Touch Pad Controller (including the touch of the touch 
pad) even if not operating the TV. It may decrease the 
battery life.


 Some operations differ depending on the application.

 Indicator / Control panel


 When pressing 8, 9, 10 buttons, the control panel 
guide appears on the right side of the screen for 3 
seconds to highlight the pressed button.


11

4

5 6

2

1

3

9

8

10

7

 Rear side of the TV

 24 mm

 1 Built-in Camera


 Automatically comes out and back in by the 
operation of a camera application.


 Do not pull or push the camera by hands.

Summary of Contents for Viera TH-58AX800A

Page 1: ...hem for future reference The images shown in this manual are for illustrative purposes only For more detailed instructions refer to eHELP Built in Operating Instructions How to use eHELP p 18 M0314 0 English Operating Instructions LED TV English Model No Australia New Zealand TH 58AX800A TH 58AX800Z TH 65AX800A TH 65AX800Z TQBC2755 ...

Page 2: ...Contents Be Sure to Read Important Notice 3 Safety Precautions 4 Quick Start Guide Accessories 7 Connections 9 Identifying Controls 13 First time Auto Tuning 16 Using your VIERA Operations 17 How to Use eHELP 18 Viewing 3D images 18 Others FAQs 20 Maintenance 21 Specifications 21 ...

Page 3: ... does not grant you that permission and explicitly disclaims any right ability or intention to obtain such permission on your behalf It is your responsibility to ensure that your use of this or any other device complies with applicable copyright legislation in your country Please refer to that legislation for more information on the relevant laws and regulations involved or contact the owner of th...

Page 4: ...bject Warning This product contains possibly dangerous parts such as plastic bags that can be breathed in or swallowed by young children accidentally Keep these parts out of reach of young children Safety Precautions To help avoid risk of electrical shock fire damage or injury please follow the warnings and cautions below Mains plug and lead Warning If you detect anything unusual immediately remov...

Page 5: ...ts such as SD Card and R03 batteries The small object could be swallowed by young children Remove SD Card immediately after use and store out of reach of young children 3D Eyewear contains small parts that can be swallowed by young children accidentally Keep these parts out of reach of young children Pedestal Warning Do not disassemble or modify the pedestal Caution Do not use any pedestal other t...

Page 6: ...tlet Remove the mains plug from the wall socket when the TV is not in use for a prolonged period of time Battery for the Remote Control 3D Eyewear Touch Pad Controller Caution Incorrect installation may cause battery leakage corrosion and explosion Replace only with the same or equivalent type Do not mix old and new batteries Do not mix different battery types such as alkaline and manganese batter...

Page 7: ...ront Pedestal has already been assembled to the TV Rear Pedestal Assembly screw A M4 14 4 Assembling the Rear Pedestal 1 Hooks Cover Accessories Remote Control p 13 N2QAYB000936 Touch Pad Controller p 14 N2QBYA000005 Rear Pedestal p 7 The Rear Pedestal cannot be held by one hand because of its weight Handle with both hands Corner cap 2 Assembly screw D 4 M4 5 Attach the corner caps to the TV when ...

Page 8: ...sure to remove the Rear Pedestal in the following way when using the wall hanging bracket or repacking the TV 1 Pull out the cover from the Rear Pedestal 2 Remove the assembly screws A from the TV 3 Lift up the TV at a slight angle from the Rear Pedestal as shown View from the side 4 Attach the cover to the Rear Pedestal When using the wall hanging bracket remove the Front Pedestal as well p 23 2 ...

Page 9: ...entre or dealer may be able to assist you in obtaining the correct aerial system for your particular area and the accessories required Connections External equipment and cables shown are not supplied with this TV Please ensure that the unit is disconnected from the mains socket before attaching or disconnecting any cables Check the terminal type and cable plugs are correct when connecting Use a fu...

Page 10: ...rs regarding aerial installation upgrading of existing systems or accessories required and the costs incurred are the responsibility of you the customer AV devices DVD Recorder VCR TV RF cable HDMI cable DVD Recorder VCR Aerial Set top box TV HDMI cable Set top box Network To use internet service you need a broadband network environment If you do not have any broadband network services please cons...

Page 11: ...t to nip the cables between the Rear Pedestal and the edge of the cover When using the optional accessory follow the option s assembly manual to fix cables Hooks Cover Camcorder Game equipment VIDEO equipment TV Viewing Listening Game equipment Camcorder Blu ray Disc Player 3D compatible equipment HDMI cable Blu ray Disc Player PC TV DisplayPort cable PC Amplifier to listen with speakers Use HDMI2...

Page 12: ... Knob Keep pushing the knob To remove from the TV Keep pushing both side snaps Snaps Cable tie Hooks Cover Cable tie Attach the cable tie Insert the cable tie in a hole Hole Bundle the cables Hooks Set the tip in the hooks ...

Page 13: ... lights 15 Input mode selection TV switches to Digital TV Analogue TV AV switches to AV input mode from Input Selection list 16 Exit Returns to Home Screen 17 HOME Displays Home Screen 18 TV Guide Australia Freeview Guide New Zealand 19 Cursor buttons Makes selections and adjustments 20 Return Returns to the previous menu page 21 Aspect Changes aspect ratio 22 Subtitle Audio Description Displays A...

Page 14: ...ll open Hook Note the correct polarity or Close Touch Pad Controller Touch Pad Controller is designed for the convenient operations especially on Home Screen or internet contents You can operate the TV intuitively with this controller Touch Pad Controller can be used by registering to this TV with Bluetooth wireless technology The registration starts automatically when you press any buttons except...

Page 15: ...nd hold for about 3 seconds to display main menu OK when in the menu system 9 Channel Up Down Cursor Up Down when in the menu system 10 Volume Up Down Cursor Left Right when in the menu system 11 Mains power On Off switch Use to switch the mains power Installing Removing batteries Slide open Note the correct polarity or Close Note It is recommended to hold Touch Pad Controller with your hand when ...

Page 16: ...nal in Tuning Menu Setup Menu To initialise all settings Shipping Condition in System Menu Setup Menu First time Auto Tuning Automatically sets up the TV and searches for available TV channels when the TV is turned on for the first time These steps are not necessary if the setup has been completed by your local dealer Please complete connections p 9 12 and settings if necessary of the connected eq...

Page 17: ...V or Remote Control Mains power On Off switch should be on p 15 The last viewed Home Screen is displayed Example TV Home Screen Example Selected content screen To return to Home Screen at any time You can set up or make Home Screen to display desired information to access specific features easily to select the default Home Screen etc For details follow the on screen instructions or refer to eHELP ...

Page 18: ...r on The lamp lights for about 2 seconds and then flashes The 3D Eyewear will be turned on and start registration Place the 3D Eyewear within 50 cm from the TV while registration in progress 3 After the registration is successfully completed the 3D Eyewear will reconnect with TV automatically when the 3D Eyewear is turned on near the TV in 3D mode Registration again When connection with the regist...

Page 19: ...are displayed on the bottom right of the screen 2 View the 3D images Safety precautions will be displayed when you first watch the 3D image Select Yes or No to continue to view 3D images Note Turn off the 3D Eyewear after using it Use the 3D Eyewear within approximately 3 2 m from the TV You cannot view the 3D images with the 3D Eyewear too far from the TV because of the difficulty of receiving ra...

Page 20: ...shine on the TV s remote control signal receiver No image can be displayed Check the TV is turned on Check the mains lead is plugged into the TV and the socket outlet Check the correct input mode is selected Check the setting of AV COMPONENT VIDEO in Input Selection to match the output of the external equipment Is Contrast Brightness or Colour in the Picture Menu set to the minimum Check all requi...

Page 21: ...he surface of the display panel cabinet or pedestal by using a soft cloth to clean the dirt or fingerprints For stubborn dirt 1 First clean the dust on the surface 2 Dampen a soft cloth with clean water or diluted neutral detergent 1 part detergent to 100 parts water 3 Wring the cloth firmly Please note liquids do not enter the TV inside May lead to product failure 4 Finally wipe away all the mois...

Page 22: ...ces can be used simultaneously except the 3D Eyewear and Touch Pad Controller Connection terminals AV IN COMPONENT VIDEO VIDEO RCA PIN Type 1 1 0 V p p 75 Ω AUDIO L R RCA PIN Type 2 0 5 V rms Y 1 0 V p p including synchronisation PB CB PR CR 0 35 V p p HDMI 1 2 3 4 input TYPE A Connectors HDMI1 3 3D Content Type Deep Colour x v Colour HDMI2 3D Content Type Audio Return Channel Deep Colour x v Colo...

Page 23: ...section Liquid crystal glass Note 3D Eyewear and Touch Pad Controller use Bluetooth wireless technology Design and Specifications are subject to change without notice Mass and Dimensions shown are approximate For the information of the open source software refer to eHELP Support Licence When using the wall hanging bracket Choosing to wall mount the TV shall be done at the owner s risk Always use a...

Page 24: ...er caps Assembly screws B M3 5 4 C M4 10 6 D M4 5 4 supplied with corner cap Holes for wall hanging bracket installation Rear of the TV 400 mm 400 mm View from the side Depth of screw minimum 8 mm maximum 14 mm Type of screw M6 Screw for fixing the TV onto the wall hanging bracket not supplied with the TV ...

Page 25: ......

Page 26: ......

Page 27: ... for the name address of the nearest Authorised Service Centre Send or take the product to a Panasonic Authorised Service Centre together with your proof of purchase receipt as a proof of purchase date Please note that freight and insurance to and or from your nearest Authorised Service Centre must be arranged by you Note that home or pick up delivery service is available for the following product...

Page 28: ...nic net Panasonic Corporation 2014 English Printed in Japan New Zealand WARRANTY New Zealand only Distributed in New Zealand by Panasonic New Zealand Limited 350 Te Irirangi Drive East Tamaki Private Bag 14911 Panmure Auckland Tel 09 272 0100 Customer Care Center Email Customerservice nz panasonic com www panasonic co nz NEW ZEALAND Warranty Information on Disposal in other Countries outside the E...

Reviews: