background image

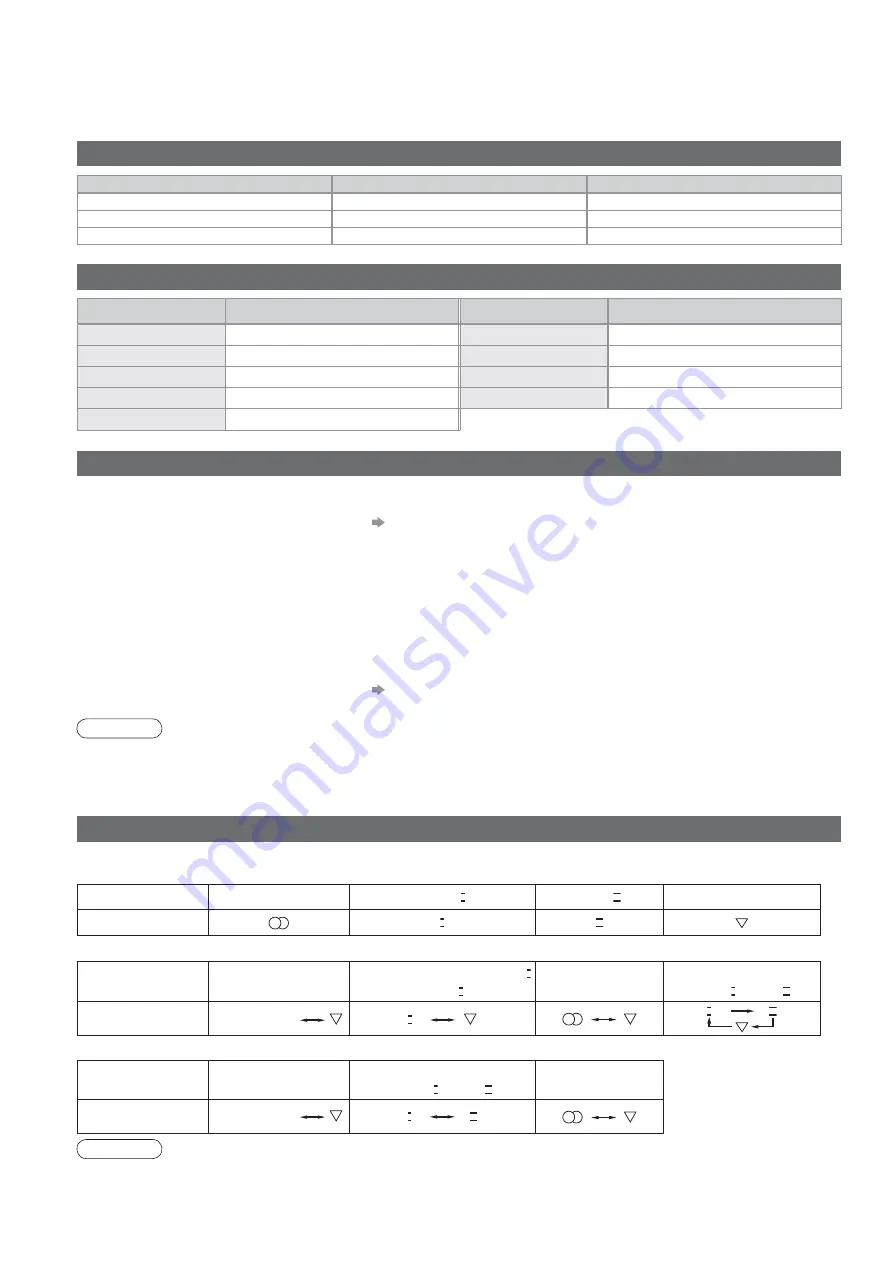
CH Display / Receive Programme

CH Display / Receive Programme

CH Display / Receive Programme

CH 0 ~ CH 5

S 6 ~ S 10

CH 10 ~ CH 12

S 2 ~ S 5

CH 6 ~ CH 9

S 11 ~ S 44

CH 5A

CH 9A

CH 20 ~ CH 75

Audio Signal

STEREO

MAIN

I

SUB

II

MONO

Mode Indicator

I

II

Type of broadcast

Regular broadcast

(Standard Audio)

R NICAM MONO 

I

(MAIN

I

 )

NICAM STEREO

NICAM DUAL MONO

(MAIN

I

 / SUB 

II

 )

Mode Indicator

No Indicator 

I

I

II

Type of broadcast

Regular broadcast

(Standard Audio)

BILINGUAL or DUAL MONO:

MAIN

I

 / SUB 

II

STEREO

Mode Indicator

No Indicator 

I

II

44

Technical Information

Programme Allocation (Analogue mode)

Rating (DVB mode)

Rating

Meaning

Rating

Meaning

-

Not classifi ed

M

Mature

P

Pre school

MA 15+

Mature Adult 15+

C

Children

AV 15+

Adult strong Violence 15+

G

General

R

Restricted 18+

PG

Parental Guidance recommended

Stereo / Bilingual Sound Selection (Analogue mode)

Note

If the stereo signal is poor or the receiving conditions are not optimum or if STEREO:MONO automatic switching 
occurs, it is recommended you switch from STEREO to MONO.

Even when the contents of the receiving signal undergo changes, selection mode is kept intact.

When the receiving conditions deteriorate, listening will be easier if the mode is set to the MONO position.

DUAL, also known as DUAL MONO or as BILINGUAL is not currently transmitted in some countries.

When you receive the stereo / bilingual sound system, sound output modes can be selected by “MPX” in the 
Sound Menu (p. 24).

NICAM

 .......Used in New Zealand, Singapore, Hong Kong etc.

A2(German)

 .......Used in Australia, Malaysia etc.

Note

During downloading, do not turn Off the TV or touch any buttons.
(The TV is automatically activated after downloading is completed.)

When the TV is switched to standby, there will be a clicking sound after a short delay. Similar clicking sounds will also 
occur at 3:00 AM and 5:00 AM when “Auto update Search in Standby” (p. 27) is set to “On”. These sounds are normal.

Update system software to ensure that you have latest version software.
If there is an update available, a notifi cation banner is displayed when the service has the update information.

To download new software, press “OK”   Downloading (approx. 20 mins.)
If you choose not to download, press “EXIT”.

Ŷ

To update automatically

Set “Auto Update Search in Standby” to “On” (p. 27)
If there is a new version software being broadcast, the TV will download this automatically.

The automatic updating sequence is carried out at 3:00 AM and 5:00 AM every morning under the following condition.
Standby (TV turned Off with the remote control) 

Ŷ

To update manually

Perform “System Update Search Now” (p. 27)
If there is an update available, a notifi cation banner is displayed.

To download new software, press “OK”   Downloading (approx. 20 mins.)
If you choose not to download, press “EXIT”.

Updating the software system (DVB mode)

Summary of Contents for VIERA TH-50PZ850A

Page 1: ...odel No TH 50PZ850A Operating Instructions Plasma Television Please read these instructions before operating your set and retain them for future reference The images shown in this manual are for illustrative purposes only ...

Page 2: ...heatre Experience an amazing level of multi ŶReceives digital terrestrial broadcastings using an integrated DVB Digital Video Broadcasting tuner ŶSharp pictures with HDMI connection ŶLinks up and controls the connected equipment with VIERA Link ...

Page 3: ...Displaying PC Screen on TV 34 HDMI Functions 35 Viewing from SD Card Photos and Movies 36 VIERA Link HDAVI ControlTM 38 External Equipment 42 Enjoy your TV Basic Features Watching TV 14 Using TV Guide 17 Viewing Teletext 18 Watching Videos and DVDs 20 FAQs etc Technical Information 44 FAQs 47 Licence 49 Specifications 50 WARRANTY 51 Quick Start Guide Accessories Options 6 Basic Connection 8 Identif...

Page 4: ... direct sunlight and other sources of heat To prevent fire never place any type of candle or naked flame on top or near the TV Power source This TV is designed to operate on 220 240 V 50 60 Hz AC Do not place foreign objects inside the TV Do not allow any objects to drop into the TV through the air vents fire or electrical shock may result Do not place the TV on sloped or unstable surfaces The TV may...

Page 5: ...er hard object Take care not to subject the surface to insect repellent solvent thinner or other volatile substances this may degrade surface quality Cabinet Pedestal Regular care Wipe the surface clean using a soft dry cloth Major contamination Dampen a soft cloth with clean water or water containing a small amount of neutral detergent Then wring the cloth and wipe the surface clean with it Final...

Page 6: ...ully read the instructions accompanying the pedestal and be absolutely sure to take steps to prevent the TV from tipping over Handle the TV carefully during installation since subjecting it to impact or other forces may cause product damage Optional accessories Wall hanging bracket vertical TY WK42PV4W angle TY WK42PR4W Batteries for the Remote Control 2 R6 AA Remote Control N2QAYB000122 Standard ...

Page 7: ... more people are required to install and remove the TV If two or more people are not present the TV may be dropped and personal injury may result Assembly screw 4 silver XYN5 F18FN Assembly screw 4 black THEL060N M5 18 M5 25 Pole 2 L TBLA3615 R TBLA3614 Base TBLX0048 1 L R ŶAssembling the pedestal Use the four assembly screws to fasten the left and right poles to the base securely Make sure that t...

Page 8: ...l the correct cable 75 ȍ coaxial and the correct terminating plug are required If a communal Aerial system is used you may require the correct connection cable and plug between the wall Aerial socket and the TV Your local Television Service Centre or dealer may be able to assist you in obtaining the correct Aerial system for your particular area and the accessories required Any matters regarding A...

Page 9: ...agram in example 1 for mains lead connection DVD Recorder or VCR Aerial Rear of the TV Example 2 Connecting DVD Recorder VCR RF cable TV DVD Recorder or VCR AC 220 240 V 50 60 Hz RCA cable RF cable Note VIERA Link connection p 38 If your recorder is not available for DVB p 48 Read the manual of the equipment too ...

Page 10: ...sen Keep pushing both side snaps Set the tip in the hooks Insert the clamper in a hole ŶAttach the clamper ŶBundle the cables Keep pushing the knob knob hooks To remove from the TV hole Basic Connection TV DVD Recorder VCR and Set top box DVD Recorder or VCR Fully wired HDMI compliant cable Aerial Rear of the TV Set top box AC 220 240 V 50 60 Hz RCA cable RF cable RF cable RCA cable Example 3 Conn...

Page 11: ...quence When in Standby mode switches TV On Teletext p 18 Switches to teletext mode OK Confirms selections and choices Press after selecting programme positions to quickly change programme DVB p 14 VCR DVD Panasonic equipment operations p 21 Volume Up Down Programme Information p 15 Displays programme information Index p 19 Returns to the teletext index page teletext mode Coloured buttons Used for t...

Page 12: ...Auto Tuning is now complete and your TV is ready for viewing You can now use the remote control to turn On the TV or turn the TV to standby mode Power LED On To edit programmes Editing Programmes p 28 3 Start Auto Tuning Auto Tuning will start to search for TV programmes and store them in the numbered order as specified by the broadcasters 2 Select your state select Home is the recommended mode for...

Page 13: ...menu ŶHow to use remote control Using the On Screen Displays Open the main menu Move the cursor select the menu Move the cursor adjust levels select from a range of options Access the menu store settings after adjustments have been made or options have been set RETURN Return to the previous menu EXIT Exit the menu system and return to the normal viewing screen Note If tuning has failed Auto Tuning...

Page 14: ...tings in Shipping Condition p 32 and select Home in Auto Tuning p 12 down or 1 Also possible to select the mode using the TV button on the front panel of the TV p 11 To select the two or three digit programme number e g 39 in a short time If one or two digit programme number quickly changes the programme Display Information banner if it is not displayed While the banner is displayed select the pro...

Page 15: ...event DVB mode To watch the programme listed in the banner To download new software to TV R System Update Search Now p 27 To hide EXIT To set display timeout Banner Display Timeout p 25 Extra information INFO press again to hide the banner DVB mode INFO Display Information banner Also appears when changing a programme 1 TEN Digital 10 30 am Coronation Street Rating PG Bad Signal 45 9 00 am 11 00 a...

Page 16: ... full screen Stretching is only noticeable at the left and right edges 4 3 4 3 Full Zoom1 Displays the image at the standard 4 3 without dis tortion Displays a 4 3 image enlarged horizontally to fit the screen Only available in DVB mode or HD signal Displays a 16 9 letterbox or 4 3 image without distortion Zoom2 Zoom3 Displays a 16 9 letterbox anamorphic image full screen without distortion Display...

Page 17: ...y G DVB mode ŶTo watch the programme Select the event or programme now on the air select watch ŶTo view details of the event DVB mode Select the event select INFO Press again to return to TV Guide ŶTo view a programme list of the selected type DVB mode Y All Types Movie News Sport Entertainment Children s Music Prog type All Types Type list select type view ŶTo view a programme list of the selecte...

Page 18: ...TEXT mode four differently coloured subjects are situated at the bottom of the screen To access more information about one of these subjects press the appropriately coloured button This facility enables fast access to information on the subjects shown What is TOP mode in case of TOP text broadcasting TOP is a particular improvement of the standard teletext service that results in an easier search ...

Page 19: ...xample P6 Appears at top of the screen ŶTo view specific sub page B View sub page Only when teletext is more than one page Watch TV while waiting for update P108 Y Y Appears when updating is completed You cannot change the programme Teletext automatically updates itself when new information becomes available The news page provides a function that indicates arrival of latest news News Flash Changes ...

Page 20: ... the input mode connected to the equipment Note If the external equipment has an aspect adjustment function set to 16 9 For details see the manual of the equipment or ask your local dealer ŶTo return to TV Display the Input select menu Displays the selected mode You can also select the input using the AV button on the remote control or the front panel of the TV Press the button repeatedly until th...

Page 21: ...o play at slow speed Programme Up Down Select programme Record Start recording Panasonic equipment connected to the TV can be directly operated with the remote control Setting your remote control to operate Panasonic VCR DVD etc Set the VCR DVD switch to the appropriate position Press and hold POWER during the following operations Enter the appropriate code for the equipment to be controlled see t...

Page 22: ...djust or select example Picture Menu example Picture Menu 1 select access select change store or access Required by some functions ŶTo return to TV at any time EXIT ŶTo return to the previous screen RETURN ŶTo change menu pages CH up down Changed Number and positions of alternatives Moved ŶChoose from among alternatives ŶAdjust using the slide bar Displays the next screen ŶGo to the next screen ŶT...

Page 23: ...u Teletext TOP System Update Access Power Save DVB Favourites Edit Access Off Intelligent Frame Creation On 2 3 Setup Menu 3 seconds VIERA Link Settings Access Banner Display Timeout On Picture Overscan NSW ACT Region Select On SD Card LED Auto Daylight Saving Time Software Licence Access Input Labels Access Side Panel High p 25 Tuning Menu Auto Tuning Access DVB Manual Tuning Analogue Manual Tuni...

Page 24: ...lower deeper sound output Treble Increases or decreases level to enhance or minimise sharper higher sound output Balance Adjusts volume level of right and left speakers Headphone Volume Adjusts the volume of the headphones Surround Surround sound settings Off Simulated Surround SRS TruSurround XT Simulated Surround Provides a dynamic enhancer to simulate improved spatial effects SRS TruSurround XT...

Page 25: ... new software to TV p 27 Power Save Reduces brightness of picture to economise on power consumption Off On Side Panel Increases the brightness of the side panel Off Low Mid High The recommended setting is High to prevent panel image retention Picture Overscan Selects the screen area displaying the image Off On On Enlarged the image to hide the edge of the image Off Displayed the image in the origi...

Page 26: ... STTL GUIDE G R Y B TV EXIT INPUT 2 3 Setup Menu 3 seconds VIERA Link Settings SD Card LED Banner Display Timeout On Input Labels Picture Overscan NSW ACT Region Select Auto Daylight Saving Time Software Licence Side Panel Off On 26 DVB Settings 4 3 5 Select Setup Select System Update Region Select or Daylight Saving Time Display the menu Set ŶTo return to TV EXIT DVB mode 1 If in Analogue mode Se...

Page 27: ...ng the TV will display a blank screen for 40 to 50 seconds Do not interrupt the TV during this procedure ŶTo update immediately System Update Auto Update Search in Standby System Update Search Now On Select Auto Update Search in Standby and then set On or Off On Automatically performs a search in standby and downloads an update if any software updates are available Download new software to TV For ...

Page 28: ...TION SDCARD EXIT TV INPUT RETURN G R Y B CH 28 Editing Programmes Select Setup Select DVB Favourites Edit DVB Service List or Analogue Service List 4 3 Display the menu You can make your favourite programme lists and skip unwanted programmes etc ŶTo return to TV EXIT 1 Select DVB or Analogue 2 DVB Favourites Edit and DVB Service List are available in DVB mode only Analogue Service List is availabl...

Page 29: ...e List Cartoon Nwk BBCi BBC Radio Wales BBC Radio Cymru BBC ONE Wales BBC THREE 70 72 105 719 720 1 7 add delete skip To retune each programme Manual Tuning R p 31 Skip unwanted programmes DVB Service List Analogue Service List List favourite programmes DVB Favourites Edit DVB mode Favourites Edit TEN Digital All DVB Services 1 ABC TV Sydney 2 SBS DIGITAL 1 3 FTV guide 4 7 Digital 7 NINE DIGITAL 9...

Page 30: ...y Access On 30 Tuning Programmes Select Setup 3 Select Tuning Menu 4 Display the menu Select a function 5 You can retune all the TV programmes when moving house or search for new services which may have recently started broadcasting ŶTo return to TV EXIT 2 access select access select access select 1 Select DVB or Analogue DVB Manual Tuning Add New DVB Services New Service Message and DVB Signal Di...

Page 31: ...mmes are retuned in DVB mode Only Analogue programmes are retuned in Analogue mode Set all DVB or Analogue programmes automatically Auto Tuning DVB Signal Display Service Name CH53 7 7 Digital Signal Quality Signal Strength 0 0 10 10 Selects a programme and checks the DVB signal condition To change the programme CH A good Signal Strength is not an indication of suitable signal for DVB reception Pl...

Page 32: ...matically start when Mains power On Off switch is next turned On p 12 ŶTo retune TV programmes only e g after moving house Auto Tuning p 31 3 2 4 Select Setup Select Shipping Condition Display the menu Set ŶTo return to TV EXIT Restore Settings Resets the TV to its original condition i e no programmes tuned in All settings programmes picture sound quality etc are reset 1 EXIT RETURN Confirm Analog...

Page 33: ...nu Select a input terminal and set ŶTo return to TV EXIT For easier identification and selection of the input mode you can label each input terminals or skip terminal that is not connected to any equipment To select the input mode p 20 1 The labels you set will be displayed in Input Selection menu p 20 or banner If Skip is selected you cannot select the mode select access select access select set a...

Page 34: ...istortion Adjust after Clock adjustment Set to the minimum level if noise occurs Sync PC sync signal type H V SOG H V Horizontal and Vertical sync from your PC Most common sync format SOG Sync on Green sync from your PC Reset PC Settings Press the OK button to reset to the default Setup settings Other items p 24 and p 25 OPTION SDCARD EXIT RETURN INPUT Input Selection AV1 AV2 AV3 AV4 PC HDMI1 HDMI...

Page 35: ...only Use with a PC is not guaranteed Only HDMI video formats in page 46 HDMI table are applicable If the connected equipment has an aspect adjustment function set the aspect ratio to 16 9 These HDMI connectors are type A These HDMI connectors are compatible with HDCP High Bandwidth Digital Content Protection copyright protection An equipment having no digital output terminal may be connected to th...

Page 36: ...out record of the date is shown as Unknown select the group to be viewed view the thumbnail of the selected group View Displayed one at a time To display hide the operation guide INFO or OPTION To the previous photo Rotate 90 anti clockwise To the next photo Rotate 90 clockwise To return to thumbnail RETURN ŶMovie View Title Trip Scene Japan MENU No Date Time Duration Movie View Mode Select Play E...

Page 37: ...enu Change the sound if the movie has multiple audio signals Display the menu Select Sound Select SPDIF Selection and set access Other items p 24 and p 25 select Audio Selection Stereo Option Menu OPTION Current sound status set select It may take several seconds to change the sound During the operation no signals are output from any of the AV terminals But the sound in Movie View can be output fr...

Page 38: ...vated the TV is automatically turned on Only when TV is in Standby mode Power off link Set Power off Link Set in Setup Menu to use this function Power off Link p 22 23 25 When TV is set to Standby mode the connected equipment is also automatically set to Standby This function will work even if the TV enters standby mode automatically by Off Timer function or auto power standby function ŶPreparatio...

Page 39: ...umed playback the recorded programme will be deleted from HDD Display VIERA Link Menu select pause select resume Pause Live TV programme HDAVIControl3 and RecorderwithHDD Pause Live TV Direct TV Recording What you see is What you record HDAVI Control 3 Direct TV Rec OPTION SDCARD EXIT RETURN Recording the current programme in DIGA Recorder immediately This function is available with DIGA Recorder ...

Page 40: ...the connected equipment is displayed But you cannot access it Use its own remote control to operate the equipment Direct TV Rec Speaker Selection VIERA Link Menu Home Cinema Start VIERA Link Control Speaker Selection Home Cinema Others Pause Live TV When the equipment of other types or manufacturers is connected Others Others is displayed You cannot access it Use its own remote control to operate ...

Page 41: ... the equipment is turned off TV speakers will be active ŶTV TV speakers are active Select Speaker Selection This function may not work properly depending on the connected equipment Image or sound may not be available for the first few seconds when the playback starts Image or sound may not be available for the first few seconds when Input mode is switched Volume function will be displayed when adjus...

Page 42: ... VIDEO S VIDEO AV4 IN AV IN 4 AUDIO 42 These diagrams show our recommendations for how to connect the TV to your various equipment For other connections consult the instructions for each piece of equipment the table below and the specifications p 50 External Equipment Recommended Connection ŶTypes of connectable equipment to each terminal Amplifier with speaker system To listen with speakers Optica...

Page 43: ...rominance in Chrominance earth Luminance in Luminance earth Hot Plug Detect 19 DDC CEC Ground 17 SCL 15 CEC 13 TMDS Clock Shield 11 TMDS Data0í 9 TMDS Data0 7 TMDS Data1 Shield 5 TMDS Data2í 3 TMDS Data2 1 18 5V Power 16 SDA 14 Reserved in cable but N C on device 12 TMDS Clockí 10 TMDS Clock 8 TMDS Data0 Shield 6 TMDS Data1í 4 TMDS Data1 2 TMDS Data2 Shield HDMI terminal Connect the S VIDEO or VID...

Page 44: ...ransmitted in some countries When you receive the stereo bilingual sound system sound output modes can be selected by MPX in the Sound Menu p 24 NICAM Used in New Zealand Singapore Hong Kong etc A2 German Used in Australia Malaysia etc Note During downloading do not turn Off the TV or touch any buttons The TV is automatically activated after downloading is completed When the TV is switched to stan...

Page 45: ...gy Industries Association JEITA Note Format the card with the recording equipment The picture may not appear correctly on this TV depending on the recording equipment used Display may take some time when there are many files and folders This function cannot display Motion JPEG and still image not DCF formatted i e TIFF BMP A data modified with a PC may not be displayed Images imported from a PC must...

Page 46: ...nput signal that can be displayed Note Signals other than above may not be displayed properly The above signals are reformatted for optimal viewing on your display Applicable input signal for PC is basically compatible to VESA standard timing PC signal is magnified or compressed for display so that it may not be possible to show fine detail with sufficient clarity COMPONENT Y PB CB PR CR HDMI Mark Ap...

Page 47: ...ewspaper It also naturally follows that higher panel resolutions contain more pixels To create a colour image each pixel consists of three tiny coloured dots known as sub pixels one each of red green and blue Each one of these dots is precisely controlled by the electronics of the TV to produce the picture Whilst Panasonic maintains the highest standards in manufacturing technology and processes i...

Page 48: ...rom an infrequently used electrical appliance or a passing vehicle or lawn mower with a noisy ignition system Picture regularly breaks up on some programmes or No Signal message Check Signal Display p 31 If Signal Quality or Signal Strength are displayed in red or constantly changing check aerial If problem persists consult your local TV aerial installer Check that the aerial and antenna cable are...

Page 49: ...y Corporation This product is licensed under the AVC patent portfolio license for the personal and non commercial use of a consumer to i encode video in compliance with the AVC Standard AVC Video and or ii decode AVC Video that was encoded by a consumer engaged in a personal and non commercial activity and or was obtained from a video provider licensed to provide AVC Video No license is granted or...

Page 50: ...1 1 0 V p p 75 COMPONENT Y 1 0 V p p including synchronization PB CB PR CR 0 35 V p p AV2 Input AUDIO L R RCA PIN Type 2 0 5 V rms VIDEO RCA PIN Type 1 1 0 V p p 75 COMPONENT Y 1 0 V p p including synchronization PB CB PR CR 0 35 V p p AV3 Input AUDIO L R RCA PIN Type 2 0 5 V rms VIDEO RCA PIN Type 1 1 0 V p p 75 S VIDEO Mini DIN 4 pin Y 1 0 V p p 75 C 0 286 V p p 75 AV4 Input AUDIO L R RCA PIN Ty...

Page 51: ...at freight and insurance to and or from your nearest Authorised Service Centre must be arranged by you Note that home or pick up delivery service is available for the following products in the major metropolitan areas of Australia or the normal operating areas of the nearest Authorised Service Centres a Picture tube CRT based Television Receivers screen b Convection Combination Microwave Ovens siz...

Page 52: ...panel You should note this serial number in the space provided below and retain this book plus your purchase receipt as a permanent record of your purchase to aid in identification in the event of theft or loss and for Warranty Service purposes Model Number Serial Number Web Site http panasonic net Panasonic Corporation 2008 ...

Reviews: