background image

Advanced

27

T

uning Programmes

Set 

programme

manually

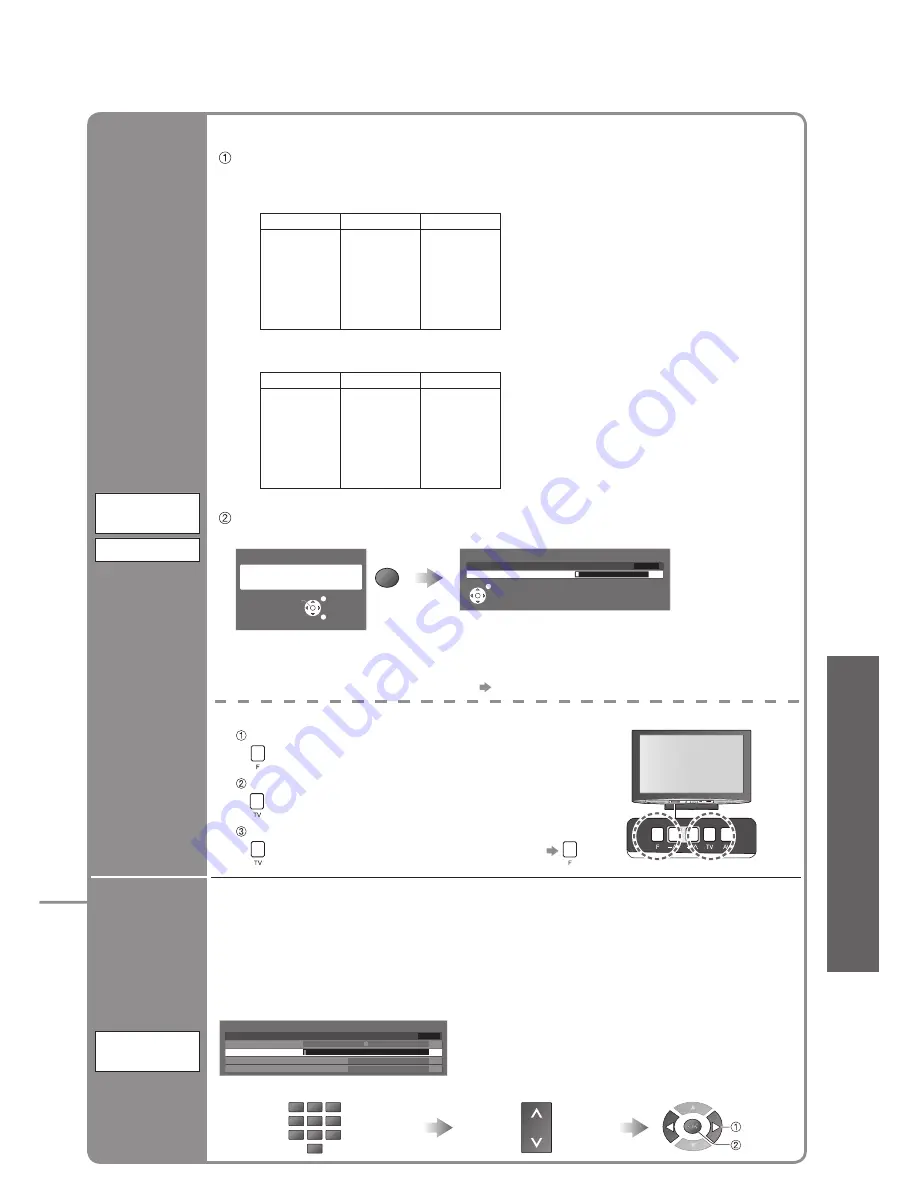
Manual 

Tuning

1 BBC1

CH33

Manual Tuning

Sound System

Manual Tuning

1

120

Fine Tuning

5.5MHz

Colour System

Auto

CH33


Fine Tuning

Use to make small adjustments to the tuning of an individual programme (affected by 

weather conditions, etc.) 


Manual Tuning

Set programme manually after Auto Tuning.

• 

Set Sound System and Colour System, and then perform this function. 

Normally set Colour System “Auto”.

• 

If a VCR is connected only with the RF cable, select programme position “0”.

 store

 search

Search and store

Select the programme

CH

Select the programme position

1

3

2

4

6

5

7

9

8

0

Set all  

programmes

automatically

Channel 

Selection

Auto Tuning

Auto Tuning

2

Scan

1

120

CH4

EXIT

EXIT

RETURN

Start Auto Tuning

All tuning data will be erased

Auto Tuning

OK

Access “Auto Tuning”

Settings are made automatically

• 

All the previous tuning settings are erased.

• 

When the operation is completed, the programme at programme position “1” will be 

displayed.

 If tuning has not been done completely   “Manual Tuning”

Automatically retune all programmes received in the area.

• 

If a Child Lock PIN number (p. 28) has been set, it must be entered.

 Select the Channel Selection method (Position / Direct) 


Position


Direct

Example

When Channel Selection is on Position, 

and Auto Tuning is performed, the TV 

memorises the programmes tuned in order 

from Programme Number 1.

During Position mode various reception 

programmes can be viewed.

Example

When Channel Selection is on Direct, 

and Auto Tuning is performed, the TV 

memorises the Programme Number which 

is the same as the programme tuned.

The Channel Display numbers for the 

broadcast stations in each region are listed 

on p. 40.

Programme Number Channel Display Received Programme

1

2

3

4

5

6

7

8

9

10

2

4

6

8

10

2

4

6

8

10

Programme Number Channel Display Received Programme

1

2

3

4

5

6

7

8

9

10

2

4

6

8

10

12

14

16

18

20

2

4

6

8

10

12

14

16

18

20

 Start Auto Tuning


For Auto Tuning, using the buttons on the front of the TV 

(p. 9)

  Press repeatedly until “Auto Tuning” appears

  Access “Auto Tuning”

  Start “Auto Tuning”

• 

To return to TV   

Summary of Contents for Viera TH-42PY800AZ

Page 1: ...ead these instructions before operating your set and retain them for future reference The images shown in this manual are for illustrative purposes only Model No TH 42PY800AZ TH 50PY800AZ Operating Instructions Plasma Television ...

Page 2: ...2 Turn your own living room into a movie theatre Experience an amazing level of multi ...

Page 3: ...store Settings 29 Input Labels 30 Displaying PC Screen on TV 31 Viewing from SD Card Photos 32 VIERA Link HDAVI ControlTM 34 External Equipment 38 Enjoy your TV Basic Features Watching TV 14 Viewing Teletext 16 Watching Videos and DVDs 18 FAQs etc Technical Information 40 FAQs 43 Licence 45 Specifications 46 Quick Start Guide Accessories Options 6 Identifying Controls 9 Basic Connection 10 Auto Tu...

Page 4: ...exposing the TV to direct sunlight and other sources of heat To prevent fire never place any type of candle or naked flame on top or near the TV Power source This TV is designed to operate on 220 240 V 50 60 Hz AC Do not place foreign objects inside the TV Do not allow any objects to drop into the TV through the air vents fire or electrical shock may result Do not place the TV on sloped or unstabl...

Page 5: ...hard object Take care not to subject the surface to insect repellent solvent thinner or other volatile substances this may degrade surface quality Cabinet Pedestal Regular care Wipe the surface clean using a soft dry cloth Major contamination Dampen a soft cloth with clean water or water containing a small amount of neutral detergent Then wring the cloth and wipe the surface clean with it Finally ...

Page 6: ...our dealer or a licenced contractor to secure the wall hanging brackets Carefully read the instructions accompanying the pedestal and be absolutely sure to take steps to prevent the TV from tipping over Handle the TV carefully during installation since subjecting it to impact or other forces may cause product damage Optional accessories Wall hanging bracket vertical TY WK42PV4W angle TY WK42PR4W B...

Page 7: ...er immediately During set up make sure that all screws are securely tightened If insufficient care is taken to ensure screws are properly tightened during assembly the pedestal will not be strong enough to support the TV and it might fall over and become damaged and personal injury may result Ensure that the TV does not fall over If the TV is knocked or children climb onto the pedestal with the TV...

Page 8: ...tach the clamper Bundle the cables Keep pushing the knob knob hooks To remove from the TV hole Accessories Options Adjust the panel to your desired angle Ensure that the pedestal does not hang over the edge of the base even if the TV swivels to the full rotation range Do not place any objects or hands within the full rotation range a b c c View from the top Set the mark at the centre as illustrate...

Page 9: ... VIERA Link Menu p 35 Press to access VIERA Link Menu directly Main Menu p 20 Press to access VIERA Link Picture Sound and Setup Menus Option Menu p 14 Easy setting for viewing and sound options SD Card p 32 Switches to SD Card viewing mode Favourite Page p 17 Calls up the teletext page stored in blue button Input mode selection TV switches to TV mode p 18 AV switches to AV input mode from Input S...

Page 10: ...z Note Do not put the RF cable close to the mains lead to avoid noise Do not place the RF cable under the TV To obtain optimum quality picture and sound an Aerial the correct cable 75 Ω coaxial and the correct terminating plug are required If a communal Aerial system is used you may require the correct connection cable and plug between the wall Aerial socket and the TV Your local Television Servic...

Page 11: ...ox TV DVD Recorder VCR and Set top box DVD Recorder or VCR Fully wired HDMI compliant cable Aerial Mains lead supplied Rear of the TV Set top box AC 220 240 V 50 60 Hz RF cable RCA cable RF cable RF cable RCA cable To remove from the TV Press both tabs and pull on mains connector to release Make sure that the mains lead is securely fixed tabs Push until both side tabs click ...

Page 12: ... the remote control to turn On the TV or turn the TV to standby mode Power LED On To edit programmes Editing Programmes p 24 4 Start Auto Tuning Auto Tuning will start to search for TV programmes and store them The sorted programme order depends upon the TV signal the broadcasting system and reception conditions 2 Select your language select Home is the recommended mode for viewing at home Select ...

Page 13: ...o use remote control Using the On Screen Displays MENU Open the main menu Move the cursor select the menu Move the cursor adjust levels select from a range of options OK Access the menu store settings after adjustments have been made or options have been set RETURN Return to the previous menu EXIT Exit the menu system and return to the normal viewing screen Note If tuning has failed Auto Tuning p ...

Page 14: ...Banner Display Timeout p 23 select programme watch HOLD Freeze unfreeze picture Hold Other useful functions Display the selectable settings for the current programme OPTION Check or change the current programme status instantly To change CH Colour Set Adjusts the colour density Picture Menu p 22 Teletext Character Set Sets the teletext language Setup Menu p 23 Volume Correction Adjusts volume of i...

Page 15: ...4 3 without distortion Displays a 4 3 image enlarged horizontally to fit the screen HD signal only Zoom1 Zoom2 Displays a 16 9 letterbox or 4 3 image without distortion Displays a 16 9 letterbox anamorphic image full screen without distortion Zoom3 Displays a 2 35 1 letterbox anamorphic image full screen without distortion At 16 9 displays the image at its maximum with slight enlargement Select Ch...

Page 16: ...ects are situated at the bottom of the screen To access more information about one of these subjects press the appropriately coloured button This facility enables fast access to information on the subjects shown What is TOP mode in case of TOP text broadcasting TOP is a particular improvement of the standard teletext service that results in an easier search and effective guide Fast overview of the...

Page 17: ... you can watch TV Enter the 4 digit number example P6 Appears at top of the screen To view specific sub page MENU B View sub page Only when teletext is more than one page Watch TV while waiting for update P108 MENU Y Y Appears when updating is completed You cannot change the programme Teletext automatically updates itself when new information becomes available The news page provides a function tha...

Page 18: ...pment Select the input mode connected to the equipment Note If the external equipment has an aspect adjustment function set to 16 9 For details see the manual of the equipment or ask your local dealer To return to TV Display the Input select menu Displays the selected mode You can also select the input using the AV button on the remote control or the front panel of the TV Press the button repeated...

Page 19: ...eed PROGRAMME Programme Up Down Select programme REC Record Start recording Panasonic equipment connected to the TV can be directly operated with the remote control Setting your remote control to operate Panasonic VCR DVD etc Set the VCR DVD switch to the appropriate position VCR DVD Press and hold POWER during the following operations Enter the appropriate code for the equipment to be controlled ...

Page 20: ... to the input signal Select the menu Select the item example Picture Menu Adjust or select example Picture Menu example Picture Menu 1 select access select change store or access Required by some functions To return to TV at any time EXIT To return to the previous screen RETURN To change menu pages CH up down Changed Number and positions of alternatives Moved Choose from among alternatives Adjust ...

Page 21: ...TOP Access Access Setup Menu Service List Edit Access Colour Matrix SD Teletext Character Set English Intelligent Frame Creation On 2 2 3 seconds Input Labels Access Setup Menu Banner Display Timeout Side Panel High Picture Overscan On System Information Access Software Licence Access VIERA Link Settings Access Power Save Off Shipping Condition Access p 23 Access Tuning Menu Auto Tuning Access Cha...

Page 22: ...Mid Strong Not valid on PC signal 3D COMB Occasionally whilst viewing still or slow moving pictures colour patterning may be seen Set to On to display sharper and more accurate colours Off On For PAL or NTSC signal reception only Not valid on S Video Component PC HDMI and SD Card Reset to Default Press the OK button to reset the present Picture Menu on all inputs to default settings Sound Menu Bas...

Page 23: ...een displays Teletext Teletext display mode TOP FASTEXT List p 16 Teletext Character Set Select teletext language English CIS E Europe Persian Shipping Condition Resets all settings for example when moving house p 29 Power Save Reduces brightness of picture to economise on power consumption Off On Side Panel Increases the brightness of the side panel Off Low Mid High The recommended setting is Hig...

Page 24: ...Frame Creation On Service List Edit Access English PROGRAMME REC VCR DVD TEXT F P INDEX HOLD OPTION DIRECTTV REC ASPECT 1 3 2 4 6 5 7 9 8 0 INPUT TV R G Y B EXIT MENU OK RETURN CH MENU 24 Editing Programmes Select Setup Select Service List Edit 3 2 Display the menu You can skip unwanted programmes or edit programmes To return to TV EXIT 1 access select access select 4 Set ...

Page 25: ...and add delete add delete select To retune each programme Manual Tuning R p 27 BBC1 Service List Editor 1 2 3 4 5 6 7 select Programme position Name Edit To change the name displayed when selecting programmes Select Rename G Set characters Edit service name Name A B C D E F G H I J K L M N U V W X Y Z 0 1 2 3 4 5 6 a b c d e f g h i j k l m n u v w x y z _ O P Q R S T 7 8 9 o p q r s t set select ...

Page 26: ...uage Teletext TOP Teletext Character Set English Shipping Condition Access Setup Menu Access Tuning Menu Auto Tuning Access Channel Selection Manual Tuning Access Position MENU 26 Tuning Programmes 3 4 5 You can retune all the TV programmes when moving house or search for new services which may have recently started broadcasting To return to TV EXIT 2 1 Select Setup Select Tuning Menu Display the ...

Page 27: ...e at programme position 1 will be displayed If tuning has not been done completely Manual Tuning Automatically retune all programmes received in the area If a Child Lock PIN number p 28 has been set it must be entered Select the Channel Selection method Position Direct Position Direct Example When Channel Selection is on Position and Auto Tuning is performed the TV memorises the programmes tuned i...

Page 28: ... can watch it To return to TV EXIT Child Lock PIN Entry Please enter new PIN PIN Child Lock Child Lock List Change PIN Access Child Lock List Services and AV Name AV1 AV2 Lock TV TV TV TV TV TV AV AV Type BBC 1 THREE 7 E4 14 CBBC 70 Nwk 72 BBCi 80 1 3 2 4 6 5 7 9 8 0 To change the PIN number Select Change PIN in and enter a new PIN number twice Appears when the programme input is locked Enter the ...

Page 29: ...en instructions Auto Tuning will automatically start when Mains power On Off switch is next turned On p 12 To retune TV programmes only e g after moving house Auto Tuning p 27 3 2 4 Select Setup Select Shipping Condition Display the menu Set To return to TV EXIT Restore Settings Resets the TV to its original condition i e no programmes tuned in All settings programmes picture sound quality etc are...

Page 30: ... the menu Select a input terminal and set To return to TV EXIT For easier identification and selection of the input mode you can label each input terminals or skip terminal that is not connected to any equipment To select the input mode p 18 1 The labels you set will be displayed in Input Selection menu p 18 or banner If Skip is selected you cannot select the mode select access select access selec...

Page 31: ...Adjust after Clock adjustment Set to the minimum level if noise occurs Sync PC sync signal type H V On G H V Horizontal and Vertical sync from your PC Most common sync format On G Sync on Green sync from your PC Reset to Default Press the OK button to reset to the default Setup settings Other items p 22 and p 23 ASPECT RETURN EXIT MENU OPTION DIRECTTV REC VCR 1 3 2 4 6 5 7 9 8 0 INPUT OK Input Sel...

Page 32: ... 3 Displayed one at a time To the previous photo Rotate 90 anti clockwise To the next photo Rotate 90 clockwise 1 2 Enter SD mode Photo View Mode select view Operation guide Thumbnail Caution During the operation no signals are output from the monitor output terminals To return to TV EXIT or SDCARD Error display images that could not be loaded etc Selected photo information is displayed The maximu...

Page 33: ...e in step or Slide show settings operate in step or Slide show Select the photo for the first view Start Slide show Display the menu Select Card Setup Menu Select the items and set access Picture Menu p 22 Menu Item Adjustments Configurations alternatives Card Setup Menu Interval Select slide show interval 5 10 15 30 60 90 120 seconds Repeat Slide show repeat Off On set select To pause To return t...

Page 34: ...re activated the TV is automatically turned on Only when TV is in Standby mode Power off link Set Power off Link Set in Setup Menu to use this function Power off Link p 20 21 23 When TV is set to Standby mode the connected equipment is also automatically set to Standby This function will work even if the TV enters standby mode automatically by Off Timer function or auto power standby function Prep...

Page 35: ...mode change the programme If you cancel pause or resumed playback the recorded programme will be deleted from HDD Display VIERA Link Menu select pause select resume Pause Live TV programme HDAVIControl3 and RecorderwithHDD Pause Live TV Direct TV Recording What you see is What you record HDAVI Control 3 Direct TV Rec R G B Y GUIDE POWER RETURN EXIT 1 3 2 4 6 5 7 9 8 MENU OPTION SD CARD ASPECT INPU...

Page 36: ...eo Camera The type of the connected equipment is displayed But you cannot access it Use its own remote control to operate the equipment Direct TV Rec Speaker Selection VIERA Link Menu Home Cinema Start VIERA Link Control Speaker Selection Home Cinema Others Pause Live TV When the equipment of other types or manufacturers is connected Others Others is displayed You cannot access it Use its own remo...

Page 37: ...ute MUTE The sound of TV speakers is mute When the equipment is turned off TV speakers will be active TV TV speakers are active Select Speaker Selection This function may not work properly depending on the connected equipment Image or sound may not be available for the first few seconds when the playback starts Image or sound may not be available for the first few seconds when Input mode is switch...

Page 38: ...ystem VIERA Link L R VIDEO S VIDEO AV4 IN AV IN 3 AUDIO 38 These diagrams show our recommendations for how to connect the TV to your various equipment For other connections consult the instructions for each piece of equipment the table below and the specifications p 46 External Equipment Recommended Connection Types of connectable equipment to each terminal Amplifier with speaker system To listen ...

Page 39: ... wired HDMI compliant cable S VIDEO 4 pin terminal Chrominance in Chrominance earth Luminance in Luminance earth Hot Plug Detect 19 DDC CEC Ground 17 SCL 15 CEC 13 TMDS Clock Shield 11 TMDS Data0 9 TMDS Data0 7 TMDS Data1 Shield 5 TMDS Data2 3 TMDS Data2 1 18 5V Power 16 SDA 14 Reserved in cable but N C on device 12 TMDS Clock 10 TMDS Clock 8 TMDS Data0 Shield 6 TMDS Data1 4 TMDS Data1 2 TMDS Data...

Page 40: ...1 21 62 63 69 21 62 63 69 62 63 69 62 63 62 C13 70 73 74 75 76 77 78 79 S 1 S 2 S 3 S 1 S 2 S 3 S 1 S 2 S 3 32 41 S 1 S 1 S 2 S 3 80 81 89 Z1 Z9 S1 S2 S10 S1 S2 S10 S1 S2 S10 42 51 S1 S2 S10 S1 S2 S10 90 91 92 93 94 95 96 97 98 99 Z10 Z11 Z12 Z13 Z14 Z15 Z16 Z17 Z18 Z19 S11 S12 S13 S14 S15 S16 S17 S18 S19 S20 S11 S12 S13 S14 S15 S16 S17 S18 S19 S20 S11 S12 S13 S14 S15 S16 S17 S18 S19 S20 52 61 S11...

Page 41: ...asier if the mode is set to the MONO position using the stereo bilingual sound selection button DUAL also known as DUAL MONO or as BILINGUAL is not currently transmitted in some countries When you receive the stereo bilingual sound system sound output modes can be selected by pressing the Stereo Bilingual Sound Selection button NICAM Used in New Zealand Singapore Hong Kong etc A2 German Used in Au...

Page 42: ...that can be displayed Note Signals other than above may not be displayed properly The above signals are reformatted for optimal viewing on your display Applicable input signal for PC is basically compatible to VESA standard timing PC signal is magnified or compressed for display so that it may not be possible to show fine detail with sufficient clarity COMPONENT Y PB CB PR CR HDMI Mark Applicable ...

Page 43: ...volume An error message appears Follow the message s instructions If the problem persists contact the authorized Service Centre VIERA Link function does not work and an error message appears Confirm the connection Turn the connected equipment on and then switch the TV on p 34 Permanently lit spots on screen Due to production process involved in this technology this may result in some pixels which ...

Page 44: ...Standby mode about 30 mins after broadcasting ends The remote control does not work Are the batteries installed correctly p 6 Has the TV been switched On No sound is produced Is Sound mute active p 9 Is the volume set to the minimum Sound level is low or sound is distorted Sound signal reception may be deteriorated Check Sound system p 27 Chaotic image noisy Set P NR in the Picture Menu to remove ...

Page 45: ...trademarks or registered trademarks of HDMI Licensing LLC HDAVI ControlTM is a trademark of Matsushita Electric Industrial Co Ltd Manufactured under license from BBE Sound Inc Licensed by BBE Sound Inc under one or more of the following US patents 5510752 5736897 BBE and BBE symbol are registered trademarks of BBE Sound Inc WARRANTY New Zealand only Distributed in New Zealand by Panasonic New Zeal...

Page 46: ...TV C13 C49 JAPAN S21 S41 HYPER Z1 Z37 CHINA 5A 9A AUST Aerial Rear VHF UHF Operating Conditions Temperature 0 C 40 C Humidity 20 80 RH non condensing Connection Terminals AV1 Input AUDIO L R RCA PIN Type 2 0 5 V rms VIDEO RCA PIN Type 1 1 0 V p p 75 Ω COMPONENT Y 1 0 V p p including synchronization PB CB PR CR 0 35 V p p AV2 Input AUDIO L R RCA PIN Type 2 0 5 V rms VIDEO RCA PIN Type 1 1 0 V p p 7...

Page 47: ...FAQs etc Specifi cations 47 MEMO ...

Page 48: ...s Record The model number and serial number of this product may be found on its rear panel You should note this serial number in the space provided below and retain this book plus your purchase receipt as a permanent record of your purchase to aid in identification in the event of theft or loss and for Warranty Service purposes Model Number Serial Number ...

Reviews: