background image

17

V

iewing

• 

W

atching V

ideos and DVDs

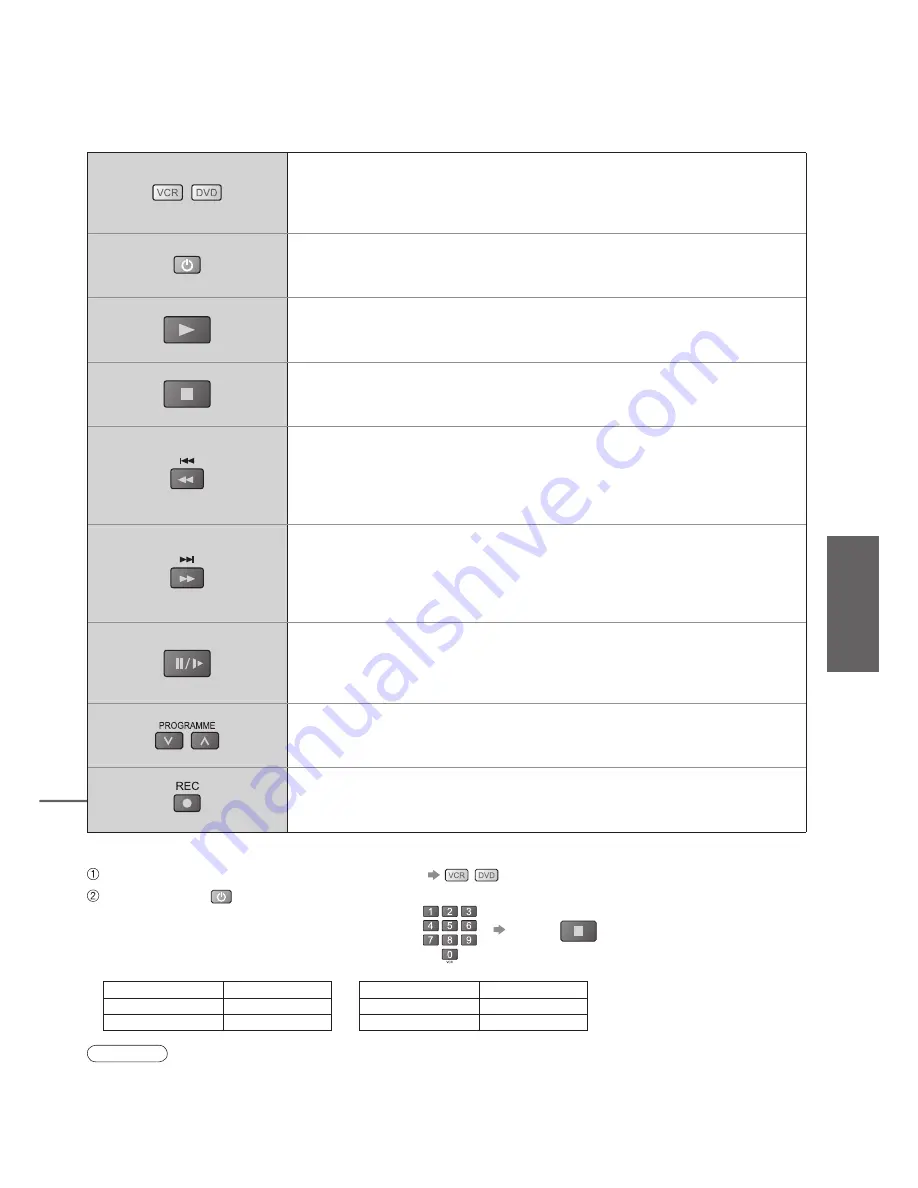
VCR / DVD selection buttons

Select VCR to operate Panasonic VCR or DVD equipment

Select DVD to operate Panasonic DVD equipment or Player home theatre

Standby

Set to Standby mode / Turn on

Play

Playback videocassette / DVD

Stop

Stop the operations

Rewind / Skip / Search

VCR: Rewind, view the picture rapidly in reverse

DVD: Skip to the previous track or title


Press and hold to search backward

Fast-forward / Skip / Search

VCR: Fast-forward, view the picture rapidly forward

DVD: Skip to the next track or title


Press and hold to search forward

Pause

Pause / Restart

DVD: Press and hold to play at slow speed

Programme Up / Down

Select programme

Record

Start recording

Panasonic equipment connected to the TV can be directly operated with the remote control.

Note

• 

Con

fi

 rm correct operation after the code changed.

• 

The codes will be reset to default values if batteries are replaced.

• 

“DVD” means DVD player, DVD recorders and Recorder home theatre.

• 

Some operations may not be possible on some equipment models.

Setting your remote control to operate Panasonic VCR, DVD, etc.


Select the VCR or DVD button you want to set


Press and hold 

 during the following operations

Enter the appropriate code for the equipment 

to be controlled, see table below

Press 

“VCR” button

Equipment

Code

VCR

10 (default)

DVD

11

“DVD” button

Equipment

Code

DVD

70 (default)

Player home theatre

71

Summary of Contents for Viera TH-42PX74EA

Page 1: ...T TV Operating Instructions Plasma Television English Please read these instructions before operating your set and retain them for future reference The images shown in this manual are for illustrative...

Page 2: ...lated to DVB Digital Video Broadcasting will work in areas where DVB T MPEG2 digital terrestrial broadcasting are received Consult your local Panasonic dealer with coverage areas DVB functions may not...

Page 3: ...DVB Settings DVB 24 pay TV software update time adjustment Editing Channels 26 Tuning Channels 28 Restore Settings 31 Input Labels 32 Displaying PC Screen on TV 33 Q Link Functions 34 HDMI Functions...

Page 4: ...to prevent electrical shock An apparatus with CLASS I construction shall be connected to a mains socket outlet with a protective earthing connection Do not touch the mains plug with a wet hand This ma...

Page 5: ...the TV could lead to product failure Use care not to subject surfaces to bug repellent solvent thinner or other volatile substances this may deteriorate the surface by peeling the paint Do not allow...

Page 6: ...the pedestal standard accessory Attaching the bands for fixing cables p 8 Rear of the TV snaps To remove from the TV To loosen Keep pushing both side snaps Set the tip in the hooks Insert the clamper...

Page 7: ...over and become damaged and personal injury may result Use the accessory fall prevention brackets to secure the TV If the TV is knocked or children climb onto the pedestal with the TV installed the TV...

Page 8: ...cial wire or chain Remove Attach Attaching the bands for fixing cables To tighten To loosen Preventing the TV from falling over The TV could fall over during an earthquake etc We recommend that measur...

Page 9: ...lects programmes in sequence Teletext p 18 OK button to confirm selections and choices Press after selecting programme positions to quickly change programme VCR DVD operations p 17 Volume Programme In...

Page 10: ...m the mains socket before attaching or disconnecting any leads When disconnecting the mains lead be absolutely sure to disconnect the mains plug at the socket outlet first Example 1 Connecting aerial...

Page 11: ...IN RF IN Basic Connection Example 3 Connecting DVD Recorder VCR and Set top box TV DVD Recorder VCR and Set top box DVD Recorder or VCR SCART cable fully wired RF cable Aerial Mains lead supplied Rear...

Page 12: ...nema Plug the TV into mains socket and switch On Takes a few seconds to be displayed 1 Auto Setup Search and store TV channels automatically These steps are not necessary if the setup has been complet...

Page 13: ...evels select from a range of options Access the menu store settings after adjustments have been made or options have been set Many features available on this TV can be accessed via the On Screen Displ...

Page 14: ...Page up down RETURN To select the two or three digit programme number e g 39 Watching TV up down or in a short time Select a channel 3 2 Select DVB Digital Video Broadcasting or Analogue Information...

Page 15: ...Multi Audio DVB mode Possible if the programme has some languages of sounds Teletext Language Setup Menu p 23 MPX Analogue mode Sound Menu p 22 Volume Correction Adjusts volume of individual channel o...

Page 16: ...the selected mode 1 Turn the TV on When connecting with SCART as example 2 or 3 p 10 and p 11 Receives input signals automatically when playback starts Input signals are automatically identified by t...

Page 17: ...DVD Press and hold to play at slow speed Programme Up Down Select programme Record Start recording Panasonic equipment connected to the TV can be directly operated with the remote control Note Confirm...

Page 18: ...four differently coloured page numbers are situated at the bottom of the screen Each of these numbers can be altered and stored in the TV s memory Store frequently viewed pages p 19 To change mode Tel...

Page 19: ...nel Teletext automatically updates itself when new information becomes available The news page provides a function that indicates arrival of latest news News Flash Changes to TV screen temporarily Vie...

Page 20: ...s menus allow you to make settings for the picture sound and other functions Displays the functions that can be set varies according to the input signal Note To initialize all settings Shipping Condit...

Page 21: ...agement Off P NR Off Picture Menu 2 2 3D COMB Off Reset to Default Set MPEG NR Off Picture Menu p 22 2 2 Reset to Default Set Sound Menu Mode Music Bass Treble Balance Surround Volume Correction Off P...

Page 22: ...r NTSC signal reception only Not valid on RGB S Video components PC and HDMI Reset to Default Press the OK button to reset the present Picture Mode to the default settings Sound Mode Basic sound mode...

Page 23: ...nutes Language OSD Language Changes language for on screen displays Teletext Language Selects teletext language West East1 East2 West English French German Greek Italian Spanish Swedish Turkish East1...

Page 24: ...s VIERA Link On Setup Menu Time Zone Auto Power Save Off Side Panel Off OPTION DIRECTTVREC RETURN EXIT INPUT TV 24 DVB Settings Select Setup Select Common Interface System Update or Time Zone Set To r...

Page 25: ...ple On screen operation guide may not correspond to the remote control buttons Caution Turn Off Mains power On Off switch whenever inserting or removing the CI module If a view card and a card reader...

Page 26: ...up Menu OPTION DIRECTTVREC EXIT INPUT TV RETURN 26 Editing Channels Select Setup Select DVB Profile Edit DVB Service List or Child Lock Set You can make your favourite channel lists skip unwanted chan...

Page 27: ...locked channel To lock all channels yellow To cancel all channel locks blue Select the channel to be locked Note Setting Shipping Condition p 31 erases the PIN number and all settings Enter the PIN n...

Page 28: ...Access New Service Message DVB Signal Condition Access On 28 Set 6 Tuning Channels Select Setup Select Tuning Menu Display the menu Select a function You can re tune all TV channels when moving house...

Page 29: ...amme Edit 1 CH33 2 CH21 3 CH21 4 CH60 5 CH21 Prog Chan Name 1 2 3 X Y Z F T P 4 5 6 SC1 Auto SC1 Auto SC1 Auto SC1 Auto SC1 Auto Sound Sys Colour Sys To change sound system based on signals Select the...

Page 30: ...4 00 Prog Channel Net ID Quality TS ID Service Name All services found will be added to the DVB Service List p 27 automatically DVB Manual Tuning Add DVB channel automatically Any new services found w...

Page 31: ...ll automatically start p 12 To re tune TV channels only e g after moving house Auto Setup p 29 3 2 4 Select Setup Select Shipping Condition Display the menu Set To return to TV EXIT Restore Settings S...

Page 32: ...to TV EXIT For easier identification and selection of the input mode you can label each input terminals or skip terminal that is not connected to any equipment To select the input mode p 16 1 The labe...

Page 33: ...ust after Clock adjustment Set to the minimum level if noise occurs Sync Chooses another synchronous signal if the image is distorted H V On G H V by the horizontal and vertical signals from your PC O...

Page 34: ...nal via a fully wired SCART cable p 38 Q Link terminal setup in Setup Menu Q Link AV1 AV2 out p 23 DATA LOGIC a trademark of Metz Corporation Megalogic a trademark of Grundig Corporation Easy Link a t...

Page 35: ...ut connect to the HDMI1 terminal via a DVI to HDMI adapter cable 2 When the DVI to HDMI adapter cable is used connect the audio cable to the audio input terminal HDMI1 use COMPONENT AUDIO terminals Au...

Page 36: ...DAVI Control based on the control functions provided by HDMI which is an industry standard known as HDMI CEC Consumer Electronics Control is a unique function that we have developed and added As such...

Page 37: ...of TV speakers is mute When the equipment is turned off TV speakers will be active VIERA Link Control Speaker Selection VIERA Link Menu Home Cinema Recorder Easy control only with VIERA remote contro...

Page 38: ...aker system Q Link Direct TV Recording VIERA Link HDMI 1 HDMI 2 AV VIDEO AUDIO AUDIO RGB VIDEO S VIDEO RGB VIDEO COMPONENT AV 1 AV 2 AUDIO IN PC 38 These diagrams show our recommendations for how to c...

Page 39: ...compliant cable Read the manuals of the equipment too VIERA Link p 36 Speaker system Computer Amplifier with speaker system PC Viewing Listening To listen with speakers Conversion adapter if necessary...

Page 40: ...ep process to determine if the picture being viewed is a widescreen picture Just 14 9 16 9 Zoom3 Zoom2 Zoom1 Directly displays the image at 16 9 without distortion anamorphic Displays a 16 9 letterbox...

Page 41: ...h any button The TV is automatically activated after downloading is completed The message might be the notification beforehand In this case the schedule information the date that the new version can b...

Page 42: ...h Red in S C in Red earth Green in Green earth Blue in Blue earth Audio out L Audio out R CVBS in video RGB status earth Status RGB Earth Q Link data Status CVBS Audio in L Audio earth Audio in R 21 1...

Page 43: ...80 1 024 60 Hz 63 98 60 02 1 366 768 60 Hz 48 39 60 04 Macintosh13 640 480 35 00 66 67 Macintosh16 832 624 49 73 74 55 Macintosh21 1 152 870 68 68 75 06 Mark Applicable input signal COMPONENT Y PB PR...

Page 44: ...transmitter installed nearby Check the analogue broadcast If the image quality is poor check the aerial and consult your nearest dealer An error message appears Follow the message s instructions If th...

Page 45: ...38 Turn Off the TV and equipment then turn them On again Check an input signal from the equipment p 43 Use an equipment compliant with EIA CEA 861 861B Unusual image is displayed Turn off the TV with...

Page 46: ...Electronics Standard Association Even if no special notation has been made of company or product trademarks these trademarks have been fully respected HDMI the HDMI Logo and High Definition Multimedi...

Page 47: ...corders VCR NTSC AV input only Playback from NTSC Video recorders VCR TV signals may not be received in some areas Aerial Rear VHF UHF Operating Conditions Temperature 0 C 35 C Humidity 20 80 RH non c...

Page 48: ...ion point Penalties may be applicable for incorrect disposal of this waste in accordance with national legislation For business users in the European Union If you wish to discard electrical and electr...

Reviews: