background image

Advanced

Main Menu

VIERA Link

Picture

Sound

Setup

Off

Power Save

Side Panel

Off

Off

2/3

Common Interface 

Access 

System Update 

Access 

Input Labels

Banner Display Timeout

3 seconds

VIERA Link

On

       Setup Menu 

Time Zone

Auto

Power Save

Off

Side Panel

Off

OPTION DIRECT TV REC

RETURN

EXIT

INPUT

TV

22

23

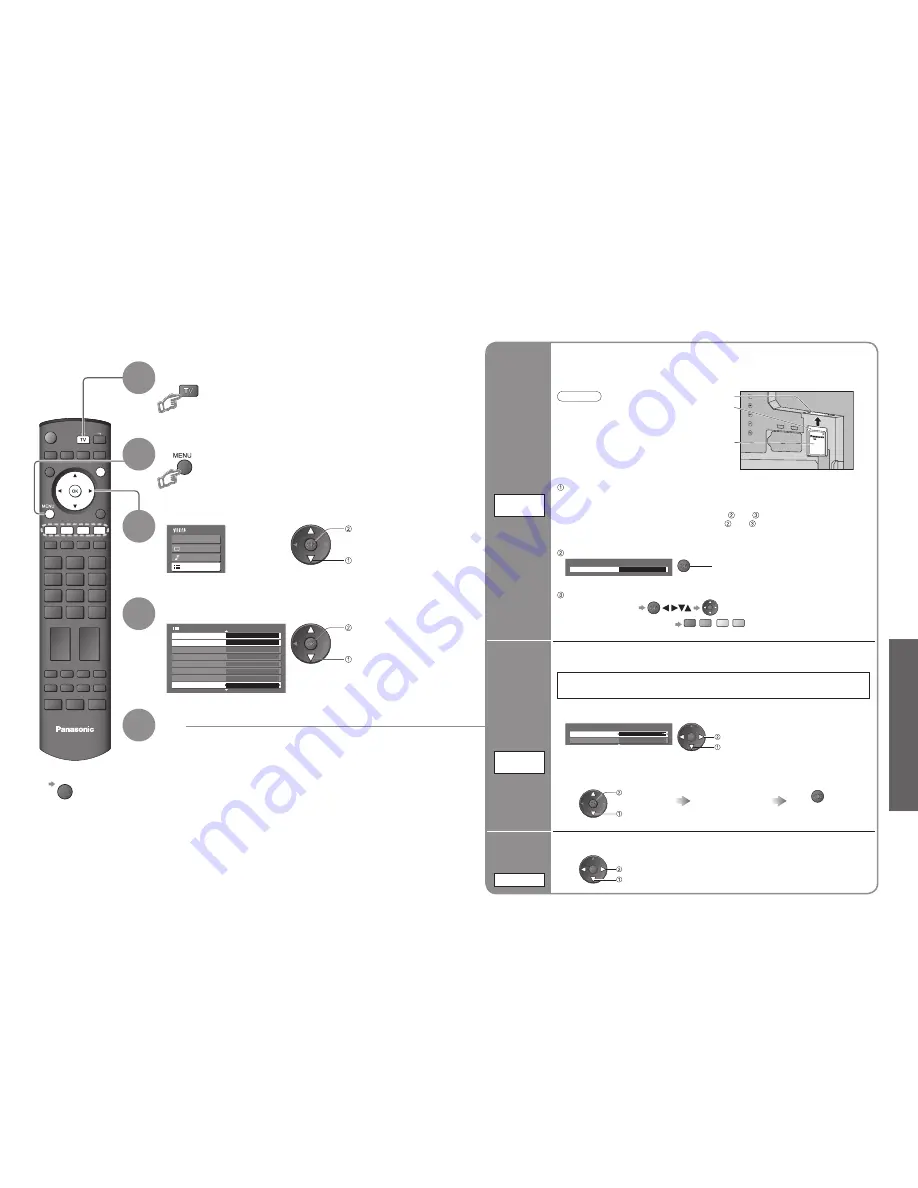
DVB Settings

Select “Setup”

Select “Common Interface”, “System Update” 

or “Time Zone”

Set


To return to TV


EXIT

(DVB mode)

DVB Settings provide access to various advanced features.

DVB Settings (DVB)

(pay-TV

, software update, time adjustment)

System

Update

Update

TV's

software

system


To update immediately

System Update

Auto Update Search in Standby

System Update Search Now

On

Select “Auto Update Search in Standby” and then set “On” or “Off”

• 

On: Automatically performs 

a search in standby and 

downloads an update, if any 

software updates are available

Download new software to TV.

• 

For details (p. 39)

If System Update is performed, the software will be updated (it may change TV 

functions). If you do not wish to do so, set “Auto Update Search in Standby” to Off.

The Common Interface Module menu provides access to software contained on Common 

Interface (CI) Modules.

This TV receiver works only Pay TV modules complying with CI standard.

Off

2 of 2

Common Interface

Slot 1:

Module inserted

 Access “Common Interface”

select, go   


Coloured characters   

red


green


yellow


blue

 Follow the on-screen instructions

example:

• 

On-screen operation guide 

may not correspond to the 

remote control buttons.

Caution

• 

Turn Off Mains power On / Off switch 

whenever inserting or removing the CI 

module.

• 

If a view card and a card reader 

come as a set, 

fi

 rst insert the card 

reader, then insert the view

card into the card reader.

• 

Do not insert the module up side down.

• 

The features that appear on screen are dependent on the contents of the selected CI 

module.

• 

Normally pay-TV services will appear without   and  .

If pay-TV services does not appear, perform   and  .

• 

For more details, see the manual of the CI module, or check with the broadcaster.

 Insert the CI module (optional)

Pay-TV

Common

Interface

Select 

“System Update Search Now”

Searches for an 

update (for several 

min.) and displays 

a corresponding 

message if any

Download

• 

Download may take 

for about 20 min.

Time Zone

Adjust the

time data

automatically

Auto


:  The time data will be adjusted according to your 

area automatically.

Others


:  The time data will be corrected based on GMT.

Set the time

4

3

5

1

2

Display the menu

If in Analogue mode

Select DVB

access

 access

 select

 access

 select

 set

 select

 access

 select

 set

 select

CI slot

Insert or

remove

straightly 

and

completely

CI module

Rear of the TV

Summary of Contents for Viera TH-42PX74E

Page 1: ...urther information Information on Disposal in other Countries outside the European Union This symbol is only valid in the European Union If you wish to discard this product please contact your local a...

Page 2: ...Labels 30 Displaying PC Screen on TV 31 Q Link Functions 32 HDMI Functions 33 HDMI terminal VIERA Link External Equipment 36 Basic Features Watching TV 12 Watching Videos and DVDs 14 Viewing Teletext...

Page 3: ...ergent Then wring the cloth and wipe the surface clean with it Finally wipe the surface clean with a dry cloth Wipe the mains plug with a dry cloth at regular intervals Moisture and dust may lead to f...

Page 4: ...V3W angle TY WK42PR2W TY WK42PR3W TY ST42D1 WG TY ST42D1 WK TY ST42D2 WG TY S42PX70WK Operating Instructions Pan European Guarantee Card Clamper 2 Mains Lead Pedestal ST 42D2 WK TBL0E0007 Read the man...

Page 5: ...g the mains lead be absolutely sure to disconnect the mains plug at the socket outlet first Example 1 Connecting aerial Example 2 Connecting DVD Recorder VCR TV only TV DVD Recorder or VCR Note Connec...

Page 6: ...s now complete and your TV is ready for viewing You can now use the remote control to turn On the TV or turn the TV to standby mode Power LED On To edit channels Editing Channels p 24 Analogue Program...

Page 7: ...language for DVB Preferred Subtitles p 21 If available Turn power on Note To watch pay TV p 23 To select from the Programme Guide Display the current programme status OPTION Check or change the curre...

Page 8: ...C HDMI1 HDMI2 TV 2 Display the Input select menu select watch VCR DVD selection buttons Select VCR to operate Panasonic VCR or DVD equipment Select DVD to operate Panasonic DVD equipment or Player hom...

Page 9: ...It may take some time for searching during which time you can watch TV Enter the 4 digit number example P6 Appears at upper left corner of the screen To view specific sub page blue View sub page Only...

Page 10: ...icture Menu example Picture Menu Changed Number and positions of alternatives Moved Choose from among alternatives Adjust using the slide bar 1 Displays the next screen Go to the next screen To change...

Page 11: ...DVB Service List Skips the unwanted DVB channels p 25 Q Link Settings Q Link Selects which AV terminal is to be used for data communication between this TV and a compatible recording equipment AV1 AV...

Page 12: ...with CI standard Off 2 of 2 Common Interface Slot 1 Module inserted Access Common Interface select go Coloured characters red green yellow blue Follow the on screen instructions example On screen ope...

Page 13: ...by entering the PIN number you can watch the channel Appears when the channel is locked Enter the PIN number 4 digits Select Service List To cancel Select the locked channel To lock all channels yello...

Page 14: ...C Radio Wales DVB 10 62 BBC Radio Cymru DVB 10 62 E4 DVB 10 62 Cartoon Nwk DVB 10 CH 29 Analogue CH 33 BBC1 Analogue Settings are made automatically 3 4 5 2 1 access select access select access select...

Page 15: ...ice found Press OK to add new service Press EXIT to lgnore Selects whether to give a notification message when a new DVB service is found Off On set Set DVB channel manually Normally use Auto Setup or...

Page 16: ...l Off OPTION DIRECTTVREC RETURN INPUT EXIT TV Input Labels AV1 DVD AV2 AV2S AV2 AV2S COMPONENT COMPONENT PC PC HDMI1 HDMI1 HDMI2 HDMI2 30 31 Displaying PC Screen on TV Input Labels To return to TV Dis...

Page 17: ...h an HDMI or DVI output terminal such as a set top box or a DVD player can be connected to the HDMI terminal using an HDMI compliant fully wired cable About connections see External Equipment p 36 Not...

Page 18: ...y set to Standby This function will work even if the TV enters standby mode automatically by Off Timer function or auto power standby function Preparations Setup the equipment to enable this function...

Page 19: ...iece of equipment the table below and the specifications p 43 External Equipment Easy playback Easy control only with VIERA remote control Home Cinema Panasonic DVD Recorder HD Video Camera etc Panaso...

Page 20: ...ds when the playback starts Image or sound may not be available for the first few seconds when Input mode is switched Volume function will be displayed when adjusting the volume of the equipment Easy...

Page 21: ...connector signal FAQs Before requesting service or assistance please follow these simple guides to resolve the problem If problem still persists please contact your local Panasonic dealer for assistan...

Page 22: ...No image can be displayed Is Colour or Contrast in the Picture Menu set to the minimum p 20 Check Colour system p 27 Blurry or distorted image no sound or low volume Reset channels p 27 No sound is pr...

Reviews: