Panasonic VIERA TH-40ES500A Operating Instructions Manual Download Page 21

English

21

 Tick the TV signal mode to tune, and then select 
[Start Auto Tuning]

  :  tune (search for the available channels)
  :  skip tuning

 Select your region (Satellite) 

New Zealand

 3

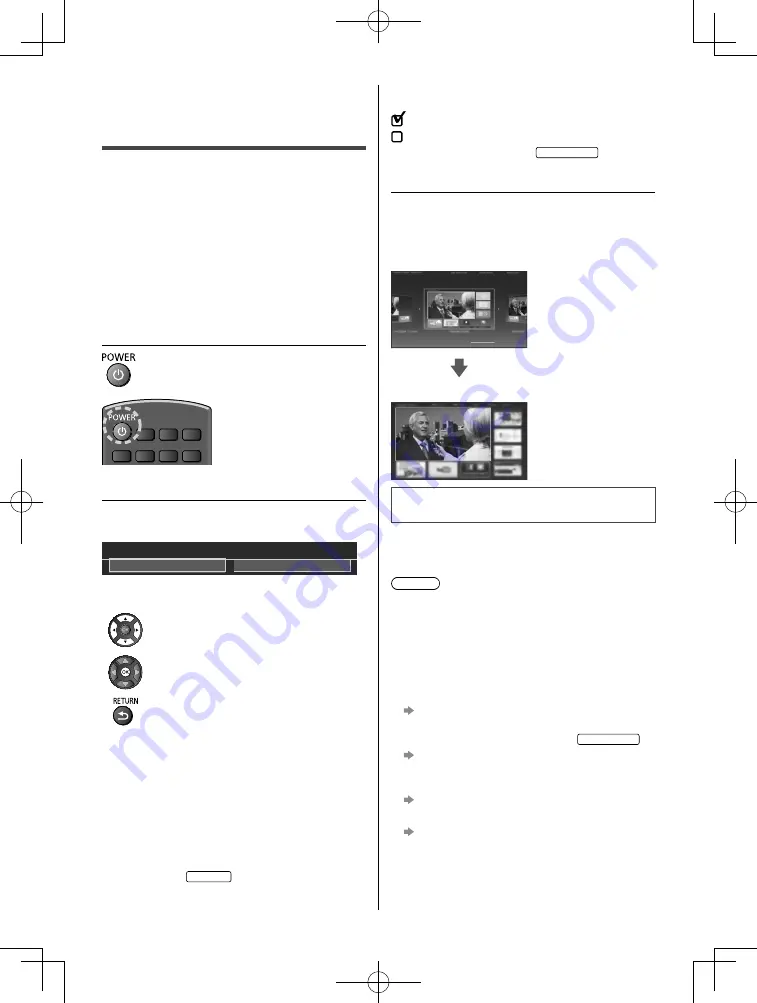
  Select the type of [Home Screen]

 The demonstration to explain how to use [my Home 
Screen] is displayed. Confirm the demonstration by 
following the on-screen instructions, and then select the 
desired [Home Screen].

 Example: [Home Screen Selection]


 Example: [TV Home Screen]


 Auto Tuning is now complete and the 
TV is ready for viewing.

 If tuning has failed check the Satellite cable, RF cable, 
and the network connection, and then follow the on-
screen instructions.

 Note

● 

 The TV goes into Standby mode when no operation 
is performed for 4 hours if [Auto Standby] in the Timer 
Menu is set to [On].

● 

 The TV goes into Standby mode when no signal is 
received and no operation is performed for 
10 minutes if [No signal Power off] in the Timer Menu 
is set to [On].

● 

 To retune all channels

    [Auto Tuning] in [Tuning Menu] (Setup Menu)

● 

 If no satellite channel is found, set [LNB Band 
Frequency] to suit your environment. 

New Zealand

    [LNB Configuration] in [Satellite TV Tuning 

Menu] (Setup Menu)

● 

 To add the available TV signal mode later

    [Add TV Signal] in [Tuning Menu] (Setup Menu)

● 

 To initialise all settings

    [Shipping Condition] in [System Menu] (Setup 

Menu)

  First time Auto 
Tuning

 When the TV is turned on for the first time, it will 
automatically search for available TV channels and give 
options to set up the TV.

● 

 These steps are not necessary if the setup has been 
completed by your local dealer.

● 

 Please complete connections (p. 15 - 18) and 
settings (if necessary) of the connected equipment 
before starting Auto Tuning. For information about 
the settings for the connected equipment, read the 
manual of the equipment.

 1

  Plug the TV into a live mains socket 

and turn the power on


● 

 Takes a few seconds to be displayed.


 2

  Select the following items

 Set up each item by following the on-screen instructions.

 Example:


 Please select your viewing environment.

 Home

 Shop


 How to use the remote control


 Move the cursor


 Access the item / store the setting


 Return to the previous item (if available)

 Select the language
 Select [Home]

 Select [Home] for use in a home viewing environment.

● 

 [Shop] is for shop display.

● 

 To change the viewing environment later on, the set 
will need to have all settings initialised by accessing 
Shipping Condition.

  Set up the network connection
 Select your area 

Australia

Summary of Contents for VIERA TH-40ES500A

Page 1: ...s manual before use The images shown in this manual are for illustrative purposes only For more detailed instructions please refer to eHELP Built in Operating Instructions How to use eHELP p 23 M0317...

Page 2: ...anual unless otherwise mentioned Illustrations shown may be different between models and countries Contents Be Sure to Read Important Notice 3 Safety Precautions 4 Quick Start Guide Accessories 6 Conn...

Page 3: ...he owner of the rights in the content you wish to record or playback This product is licensed under the AVC patent portfolio license for the personal and non commercial use of a consumer to i encode v...

Page 4: ...the TV Only using furniture that can safely support the TV Ensuring the TV is not overhanging the edge of the supporting furniture Not placing the TV on tall furniture for example cupboards or bookcas...

Page 5: ...in use for a long time Caution This TV will still consume some power even in the Off mode as long as the mains plug is still connected to a live mains socket Remove the mains plug from the wall socket...

Page 6: ...orarily stop using the headphones Battery for the Remote Control Caution Incorrect installation may cause battery leakage corrosion and explosion Replace only with the same or equivalent type Do not m...

Page 7: ...y not be placed all together Take care not to throw them away unintentionally Assembling Removing the pedestal 32 inch model Assembly screw 4 Assembly screw 4 M4 15 mm Bracket Base Preparations Take o...

Page 8: ...r no measure can guarantee protection in all cases Attaching the fall prevention parts Band Screw Wood screw Base L L Base R R Preparations Take out the pedestal and the TV from the packing case and p...

Page 9: ...soft cloth blanket etc Use a flat and firm table bigger than the TV Do not hold the screen panel part Make sure not to scratch or break the TV Assembling the pedestal Select a method to assemble the p...

Page 10: ...English 10 2 3 B 4 G 49 inch model Style1 1 A C A D E F...

Page 11: ...English 11 2 3 B 4 G 49 inch model Style2 1 A C A D E F...

Page 12: ...English 12 2 3 B 4 G 55 inch model Style1 1 A C A D E F...

Page 13: ...English 13 2 3 B 4 G 55 inch model Style2 1 A C A D E F...

Page 14: ...screws from the TV 4 Pull out the pedestal from the TV 5 Remove the assembly screws from the bracket Preventing the TV from falling over It is recommended to secure the pedestal to a furniture as sho...

Page 15: ...e Keep the TV away from electronic equipment video equipment etc or equipment with an infrared sensor otherwise distortion of image sound may occur or operation of other equipment may be affected Plea...

Page 16: ...is used you may require the correct connection cable and plug between the wall aerial socket and the TV Your local Television Service Centre or dealer may be able to assist you in obtaining the correc...

Page 17: ...r Game equipment VIDEO equipment TV Viewing Listening Camcorder Game equipment Amplifier listening with external speakers Use HDMI2 to connect the TV to an amplifier which has ARC Audio Return Channel...

Page 18: ...English 18 VIERA Link Use HDMI1 3 for VIERA Link connection For details refer to eHELP Search by Purpose Functions VIERA Link HDAVI Control...

Page 19: ...o 16 Subtitle Audio Description Displays Audio Description Subtitle Menu 17 Exit Returns to the normal viewing screen 18 HOME Displays Home Screen For details refer to eHELP Search by Purpose Read fir...

Page 20: ...turn Off the apparatus completely you must pull the mains plug out of the mains socket Standby On Installing Removing batteries Pull open Hook Note the correct polarity or Close Indicator Control pan...

Page 21: ...V Tuning Menu Setup Menu To add the available TV signal mode later Add TV Signal in Tuning Menu Setup Menu To initialise all settings Shipping Condition in System Menu Setup Menu First time Auto Tunin...

Page 22: ...ure and the setup of APPS List follow the on screen instructions or refer to eHELP Search by Purpose Home Screen APPS List Operations Turn power on TV or Remote Control Mains power On Off switch shoul...

Page 23: ...xplanation for a better understanding of the operation of each feature 1 Display eHELP or Help eHELP If the eHELP has been accessed previously since the TV was turned on the confirmation screen is dis...

Page 24: ...al receiver Situate the TV away from sunshine or other sources of bright light so they do not shine on the TV s remote control signal receiver No image is displayed Check the TV is turned on Check the...

Page 25: ...cket Display panel Cabinet Pedestal Regular care Gently wipe the surface of the display panel cabinet or pedestal by using a soft cloth to remove dirt or fingerprints For stubborn dirt 1 First clean t...

Page 26: ...eption New Zealand 8 MHz VHF UHF New Zealand free to air TV broadcast reception PAL B G Reception of Off air broadcast PAL 60 Hz Playback of NTSC tape from some PAL Video recorders VCR M NTSC Playback...

Page 27: ...lation and usage instructions Do not mount the unit directly below ceiling lights such as spotlights or halogen lights which typically give off high heat Doing so may warp or damage plastic cabinet pa...

Page 28: ......

Page 29: ......

Page 30: ......

Page 31: ...for the name address of the nearest Authorised Service Centre Send or take the product to a Panasonic Authorised Service Centre together with your proof of purchase receipt as a proof of purchase date...

Page 32: ...provided below and retain this book plus your purchase receipt as a permanent record of your purchase to aid in identification in the event of theft or loss and for Warranty Service purposes Model Num...

Reviews: