background image

16

17

V

iewing

Terminal

AV1

AV2

Component

PC

HDMI1

HDMI2

Manual input 

  default 

setting in 

“Input Labels”

AV1

AV1-RGB

AV2

AV2-S-Video

AV2-RGB

Component

PC

HDMI1

HDMI2

Auto input 


EC mode or 

VIERA Link

EC/AV1

EC/AV1-RGB

EC/AV2

EC/AV2-S-Video

EC/AV2-RGB

EC/HDMI1

• 

Applicable for EC 

mode and VIERA Link

EC/HDMI2

• 

Applicable for 

VIERA Link

(

)

(

)

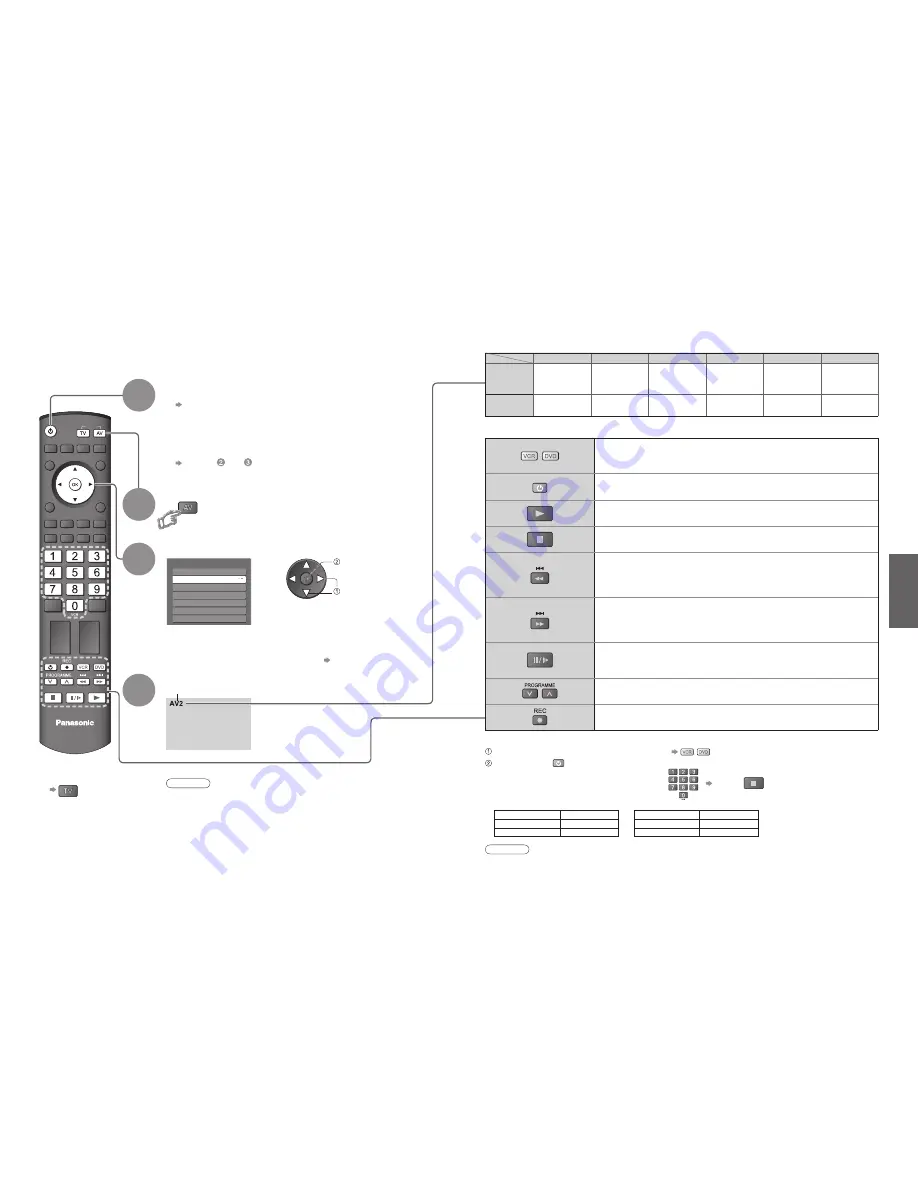
OPTION DIRECT TV REC

EXIT

RETURN

INPUT

TV

Watching VCR, DVD and Satellites

2

3

Connect the external equipment (VCRs, DVD equipment, etc.) and you can watch the input.

Connect the Satellite receiver and you can watch satellite broadcasts.

To connect the equipment (p. 8 and p. 9)

The Remote Control is capable of operating some functions of selected Panasonic external equipment. 

Select the input mode connected to the equipment

Note

• 

If the external equipment has an aspect adjustment function, set to “16:9”.

• 

For details, see the manual of the equipment or ask your local dealer.


To return to TV


Display the Input select menu

Displays the selected mode

1

Turn the TV on


When connecting with SCART as example 2 or 3 

(p. 8 and p. 9)


  Receives input signals automatically when playback starts or 

satellite receiver is switched on

 •  

Input signals are automatically identified by the SCART (pin 8) 

terminal.

 • 

This function is also available for HDMI connections (p. 41).


If input mode is not switched automatically 


Perform   and 

• 

You can also select the input using the AV button on the remote 

control or the front panel of the TV.

  Press the button repeatedly until the desired input is selected.

• 

You can label or skip each input modes   “Input Labels” (p. 34)

• 

Dependant on the setup of the equipment

Screen display

• 

W

atching VCR, DVD and Satellites

VCR / DVD selection buttons

Select VCR to operate Panasonic VCR or DVD equipment

Select DVD to operate Panasonic DVD equipment or Player home theatre

Standby

Set to Standby mode / Turn on

Play

Playback videocassette / DVD

Stop

Stop the operations

Rewind / Skip / Search

VCR: Rewind, view the picture rapidly in reverse

DVD: Skip to the previous track or title


Press and hold to search backward

Fast-forward / Skip / Search

VCR: Fast-forward, view the picture rapidly forward

DVD: Skip to the next track or title


Press and hold to search forward

Pause

Pause / Restart

DVD: Press and hold to play at slow speed

Programme Up / Down

Select programme

Record

Start recording

Panasonic equipment connected to the TV can be directly operated with the remote control.

Note

• 

Confirm correct operation after the code changed.

• 

The codes will be reset to default values if batteries are replaced.

• 

“DVD” means DVD player, DVD recorders and Recorder home theatre.

• 

Some operations may not be possible on some equipment models.

Setting your remote control to operate Panasonic VCR, DVD, etc.


Select the VCR or DVD button you want to set


Press and hold 

 during the following operations

Enter the appropriate code for the equipment 

to be controlled, see table below

Press 

“VCR” button

Equipment

Code

VCR

10 (default)

DVD

11

“DVD” button

Equipment

Code

DVD

70 (default)

Player home theatre

71

Input Selection 

AV1 

AV2/AV2S 

COMPONENT

PC

HDMI1

HDMI2

TV

4

View

 select

 watch

Summary of Contents for Viera TH-37PX70B

Page 1: ...his waste in accordance with national legislation For business users in the European Union If you wish to discard electrical and electronic equipment please contact your dealer or supplier for further information Information on Disposal in other Countries outside the European Union This symbol is only valid in the European Union If you wish to discard this product please contact your local authori...

Page 2: ...PX70B Declaration of Conformity No 4491 15 January 2007 TH 50PX70B Declaration of Conformity No 4492 15 January 2007 Support Audio Description signal p 13 and p 22 Audio description AD is an ancillary component associated with a broadcasting which delivers a verbal description of the visual scene as an aid to understanding and enjoyment particularly for visually impaired viewers HD ready HD ready ...

Page 3: ...ck or fire do not expose this TV to rain or excessive moisture This TV must not be exposed to dripping or splashing water and objects filled with liquid such as vases must not be placed on top of or above the TV Do not block the rear ventilation openings Ventilation should not be impeded by covering the ventilation openings with items such as newspapers tablecloths and curtains Transport only in u...

Page 4: ...en Hook 2 Note the correct polarity or Close Cursor buttons to make selections and adjustments Standby On Off switch Switches TV On or Off standby Sound mute On Off Changes aspect ratio p 13 Selects programmes in sequence Teletext p 18 OK button to confirm selections and choices Press after selecting programme positions to quickly change programme VCR DVD operations p 17 Volume Programme Informati...

Page 5: ...ely sure to disconnect the mains plug at the socket outlet first Basic Connection Example 1 Connecting aerial Example 2 Connecting DVD Recorder VCR Example 3 Connecting DVD Recorder VCR and Sattelite receiver AC 220 240 V 50 60 Hz RF cable RF cable RF cable RF cable TV only TV DVD Recorder or VCR TV DVD Recorder VCR and Satellite AC 220 240 V 50 60 Hz AC 220 240 V 50 60 Hz SCART cable fully wired ...

Page 6: ...You can now use the remote control to turn On the TV or turn the TV to standby mode Power LED On 2 If you input the ID later Owner ID p 33 If a compatible recording equipment with Q Link or similar technologies p 38 is connected analogue channel information is automatically downloaded to the equipment Auto Setup will start to search for TV channels and store them The sorted programme order depends...

Page 7: ...gramme has this signal then you will hear the description sound Note Also possible to change the settings in Menu list p 22 and p 23 select change Other useful functions Operate after Display information banner To set display timeout Banner Display Timeout p 23 To hide EXIT Appears also when changing channel Display programme information 1 BBC ONE WALES 23 35 Corontation Street Mute Bad Signal Enc...

Page 8: ...will be listed after DVB broadcasts D means DVB channel and A means Analogue channel TV Guide date Programme TV Guide start page View TV Guide landscape or portrait Current date and time Category list Type list To list favourite channels p 29 To return to TV EXIT Landscape Displays by broadcaster View Portrait to see one channel at a time View Landscape to see many channels Note When this TV is tu...

Page 9: ...TV Press the button repeatedly until the desired input is selected You can label or skip each input modes Input Labels p 34 Dependant on the setup of the equipment Screen display Watching VCR DVD and Satellites VCR DVD selection buttons Select VCR to operate Panasonic VCR or DVD equipment Select DVD to operate Panasonic DVD equipment or Player home theatre Standby Set to Standby mode Turn on Play ...

Page 10: ... DVB teletext service the images you see can contain graphics and text laid out and controlled in a manner decided by the broadcaster You can check if the programme has teletext information To change the channel When select or go is displayed When symbol is displayed When the key words are displayed on colour bar red green yellow blue When options with numbers are displayed When i is displayed inf...

Page 11: ...es depending on the broadcasters up to 79 pages It may take some time for searching during which time you can watch TV View sub page Only when teletext is more than one page How to Use Menu Functions picture sound quality etc Viewing Teletext How to Use Menu Functions Display the menu 3 2 4 Various menus allow you to make settings for the picture sound and other functions Displays the functions th...

Page 12: ...r digital signal only No setting for HDMI2 available Audio Description Menu Audio Description Useful for visually impaired viewers Off On Select On to sound the description sound if the programme has the signal Volume Adjusts the volume for audio description Reset to Default Press the OK button to reset the present Sound Mode to the default settings Effective to Bass Treble and Balance Menu Item A...

Page 13: ...Channel DVB Service List Cartoon Nwk BBCi BBC Radio Wales BBC Radio Cymru BBC ONE Wales BBC THREE 70 72 105 719 720 1 7 p 29 Analogue Programme Edit 1 CH33 2 CH21 3 CH21 4 CH60 5 CH21 1 2 3 X Y Z F T P 4 5 6 Prog Chan Name p 31 Child Lock Service List Change PIN Access p 29 Input Labels AV1 DVD AV2 AV2S AV2 AV2S COMPONENT COMPONENT PC PC HDMI1 HDMI1 HDMI2 HDMI2 p 34 System Update Auto Update Searc...

Page 14: ...n Interface Module menu provides access to software contained on Common Interface CI Modules This TV receiver works only Pay TV modules complying with CI standard Common Interface Slot 1 Module inserted Access Common Interface select go Coloured characters red green yellow blue Follow the on screen instructions example On screen operation guide may not correspond to the remote control buttons Caut...

Page 15: ...ed due to broadcast restrictions To edit Profile Select the field of Profile to edit and To name the Profile red Select the character RETURN To move the channel green Select the new position Confirm green To delete the channel yellow To delete all channels blue Control channel audience 1 of 2 Child Lock PIN Entry Please enter new PIN PIN Child Lock Service List Change PIN Access Wed 12 05 04 10 46...

Page 16: ...number p 29 has been set it must be entered All previous settings are erased The analogue settings are downloaded to a Q Link compatible equipment connected to the TV Display a notification message New Service Message New DVB service found Press OK to start Auto Setup Press EXIT to lgnore Selecting Auto Setup will delete current Profile and Childlock settings Selects whether to give a notification...

Page 17: ...f theft it will help the Police to determine the owner If you have skipped the Owner ID input in Auto Setup p 10 and input it later start from If you input the Owner ID in Auto Setup p 10 perform Select Setup Display the menu 1 2 1 Check the message and initialise Follow the on screen instructions Auto Setup will automatically start when Mains power On Off switch is next turned On p 10 To re tune ...

Page 18: ... DVD AV2 AV2S AV2 AV2S COMPONENT COMPONENT PC PC HDMI1 HDMI1 HDMI2 HDMI2 OPTION DIRECTTVREC EXIT RETURN INPUT OPTION DIRECTTVREC INPUT EXIT TV RETURN To return to TV Displaying PC Screen on TV Select the external input Select PC 2 The screen of the PC connected to the TV can be displayed on the TV You can also listen to PC sound with the audio cable connected To connect PC p 42 Corresponding signa...

Page 19: ...ry as above Repeat the operations as below and set items in the order of to To change a timer programming event To cancel a timer programming event Select the programme to be deleted using and press red and can also be entered with numeric buttons Start making the settings Recording Controls DVB 2 Direct TV recording You can record the current programme to DVD Recorder or VCR immediately p 38 TV G...

Page 20: ...nels DATA LOGIC a trademark of Metz Corporation Megalogic a trademark of Grundig Corporation Easy Link a trademark of Philips Corporation SMARTLINK a trademark of Sony Corporation Read the manuals of the equipment too Download analogue channel settings Perform Auto Setup p 30 When first using this TV see Auto Setup p 10 Perform download to the equipment p 23 HDMI Functions Q Link Functions 1 The H...

Page 21: ...Panasonic equipment is also automatically set to Standby This function will work even if the TV enters standby mode automatically by Off Timer function or auto power standby function Speaker control You can control the theatre speaker with TV s remote control This function is available when Panasonic Amplifier or Player theatre is connected If you cannot access the menu check the settings and the ...

Page 22: ...nectable equipment to each connector External Equipment External Equipment Computer Amplifier with speaker system PC Viewing Listening To listen with speakers Conversion adapter if necessary DVD Recorder VCR SCART cable RF cable To record playback To watch DVDs DVD player Viewing Listening Easy playback Easy control only with VIERA remote control Home Cinema Panasonic DVD Recorder HD Video Camera ...

Page 23: ...ant to update the software and reboot the system Press OK to download the new version Press EXIT to lgnore Updating the DVB software Note During software download and update DO NOT switch off the TV From time to time a new version of software for DVB mode may become available for download to enhance performance or operations of the TV A notification banner will appear when you tune to one of the B...

Page 24: ... PC signals see below Max display resolution D sub 15 pin connector signal FAQs Before requesting service or assistance please follow these simple guides to resolve the problem If problem still persists please contact your local Panasonic dealer or Panasonic Customer Care Centre for assistance For details p 52 White spots or shadow images noise Check the position direction and connection of the ae...

Page 25: ... involved quality of the DTV signals may be relatively low in some cases despite good reception of analogue programmes Chaotic image noisy Set P NR in the Picture Menu to remove noise p 22 Check nearby electrical products car motorcycle fluorescent lamp The remote control does not work Are the batteries installed correctly p 6 Has the TV been switched On TV goes into Standby mode Off Timer functio...

Page 26: ...eted TV can now be switched off Auto Setup will automatically start when Mains power On Off switch is next turned On p 10 Software Update failed Please try again later Press EXIT to continue Perform System Update Search Now in System Update p 27 If it is still failed there may not be the new software Software successfully updated Press EXIT to continue The software updating is finished Timer Event...

Reviews: