background image

10

OPTION SD CARD

INPUT

EXIT

RETURN

TV

Auto Setup

This will take about 3 minutes.

EXIT

RETURN

CH 29

Channel

Service Name

CH 33

Analogue: 2

Searching

Scan

2

78

1

41

Sending Preset Data

Please wait!

Remote control unavailable

0%

100%

Country

Portugal

Spain

Italy

France

Austria

Germany

Switzerland

Hungary

Czech

E.Eu

Ireland

Poland

Netherlands

Belgium

Finland

Norway

Sweden

Denmark

Greece

Menüsprache

Nederlands

Português

Español

Italiano

Français

English

Deutsch

Latviešu

Slovenščina

Hrvatski

Lietuvių

eesti keel

Srpski

Românǎ

Български

Slovenčina

Magyar

čeština

Polski

Еλληνικά

Türkçe

Suomi

Norsk

Svenska

Dansk

Please select your viewing environment.

Home

Shop

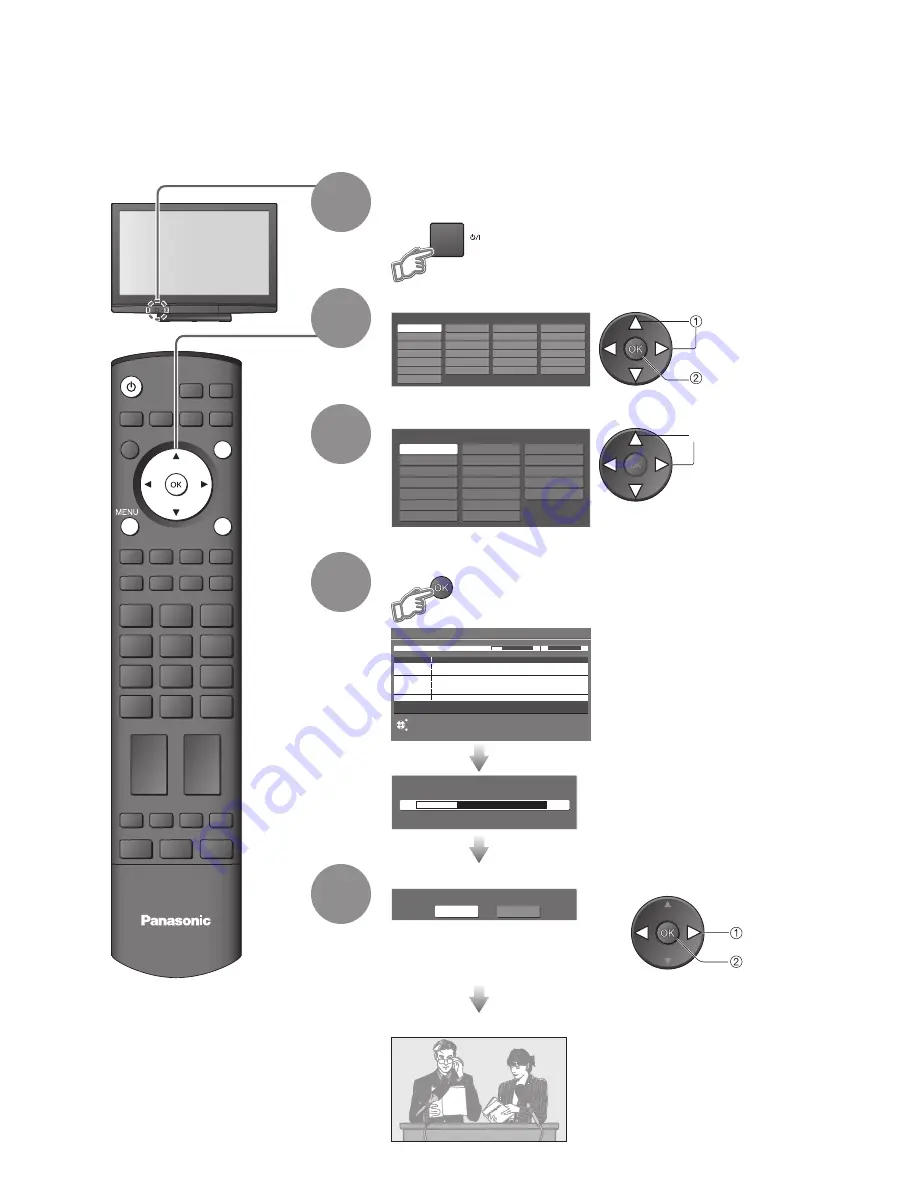
Plug the TV into mains socket and switch On

(Takes a few seconds to be displayed)

1

 Auto Setup

Auto Setup is now complete and your TV is ready for viewing.

• 

You can now use the remote 

control to turn On the TV or turn 

the TV to standby mode.

(Power LED: On)

4

Start Auto Setup 

• 

If Q-Link, VIERA Link or similar 

technology, compatible recorder is 

connected, programme, language, 

country / region settings are 

automatically downloaded to the 

recorder.

• 

Auto Setup will start to search for 

TV programmes and store them.

  The sorted programme order 

depends upon the TV signal, 

the broadcasting system and 

reception conditions.

3

Select your country

select

2

Select the language

 select

 store

• 

“Shop” and “Home” are equal 

to “Dynamic” and “Normal” 

respectively - “Viewing Mode” in 

“Picture Menu” (p. 14)

5

Select the picture setting

 select

 set

Search and store TV programmes automatically.

These steps are not necessary if the setup has been completed by your local dealer.

• 

Depending on the selected 

countries, you may also be 

required to select the region.

Summary of Contents for Viera TH-37PV80PA

Page 1: ...F file under MANUAL PDF manually to view the instructions Please read these instructions before operating your set and retain them for future reference The images shown in this manual are for illustrative purposes only Please refer to Pan European Guarantee Card if you need to contact your local Panasonic dealer for assistance Operating Instructions Plasma Television Model No TH 37PV80PA TH 42PV80...

Page 2: ...t expose to direct sunlight and other sources of heat Avoid exposing the TV to direct sunlight and other sources of heat To prevent fire never place any type of candle or naked flame on top or near the TV Power source This TV is designed to operate on 220 240 V 50 60 Hz AC Do not place foreign objects inside the TV Do not allow any objects to drop into the TV through the air vents fire or electric...

Page 3: ...ical shock First remove the mains plug from the socket outlet Display panel Regular care Gently wipe the surface clean of dirt by using a soft cloth Major contamination Wipe the surface clean using a soft cloth dampened with clean water or diluted neutral detergent 1 part detergent to 100 parts water Then using a soft dry cloth evenly wipe the surface clean until it is dry Caution The surface of t...

Page 4: ...r to secure the wall hanging brackets Carefully read the instructions accompanying the pedestal and be absolutely sure to take steps to prevent the TV from tipping over Handle the TV carefully during installation since subjecting it to impact or other forces may cause product damage Optional accessories Wall hanging bracket vertical TY WK42PV3W TY WK42PV4W angle TY WK42PR3W TY WK42PR4W Batteries f...

Page 5: ...t your nearest Panasonic dealer immediately During set up make sure that all screws are securely tightened If insufficient care is taken to ensure screws are properly tightened during assembly the pedestal will not be strong enough to support the TV and it might fall over and become damaged and personal injury may result Ensure that the TV does not fall over If the TV is knocked or children climb ...

Page 6: ...by one When a function is already displayed press to increase or decrease the selected function When in Standby mode switches TV On Changes the input mode Function select Volume Contrast Brightness Colour Sharpness Tint NTSC mode Bass Treble Balance Auto Setup Headphones jack AV3 terminals SD Card slot Accessories Options Identifying Controls Mains power On Off switch Switch On to turn on the TV o...

Page 7: ...urns to the normal viewing screen Direct TV Recording Records programme immediately in DVD Recorder VCR with Q Link or VIERA Link connection Numeric buttons Changes programme and teletext pages When in Standby mode switches TV On VIERA Link Menu Press to access VIERA Link Menu directly Aspect Changes aspect ratio from Aspect Selection list Also possible by pressing this button repeatedly until you...

Page 8: ...supplied with this TV Please ensure that the unit is disconnected from the mains socket before attaching or disconnecting any leads When disconnecting the mains lead be absolutely sure to disconnect the mains plug at the socket outlet first Example 1 Connecting aerial Example 2 Connecting DVD Recorder VCR RF cable TV only TV DVD Recorder or VCR AC 220 240 V 50 60 Hz AC 220 240 V 50 60 Hz Note Conn...

Page 9: ... TV DVD Recorder VCR and Set top box DVD Recorder or VCR Fully wired HDMI compliant cable Aerial Mains lead supplied Rear of the TV Set top box AC 220 240 V 50 60 Hz RF cable RF cable SCART cable fully wired SCART cable fully wired RF cable RF cable Push until both side tabs click Press both tabs and pull on mains connector to release tabs Make sure that the mains lead is securely fixed To remove ...

Page 10: ...yed 1 Auto Setup Auto Setup is now complete and your TV is ready for viewing You can now use the remote control to turn On the TV or turn the TV to standby mode Power LED On 4 Start Auto Setup If Q Link VIERA Link or similar technology compatible recorder is connected programme language country region settings are automatically downloaded to the recorder Auto Setup will start to search for TV prog...

Page 11: ... the On Screen Displays MENU Open the main menu Move the cursor select the menu Move the cursor adjust levels select from a range of options Access the menu store settings after adjustments have been made or options have been set RETURN Return to the previous menu EXIT Exit the menu system and return to the normal viewing screen Note If tuning has failed Auto Setup p 15 If downloading has failed D...

Page 12: ...elect the menu Select the item example Picture Menu access select Adjust or select change example Picture Menu example Picture Menu store or access Required by some functions 1 select Changed Number and positions of alternatives Moved Choose from among alternatives Adjust using the slide bar Displays the next screen Go to the next screen To reset the settings To reset the picture settings only Res...

Page 13: ...Wall Over 30cm 1 2 2 2 Reset to Default Set Sound Menu HDMI1 Input Auto p 14 Link Settings Power off Link Set Power on Link Set Download Access Q Link AV2 AV2 out TV VIERA Link On p 15 Tuning Menu Auto Setup Access Manual Tuning Access p 15 Only available items can be selected 1 2 AV Colour System Auto Child Lock Access Tuning Menu Off Timer Off OSD Language Teletext TOP Access Access Setup Menu L...

Page 14: ...low moving pictures colour patterning may be seen Set to On to display sharper and more accurate colours Off On For PAL or NTSC signal reception only Not valid on RGB S Video Component PC HDMI and SD Card Reset to Default Press the OK button to reset the present Picture Mode to the default settings Sound Mode Basic sound mode Music Speech Bass Increases or decreases level to enhance or minimise lo...

Page 15: ...TOP FLOF List Teletext Character Set Selects teletext language West East1 East2 West English French German Greek Italian Spanish Swedish Turkish etc East1 Czech English Estonian Lettish Rumanian Russian Ukrainian etc East2 Czech Hungarian Lettish Polish Rumanian etc Shipping Condition Resets all settings for example when moving house Power Save Reduces brightness of picture to economise on power c...

Page 16: ...and or accompanying documents mean that used electrical and electronic products and batteries should not be mixed with general household waste For proper treatment recovery and recycling of old products and used batteries please take them to applicable collection points in accordance with your national legislation and the Directives 2002 96 EC and 2006 66 EC By disposing of these products and batt...

Reviews: