background image

37

Advanced

 VIERA

 Link

TM

 “HDA

VI Control

TM

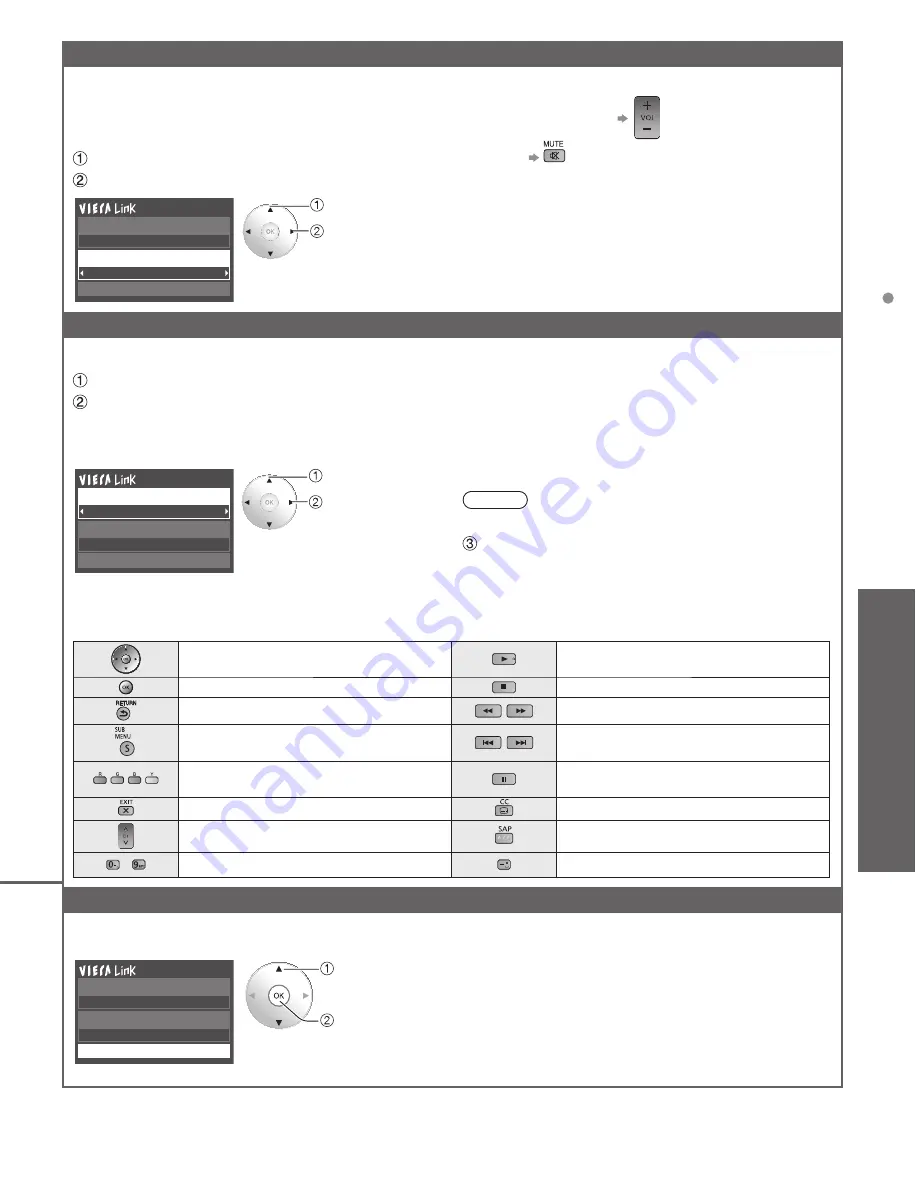
Speaker control

You can select the Home theater or TV speakers for audio 
output.
Control the theater speakers with the TV remote control.
This function is available only when a Panasonic Amplifier 
or Player theater is connected.

 Select “Speaker output”
 Select “Home theater” or “TV”

 select

 change

Recorder

TV

Back to TV

VIERA Link control

Speaker output


Home theater: 

Adjustment for the equipment


Volume up / down   

 Mute 


• 

The sound of the TV is muted.

• 

When the equipment is turned off, the TV speakers 
take over.

• 

Selecting “Home theater” turns the equipment on 
automatically if it is in Standby mode.


TV: 

The TV speakers are on.

 VIERA Link control only with the TV’s remote control

In the VIERA Link menu, you can select HDMI connected equipment and access it quickly. Continue using your TV 
remote control to operate the equipment, pointing it at the TV.

 Select “VIERA Link control”  
  Select the equipment you want to access

(Recorder/Home theater/Player/Camcorder/LUMIX/
Digital camera/ Network camera)


Using VIERA TOOLS (p. 22)

 select

 change

You can select available items 
only. 

Recorder

TV

VIERA Link control

Speaker output

Back to TV


If there is more than one equipment item, a number 
after the name indicates the number of items. (e.g. 
Recorder 1/Recorder 2/Recorder 3...) 


The number of equipment items that can be connected 
is three for recorders, and a total of three for Home 
theater/Player/Camcorder/LUMIX/Digital camera/
Network camera.

Note


There is a limit to the number of HDMI connectors.

  Operate the equipment with the TV remote 

control, pointing it at the TV


To operate the equipment, read the manual of the 
equipment.


Available TV remote control buttons

Whether an operation is available differs depending on the connected equipment. 

Move the cursor/Select

Play

Set/Access

Stop

Return to previous menu

Reverse/Forward

Display the functions 
menu on the equipment

Skip Reverse/Forward

Available when the purpose of the keys 
is displayed on screen

Pause

Exit

Closed caption

Channel Up/Down

SAP (Select Audio Mode)

-

0-9

Select digital subchannel

Back to TV

Returns the input selection of the device selected with the VIERA Link Control to the TV input.

Select “Back to TV”

 select

 OK

Recorder

TV

VIERA Link control

Speaker output

Back to TV

Summary of Contents for Viera TC-P55ST30

Page 1: ...EE UU Puerto Rico llame al 1 877 95 VIERA 958 4372 www panasonic com help Gracias por su decisi n de comprar este producto marca Panasonic Lea estas instrucciones antes de utilizar su televisor y gu...

Page 2: ...med Typical still images Channel number and other logos Image displayed in 4 3 mode SD Card photo Video game Computer image Set up Do not place the unit where it s exposed to sunlight or other bright...

Page 3: ...icensed under the AVC patent portfolio license for the personal and non commercial use of a consumer to i encode video in compliance with the AVC Standard AVC Video and or ii decode AVC Video that was...

Page 4: ...el Servicing is required when the apparatus has been damaged in any way such as power supply cord or plug is damaged liquid has been spilled or objects have fallen into the apparatus the apparatus has...

Page 5: ...d in the socket outlet Do not place a heavy object on the cord or place the cord near a high temperature object Do not twist the cord bend it excessively or stretch it Do not pull on the cord Hold ont...

Page 6: ...al installer A minimum of two people are required for installation Flat panel displays can be heavy Panasonic recommends that a qualified installer perform the wall mount installation See page 4 The A...

Page 7: ...ucus NJ 07094 Contact Source Panasonic Consumer Electronics Company 1 877 95 VIERA 958 4372 email consumerproducts panasonic com This device complies with Part 15 of FCC Rules and RSS Gen of IC Rules...

Page 8: ...00 mm 55 b 11 8 300 mm Rear of the TV Holes for wall hanging bracket installation Screw for fixing the TV onto the wall hanging bracket not supplied with the TV Depth of screw minimum 0 67 17 0 mm max...

Page 9: ...mage TBL5ZX0048 TC P42ST30 TC P46ST30 TC P50ST30 A TC P55ST30 Attach pole cover with assembly screw C only for 42 46 and 50 C Set up Carry out work on a horizontal and level surface Tighten assembly s...

Page 10: ...rocedure p 9 Otherwise the TV and or pedestal may fall over and become damaged and personal injury may result Location a b c c Adjust the plasma panel to your desired angle View from above TC P42ST30...

Page 11: ...atch colors of plugs and terminals Insert firmly Insert firmly Connection references Antenna or Cable connection Cable You need to subscribe to a cable TV service to enjoy viewing their programming Yo...

Page 12: ...AV Equipment Connect to Audio input terminal HDMI connection p 57 To use COMPONENT terminals L R Y PB PR AUDIO OUT COMPONENT VIDEO OUT white red green blue red white red green blue red white red gree...

Page 13: ...input External equipment operations p 37 Closed caption On Off p 19 Selects Secondary Audio Programming p 19 Exits from Menu screen VIERA Link menu p 36 37 Displays VIERA Connect includes VIERA CAST H...

Page 14: ...ct Yes the picture mode will regularly reset to Vivid and a Picture Refresh message will be displayed on the screen Yes select OK Select No and return to previous screen If you select Yes Screen enter...

Page 15: ...a Cable Satellite or Fiber Optic box with this TV No Yes Yes ANT Cable setup Step 4 of 7 Cable service No box Over the Air Antenna How does the TV receive its programming content Antenna Cable In Retu...

Page 16: ...thernet cable connection Validate IP address Check for IP address duplication Check connection to the Internet Check communication with VIERA Connect server Test in progress RETURN Start connection te...

Page 17: ...date and time 2011 4 5 6 00 AM Mode Manual Adjust the clock manually Year Month Day Hour Minute Auto The clock is adjusted automatically via Internet service Only available when the TV is on a network...

Page 18: ...tructions on the Access point setup screen and configure the appropriate security settings For more details on setting of Access point please refer to operating manual for the Access point We recommen...

Page 19: ...turned off Other Useful Functions Listen with SAP Secondary Audio Programming Select the Audio mode for watching TV Digital mode Press SAP to select next Audio track if available when receiving a digi...

Page 20: ...orites or type of channels to view when pressing the channel up down button Set favorite channel below Edit the channel identifier p 47 Check the signal strength p 47 All Setup SUB MENU Edit CH captio...

Page 21: ...ntering the password enter the password twice in order to register it Make a note of your password Do not forget it If you have forgotten your password consult your local dealer When you select a lock...

Page 22: ...p 25 VIERA Connect Displays VIERA Connect Home Screen for Enjoying Internet Services p 43 Media player Media player p 26 31 DLNA Using DLNA feature p 44 Game mode Change to Game mode Picture mode p 49...

Page 23: ...ion if no action is taken for several seconds the Input select menu disappears The terminal and label names of the connected equipment are displayed Note The input label will be displayed on the Input...

Page 24: ...a 46 inch television 5 6 1 7 m or more For a 50 inch television 6 2 1 9 m or more For a 55 inch television 6 8 2 1 m or more Using the 3D Eyewear at a distance closer than the recommended distance may...

Page 25: ...th Medium Diagonal line filter Safety precautions Left Right swap Normal 3D adjustment Off Settings Item Description Auto detect 3D Auto 1 Switches to 3D display when 3D indication is available HDMI 3...

Page 26: ...e select Slideshow Media select Info SD memory card OK Select RETURN Sort SUB MENU Photos Videos Music Media Select SD memory card OK RETURN Select Information panel s o t o h p l l A Photos r e y a l...

Page 27: ...ing on data storage conditions Select Title Folder Sort by Date 24 11 2009 01 12 2009 03 12 2009 20 12 2009 22 12 2009 23 10 2009 25 10 2009 01 11 2009 05 11 2009 10 11 2009 22 11 2009 23 11 2009 Medi...

Page 28: ...elect the Transition effect shown between photos Off Fade in Wipe Wipe Wipe Wipe Slide in Slide in Slide in Slide in Zoom in Comb Comb Dissolve Checker wipe Motion Random Photo size Removes the black...

Page 29: ...or Photos view s o t o h p l l A Photos Multi shot 3D r e y a l p a i d e M Select Info SD memory card OK Select RETURN SUB MENU Select first s o t o h p l l A Photos Multi shot 3D r e y a l p a i d e...

Page 30: ...n area RETURN To display hide Guide and Banner Subtitles are not supported in MKV file 2D 3D status Video options Displayed menu will differ depending on contents Select Video options in Setup SUB MEN...

Page 31: ...e Next skip Prev skip User BGM setting are not available To display hide Guide and Banner Play Pause Stop Reverse Music options Select Music options in Setup SUB MENU next Setup SUB MENU Music options...

Page 32: ...udio Return Channel ARC is a function that enables digital sound signals to be sent via an HDMI cable back from the TV to a connected audio device When adding new equipment reconnecting equipment or c...

Page 33: ...nal then connect the camcorder to this input After connection confirm the HDAVI control functions p 34 37 HD Camcorder with VIERA Link function HDMI mini HDMI cable LUMIX with VIERA Link function If c...

Page 34: ...ngs in Setup Menu Setup 2 2 Advanced setup First time setup About Reset to defaults VIERA Link settings ECO energy saving Keyboard type U S select next Select VIERA Link On No Yes TV Quick start No st...

Page 35: ...be turned off automatically when not in use under these conditions The connected equipment has HDAVI Control 2 or later for available equipment only Example of timing for operation When the input is s...

Page 36: ...ext Select the item Recorder TV VIERA Link control Speaker output Back to TV select Items in the VIERA Link menu may be grayed out if no compatible equipment is connected must be HDAVI Control 2 or la...

Page 37: ...VIERA TOOLS p 22 select change You can select available items only Recorder TV VIERA Link control Speaker output Back to TV If there is more than one equipment item a number after the name indicates...

Page 38: ...ou can watch them on the TV Windows 7 is the server software that has been tested for the performance with this TV current as of January 2011 For installing read the manual for the server software The...

Page 39: ...he network for connecting anything else but the TV you could just connect the TV directly to the Cable DSL Ethernet connection Wired connection Using Router If you are using the network for connecting...

Page 40: ...communication with VIERA Connect server Test in progress Complete Connection test Success Completion screen is displayed Error Follow the directions on screen to complete the setting If you perform th...

Page 41: ...d Menu IP address DNS settings IP setting mode IP address 192 168 0 5 Subnet mask 255 255 255 0 Default gateway 192 168 0 254 DNS setting mode Automatic DNS 192 168 0 20 Automatic The acquired address...

Page 42: ...ou need to register the camera as shown below You can also set Default camera or Disconnect Delete the registered cameras Press Network cameras list and display screen Set Network camera setting Selec...

Page 43: ...menu screen Press to go back to the Home screen Preparations Network connections p 39 Network settings p 40 42 Display the Home screen Select the item and press OK MORE BACK select view Video communi...

Page 44: ...server list select next To display Information Select contents Display contents of selected server Size Screen format 3648x2736 JPEG DLNA server SERVER1 Photos All photos w o h s e d i l S P000102 200...

Page 45: ...creen 1 9 Preset position Home position 1 9 0 Pan Tilt RETURN Single screen Camera name Camera 1 Model BL C210A Select OK RETURN 4 cam 8 cam Camera name Camera 1 Model BL C210A Multi screen 1 4 9 spli...

Page 46: ...ter the scanning is completed select Apply see p 47 All previously saved channels are erased Press to exit from a menu screen Display the menu Select Setup Menu Setup 1 2 ANT Cable setup Input labels...

Page 47: ...D A Select Delete ABC abc or change set Caption Select or edit the station identifier maximum 7 characters available Favorite Set favorite 1 3 26 1 1 2 3 select set Set favorite Select the number Add...

Page 48: ...nected to the HDMI 1 terminal Customize label Input labels HDMI 3 Component Video HDMI 2 HDMI 1 Change Select Menu structure Menu bar Press OK to move to the Menu items Menu items Press OK to proceed...

Page 49: ...de setting in more detail Reset to defaults Resets all Pro setting adjustments to factory default settings Color space Wide Normal Adjust the color representation in panel color gamut W B high R G B A...

Page 50: ...ondition e g 3 2 pulldown will be grayed out if the input signal is high definition or you are viewing photos etc Advanced picture 3D Y C filter Off On Minimizes noise and cross color in the picture C...

Page 51: ...nent Video The default setting is Digital for the HDMI connection Digital input signal Select audio input terminal when DVI cable is connected Analog audio input signal Timer settings The TV can autom...

Page 52: ...password to enter the Home screen Change password Change the password Input the new 4 digit password twice This television is designed to support the Downloadable U S Region Rating System when availa...

Page 53: ...y turns off when NO SIGNAL and NO OPERATION continue for more than 10 minutes Not in use when Auto power on is set to Yes or On Off Timer is set No signal for 10 minutes was activated will be displaye...

Page 54: ...AN ENGLISH RATINGS C E L R E Exempt Exempt programming includes news sports documentaries and other information programming talk shows music videos and variety programming C Programming intended for c...

Page 55: ...image are cut off Standard Note that Image retention of the side bar may occur from displaying it for a long time ZOOM ZOOM Note 480i 4 3 480i 16 9 480p 4 3 480p 16 9 FULL JUST 4 3 or ZOOM 1080p 1080i...

Page 56: ...cause the TV to malfunction Do not remove the card while the unit is accessing data this can damage card or unit Do not touch the terminals on the back of the card Do not subject the card to high pres...

Page 57: ...ls are reformatted before being displayed on the screen If the connected device has an aspect adjustment function set the aspect ratio to 16 9 These HDMI connectors are type A These HDMI connectors ar...

Page 58: ...d then wring the cloth to remove excess liquid Use this cloth to wipe the surface of the display panel then wipe it evenly with a dry cloth of the same type until the surface is dry Do not scratch or...

Page 59: ...on the top and bottom and or sides of the screen Change the format aspect ratio of the picture by pressing the FORMAT button on the remote control p 20 Check the aspect settings on your external vide...

Page 60: ...le or Satellite box to the TV Use an HDMI cable It carries both digital video and audio signal in HD HDMI cable is the only cable needed to connect an HD device to the TV Why does the CC button not di...

Page 61: ...e looks 3D 1 Begin playing the 3D video source 2 Ensure that the Panasonic 3D Eyewear glasses are on check the glasses battery 3 Press 3D button directly or press the VIERA TOOLS button on the TV s re...

Page 62: ...AUDIO L R RCA PIN Type 2 0 5 V rms HDMI 1 3 TYPE A Connector 3 This TV supports HDAVI Control 5 function USB 1 2 USB 2 0 Type A connector x 2 DC5V MAX500mA LAN for VIERA Connect RJ45 10BASE T 100BASE...

Page 63: ...ynchronization PB PR 0 35 V p p AUDIO L R RCA PIN Type 2 0 5 V rms HDMI 1 3 TYPE A Connector 3 This TV supports HDAVI Control 5 function USB 1 2 USB 2 0 Type A connector x 2 DC5V MAX500mA LAN for VIER...

Page 64: ...ware is distributed in the hope that it will be useful but WITHOUT ANY WARRANTY without even the implied warranty of MERCHANTABILITY or FITNESS FOR A PARTICULAR PURPOSE At least three 3 years from del...

Page 65: ...se 14 I Image Viewer Auto 53 Info 19 Input 23 53 L Language 14 53 Last 13 Lock Parental control 52 54 M Media player 22 26 31 Menu 48 Movies Video 30 Music 31 Mute 13 N Network camera 37 39 42 45 Netw...

Page 66: ...nty ONLY COVERS failures due to defects in materials or workmanship and DOES NOT COVER normal wear and tear or cosmetic damage nor does it cover markings or retained images on the glass panel resultin...

Page 67: ...lso contact us directly at 1 877 95 VIERA 958 4372 Monday Friday 9 am 9 pm Saturday Sunday 10 am 7 pm EST For hearing or speech impaired TTY users TTY 1 877 833 8855 Accessory Purchases United States...

Page 68: ...he warranty ALSO DOES NOT COVER damages which occurred in shipment or failures which are caused by products not supplied by Panasonic Canada Inc or failures which result from accidents misuse abuse ne...

Page 69: ...AUDIO L R RCA PIN Type 2 0 5 V rms HDMI 1 3 TYPE A Connector 3 This TV supports HDAVI Control 5 function USB 1 2 USB 2 0 Type A connector x 2 DC5V MAX500mA LAN for VIERA Connect RJ45 10BASE T 100BASE...

Page 70: ...ynchronization PB PR 0 35 V p p AUDIO L R RCA PIN Type 2 0 5 V rms HDMI 1 3 TYPE A Connector 3 This TV supports HDAVI Control 5 function USB 1 2 USB 2 0 Type A connector x 2 DC5V MAX500mA LAN for VIER...

Page 71: ...69 Support Information Limited Warranty for Canada Note...

Page 72: ...servicios que le ofrece la garant a Modelo N mero de serie Panasonic Consumer Electronics Company Division of Panasonic Corporation of North America One Panasonic Way Secaucus New Jersey 07094 U S A P...

Reviews: