background image

20

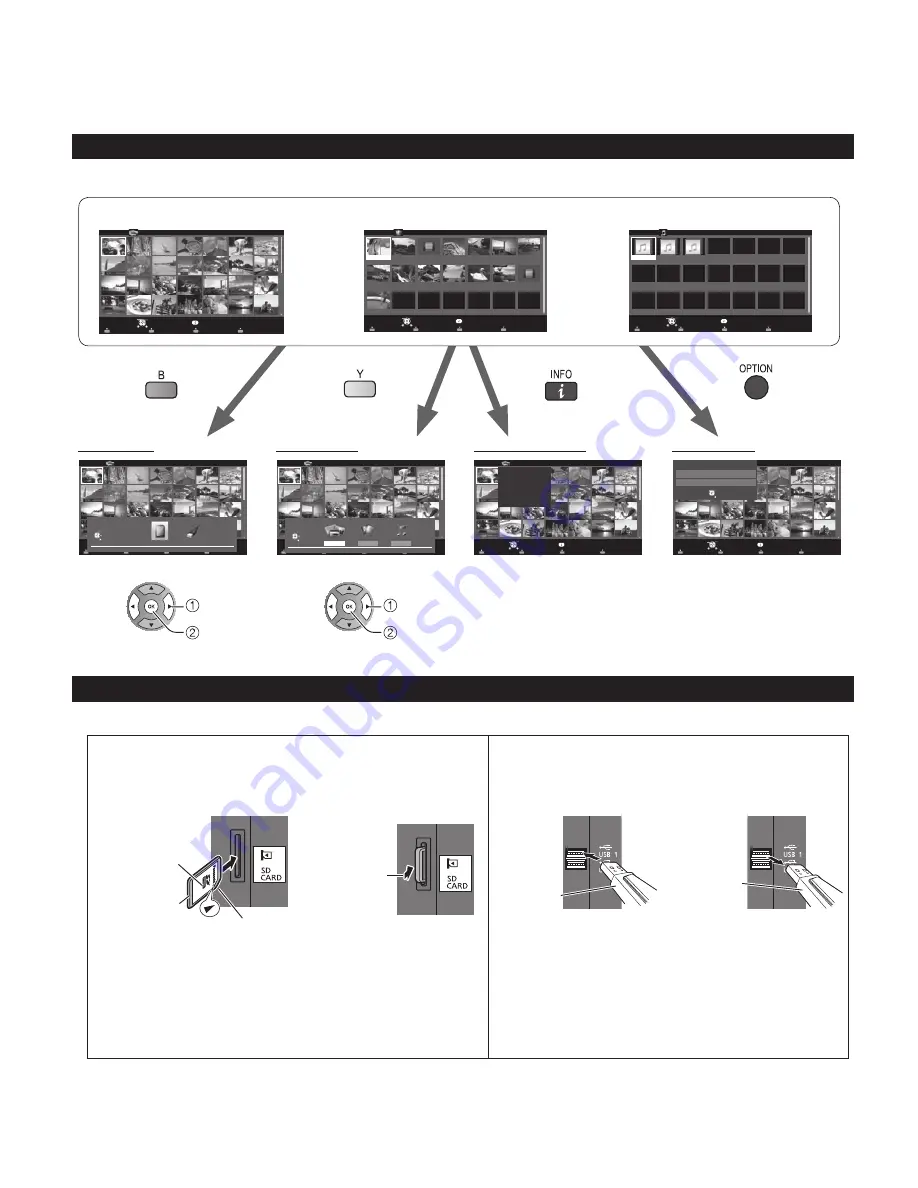
Using  Media player

You can view still and motion images and play music saved on a USB flash memory and an SD card.

Basic features for Media player


Available contents and features

Option menu

Photos --> p. 22-23
Videos --> p. 24
Music --> p. 24

Displays data information.
(File name, Date, and Size etc.)
* Information differs depending 

on selected data.

 select

 OK

 select

 OK

Photos

s

o

t

o

h

p


l

l

A

Photos


r

e

y

a

l

p


a

i

d

e

M

Media select

Slideshow

Drive select

Info

SD memory card

OK

Select

RETURN

Sort

OPTION

Videos

Titles/Folders view

Videos


r

e

y

a

l

p


a

i

d

e

M

2009_9

Nature2

Nature3

Nature4

Nature5

Nature6

2009_4

2009_7

Trip1

Trip2

Trip3

Trip4

Trip5

Room

Nature1

Media select

Play

Drive select

Info

SD memory card

OK

Select

RETURN

OPTION

Music

Folders

My Music_1

My Music_2

My Music_3

Media player           Music

Media select

Play Folder

Drive select

Info

SD memory card

OK

Select

RETURN

OPTION

Drive select

s

o

t

o

h

p

 l

l

A

Photos


r

e

y

a

l

p


a

i

d

e

M

Media select

Slideshow

Drive select

Info

SD memory card

OK

Select

RETURN

Sort

SUB MENU

SD memory card

Drive select

OK

RETURN

Select

Media select

s

o

t

o

h

p

 l

l

A

Photos


r

e

y

a

l

p


a

i

d

e

M

Device select

Slideshow

Media select

Info

SD memory card

OK

Select

RETURN

Sort

SUB MENU

Photos

Videos

Music

Media Select

SD memory card

OK

RETURN

Select

Information panel

s

o

t

o

h

p


l

l

A

Photos


r

e

y

a

l

p


a

i

d

e

M

Media select

Slideshow

Drive select

Info

SD memory card

OK

Select

RETURN

Sort

OPTION

1/70

File name:

100-0001.jpg

Date:

15/04/2011

Size:

640x480

Option menu

s

o

t

o

h

p


l

l

A

o

t

o

h

P


r

e

y

a

l

P


a

i

d

e

M

Media select

Slideshow

Drive select

Info

SD memory card

OK

Select

RETURN

Sort

OPTION

Option menu

Slideshow settings

Thumbnails size

OK

RETURN

Select

Media information


Inserting or removing an SD card/USB flash memory

 SD card

 USB flash memory


Insert the card

Gently insert the SD Card 
label surface facing front.

Label surface

Push until a 

click is heard

Cutout


Remove the card

Press in lightly 

on SD Card, 

then release.


Insert the device


Remove the device 

Insert 
straight in

Pull 
straight out


Compliant card type (maximum capacity):
SDXC Card (64 GB), SDHC Card (32 GB), microSDHC 
Card (32 GB), SD Card (2 GB), miniSD Card (2 GB), 
microSD Card (2 GB) (requiring microSDHC Card/
miniSD Card/microSD Card/ adapter)


If a microSDHC Card, miniSD Card or microSD Card is 
used, insert/remove it together with the adapter.


Media player only supports USB Mass storage 
class devices.


For more information and cautions on SD card and USB flash memory (p. 40)

tc̲p42̲50̲XT50̲eng̲0637.indb   20

tc̲p42̲50̲XT50̲eng̲0637.indb   20

2012/01/20   10:19:01

2012/01/20   10:19:01

Summary of Contents for VIERA TC-P50XT50

Page 1: ...ias por su decisión de comprar este producto marca Panasonic Lea estas instrucciones antes de utilizar su televisor y guárdelas para consultarlas en el futuro Las imágenes mostradas en este manual tienen solamente fines ilustrativos Model No Número de modelo TC P42XT50 TC P50XT50 Español English Thank you for purchasing this Panasonic product Please read these instructions before operating your se...

Page 2: ...t to certain intellectual property rights of Microsoft Use or distribution of this technology outside of this product is prohibited without the appropriate license s from Microsoft b Content owners use Microsoft PlayReady TM content access technology to protect their intellectual property including copyrighted content This device uses PlayReady technology to access PlayReady protected content and ...

Page 3: ...meet ENERGY STAR qualifications The Bluetooth word mark and logos are registered trademarks owned by Bluetooth SIG Inc and any use of such marks by Panasonic Corporation is under license Other trademarks and trade names are those of their respective owners Manufactured under license from Dolby Laboratories Dolby and the double D symbol are trademarks of Dolby Laboratories HDAVI Control is a tradem...

Page 4: ...aged liquid has been spilled or objects have fallen into the apparatus the apparatus has been exposed to rain or moisture does not operate normally or has been dropped 15 To prevent electric shock ensure the grounding pin on the AC cord power plug is securely connected WARNING CAUTION TV set WARNING Small parts can present choking hazard if accidentally swallowed Keep small parts away from young c...

Page 5: ... cord immediately Continued use of the TV under these conditions might cause a fire or permanent damage to the TV Have the TV evaluated by an Authorized Service Center Servicing of the TV by unauthorized personnel is strongly discouraged due to its high voltage If water or an object gets inside the Plasma TV if the Plasma TV is dropped or if the enclosure becomes damaged unplug the power supply co...

Page 6: ... information visit www aap org WARNING CAUTION 3D Eyewear WARNING Accidental Ingestion Keep 3D Eyewear parts in places out of the reach of children There is a danger small children could swallow such parts by mistake If a child accidentally swallows such parts seek immediate medical attention Place Do not use 3D Eyewear in hospital or other medical facilities Radio waves from 3D Eyewear may cause ...

Page 7: ...nimum 20 cm 8 inches spacing requirement between transmitters and all person s body excluding extremities of hands wrist and feet during wireless modes of operation Responsible Party Panasonic Corporation of North America One Panasonic Way Secaucus NJ 07094 Contact Source Panasonic Consumer Marketing Company of North America 1 877 95 VIERA 958 4372 email consumerproducts panasonic com This device ...

Page 8: ...rtical and 5 10 or 15 degree tilting for this TV Rear of the TV Holes for wall hanging bracket installation Screw for attaching the TV to the wall hanging bracket not supplied with the TV Depth of screw minimum 0 67 17 0 mm maximum 1 38 35 0 mm View from the side a b M8 Warning In order to maintain the TV s performance and safety be absolutely sure to ask your dealer or a licensed contractor to se...

Page 9: ...e TV Be sure to remove the pedestal in the following way when using the wall hanging bracket or repacking the TV Remove the assembly screws from the TV Lift the TV from the pedestal Remove the assembly screw from the cover Pull out the cover Remove the assembly screws from the Bracket Remove the assembly screws from the Back of stand and pull out the neck Warning Do not disassemble or modify the p...

Page 10: ...tach the ferrite core as close as possible to connector on the TV side as shown Close the ferrite core until it clicks example USB connecter Installing the remote s batteries Open Hook Note the correct polarity or Close Caution Incorrect installation may cause battery leakage and corrosion resulting in damage to the remote control Do not mix old and new batteries Do not mix different battery types...

Page 11: ...Power cord connection Antenna or Cable connection Cable You need to subscribe to a cable TV service to enjoy viewing their programming You may need to subscribe to a high definition HD cable service to enjoy HD programming The connection for high definition can be done with the use of an HDMI or Component Video cable p 12 Note When using a Cable box external equipment and video cables shown in thi...

Page 12: ...d green blue red white red green blue red white red green blue red e g Blu ray Disc player AV Equipment To use COMPOSITE terminals L R COMPOSITE OUT yellow white red yellow white red yellow white red or e g DVD Recorder AV Equipment e g VCR DIGITAL AUDIO IN e g Amplifier Audio equipment For HDMI ARC Audio Return Channel connection see p 25 The Green terminal is shared for both the COMPONENT and CO...

Page 13: ...ct source to watch p 17 Displays Main Menu p 38 Displays Options Menu for special functions when available p 16 Colored buttons used for various functions Volume up down Sound mute On Off Changes aspect ratio and zoom p 16 39 Switches to previously viewed channel or input External equipment operations Closed Caption On Off p 15 Selects Secondary Audio Programming p 15 Exits from menu screen Displa...

Page 14: ...t step Input select Refer to Watching content from external devices p 17 Configure Network settings Select the Network type and select the setting mode If you select Wireless WiFi start Wireless network settings Select Automatic or set Manual setting start connection test When you complete Network settings successfully the completion screen will be displayed Adjust the Clock Select the clock mode ...

Page 15: ...P settings in Audio menu Menu Audio DTV language and SAP settings If you change the audio settings with SAP button DTV language and SAP settings does not change Audio track 1 of 7 English Main audio English audio Track number Number of tracks Current audio track information language audio type Audio service information example Analog mode Select the desired Audio mode Stereo SAP Mono SAP is not av...

Page 16: ...favorites or type of channels to view when pressing the channel up down button Set favorite channel below Edit the channel identifier p 37 Check the antenna s signal strength p 37 All Options menu Edit CH caption Signal meter Set favorite Channel surf mode Call up a favorite channel FAVORITE Channel numbers registered in Favorite are displayed on the favorite tune screen Select the desired broadca...

Page 17: ...d example Input label select enter or HDMI 1 GAME Terminal example Label Set ANT Cable in p 37 Enable Inputs Edit labels Input labels Press MENU Setup Input labels You can also press the corresponding NUMBER button or press INPUT repeatedly to cycle through the available inputs If you are unsure which input to select wait 2 seconds between each selection COMPONENT and COMPOSITE VIDEO IN terminals ...

Page 18: ...yewear immediately if you experience any redness pain or itching on the nose or temples Prolonged use may cause such symptoms due to excess pressure which may result in the user feeling unwell Use the 3D Eyewear where there is no interference from other devices with Bluetooth signals Viewing 3D images The following 3D content can be enjoyed on this TV A 3D Blu ray disc played on 3D capable Blu ray...

Page 19: ...agonal line filter Safety precautions Left Right swap Normal 3D adjustment Off Settings Item Description Auto detect 3D Auto 1 Switches to 3D display when 3D indication is available HDMI 3D AVCHD file etc Auto 2 Same as Auto 1 plus it detects 3D signal by identifying similar image in side by side or top and bottom 3D formats Note Choose 3D mode manually when auto detection is not available Off Aut...

Page 20: ...ce select Slideshow Media select Info SD memory card OK Select RETURN Sort SUB MENU Photos Videos Music Media Select SD memory card OK RETURN Select Information panel s o t o h p l l A Photos r e y a l p a i d e M Media select Slideshow Drive select Info SD memory card OK Select RETURN Sort OPTION 1 70 File name 100 0001 jpg Date 15 04 2011 Size 640x480 Option menu s o t o h p l l A o t o h P r e ...

Page 21: ...s Select Title Folder Sort by Date 24 11 2009 01 12 2009 03 12 2009 20 12 2009 22 12 2009 23 10 2009 25 10 2009 01 11 2009 05 11 2009 10 11 2009 22 11 2009 23 11 2009 Media player Photos Media select Slideshow Drive select Info SD memory card OK Select RETURN Sort OPTION select OK e g Photos Select file s o t o h p l l A Photos r e y a l p a i d e M Media select Slideshow Drive select Info SD memo...

Page 22: ...Sepia Gray scale Transition effect Select the Transition effect shown between photos Off Fade in Wipe Wipe Wipe Wipe Slide in Slide in Slide in Slide in Zoom in Comb Comb Dissolve Checker wipe Motion Random Photo size Removes the black borders that are added according to the size of the photo being displayed Normal Zoom Burst playback Continuously plays photos that were shot Off On Display interva...

Page 23: ...hotos view s o t o h p l l A Photos Multi shot 3D r e y a l p a i d e M Select Info SD memory card OK Select RETURN OPTION Select first s o t o h p l l A Photos Multi shot 3D r e y a l p a i d e M Select Info SD memory card OK Select RETURN OPTION Select second Select first photo and second photo by pressing OK To select the second image the size and date must be the same as the first image exampl...

Page 24: ...se is displayed Movie banner Navigation area To display hide Guide and Banner 2D 3D status Music view Music thumbnail Folders My Music_1 My Music_2 My Music_3 Media player Music Media select Play Folder Drive select Info SD memory card OK Select RETURN OPTION Features Play folder Drive select Media select Colored button operation is not available in DLNA mode Music playback screen AAAAAA BBBBBBB X...

Page 25: ...ction that enables digital sound signals to be sent via an HDMI cable back from the TV to a connected audio device When adding new equipment reconnecting equipment or changing the setup after the connection turn the equipment on and then switch the TV on Set the input mode to HDMI1 or HDMI 2 p 17 and make sure that the image is displayed correctly VIERA Link HDAVI Control is based on the control f...

Page 26: ... available HDMI terminal then connect the camcorder to this input After connection confirm the HDAVI control functions p 27 29 HD Camcorder with VIERA Link function HDMI mini HDMI cable LUMIX with VIERA Link function If connection or setting of equipment compatible with HDAVI control is changed switch the power of this unit Off and On again while the power of all equipment is On so that the unit c...

Page 27: ...ed setup First time setup About Reset to defaults VIERA Link settings ECO energy saving Keyboard type U S select next Set VIERA Link to On Menu Picture Audio Timer Lock Setup On No Yes TV Quick start No stay on VIERA Link settings VIERA Link Power on link Power off link Default speakers Energy saving mode Unselected device energy save Network select Select and make other settings Menu Picture Audi...

Page 28: ...atically when not in use under these conditions The connected equipment has HDAVI Control 2 or later for available equipment only Example of timing for operation When the input is switched from the HDMI Default speakers TV is the default setting To set the Home theater system as Default speakers change the Default speakers setting from TV to Theater Sound will be output from the Home theater whene...

Page 29: ...rned off the TV speakers take over Selecting Home theater turns the equipment on automatically if it is in Standby mode TV The TV speakers are on VIERA Link control only with the TV s remote control In the VIERA Link menu you can select HDMI connected equipment and access it quickly Continue using your TV remote control to operate the equipment pointing it at the TV Select VIERA Link control Selec...

Page 30: ...connecting anything else but the TV you could just connect the TV directly to the Cable DSL Ethernet connection Wired connection Using Router If you are using the network for connecting various equipments and want to connect the TV you should use a router to connect the TV to the Internet Wireless connection If you are using the network for connecting various equipments and want to connect the TV ...

Page 31: ...k type Ethernet cable Wireless WiFi Wireless network settings Sets Changes wireless network settings Press Wireless network settings and display Wireless networks Or select connection method below with color key Follow the directions on screen to complete the setting WPS Push WPS PIN Manual settings Search again RETURN OK Select your wireless network Wireless networks Select 0024A5C1C1FE_A 1 11n 5...

Page 32: ...de Automatic DNS 192 168 0 20 Proxy setting Automatic Network select OK Select item and press OK select OK Menu Picture Audio Proxy setting Proxy address 0 Proxy port Enter address or port number and press OK Proxy address This is the address of the relay server that is connected to the target server instead of the browser and sends data to the browser Setting is only required if specified by the ...

Page 33: ...e notice On Press OK to start the Software update screen Follow directions on the screen Set Clock first Press MENU Setup Clock New software notice Displays new software update information when TV is turned on Select New software notice Set the status On Off select Change Menu Picture Audio Timer Lock Setup Network Network Connection test Network connection Wireless network settings IP address DNS...

Page 34: ... Link menu p 29 Enjoy Online movies This function allows you to access VOD Video on demand services easily with selecting the icon You need broadband environment to use this service Preparations Network connections p 30 Network settings p 31 33 Display the Online Movies screen Select the item and press OK select view example Depending on the usage conditions it may take a while to read all the dat...

Page 35: ... select next To display Information To display Slideshow settings p 22 photo only To display Optional menu View Play See Using Media player to operate p 20 24 This TV is a DLNA Certified product DLNA Digital Living Network Alliance is a standard that makes DLNA Certified digital electronics easier and more convenient to use on a home network To learn more visit www dlna org It allows you to share ...

Page 36: ...etwork After the scanning is completed select Apply see p 37 All previously saved channels are erased The current channel settings can be changed according to your needs and reception conditions ANT Cable setup and operation Select Setup Menu Picture Audio Timer Lock Setup Network Setup 1 2 ANT Cable setup Input labels Anti image retention Closed caption Channel surf mode Language Clock All 3D set...

Page 37: ...edit the station identifier maximum 7 characters available Favorite Set favorite 1 3 26 1 1 2 3 select set Set favorite Select the number Add Press OK to select Yes add or No skip Move the cursor to a channel number Manual program Edit Cancel Apply Caption Favorite Add 2 Yes 3 Yes Channel select press OK to tune to the channel Select Apply select OK l program Cancel Apply Caption Favorite Add Yes ...

Page 38: ... software notice Network status Timer Automatically turn On Off at date and time Sleep Off timer Timer1 5 Turn On Off at the set date If the Timer settings are grayed out first set the clock and make sure Auto power on is set to No See below Setup Lock Locks specified channels or shows to prevent children from watching objectionable content You will be asked to enter your password each time you di...

Page 39: ...ocking NR programs non rated not applicable and none as per FCC Rules Section15 120 e 2 If the option of blocking NR programs is chosen unexpected and possibly confusing results may occur and you may not receive emergency bulletins or any of the following types of programming Emergency Bulletins Such as EAS messages weather warnings and others Locally originated programming News Political Public S...

Page 40: ...c MP3 files MP3 AAC files AAC FLAC files FLAC For Media player only Note Format the card with the recording equipment The picture may not appear correctly on this TV depending on the recording equipment used Some files may not be played back even if they fulfill these conditions Depending on how you make SD Card USB Flash Memory or the media server files and folders may not be displayed in the ord...

Page 41: ...ck starts Image or sound may not be available for the first few seconds when input mode is switched Volume function will be displayed when adjusting the volume of the equipment If you connect equipment that has HDAVI Control 2 or later function to the TV with an HDMI cable the sound from the DIGITAL AUDIO OUT terminal can be output as multi channel surround HDAVI Control 5 is the newest standard c...

Page 42: ...will also be output in analog format If the recorder or output monitor is connected to the TV the CC needs to be set up on the recorder or output monitor 4 3 side bars Do not display a picture in 4 3 mode for an extended period as this can cause Image retention to remain on either or both sides of the display field To reduce the risk of such Image retention change the brightness of the side bars T...

Page 43: ...ring the cloth dry Use this cloth to wipe the cabinet and then wipe it dry with a dry cloth Do not allow any mild liquid dish soap to come into direct contact with the surface of the Plasma TV If water droplets get inside the unit operating problems may result Avoid contact with volatile substances such as insect sprays solvents and thinner otherwise the quality of the cabinet surface may be adver...

Page 44: ...e screen Change the format aspect ratio of the picture by pressing the FORMAT button on the remote control p 16 Check the aspect settings on your external video source such as Cable Satellite box DVD Blu ray Disc player etc Note Some content such as film based movies are available in extra wide format Top and bottom bars are unavoidable Why is the picture snowy when ANT Cable in is selected When u...

Page 45: ...ontraction that can produce sounds This is not a sign of faulty operation or a malfunction How do I get Online Movies to work on my TV 1 You need a broadband high speed Internet service with a speed of no less than 1 5 Mbps p 30 2 Connect the TV to the Internet through your router by an Ethernet cable or a Panasonic Wireless LAN Adapter Optional accessory 3 Run the Connections Test under the Netwo...

Page 46: ...iewing experience What is the easiest and best way to connect a High Definition Cable or Satellite box to the TV Use an HDMI cable It carries both digital video and audio signal in HD HDMI cable is the only cable needed to connect an HD device to the TV Why does the CC button not display Closed Caption When viewing TV via an HDMI connected device such as a Cable or Satellite box CC must be enabled...

Page 47: ...AUDIO R COMPONENT IN RCA PIN Y PB PR AUDIO L AUDIO R HDMI IN 1 2 TYPE A Connector supports HDAVI Control 5 function USB 1 2 USB2 0 Type A connector DIGITAL AUDIO OUT PCM Dolby Digital Fiber Optic OTHERS SD CARD slot ETHERNET 10BASE T 100BASE TX Dimensions Including pedestal W H D 39 8 26 1 12 6 1 009 mm 663 mm 320 mm 46 7 30 1 13 2 1 186 mm 764 mm 335 mm TV Set only W H D 39 8 24 3 3 3 1 009 mm 61...

Page 48: ... 12 41 Home Use 14 I Info 15 Input 17 L language 14 Last 13 Lock Parental control 39 M Media player 17 20 24 Menu 38 Movies Video 24 Music 24 Mute 13 N Network services 30 35 O Options menu 16 P Pedestal 8 9 Photo 22 23 Power 13 R Remote control 13 S Safety 4 SAP 15 Scan 36 SD Card 20 40 41 Signal Meter 37 Specifications 47 Store Demonstration 14 T Technical Information 39 42 U USB 20 40 41 V VIER...

Page 49: ...ty ONLY COVERS failures due to defects in materials or workmanship and DOES NOT COVER normal wear and tear or cosmetic damage nor does it cover markings or retained images on the glass panel resulting from viewing fixed images including among other things non expanded standard 4 3 pictures on wide screen TV s or onscreen data in a stationary and fixed location The Limited Warranty ALSO DOES NOT CO...

Page 50: ...y Friday 9 am 9 pm Saturday Sunday 10 am 7 pm EST For hearing or speech impaired TTY users TTY 1 877 833 8855 Accessory Purchases United States and Puerto Rico Purchase Parts Accessories and Instruction Books on line for all Panasonic Products by visiting our Web Site at http www pstc panasonic com or send your request by E mail to npcparts us panasonic com You may also contact us directly at 1 80...

Page 51: ...VER damages which occurred in shipment or failures which are caused by products not supplied by Panasonic Canada Inc or failures which result from accidents misuse abuse neglect mishandling misapplication alteration faulty installation set up adjustments misadjustment of consumer controls improper maintenance power line surge lightning damage modification introduction of sand humidity or liquids c...

Page 52: ...nufacture Specifications are subject to change without notice Non metric weights and measurements are approximate Side ViewBack P120206 Side view with the pedestal option attached 12 6 320 26 1 663 11 9 300 8 0 201 15 8 400 15 8 400 39 8 1009 24 3 616 3 3 84 4 0 101 Side Panel Rear Panel Dimensions W x H x D 39 8 1 009 mm x 26 1 663 mm x 12 6 320 mm Including pedestal 39 8 1 009 mm x 24 3 616 mm x...

Page 53: ...nufacture Specifications are subject to change without notice Non metric weights and measurements are approximate Side ViewBack Side view with the pedestal option attached 13 2 335 30 1 764 11 9 300 8 0 201 18 2 460 15 8 400 46 7 1186 28 2 717 3 3 84 4 8 121 Dimensions W x H x D 46 7 1 186 mm x 30 1 764 mm x 13 2 335 mm Including pedestal 46 7 1 186 mm x 28 2 717 mm x 3 3 84 mm TV Set only Mass 56...

Page 54: ...ervicios que le ofrece la garantía Modelo Número de serie Panasonic Consumer Marketing Company of North America Division of Panasonic Corporation of North America One Panasonic Way Secaucus New Jersey 07094 U S A Panasonic Canada Inc 5770 Ambler Drive Mississauga Ontario L4W 2T3 CANADA 2012 Panasonic Corporation of North America All Rights Reserved Printed in U S A 2012 Panasonic Corporation of No...

Reviews: