background image

12

13

Quick Start 

Guide

 Identifying 

Controls

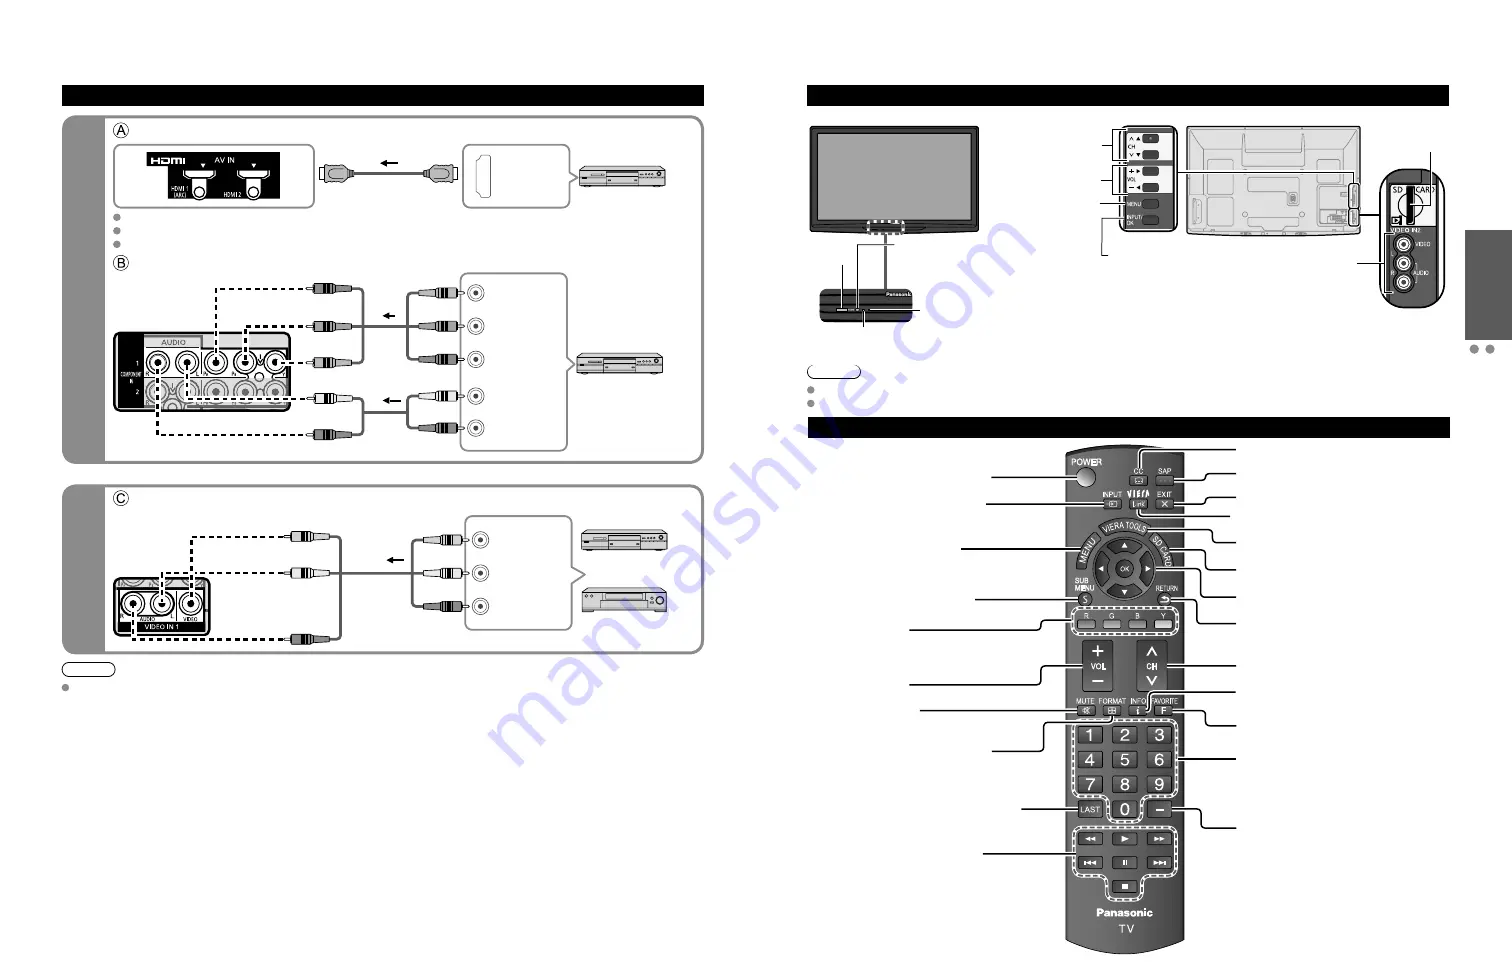
 Basic Connection (A

V cable connections)

High-Definition

Standard-Definition

Note

  For more details on the external equipment’s connections, please refer to the operating manuals for the equipment.

Remote control

Switches TV On or Off (Standby)

Changes the input mode (p. 24)

Displays Main Menu (p. 25)

Displays Sub Menu (p. 18, 27)

Colored buttons 
(used for various functions)
(for example, p. 16, 23, 33)

Volume up/down

Sound Mute On/Off

Changes aspect ratio (p. 18, 43)

Switches to previously viewed channel 
or input modes

External equipment operations
(p. 33)

Closed caption On/Off (p. 18)

Selects Audio Mode for TV viewing (p. 18)

Exits from Menu screen
VIERA Link menu (p. 32-33)

Display VIERA TOOLS (p. 20)

Viewing from SD Card (p. 22-23)

Selects/OK/Change

Returns to previous menu

Channel up/down

Displays or removes the channel 
banner (p. 18)

Operates the Favorite channel list 
function (p. 18-19)

Numeric keypad to select any channel 
(p. 17) or press to enter alphanumeric 
input in menus 
(p. 16, 24, 32, 34, 36, 39, 40)

Use for digital channels (p. 17)

Identifying Controls

Basic Connection 

(Continued)


To use HDMI terminals

HDMI

AV OUT

e.g. Blu-ray Disc player

AV Equipment

  Connecting to HDMI terminals will enable you to enjoy high-definition digital images and high-quality sound.
  The HDMI connection is required for a 1080p signal.
  For “VIERA Link

TM

 connections”, please refer to p. 29.


To use COMPONENT terminals

L

R

Y

P

B

P

R

AUDIO

OUT

COMPONENT

VIDEO OUT

white

red

green

blue

red

white

red

green

blue

red

white

red

green

blue

red

e.g. Blu-ray Disc 

player

AV Equipment

 To use COMPOSITE terminals

L

R

COMPOSITE

OUT

yellow

white

red

yellow

white

red

yellow

white

red

or

e.g. DVD Recorder

AV Equipment

e.g. VCR

AV cable connections

Note

  The TV consumes a small amount of electric energy even when turned off.
  Do not place any objects between the TV remote control sensor and remote control.

TV controls/indicators

Changes the input 

mode

Chooses Menu and 

Submenu entries

Displays the Main 

Menu

Volume up/down

Remote control 

sensor within about 

23 feet (7 meters) in 

front of the TV set

Selects channels 

in sequence

Front of the TV

Back of the TV

C.A.T.S. sensor

Plasma C.A.T.S. (Contrast Automatic 

Tracking System) (p. 26)

Power indicator

(on:  red, off:  no light)

SD card slot

Video Input 2 connector

POWER 

button

Summary of Contents for Viera TC-P42X2

Page 1: ...his book plus your purchase receipt as a permanent record of your purchase to aid in identification in the event of theft or loss and for Warranty Service purposes Model Number Serial Number Panasonic Canada Inc 5770 Ambler Drive Mississauga Ontario L4W 2T3 CANADA 2010 Panasonic Corporation of North America All Rights Reserved Printed in U S A M0110 0 Model No TC P42X2 TC P50X2 English Thank you f...

Page 2: ...ymbol are trademarks of Dolby Laboratories Experience an amazing level of multimedia excitement Enjoy rich multimedia SD memory card Camcorder Amplifier Home theater system VCR DVD recorder Blu ray Disc recorder Set Top Box DVD player Blu ray Disc player Watching TV 17 Using VIERA TOOLS 20 Viewing with VIERA IMAGE VIEWER 22 Watching Videos and DVDs 24 How to Use Menu Functions picture sound qualit...

Page 3: ...damage the cables which in turn can cause fire or electric shock To prevent an electric shock disconnect the power plug from the wall outlet as a safety precaution before carrying out any cleaning Transport only in upright position Transporting the unit with its display panel facing upward or downward may cause damage to the internal circuitry Using a dry cloth clean any dust from the power supply...

Page 4: ...hat they cannot be pulled or grabbed by curious children WALL MOUNTING IF YOU DECIDE TO WALL MOUNT YOUR FLAT PANEL DISPLAY ALWAYS Use a mount that has been recommended by the display manufacturer and or listed by an independent laboratory such as UL CSA ETL Follow all instructions supplied by the display and wall mount manufacturers If you have any doubts about your ability to safely install your ...

Page 5: ...y sure to take steps to prevent the TV from tipping over Handle the TV carefully during installation since subjecting it to impact or other forces may cause product damage Take care when fixing wall brackets to the wall Always ensure that there are no electrical cables or pipes in the wall before hanging bracket When using the angled type wall hanging bracket please ensure that there is sufficient...

Page 6: ...wer cord plug from the wall outlet first For additional assistance visit us at www panasonic ca Example Connecting Antenna To watch TV Cable TV VHF UHF Antenna TV VHF UHF Antenna NTSC National Television System Committee Conventional broadcasting ATSC Advanced Television Systems Committee Digital TV Standards include digital high definition television HDTV standard definition television SDTV data ...

Page 7: ...p 17 Identifying Controls Basic Connection Continued To use HDMI terminals HDMI AV OUT e g Blu ray Disc player AV Equipment Connecting to HDMI terminals will enable you to enjoy high definition digital images and high quality sound The HDMI connection is required for a 1080p signal For VIERA LinkTM connections please refer to p 29 To use COMPONENT terminals L R Y PB PR AUDIO OUT COMPONENT VIDEO OU...

Page 8: ...played The settings up to that point are saved You can reset the settings using First time setup p 27 To change the setting Language ANT Cable setup Input labels Clock later go to the Menu screen p 27 Press to return to the previous screen Auto channel setup ANT Cable setup Select the connected Antenna in terminal ANT Cable setup Step 3 of 6 Select Not used when viewing TV via Satellite receiver o...

Page 9: ...AMERA MONITOR AUX RECEIVER MEDIA CTR MEDIA EXT OTHER Adjust the Clock Set clock Select NEXT then press OK to go to the next step Step 6 of 6 Edit RETURN Change Select 0 9 Set clock Day Hour Minute Next Year Month Current year select set OK RETURN Select 0 9 10 Minute Next 10 or Follow the instructions on screen to complete the following operations Complete the First time setup Completion message i...

Page 10: ... aspect ratio Press FORMAT to cycle through the aspect modes p 43 480i 480p FULL JUST 4 3 ZOOM 1080p 1080i 720p FULL H FILL JUST 4 3 ZOOM Call up a favorite channel FAVORITE Channel numbers registered in Favorite are displayed on the favorite tune screen Select the desired broadcast station with the cursor or use number buttons p 19 Watching TV Continued Other Useful Functions Operate after p 17 S...

Page 11: ...A Link setting to On as shown below Press to exit from a menu screen Press to return to the previous screen Display the menu Select Setup Menu Adjusts Surf mode Language Clock Channels Inputs and other settings Setup 2 2 Advanced setup First time setup About Reset to defaults VIERA Link settings ECO energy saving select next Select VIERA Link settings Setup Menu 2 2 Advanced setup First time setup...

Page 12: ...ng microSDHC Card miniSD Card microSD Card adapter If a microSDHC Card miniSD Card or microSD Card is used insert remove it together with the adapter For cautions and details on SD Cards p 44 Gently insert the SD Card label surface facing front Label surface Push until a click is heard Press in lightly on SD Card then release Sort To sort by Folder month or date In Select the sort type Slideshow F...

Page 13: ...emote control supplied with the equipment Note For details see the manual for the connected equipment How to Use Menu Functions Various menus allow you to make settings for the picture sound and other functions so that you can enjoy watching TV best suited for you Press to exit from a menu screen Press to return to the previous screen Display the menu Shows the functions that can be adjusted Some ...

Page 14: ...ls Selects the terminal and label of the external equipment p 39 Anti Image retention Pixel orbiter Prevents Image retention with Wobbling Automatic Periodic Automatic Shifts the display image automatically Periodic Shifts the display image every 1 2 3 4 minutes according to what was set in the Time minutes menu Time minutes Sets the time for the Pixel orbiter Periodic setting 1 2 3 4 4 3 side bar...

Page 15: ...low the connection diagrams below for HDAVI control of a single piece of AV equipment such as a DVD recorder DIGA Home theater system Refer to page 30 33 for Setup Menu settings and additional control information Optional HDMI and or optical cables are not included If connection or setting of equipment compatible with HDAVI control is changed switch the power of this unit Off and On again while th...

Page 16: ... is turned off all connected VIERA Link compatible equipment is moved to ECO standby mode automatically under above conditions Minimum power consumption of Standby condition for the equipment Unselected device energy save for HDAVI Control 2 or later Condition Unselected device energy save Yes The equipment has HDAVI Control 2 or later for available equipment only connected with an HDMI cable Exam...

Page 17: ...nnected equipment and access it quickly Continue using your TV remote control to operate the equipment pointing it at the TV Select VIERA Link control Select the equipment you want to access Recorder Home theater Player Camcorder LUMIX Digital camera If there is more than one equipment item a number after the name indicates the number of items e g Recorder 1 Recorder 2 Recorder 3 The number of equ...

Page 18: ...f rating and any other more restrictive ratings will also be blocked To select the channel or the rating of the program to lock Channel lock Select up to 7 1 7 channels to block These channels will be blocked regardless of the program rating Select Mode and set to Custom Select a channel to lock Menu Selects the lock mode Custom Channel lock Mode Channel 1 Channel 2 Channel 3 Channel 4 Channel 5 C...

Page 19: ...hannel tuning mode Digital only Analog only in Channel surf mode p 27 Edit Caption 80 101 Edit CH caption Caption Channel OK RETURN Delete ABC abc R G B Y Select D A change set or Caption Select or edit the station identifier maximum 7 characters available Favorite Set favorite 1 3 26 1 1 2 select set Set favorite Select the number Add Press OK to select Yes add or No skip Move the cursor to a cha...

Page 20: ...set to defaults Confirmation screen is displayed Select Yes and press OK Press to exit from a menu screen Display the menu Select Closed caption Menu Display broadcast TV s Closed Caption CC text when available Primary CC1 On Closed caption Digital Mode Analog Digital setting Reset to defaults next select Input Labels Input labels Display labels of Connected devices Devices connected to external i...

Page 21: ...evious screen Note The TV automatically turns Off after 90 minutes when turned On by the Timer This operation will be cancelled if the Off time is selected or if a key is pressed Display the menu Select Timer Menu Set the TV to turn on or off automatically at the designated date and time Timer Sleep Timer 1 Timer 2 Timer 3 Timer 4 Timer 5 next select Select the Timer to set Menu Turns the TV off a...

Page 22: ...xempt Exempt programming G General Programming intended for audience of all ages Contains no violence or the violence content is minimal or is depicted appropriately 8 ans 8 General Not recommended for young children Programming intended for a broad audience but contains light or occasional violence Adult supervision recommended 13 ans Programming may not be suitable for children under the age of ...

Page 23: ... multi channel surround HDAVI Control 5 is the newest standard current as of December 2009 for the HDAVI Control compatible equipment This standard is compatible with the conventional HDAVI equipment HDMI connection HDMI high definition multimedia interface allows you to enjoy high definition digital images and high quality sound by connecting the TV unit and the devices HDMI compatible equipment ...

Page 24: ...ently using only a cleaning cloth or a soft lint free cloth If the surface is particularly dirty soak a soft lint free cloth in diluted mild liquid dish soap 1 part mild liquid dish soap diluted by 100 times the amount of water and then wring the cloth to remove excess liquid Use this cloth to wipe the surface of the display panel then wipe it evenly with a dry cloth of the same type until the sur...

Page 25: ...connected to the unit Set the audio setting of the HDMI device to Linear PCM If digital sound connection has a problem select analog sound connection Problem Actions VIERA logo moves on the screen Screen Some spots remain bright or dark Chaotic image noisy No image is displayed on screen Only spots are displayed instead of images Neither image nor sound is produced The function to prevent Image re...

Page 26: ...on of the Servicer and in no event will Panasonic Canada Inc or the Servicer be liable for any special indirect or consequential damages This warranty is given only to the original purchaser or the person for whom it was purchased as a gift of a Panasonic brand product mentioned above sold by an authorized Panasonic dealer in Canada and purchased and used in Canada which product was not sold as is...

Reviews: