background image

10

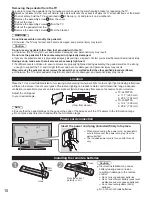
Removing the pedestal from the TV 

Be sure to remove the pedestal in the following way when using the wall-hanging bracket or repacking the TV. 

  Spread out a blanket or other such soft material onto a work surface such as a desk, and place the TV screen side down on the blanket.
 To work safely, hold the TV as described in 

 of Set-up (p. 9) and place it on a workbench.

 Remove the assembly screw 

 from the cover. 

 Pull out the cover. 
 Remove the assembly screws 

 from the TV. 

 Pull out the pedestal from the TV. 
 Remove the assembly screws 

 from the bracket. 

WARNING

Do not disassemble or modify the pedestal.

  Otherwise, the TV may fall over and become damaged, and personal injury may result.

Caution

Do not use any pedestal other than that provided with this TV.

  Otherwise, the TV may fall over and become damaged, and personal injury may result.

Do not use the pedestal if it becomes warped or physically damaged.

  If you use the pedestal when it is physically damaged, personal injury may result. Contact your nearest Panasonic Dealer immediately.

During set-up, make sure that all screws are securely tightened.

  If sufficient care is not taken to ensure screws are properly tightened during assembly, the pedestal will not be strong 

enough to support the TV, and it might fall over and become damaged, and personal injury may result.

When removing the pedestal, do not remove the pedestal by any methods other than the specified procedure. (Above)

  Otherwise, the TV and/or pedestal may fall over and become damaged, and personal injury may result.

Location

Place the TV at a comfortable distance for viewing. Avoid placing it where sunlight or other bright light (including reflections) 
will fall on the screen. Use of some types of fluorescent lighting can reduce remote control transmitter range. Adequate 
ventilation is essential to prevent an internal component failure. Keep away from areas of excessive heat or moisture.

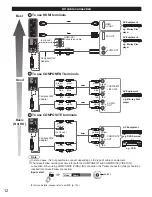
Adjust the LCD panel 
to your desired angle.

a

15°

15°

b

(View from above)

 TC-L47WT50

  a: 11.7 ” (295 mm)
  b: 28.9 ” (734 mm)

 TC-L55WT50

  a: 13.4 ” (339 mm)
  b: 28.9 ” (734 mm)

Note

  Ensure that the pedestal does not hang over the edge of the base even if the TV swivels to the full rotation range.
  Do not place any objects or hands within the full rotation range.

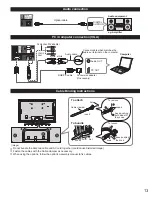
Power cord connection

• 

When disconnecting the power cord, be absolutely 
sure to disconnect the power cord plug from the 
wall outlet first.

• 

The included power cord is for use with this unit 
only.

Insert the power cord plug (included) firmly into place.

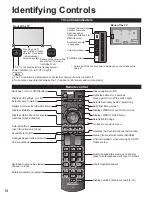
 Installing the remote’s batteries

Pull 
open

Hook

Note the correct 
polarity (+ or -).

Close

Caution

  Incorrect installation may cause 

battery leakage and corrosion, 
resulting in damage to the remote 
control.

• 

Do not mix old and new batteries.

• 

Do not mix different battery types (such 
as alkaline and manganese batteries).

• 

Do not use rechargeable (Ni-Cd) 
batteries.

  Do not burn or break batteries.

tc̲L47̲55̲wt50̲eng̲0653.indb   10

tc̲L47̲55̲wt50̲eng̲0653.indb   10

2012/03/19   13:51:34

2012/03/19   13:51:34

Summary of Contents for Viera TC-L47WT50

Page 1: ...p TQB2AA0653 Gracias por su decisi n de comprar este producto marca Panasonic Lea estas instrucciones antes de utilizar su televisor y gu rdelas para consultarlas en el futuro Las im genes mostradas e...

Page 2: ...re than our cost of physically performing source code distribution a complete machine readable copy of the corresponding source code covered under LGPL Contact Information cdrequest am linux jp Source...

Page 3: ...oth SIG Inc and any use of such marks by Panasonic Corporation is under license Other trademarks and trade names are those of their respective owners Manufactured under license from Dolby Laboratories...

Page 4: ...t apparatus combination to avoid injury from tip over 13 Unplug this apparatus during lightning storms or when unused for long periods of time 14 Refer all servicing to qualified service personnel Ser...

Page 5: ...A RECEPTACLE OR OTHER OUTLET UNLESS THE BLADES CAN BE FULLY INSERTED TO PREVENT BLADE EXPOSURE 30 CAUTION USE WITH OTHER STAND MAY RESULT IN INSTABILITY POSSIBLY CAUSING INJURY 31 CAUTION DANGER OF E...

Page 6: ...ess LAN Adapter with FCC ID H8N WLU5150 IC ID 1353A WLU5150 and 2 Bluetooth Adapter with FCC ID NKR DBUBP207 IC ID 4441A DBUBP207 Other transmitters shall not be used unless specifically recommended w...

Page 7: ...nic recommends that a qualified installer perform the wall mount installation See page 8 The American Academy of Pediatrics discourages media viewing for children younger than two years For more detai...

Page 8: ...bracket Please contact a professional installer to purchase the recommended UL qualified wall hanging bracket For additional details please refer to the wall hanging bracket installation manual M8 Dep...

Page 9: ...usion of Neck Make sure that the bracket is anchored before fixing the screws Fix securely with assembly screws 4 screws A Bracket Front Base Hold the bracket not to fall over Protrusion of Neck top S...

Page 10: ...e pedestal do not remove the pedestal by any methods other than the specified procedure Above Otherwise the TV and or pedestal may fall over and become damaged and personal injury may result Location...

Page 11: ...ion HD cable service to enjoy HD programming The connection for high definition can be done with the use of an HDMI or Component Video cable p 12 Note When using a Cable box external equipment and vid...

Page 12: ...AV Equipment white red red blue green Component AV adapter To use COMPOSITE terminals L R COMPOSITE OUT yellow white red yellow white red yellow white red or e g DVD Recorder AV Equipment e g VCR gre...

Page 13: ...ecessary white white red red Component AV adapter not in use Cable Binding Instructions To attach hole Insert To bundle To remove To loosen Keep pushing both sides till they snap snaps Set hooks knob...

Page 14: ...ist function Viewing from external media SD USB Channel up down when viewing from ANT Cable source Numeric keypad to select any channel or press to enter alphanumeric input in menus Use for digital ch...

Page 15: ...ton OPTION Touch Pad Tap Swipe Trace the fringe to scroll Return VIERA TOOLS button Displays VIERA TOOLS menu On screen remote button Press and hold for On screen remote Channel up down Left button OK...

Page 16: ...ding on the application Remote control with on screen menu Pressing and holding down the On screen remote button displays the remote control panel This will enable you to operate it as a Remote Contro...

Page 17: ...n Auto is selected clock will be set automatically according to Time zone and DST Pair the Touch Pad Controller To pair the Touch Pad Controller hold the touch pad within 1 6 feet 50 cm of the TV and...

Page 18: ...f you experience any redness pain or itching on the nose or temples Prolonged use may cause such symptoms due to excess pressure which may result in the user feeling unwell Use the 3D Eyewear where th...

Page 19: ...elect next select next select Change the menus using To return to the previous menu layer To exit eHELP Operate eHELP Go to Menu is available depending on the situation or condition Display the Menu r...

Page 20: ...as they can damage the surface coating If using a chemically treated cloth follow the instructions supplied with the cloth Do not attach sticky tape or labels as they can make the surface of the pede...

Page 21: ...l Fiber Optic OTHERS SD CARD slot ETHERNET 10BASE T 100BASE TX Dimensions Including pedestal W H D 42 0 27 9 13 2 1 066 mm 708 mm 335 mm 48 7 31 6 13 2 1 236 mm 804 mm 335 mm TV Set only W H D 42 0 24...

Page 22: ...Limited Warranty ONLY COVERS failures due to defects in materials or workmanship and DOES NOT COVER normal wear and tear or cosmetic damage nor does it cover markings or retained images on the glass p...

Page 23: ...Friday 9 am 9 pm Saturday Sunday 10 am 7 pm EST For hearing or speech impaired TTY users TTY 1 877 833 8855 Accessory Purchases United States and Puerto Rico Purchase Parts Accessories and Instructio...

Page 24: ...The warranty ALSO DOES NOT COVER damages which occurred in shipment or failures which are caused by products not supplied by Panasonic Canada Inc or failures which result from accidents misuse abuse...

Page 25: ...gn or manufacture Specifications are subject to change without notice Non metric weights and measurements are approximate Side View P120308 15 8 400 15 8 400 27 9 708 13 2 335 6 0 151 42 0 1066 24 8 6...

Page 26: ...or manufacture Specifications are subject to change without notice Non metric weights and measurements are approximate Side View P120329 15 8 400 15 8 400 31 6 804 13 2 335 6 0 151 48 7 1236 28 6 726...

Page 27: ...vicios que le ofrece la garant a Modelo N mero de serie Panasonic Consumer Marketing Company of North America Division of Panasonic Corporation of North America One Panasonic Way Secaucus New Jersey 0...

Reviews: