


24
25
Advanced
How to Use Menu Functions
(picture, sound quality
, etc.)
(Continued)
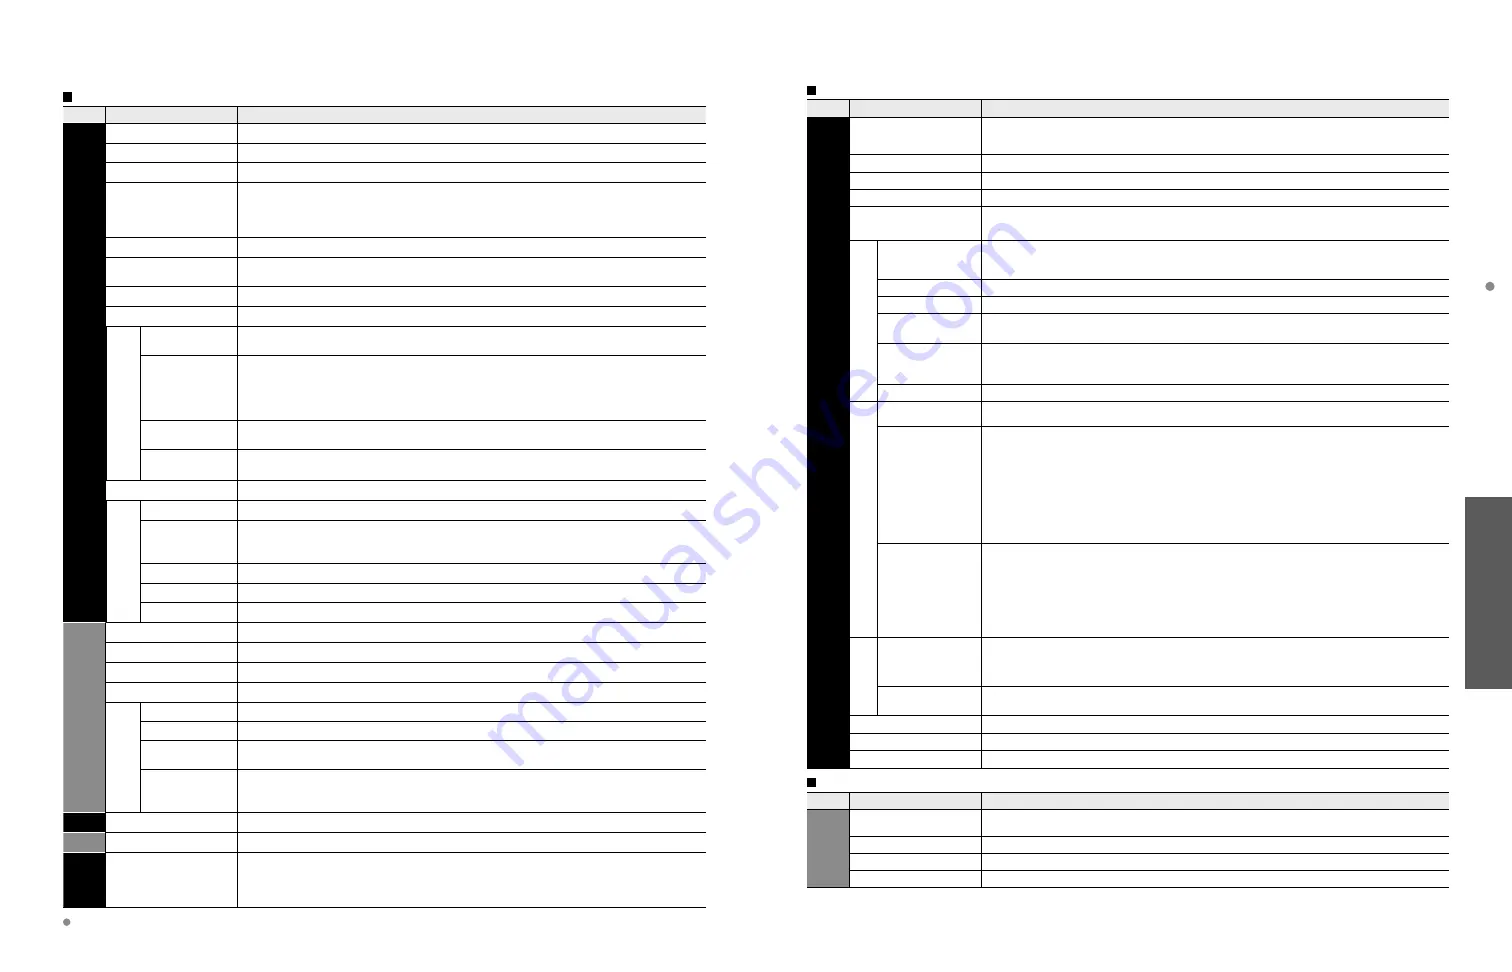
Menu list
Menu
Item
Adjustments/Configurations (alternatives)
Setup
Channel surf mode
Sets the mode to select the channel with the Channel up/down button.
(All/Favorite/Digital only/Analog only)
•
Favorite: Only channels registered as FAVORITE. (p. 16)
Language
Selects the screen menu language.
Clock
Adjusts the clock. (p. 14)
ANT/Cable setup
Sets channels. (p. 13)
Input labels
Selects the terminal and label of the external equipment. (p. 37)
VIERA
Link settings
VIERA Link
Controls the equipment connected to HDMI terminals
(Off/On)
(p. 28)
•
“Power off link”, “Power on link”, “Energy saving mode”, “Unselected device energy save”
and “Default speakers” cannot be selected if “Off” is set.
Power on link
Sets “Power on link” of the HDMI connected equipment
(No/Yes)
(p. 28)
Power off link
Sets “Power off link” of the HDMI connected equipment
(No/Yes)
(p. 28)
Energy saving
mode
Sets “Energy saving mode” of the HDMI connected equipment.
(Quick start/Save)
(p. 28)
Unselected
device energy
save
Sets “Unselected device energy save” of the HDMI connected equipment. (p. 28)
(No (stay on)/Yes (with prompt)/Yes (no prompt))
Default speakers
Selects the default speakers
(TV/Theater)
(p. 28)
ECO/energy saving
Power save
Reduces screen brightness to lower power consumption. Eye-friendly for viewing in a dark
room.
(Standard/Saving)
No signal for 10
minutes
To conserve energy, the TV automatically turns off when NO SIGNAL and NO OPERATION
continue for more than 10 minutes.
(Stay on/Power TV off)
Note
•
Not in use when “Auto power on”, “On/Off Timer” or “Lock” is set, or while “SD mode” or
“Digital Channel” is selected.
•
“No signal for 10 minutes was activated” will be displayed for about 10 seconds when
the TV is turned on for the first time after the power was turned off by “No signal for 10
minutes”.
•
The on-screen display will flash 3, 2 and 1 to indicate the last three (3) remaining minutes
prior to the shut-off.
No activity for 3
hours
To conserve energy, the TV automatically turns off when no operation of remote and side
panel key continues for more than 3 hours.
(Stay on/Power TV off)
Note
•
Not in use when “Auto power on” or “On/Off Timer” is set, or while “PC input” is selected.
•
“No activity for 3 hours was activated” will be displayed for about 10 seconds when the TV
is turned on for the first time after the power was turned off by “No activity for 3 hours”.
•
The on-screen display will flash 3, 2 and 1 to indicate the last three (3) remaining minutes
prior to the shut-off.
Advanced
setup
Auto power on
Turns TV On automatically when the cable box or a connected device is turned On
(No/Yes)
TV AC cord must be plugged into this device. TV comes on every time the power is restored.
•
The “Sleep” timer, “On / Off timer”, and “First time setup” will not function if “Auto power on” is set.
(p. 38)
Image viewer
auto play
Set “Thumbnail” or “Slideshow” to play back SD cards automatically.
(Slideshow/Thumbnail/Set later/Off)
First time setup
Restart first time setup from “Language” setting. (p. 12)
About
Displays TV version and software license.
Reset to defaults
Performing Reset will clear all items set with Setup, such as channel settings.
Sub menu list
Menu
Item
Adjustments/Configurations (alternatives)
Setup
SUB MENU
Channel surf mode
Sets the mode to select the channel with Channel up/down button.
(All/Favorite/Digital only/Analog only)
Set favorite
Sets favorite channels. (p. 16)
Edit CH caption
Changes the station identifier. (p. 35)
Signal meter
Checks the signal strength if interference or freezing occurs on a digital image.
How to Use Menu Functions
Menu list
Menu
Item
Adjustments/Configurations (alternatives)
Picture
Reset to defaults*
Resets all picture adjustments to factory default settings except for “Advanced picture”.
Picture mode
Basic picture mode
(Vivid/Standard/Cinema/Custom)
(p. 43)
Back light
Adjusts the luminance of the back light.
Contrast, Brightness,
Color, Tint, Sharpness
Adjusts color, brightness, etc. for each picture mode to suit your taste
•
Display range
Contrast/Brightness/Color/Sharpness:
0 - 100
Tint:
-50
-
+50
Color temp.
Selects a choice of Cool (blue), Normal, or Warm (red) color.
(Cool/Normal/Warm)
A.I. picture
Controls dark areas without affecting the black level or brightness in the overall picture
(Off/On)
C.A.T.S.
Adjusts the brightness and gradation according to the ambient lighting condition.
(Off/On)
Video NR
Reduces noise, commonly called snow. Leave it off when receiving a strong signal.
(Off/On)
Aspect adjustments
Screen format
Changes the format (aspect ratio).
(FULL/H-FILL/JUST/4:3/ZOOM)
Lets you choose the aspect depending on the format of received signal. (p. 41)
HD size
Selects between 95 % (Size 1) or 100 % (Size 2) for the scanning area with High-definition
signal.
(Size 1/Size 2)
Select “Size 1” if noise is generated on the edges of the screen.
•
Size 1: Selected item for “HD size”. Scanning 95 %
•
Size 2: Selected item for “HD size”. Scanning 100 %
H size
Adjusts the horizontal display range to reduce noise of both side edges of an image.
(Size 1/Size 2)
Size 2: Adjusts the image size according to the aspect mode for to reduce noise.
(p. 44)
Zoom
adjustments
Adjusts vertical alignment and size when aspect setting is “ZOOM”
PC adjustments
Sets PC display (p. 22)
Advanced picture
3D Y/C filter
Minimizes noise and cross-color in the picture.
(Off/On)
Color matrix
Selects image resolution of component-connected devices
(SD/HD)
•
SD: Standard Definition HD: High Definition
•
Only used with 480p video signal.
MPEG NR
Reduces noise of specific digital signals of DVD, STB, etc.
(Off/On)
Black level
Selects Dark or Light. Valid only for external input signals.
(Dark/Light)
3:2 pulldown
Adjusts the picture recorded in 24 fps for optimum quality.
(Off/On/Auto)
Audio
Reset to defaults*
Resets Bass, Treble, and Balance adjustments to factory default settings.
Bass
Increases or decreases the bass response.
Treble
Increases or decreases the treble response.
Balance
Emphasizes the left / right speaker volume.
Advanced audio
Surround
Enhances audio response when listening to stereo.
(Off/On)
Volume leveler
Minimizes volume disparity after switching to external inputs.
TV speakers
Switches to “Off” when using external speakers
(Off/On)
•
“Surround” and “Volume leveler” do not work if “Off” is selected.
HDMI 1 in
HDMI 2 in
HDMI 3 in
The default setting is “Digital” for the HDMI connection. (Digital input signal)
Select audio input terminal when DVI cable is connected. (Analog audio input signal)
(Digital/Component/Video 1/Video 2)
Timer
Sleep, Timer 1-5
The TV can automatically turn On/Off at the designated date and time
Lock
Locks the channels and programs. (p. 32)
Closed
caption
Closed caption
Displays subtitles (Closed caption). (p. 36)
In the AV mode, the Audio and Setup menus give fewer options.
* Confirmation screen is displayed. Select “Yes” and press OK to reset.


