background image

English

13

  Set up the network connection
 Select your country
 Select your area


 When selecting [CATV/Other], press the OK button, 
and then select the Channel Plan from Indian CATV, 
South Africa, American System, American CATV or 
Japan CATV.

 3

  Select the type of [Home Screen]

 The demonstration to explain how to use [my Home 
Screen] is displayed. Confirm the demonstration by 
following the on-screen instructions, and then select the 
desired [Home Screen].

 Example: [Home Screen Selection]


 Example: [TV Home Screen]


 Auto Tuning is now complete and 
your TV is ready for viewing.

 If tuning has failed, check the connection of the network, 
RF cable, and then follow the on-screen instructions.

 Note


 The TV will automatically go into Standby mode 
when no operation is performed for 4 hours if [Auto 
Standby] in the Timer Menu is set to [On].


 The TV will automatically go into Standby mode when 
no signal is received and no operation is performed 
for 10 minutes if [No signal Power off] in the Timer 
Menu is set to [On].


 To retune all channels 


[Auto Tuning] in [Tuning Menu] (Setup Menu)


 To initialise all settings 


[Shipping Condition] in [System Menu] (Setup 
Menu)

  First time Auto 
Tuning

 Automatically sets up the TV and searches for available 
TV channels when the TV is turned on for the first time.


 These steps are not necessary if the setup has been 
completed by your local dealer.


 Please complete connections (p. 7 - 9) and settings 
(if necessary) of the connected equipment before 
starting Auto Tuning. For details of settings for 
the connected equipment, read the manual of the 
equipment.

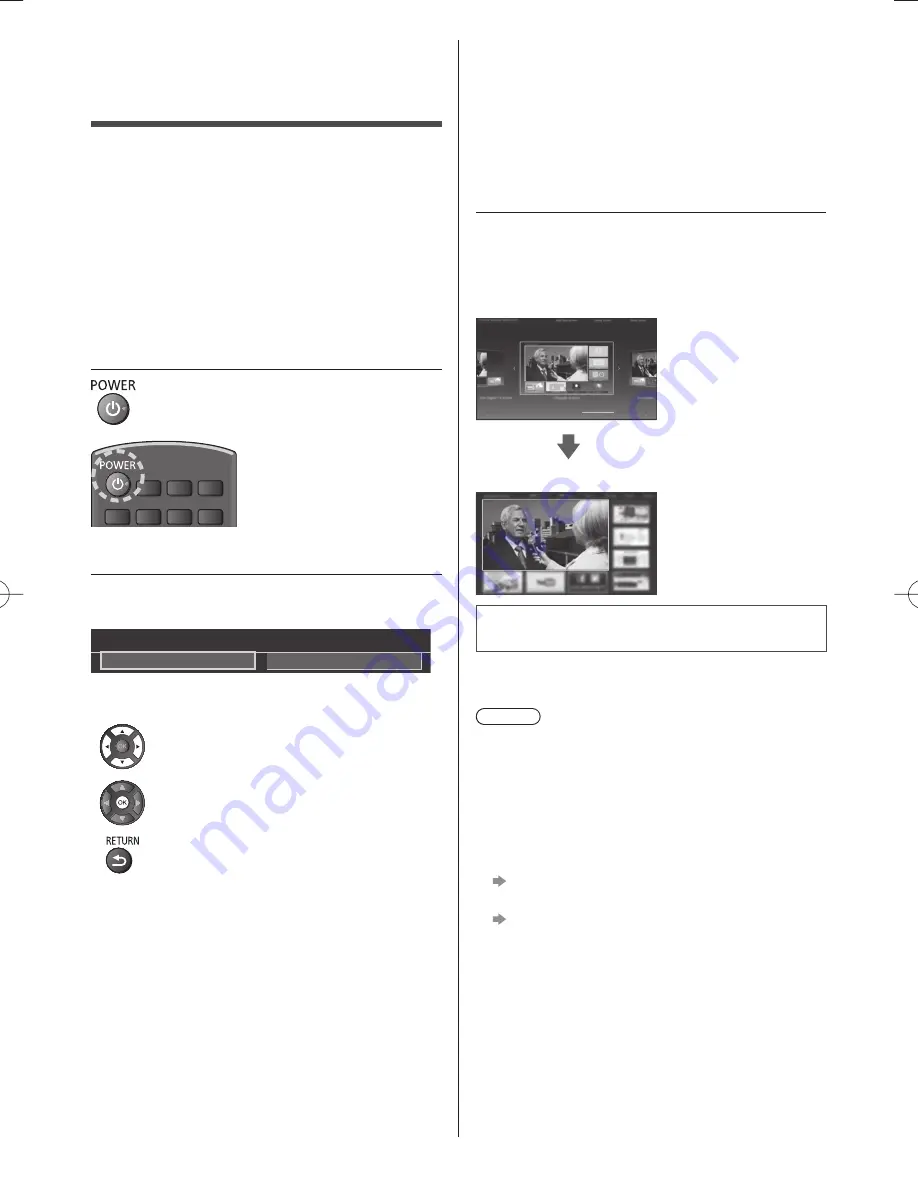
 1

  Plug the TV into mains socket and 

turn power on


 Takes a few seconds to be displayed.


 2

  Select the following items

 Set up each item by following the on-screen instructions.

 Example:


 Please select your viewing environment.

 Home

 Shop


 How to use remote control


 Move the cursor


 Access the item / store the setting


 Return to the previous item (if available)


 Select the language
 Select [Home]

 Select [Home] viewing environment to use in your home 
environment.


 [Shop] is for shop display.


 To change viewing environment later on, you will 
need to initialise all settings by accessing Shipping 
Condition.

Summary of Contents for Viera AS670M series

Page 1: ...refully before operating this product and retain them for future reference The images shown in this manual are for illustrative purposes only English AS670M series AS700M series For more detailed instructions refer to eHELP Built in Operating Instructions How to use eHELP p 15 M0414 1044 English CNX TQB4GC1138 1 ...

Page 2: ...Contents Be Sure to Read Important Notice 3 Safety Precautions 3 Quick Start Guide Accessories 6 Connections 7 Identifying Controls 10 First time Auto Tuning 13 Using your VIERA Operations 14 How to Use eHELP 15 Viewing 3D images 15 Others FAQs 16 Maintenance 16 Specifications 17 ...

Page 3: ...age of such other maker s peripheral devices The recording and playback of content on this or any other device may require permission from the owner of the copyright or other such rights in that content Panasonic has no authority to and does not grant you that permission and explicitly disclaims any right ability or intention to obtain such permission on your behalf It is your responsibility to en...

Page 4: ...ing website English only http panasonic net viera support Bluetooth wireless technology Caution The TV and Touch Pad Controller use the 2 4 GHz radio frequency ISM band Bluetooth To avoid malfunctions or slow response caused by radio wave interference keep the TV and Touch Pad Controller away from the devices such as other wireless LAN devices other Bluetooth devices microwaves mobile phones and t...

Page 5: ...id any accidental damage or injury Do not view 3D images from a distance shorter than recommended The recommended viewing distance is at least 3 times of the image height 50 inch model 1 9 m or more 55 inch model 2 1 m or more 60 inch model 2 3 m or more When black bands at the top and bottom of the screen are displayed such as movies view the screen from a distance at least 3 times the height of ...

Page 6: ...uch Pad Controller p 11 N2QBYA000004 Pedestal p 6 50 inch model 55 inch model 60 inch model Mains lead p 8 Batteries R6 2 For Remote Control p 11 R03 2 For Touch Pad Controller p 12 3D Eyewear 4 p 15 Operating Instructions Accessories may not be placed all together Take care not to throw them away unintentionally For the information of optional accessories refer to eHELP Support Optional accessori...

Page 7: ...ed sensor otherwise distortion of image sound may occur or operation of other equipment may be affected Please also read the manual of the equipment being connected Terminals 5 4 7 8 6 1 2 3 1 SD Card slot 2 USB 1 2 port 3 HDMI3 4 AV COMPONENT VIDEO p 9 5 ETHERNET p 8 6 Aerial terminal p 8 7 DIGITAL AUDIO OUT 8 HDMI1 2 p 8 9 2 3 B Removing the pedestal from the TV Be sure to remove the pedestal in...

Page 8: ...e When disconnecting the mains lead be absolutely sure to disconnect the mains plug at the socket outlet first Aerial TV RF cable Aerial Keep RF aerial cable away from the mains lead to avoid and minimise mains interference pickup Do not place the RF cable under the TV An aerial correct cable 75 Ω coaxial and correct terminating plug are required to obtain optimum quality picture and sound If a co...

Page 9: ... with speaker system External equipment DVD Player etc Communication Camera Use USB 1 for connecting the Communication Camera For more information refer to eHELP Support Optional accessories Communication Camera VIERA Link Use HDMI1 3 for VIERA Link connection For more information refer to eHELP Functions VIERA Link HDAVI Control Wireless connection Internet environment Built in wireless LAN Acces...

Page 10: ...ges aspect ratio 15 STILL Freeze unfreeze picture 16 Exit Returns to Home Screen 17 HOME Displays Home Screen 18 Media Player Switches to SD Card and USB device viewing listening mode 19 Cursor buttons Makes selections and adjustments 20 Return Returns to the previous menu page 21 Channel Up Down 22 Sound Mute On Off 23 Last view Switches to previously viewed channel or input mode 24 Operations fo...

Page 11: ...ll open Hook Note the correct polarity or Close Touch Pad Controller Touch Pad Controller is designed for the convenient operations especially on Home Screen or internet contents You can operate the TV intuitively with this controller Touch Pad Controller can be used by registering to this TV with Bluetooth wireless technology The registration starts automatically when you press any buttons except...

Page 12: ...arity or Close Note It is recommended to hold Touch Pad Controller with your hand when using The battery power will be used whenever you use Touch Pad Controller including the touch of the touch pad even if not operating the TV It may decrease the battery life Some operations differ depending on the application Indicator Control panel When pressing 1 2 3 buttons the control panel guide appears on ...

Page 13: ...Timer Menu is set to On To retune all channels Auto Tuning in Tuning Menu Setup Menu To initialise all settings Shipping Condition in System Menu Setup Menu First time Auto Tuning Automatically sets up the TV and searches for available TV channels when the TV is turned on for the first time These steps are not necessary if the setup has been completed by your local dealer Please complete connectio...

Page 14: ...APPS List Operations Turn power on TV or Remote Control Mains power On Off switch should be on p 12 The last viewed Home Screen is displayed Example TV Home Screen Example Selected content screen To return to Home Screen at any time You can set up or make Home Screen to display desired information to access specific features easily to select the default Home Screen etc For details follow the on sc...

Page 15: ...o 2D 3D mode in 3D Mode Selection 1 Put the 3D Eyewear on 2 View the 3D images Safety precautions will be displayed when you first watch the 3D image Select Yes or No to continue to view 3D images Note Do not exert pressure on or scratch the lens of the 3D Eyewear 3D content will not be correctly visible if the 3D Eyewear is worn upside down or back to front When viewing 3D images make sure your e...

Page 16: ...t FAQs The TV does not switch on Check the mains lead is plugged into the TV and the socket outlet The TV goes into Standby mode Auto power standby function is activated The remote control does not work or is intermittent Are the batteries installed correctly p 11 Has the TV been switched on The batteries may be running low Replace them with new ones Point the remote control directly at the TV s r...

Page 17: ...ITAL AUDIO OUT PCM Dolby Digital DTS Fibre optic Specifications TV Model No AS670 series 50 inch model TH 50AS670M 55 inch model TH 55AS670M AS700 series 60 inch model TH 60AS700M Dimensions W H D AS670 series 50 inch model 1 130 mm 703 mm 214 mm With Pedestal 1 130 mm 658 mm 54 mm TV only 55 inch model 1 244 mm 767 mm 292 mm With Pedestal 1 244 mm 722 mm 54 mm TV only AS700 series 60 inch model 1...

Page 18: ... technology Design and Specifications are subject to change without notice Mass and Dimensions shown are approximate For the information of the open source software refer to eHELP Support Licence Receiving systems Band name 17 Systems Function 1 PAL B G H Reception of broadcast transmissions and Playback from Video Cassette Tape Recorders 2 PAL I 3 PAL D K 4 SECAM B G 5 SECAM D K 6 SECAM K1 7 NTSC...

Page 19: ...nded wall hanging bracket Holes for wall hanging bracket installation Rear of the TV 400 200 View from the side Depth of screw 50 inch model 55 inch model minimum 9 mm maximum 18 mm 60 inch model minimum 10 mm maximum 20 mm Diameter M6 Screw for fixing the TV onto the wall hanging bracket not supplied with the TV ...

Page 20: ... Built in wireless LAN Touch Pad Controller UAE TRA REGISTERED No ER0120168 13 DEALER No DA0052708 10 OMAN TRA TRA TA R 1608 13 D090281 UAE Built in Bluetooth UAE TRA REGISTERED No ER0098365 12 DEALER No DA0052708 10 Nigeria Connection and use of this communications equipment is permitted by the Nigerian Communications Commission UAE Touch Pad Controller UAE TRA REGISTERED No ER0122174 13 DEALER N...

Reviews: