background image

English

16

  Viewing 3D images

 You can enjoy viewing 3D images with contents or 
programmes corresponding to the 3D effect by wearing 
the 3D Eyewear (supplied).


 The 3D Eyewear must be worn to view 3D images.


 This TV supports [Frame Sequential]

*

, [Side by Side] 

and [Top and Bottom] 3D formats.


 For more information, refer to [eHELP] (Watching > 
3D).

 *

:  The 3D format that the images for the left and right 

eyes are recorded with the high definition quality and 
alternately played back.

 To view the 3D images


 Playing back 3D-compatible Blu-ray disc 
(Frame Sequential format)


 Connect the 3D-compatible player via a fully 
wired HDMI compliant cable. (If you use the non 
3D-compatible player, the images will be displayed in 
2D mode.)


 If the input mode is not switched automatically, select 
the input mode connected to the player using the AV 
button.


 3D-supported broadcast


 Please consult the suppliers of contents or 
programmes for availability of this service.


 3D photos and 3D videos taken by 
3D-compatible Panasonic products


 Available in Media Player and Network services.


 2D images converted to 3D


 Press the 3D button and set to [2D

3D] mode in [3D 

Mode Selection].

 1

  Put the 3D Eyewear on

 2

  View the 3D images

 Safety precautions will be displayed when you first 
watch the 3D image. Select [Yes] or [No] to continue to 
view 3D images.

 Note


 Do not exert pressure on or scratch the lens of the 3D 
Eyewear.


 3D content will not be correctly visible if the 3D 
Eyewear is worn upside down or back-to-front.


 When viewing 3D images, make sure your eyes 
are at an approximately horizontal level and keep a 
position where you do not see double images.

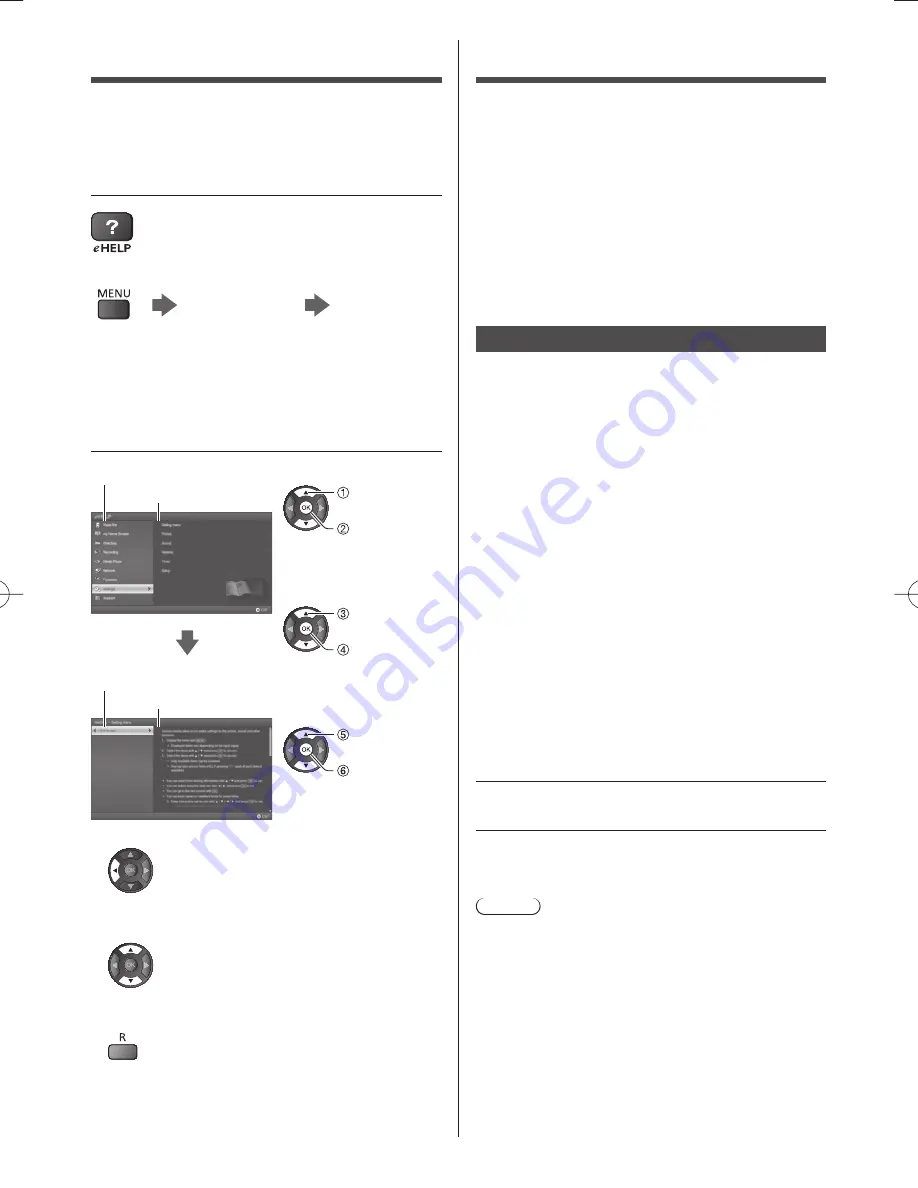
  How to Use eHELP

 [eHELP] is the detailed operating instructions built into 
the TV, and helps you to get more understanding of the 
operations for each feature.

 1

 Display [eHELP]


 or


 [Help]


 [eHELP]


 If this is not the first time to view [eHELP] from 
when the TV is turned on, the confirmation screen 
is displayed to select whether [First Page] or [Last 
Page].

 2

  Select the category and item


 Category field

 Item field


    select 

category

    access


    select item

   access


    select sub 

item

   access


 Sub item field

 Description


 To return to the previous field


 To scroll the description (if more than 1 page)
 While the description is highlighted


 To display the menu related to the description (only 
for some descriptions)


 (red)

Summary of Contents for VIERA AS670H series

Page 1: ...product and retain them for future reference The images shown in this manual are for illustrative purposes only For more detailed instructions refer to eHELP Built in Operating Instructions How to use eHELP p 16 M0514 1054 English Operating Instructions LED TV English AS670H series AS700H series TQB4GC1140 1 CQD ...

Page 2: ...Contents Be Sure to Read Important Notice 3 Safety Precautions 4 Quick Start Guide Accessories 6 Connections 8 Identifying Controls 11 First time Auto Tuning 14 Using your VIERA Operations 15 How to Use eHELP 16 Viewing 3D images 16 Others FAQs 17 Maintenance 17 Specifications 18 ...

Page 3: ...of this or any other device complies with applicable copyright legislation in your country Please refer to that legislation for more information on the relevant laws and regulations involved or contact the owner of the rights in the content you wish to record or playback This product is licensed under the AVC patent portfolio license for the personal and non commercial use of a consumer to i encod...

Page 4: ...stallation of the pedestal Ensure that children do not climb onto the pedestal Install or remove the TV from the pedestal with at least two people Install or remove the TV by the specified procedure Safety Precautions To help avoid risk of electrical shock fire damage or injury please follow the warnings and cautions below Mains plug and lead Warning If you detect anything unusual immediately remo...

Page 5: ...ot use the TV and Touch Pad Controller near any automatic control equipment such as automatic doors or fire alarms Radio waves may interfere with the automatic control equipment and cause accidents due to the malfunction Keep the distance at least 22 cm from the TV and Touch Pad Controller when you have a cardiac pacemaker Radio waves may interfere with the operation of the pacemaker Do not disass...

Page 6: ... the 3D Eyewear may cause an allergic reaction Viewing 3D Images Caution Pay special attention when children are viewing 3D images 3D images should not be viewed by children younger than about 6 years old as a guideline All children must be fully supervised by parents or guardians who must ensure their safety and health while they are viewing 3D images Stop viewing 3D images immediately if you fee...

Page 7: ...all hanging bracket or repacking the TV 1 Remove the assembly screws from the TV 2 Pull out the pedestal from the TV 3 Remove the assembly screws from the bracket Assembling Removing the pedestal Assembly screw 4 M5 15 Assembly screw 4 M4 12 Bracket 2 Base 42 inch model 50 inch model 55 inch model 60 inch model A C D 1 ...

Page 8: ...g the correct aerial system for your particular area and the accessories required Any matters regarding aerial installation upgrading of existing systems or accessories required and the costs incurred are the responsibility of you the customer Connections External equipment and cables shown are not supplied with this TV Please ensure that the unit is disconnected from the mains socket before attac...

Page 9: ...AV devices DVD Recorder VCR TV RF cable HDMI cable DVD Recorder VCR Aerial Set top box TV HDMI cable Set top box Network To use internet service you need a broadband network environment If you do not have any broadband network services please consult your retailer for assistance Prepare the internet environment for wired connection or wireless connection Setup of the network connection will start ...

Page 10: ...to the amplifier For the connections read the manuals of the equipment and amplifier TV HDMI cable Amplifier with speaker system External equipment DVD Player etc Communication Camera Use USB 1 for connecting the Communication Camera For more information refer to eHELP Support Optional accessories Communication Camera USB HDD for recording Use USB 2 for connecting the USB HDD For more information ...

Page 11: ...e from Input Selection list 14 Aspect Changes aspect ratio 15 Subtitles Displays subtitles 16 Exit Returns to Home Screen 17 HOME Displays Home Screen 18 TV Guide 19 Cursor buttons Makes selections and adjustments 20 Return Returns to the previous menu page 21 Channel Up Down 22 Sound Mute On Off 23 Last view Switches to previously viewed channel or input mode 24 Operations for contents connected ...

Page 12: ...ll open Hook Note the correct polarity or Close Touch Pad Controller Touch Pad Controller is designed for the convenient operations especially on Home Screen or internet contents You can operate the TV intuitively with this controller Touch Pad Controller can be used by registering to this TV with Bluetooth wireless technology The registration starts automatically when you press any buttons except...

Page 13: ... Slide open Note the correct polarity or Close Note It is recommended to hold Touch Pad Controller with your hand when using The battery power will be used whenever you use Touch Pad Controller including the touch of the touch pad even if not operating the TV It may decrease the battery life Some operations differ depending on the application Indicator Control panel When pressing 1 2 3 buttons the...

Page 14: ...er Menu is set to On To retune all channels Auto Tuning in Tuning Menu Setup Menu To add the available TV signal mode later Add TV Signal in Tuning Menu Setup Menu To initialise all settings Shipping Condition in System Menu Setup Menu First time Auto Tuning Automatically sets up the TV and searches for available TV channels when the TV is turned on for the first time These steps are not necessary...

Page 15: ... Operations Turn power on TV or Remote Control Mains power On Off switch should be on p 13 The last viewed Home Screen is displayed Example TV Home Screen Example Selected content screen To return to Home Screen at any time You can set up or make Home Screen to display desired information to access specific features easily to select the default Home Screen etc For details follow the on screen inst...

Page 16: ... 2D images converted to 3D Press the 3D button and set to 2D 3D mode in 3D Mode Selection 1 Put the 3D Eyewear on 2 View the 3D images Safety precautions will be displayed when you first watch the 3D image Select Yes or No to continue to view 3D images Note Do not exert pressure on or scratch the lens of the 3D Eyewear 3D content will not be correctly visible if the 3D Eyewear is worn upside down ...

Page 17: ...t FAQs The TV does not switch on Check the mains lead is plugged into the TV and the socket outlet The TV goes into Standby mode Auto power standby function is activated The remote control does not work or is intermittent Are the batteries installed correctly p 12 Has the TV been switched on The batteries may be running low Replace them with new ones Point the remote control directly at the TV s r...

Page 18: ...rts HDAVI Control 5 function ETHERNET 10BASE T 100BASE TX Specifications TV Model No AS670 series 42 inch model TH 42AS670H 50 inch model TH 50AS670H 55 inch model TH 55AS670H AS700 series 60 inch model TH 60AS700H Dimensions W H D AS670 series 42 inch model 962 mm 608 mm 202 mm With Pedestal 962 mm 562 mm 54 mm TV only 50 inch model 1 130 mm 703 mm 214 mm With Pedestal 1 130 mm 658 mm 54 mm TV on...

Page 19: ... 18 Usage temperature range 0 C 40 C USB 1 2 DC 5 V Max 500 mA Hi Speed USB USB 2 0 DIGITAL AUDIO OUT PCM Dolby Digital DTS Fibre optic Receiving systems Band name 17 Systems Function 1 PAL B G H Reception of broadcast transmissions and Playback from Video Cassette Tape Recorders 2 PAL I 3 PAL D K 4 SECAM B G 5 SECAM D K 6 SECAM K1 7 NTSC M NTSC 3 58 4 5 MHz 8 NTSC 4 43 5 5 MHz Playback from Speci...

Page 20: ...18 mm 60 inch model minimum 10 mm maximum 20 mm Diameter M6 Screw for fixing the TV onto the wall hanging bracket not supplied with the TV Materials Main body Lens section Resin Use Panasonic 3D Eyewear supporting passive 3D system technology Note Touch Pad Controller uses Bluetooth wireless technology Design and Specifications are subject to change without notice Mass and Dimensions shown are app...

Page 21: ......

Page 22: ......

Page 23: ......

Page 24: ...ase to aid in identification in the event of theft or loss and for Warranty Service purposes Model Number Serial Number Web Site http panasonic net Panasonic Corporation 2014 English Printed in Malaysia Information on Disposal in other Countries outside the European Union This symbol is only valid in the European Union If you wish to discard this product please contact your local authorities or de...

Reviews: