background image

Re

cording

Manual recording functions

169

LSQT1049

Manual recording functions

When the AUTO/MANUAL/FOCUS switch is set to AUTO, the unit adjusts automatically the 
following settings.

White balance

Shutter speed

Iris/gain value

Focus

Above settings may not be adjusted automatically depending on light sources or 
scenes. If so, adjust the settings manually.

(RAM)


(-RW‹VR›)


(-RW‹V›)


(-R)


(SD)

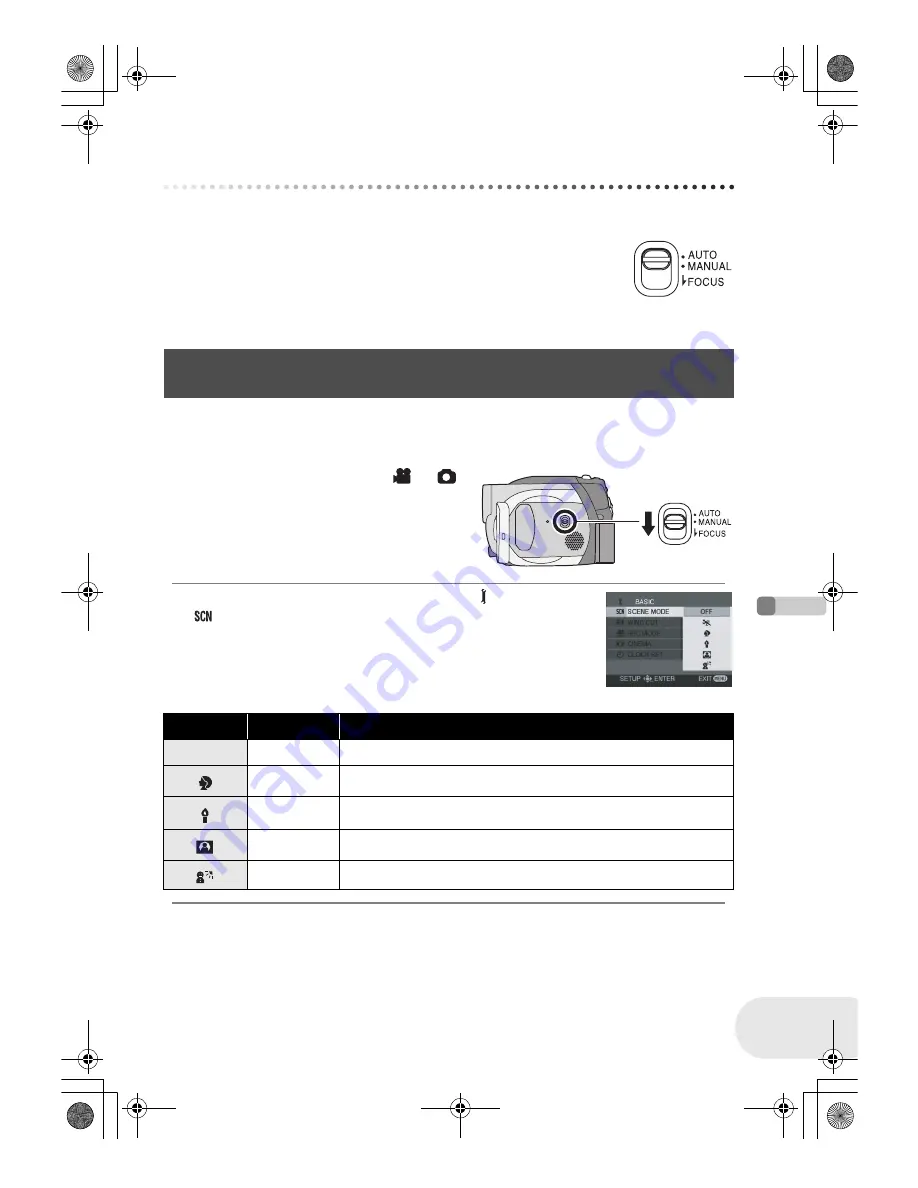
When you record images in different situations, this mode automatically sets optimum shutter 
speeds and apertures.

¬

Rotate the mode dial to select 

 or 

.

1 Set the AUTO/MANUAL/FOCUS 

switch to MANUAL.

2 Press the MENU button, then select [

BASIC] 

#


[

SCENE MODE] 

#

 desired item and press the 

joystick.

Scene mode

This is for recording in various situations.

Display

Mode

Recording conditions

5

Sports

To record sports scenes or scenes where there are quick motions

Portrait

To make people stand out against the background

Low light

To make the scene brighter in dark conditions

Spotlight

To make the subject under a spotlight look more attractive

Surf & snow

To record images in bright places such as ski slopes and beaches

LSQT1049(ENG).book  169 ページ  2005年12月20日 火曜日 午後6時45分

Summary of Contents for VDR-D150GC

Page 1: ...r 使用說明書 Operating Instructions DVD 攝錄放影機 DVD Video Camera Model No VDR D150GC 使用前 請仔細閱讀本說明書 Before use please read these instructions completely LSQT1049 A LSQT1049 TC_GC book 1 ページ 2005年12月22日 木曜日 午後8時13分 ...

Page 2: ...的物體 如 花瓶 放在本設備上 攝錄放影機 標牌位於攝錄放影機的下面 AC 適配器 標牌位於 AC 適配器的下面 電源插座應當安置在本設備附近 並便於連 接 或者電源插頭或電器耦合器保持在隨時 可以使用的狀態 IEC 60825 1 2001 注意 本產品具有 1 級以上的激光二極管 為了保 證安全 不要卸掉任何蓋子或試圖接觸產品 內部 所有的維修 請與授權的人員聯繫 1 級 激光產品 如何更換保險絲 保險絲的位置根據 AC 電源線類型的不同而 有所不同 圖 A 與 B 確保使用合適的 AC 電源線並遵照下列指示 進行操作 圖例可能與實際的 AC 電源線有所不同 1 用螺絲起子開啟保險絲蓋 2 更換保險絲並關上並合緊保險絲蓋 歐盟以外國家的棄置資訊 本符號只適用於歐盟國家 如欲丟棄本產品 請聯絡當地 政府單位或經銷商 洽詢正確 的棄置方法 LSQT1049 TC_GC book 2 ページ...

Page 3: ... 其他出版物或播放材料都侵犯版權法 即使是個人 使用 也嚴禁複製某些特定的材料 SD 徽標是商標 攝錄放影機使用了版權保護技術 並且被日本和美國的專利技術和知識產權所保護 要想使用這 些版權保護技術 必須得到 Macrovision 公司的授權 禁止分解或改裝攝錄放影機 由 Dolby Laboratories 授權製造 Dolby 和雙 D 符號是 Dolby Laboratories 的商標 本說明書中提到的其他系統和產品的名稱通常是開發相關系統或產品的廠家的註冊商標或商標 LSQT1049 TC_GC book 3 ページ 2005年12月22日 木曜日 午後8時13分 ...

Page 4: ...記憶卡 25 選擇一種模式 26 操縱桿的使用方法 27 轉換語言 31 使用功能表螢幕 32 設定日期和時間 34 調整 LCD 顯示屏 取景器 36 拍攝 拍攝之前 37 拍攝動態影像 38 改變動態影像的拍攝模式 40 拍攝靜態圖片 41 各種拍攝功能 43 放大 縮小功能 43 自拍 44 肌膚柔和模式 45 淡入 淡出功能 46 逆光補償功能 48 自拍計時器拍攝 49 風聲噪音減少功能 50 寬屏電影模式 50 夜視功能 51 影像穩定器功能 52 手動拍攝功能 53 場景模式 53 手動對焦調整 55 白平衡 56 手動快門速度 光圈調整 58 重播 動態影像重播 59 靜態圖片重播 62 以投影片播放形式重播靜態圖片 63 目錄 LSQT1049 TC_GC book 4 ページ 2005年12月22日 木曜日 午後8時13分 ...

Page 5: ...格式化 SD 記憶卡 82 封存光碟 83 封存光碟 83 未封存 DVD RW 84 保護光碟 85 顯示光碟資訊 86 用其他產品 用電視機 87 在電視機上重播 87 用 DVD 錄影機 播放機 88 在 DVD 錄影機 播放機上重播 88 將拍攝內容複製到 DVD 錄影機的 硬盤上 89 用 VCR 90 將影像複製到其他視頻設備上 90 用印表機 PictBridge 91 其他 功能表 94 功能表列表 94 設定功能表 96 指示 97 指示 97 訊息 99 不能 同時 使用 的 功能 101 常見問題解答 102 故障排除 103 使用時的注意事項 107 名詞解釋 111 規格 113 SD 記憶卡上可拍攝的圖片數量 115 LSQT1049 TC_GC book 5 ページ 2005年12月22日 木曜日 午後8時13分 ...

Page 6: ...使用之前 特點 6 LSQT1049 使用之前 特點 易於拍攝 l 38 無需搜索拍攝開始位置 新拍攝內容不會覆蓋任何以前拍攝的場景 易於重播 l 59 拍攝的場景以縮略圖顯示 可以很容易地搜索到想觀看的場景 LSQT1049 TC_GC book 6 ページ 2005年12月22日 木曜日 午後8時13分 ...

Page 7: ...將喜歡的場景集中起來新增一個原始視頻 播放列表 然後很容易地將本視頻複製到 VCR 或 DVD 錄影機的硬盤上 和 DVD 播放機 錄影機一起使用 l 88 祇需將光碟插入與 8 釐米光碟兼容的 DVD 播放機 錄影機中即可重播在本機上拍攝的場景 如果有帶硬盤的 DVD 錄影機 可以用本機將拍攝到 DVD RAM 或 DVD RW VR 格式 上的場景 複製到硬盤上 LSQT1049 TC_GC book 7 ページ 2005年12月22日 木曜日 午後8時13分 ...

Page 8: ...器 VW AD11E EB MC 保護鏡 VW LMC30E 電池組 鋰電池 CGA DU12 1150 mAh 三腳架 VW CT45E 電池組 鋰電池 CGA DU14 1360 mAh 8 釐米 DVD RAM 光碟 單面 LM AF30E 電池組 鋰電池 CGA DU21 2040 mAh 8 釐米 DVD RAM 光碟 雙面 LM AF60E 廣角轉換鏡頭 VW LW3007E 8 釐米 DVD RW 光碟 單面 LM RW30E 遠攝轉換鏡頭 VW LT3014E 8 釐米 DVD RW 光碟 雙面 LM RW60E ND 濾鏡 VW LND30E 8 釐米 DVD R 光碟 單面 LM RF30E LSQT1049 TC_GC book 8 ページ 2005年12月22日 木曜日 午後8時13分 ...

Page 9: ...ON l 22 12 狀態指示燈 l 22 13 模式轉盤 l 26 14 操縱桿 l 27 上下左右移動選擇選項 按中心部位確定選擇 15 刪除按鈕 l 64 75 77 16 功能表按鈕 MENU l 32 17 電池座 l 19 18 目鏡校正旋鈕 l 36 19 變焦桿 W T l 43 音量桿 sVOLUMEr l 60 20 拍照鍵 PHOTO SHOT l 41 21 記憶卡存取指示燈 l 25 22 記憶卡插槽蓋 l 25 23 記憶卡插槽 l 25 24 三腳架插座 l 11 25 電池釋放手柄 BATTERY RELEASE l 19 由於 LCD 生產技術的限制 在取景器螢幕上 可能會有一些微小的亮點或者暗點 但這不是 故障 不會影響拍攝的圖片 1 2 3 4 6 5 7 8 10 9 11 12 13 14 17 15 16 18 19 20 22 25 23 24...

Page 10: ...US l 53 29 揚聲器 30 光碟彈出手柄 DISC EJECT l 23 31 光碟存取指示燈 ACCESS PC l 23 32 光碟室 l 23 33 手持帶 l 下面 調整帶子長度以適合手的尺寸 調整帶子的長度和襯墊的位置 1 翻轉帶子 2 調整長度 3 固定帶子 由於 LCD 生產技術的限制 在 LCD 顯示屏螢 幕上可能會有一些微小的亮點或者暗點 但這 不是故障 不會影響拍攝的圖片 26 28 27 29 30 31 32 33 使用手持帶 2 1 3 LSQT1049 TC_GC book 10 ページ 2005年12月22日 木曜日 午後8時13分 ...

Page 11: ...頭方向拉動鏡 頭蓋連線 A 在不進行拍攝時 請一定用鏡頭蓋蓋住鏡 頭 以保護鏡頭 B 取下鏡頭蓋時 請按住突起 如果鏡頭蓋連線開了 將鏡頭蓋連線的末端穿過鏡頭蓋上的安裝孔 然後將鏡頭蓋 穿過本身所構成的圈并拉緊 這是一個用於將本機安裝到可選的三腳架上的一個凹洞 關於如 何將三腳架安裝到本機上 請仔細閱讀使用說明書 當使用三腳架時 不能開啟記憶卡插槽蓋 將本機安裝到三腳架 上之前 請插入 SD 記憶卡 l 25 安裝鏡頭蓋 A B 三腳架插座 LSQT1049 TC_GC book 11 ページ 2005年12月22日 木曜日 午後8時13分 ...

Page 12: ...顯示屏 取景器現在處於無效狀態 LCD 顯示屏可開啟至 90o 2 隨意調整 LCD 顯示屏的角度 顯示屏可以向鏡頭方向向上旋轉 180o A 或向取景器方向旋轉 90o B 可以從功能表調整 LCD 顯示屏的亮度和色彩級別 l 36 如果將其強制開啟或旋轉 本機可能會被損壞或出 故障 當 LCD 顯示屏向鏡頭方向旋轉 180o 自拍時 時 LCD 顯示屏和取景器將同時啟動 拉出取景器直到發出喀噠聲 l 36 調整取景器 使用 LCD 顯示屏 PUSH OPEN B A 使用取景器 LSQT1049 TC_GC book 12 ページ 2005年12月22日 木曜日 午後8時13分 ...

Page 13: ...r 2 0 拍攝格式 DVD 視頻 拍攝格式 VR 格式 DVD 視頻 拍攝格式 VR 格式 DVD 視頻格式 視頻格式 DVD 視頻格式 視頻格式 特性 可擦寫光碟 可擦寫光碟 一次性刻錄光 碟 1 1 通過格式化光碟 可以重複使用光碟 l 81 一次性刻錄光 碟 螢幕上的顯示 本說明書中的指示 RAM RW VR RW V R 功能 在本機上編輯 在其他產品上重播 2 2 支持 8 釐米光碟的 DVD 播放機和 DVD 錄影機 3 3 可以在兼容的產品上重播 4 4 可以在兼容的產品上重播 可能必須在本機上封存光碟 5 5 必須在本機上封存光碟 l 83 5 封存光碟後拍攝 6 6 不封存此光碟 l 84 可用的 不可用的 LSQT1049 TC_GC book 13 ページ 2005年12月22日 木曜日 午後8時13分 ...

Page 14: ...他產品上播放 不支持在 DVD R 上以 DVD 視頻拍攝格式進行拍攝 當使用 DVD RW 或 DVD R 時 請不要進行下列操作 因為這樣做可能會使光碟不可用 用本機在光碟上拍攝以後 又用其他產品在光碟上拍攝 用其他產品在光碟上拍攝以後 又用本機在光碟上拍攝 插入一張在其他產品中未封存的光碟 關於格式化類型 不能用在本機上的光碟的例子 什麼是 DVD 視頻拍攝格式 VR 格式 這是一種拍攝在 DVD 光碟上的格式 允許重 複拍攝和刪除 並新增播放列表 可以用本 機在 DVD RAM 和 DVD RW 上以 DVD 視頻 拍攝格式進行拍攝 什麼是 DVD 視頻格式 視頻格式 通過封存此光碟 可以在大多數 DVD 播放機 上重播 可以用本機在 DVD RW 和 DVD R 上以 DVD 視頻格式進行拍攝 DVD RAM 2 6 GB Ver 1 0 DVD ROM MO DVD R 3 9...

Page 15: ...格式 視頻格式 進行 拍攝 然後格式化光碟 l 14 關於格式化類型 1 當在本機中插入一張嶄新的 DVD RW 時 出現右側的螢 幕 選擇 是 然後按下操縱桿 2 選擇格式化類型 然後按下操縱桿 3 當出現確認螢幕時 選擇 是 然後按下操縱桿 要改變格式化類型 請重新格式化光碟 l 81 如果光碟被格式化 則所有拍攝在光碟上的資料將 被刪除 當使用嶄新的 DVD RW 時 Video DVD 視頻格式 VR DVD 視頻拍攝格式 LSQT1049 TC_GC book 15 ページ 2005年12月22日 木曜日 午後8時13分 ...

Page 16: ... 上格式化 SD 記憶卡 則花在拍攝上 的時間會變長 並可能無法使用 SD 記憶卡 l 82 我們建議使用松下牌 SD 記憶卡 使用之前 一定要將 miniSD 卡插入到專用的卡適配器中 不用適配器而將卡插入到本機中可能 會損壞本機或記憶卡 請不要將空的卡適配器插入到本機中 當插入或取出 miniSD 卡時 請不要將適配器留在本機 中 這樣可能會導致本機發生故障 當 SD 記憶卡上的寫保護開關被鎖定時 無法在記憶卡上進行拍攝 刪除或編輯 讓記憶卡遠離兒童的接觸範圍 以防止兒童吞服 不能在本機上使用 MultiMediaCard 本機可以使用的記憶卡 記憶卡類型 SD 記憶卡 容量 8 MB 16 MB 32 MB 64 MB 128 MB 256 MB 512 MB 1 GB 2 GB 最大容量 本說明書中的指示 SD 寫保護開關 鎖定狀態 LSQT1049 TC_GC book 16 ペ...

Page 17: ...黏貼 這樣可能導致光碟變形和旋轉不平衡 而致使其無法使用 僅能用軟的 油基氈筆在光碟的標簽面上寫字 請不要使用圓株筆或其他硬的書寫工具 請不要使用拍攝清潔噴劑 汽油 稀釋劑 防靜電液或任何其他溶劑 請不要使用防劃保護器或蓋子 請不要將記憶卡的端子暴露在水 垃圾或灰塵中 請不要掉落 堆積或撞擊光碟 請不要將物體放置在光碟上 請不要使用下列光碟 帶有撕袪黏貼或標簽後所殘留的黏合劑的光碟 嚴重變形或劃傷的光碟 不規則形狀的光碟 比如心形 請不要放置在下列地方 陽光直射處 積滿灰塵或潮濕的地方 加熱器附近 易受溫差影響的地方 會發生水汽凝結 產生靜電或電磁波的地方 為了保護光碟和記憶卡 當不使用時 請將它們放回到盒子中 光碟和記憶卡的操作 LSQT1049 TC_GC book 17 ページ 2005年12月22日 木曜日 午後8時13分 ...

Page 18: ...地插進去 AC 電纜的輸出插頭沒有完全插入到 AC 適配器的插孔中 如 A 中所 示 有一道縫隙 充電指示燈 點亮 充電正在進行 熄滅 充電已經完成 閃爍 電池過放電 放電過度 稍等片刻 指示燈將會點亮 開始正常充電 當電池的溫度過高或過低時 CHARGE 指示燈閃爍 充電時間將比正常的充電的時間要 長一些 電池的充電時間 l 20 我們建議使用松下電池 如果使用其他品牌的電池 我們不能保證本產品的 質量 如果 DC 電纜被連接到 AC 適配器 則電池將不會充 電 從 AC 適配器上取下 DC 電纜 給電池充電 A LSQT1049 TC_GC book 18 ページ 2005年12月22日 木曜日 午後8時13分 ...

Page 19: ...設定 電源 19 LSQT1049 把電池頂靠到電池座上 並滑動電池 直到發出喀噠一 聲 當滑動 BATTERY RELEASE 手柄的同時 滑動電池以便 取出 請用手握住電池 以防掉到地上 取出電池之前 一定要關閉本機上的電源並檢查狀 態指示燈和存取指示燈是否都滅了 安裝電池 取下電池 LSQT1049 TC_GC book 19 ページ 2005年12月22日 木曜日 午後8時13分 ...

Page 20: ... 7 2 V 2040 mAh 3 h 55 min 電池型號 電壓 容量 拍攝模式 最長連續可拍攝時間 間斷可拍攝時間 提供的電池 CGA DU12 可選件 7 2 V 1150 mAh XP 1 h 50 min 1 h 40 min 55 min 50 min SP 2 h 5 min 1 h 50 min 1 h 55 min LP 2 h 15 min 2 h 1 h 5 min 1 h CGA DU14 可選件 7 2 V 1360 mAh XP 2 h 20 min 2 h 5 min 1 h 10 min 1 h SP 2 h 35 min 2 h 20 min 1 h 15 min 1 h 10 min LP 2 h 50 min 2 h 35 min 1 h 25 min 1 h 15 min CGA DU21 可選件 7 2 V 2040 mAh XP 3 h 30 ...

Page 21: ...時間將變短 電池在使用或者充電後會變熱 本機在使用時也將 變熱 這不是故障 應意識到 在低溫下電池的工作時間將變短 我們 建議給一塊備用電池充電 以備在拍攝時使用 1 將 AC 電纜連接到 AC 適配器和 AC 電源插座上 2 將 DC 電纜連接到 AC 適配器上 3 將 DC 電纜連接到本機上 由於 AC 電纜是專為本機設計的 請不要將此 AC 電纜給其他設 備使用 請不要將其他設備的 AC 電纜給本機使用 當 DC 電纜被連接到 AC 適配器上時 電池將不會充 電 連接到 AC 電源插座 LSQT1049 TC_GC book 21 ページ 2005年12月22日 木曜日 午後8時13分 ...

Page 22: ...間顯示閃爍 設定此項 l 34 在按 A 按鈕的同時 將 OFF ON 開關設定為 OFF 狀態指示燈 B 熄滅 開啟 關閉本機 如何開啟電源 A B 如何關閉電源 A B 當更換光碟或電池以後第一次開啟電源時 本機會執行識別程式以核實光碟沒有問題 關於 DVD RAM 該程式會花費約 25 秒的時間 如果想一開啟電源就開始使用本機 按下列步驟操作 1 開啟電源 2 正在讀取光碟 從螢幕上消失以後 關閉電源 可以在再次開啟電源約 8 秒鐘以後開始拍攝 根據光碟情況不同 可能花費時間比這更長 如果沒有設定日期和時間 本功能不起作用 LSQT1049 TC_GC book 22 ページ 2005年12月22日 木曜日 午後8時13分 ...

Page 23: ...AC 適配器連接到本機上 祇有本機電源開著 才能開啟光碟盒的蓋 1 滑動一下 DISC EJECT 手柄 然後鬆開 ACCESS PC 指示燈閃爍一會兒以後 光碟盒的蓋將 微開 2 用手開啟光碟盒的蓋並插入 取出光碟 插入光碟 將光碟放在中間的心軸上 A 拍攝 重播面 B 傳感器鏡頭 取出光碟 當按下心軸時 捏住光碟的邊並向上輕輕取出 3 按光碟盒蓋上標記 PUSH CLOSE 的部分關閉蓋子 A B 喀噠 LSQT1049 TC_GC book 23 ページ 2005年12月22日 木曜日 午後8時13分 ...

Page 24: ...果將單面光碟列印標簽朝裡插入 會出現錯誤訊 息 取出光碟 將其拍攝 重播面朝裡重新插入 不要讓拍攝 重播面變髒或劃傷 當取出光碟時或電源沒有完全關閉之前 不要取出 電池組或斷開 AC 適配器 如果這樣做 蓋子不會開 啟 如果發生了這樣的事情 請重新安上電池組或 重新連接 AC 適配器 滑動一下 DISC EJECT 手 柄 然後將其鬆開 當再次開啟電源時 會顯示一 個維修光碟訊息 l 100 關於恢復 不要將 8 釐米 DVD RAM DVD RW 或 DVD R 以外的 光碟插入到光碟盒中 這樣做可能會導致故障 不要觸摸傳感器鏡頭或光碟盒內的其他部件 一定 不要觸摸傳感器鏡頭周圍區域 因為它會變得極熱 DVD RAM SIDE A SIDE A 標記 反面是 SIDE A 的拍攝 重播面 插入光碟以後 拍攝完成以後 當 ACCESS PC 指示燈點亮時 光碟正在旋轉 光碟資訊正被錄製 如...

Page 25: ... 或從記憶卡插槽中取 出 當插入 SD 記憶卡時 將標簽 A 一側朝上 一次將其平直插入到足夠 深 當取出 SD 記憶卡時 按 SD 記憶卡的中心部位 然後將其平直拉出 3 將記憶卡插槽蓋蓋嚴 關於 SD 記憶卡 電噪音 靜電 本機或 SD 記憶卡的故障可能會損壞或刪除存儲在 SD 記憶卡上的資料 我們建議 將重要資料保存到計算機上 記憶卡存取指示燈 當本機存取 SD 記憶卡 讀取 拍攝 重播 擦除等 時 存取指示燈點亮 當存取指示燈點亮時 如果執行下列操作 則 SD 記憶卡或已拍攝的資料可能會被損壞 或者本機 可能會發生故障 插入或取出 SD 記憶卡 操作 OFF ON 開關或模式轉盤 A LSQT1049 TC_GC book 25 ページ 2005年12月22日 木曜日 午後8時13分 ...

Page 26: ...和重播模式之間進行切換 緩慢而安全地轉動模式轉盤 不要太用力轉動轉盤 轉動模式轉盤 並將想要的模式圖形設定到 圖例中顯示的位置 光碟錄製模式 l 38 使用該模式在光碟上拍攝動態影像 光碟播放模式 l 59 使用該模式重播在光碟上的動態影像 記憶卡拍攝模式 l 41 使用該模式在 SD 記憶卡上拍攝靜態圖片 記憶卡播放模式 l 62 使用該模式重播在 SD 記憶卡上的靜態圖片 LSQT1049 TC_GC book 26 ページ 2005年12月22日 木曜日 午後8時13分 ...

Page 27: ...後按下操縱桿選定 功能表螢幕操作 l 32 按下操縱桿的中心部位 螢幕上將顯示圖示 根據模式的不同 每次按鍵顯示會發生如下變化 在光碟播放模式或記憶卡播放模式中 螢幕上將自動顯示圖示 基本操作 1 通過向上移動選擇 2 通過向下移動選擇 3 通過向左移動選擇 4 通過向右移動選擇 5 按下操縱桿選擇選項 操縱桿和螢幕顯示 光碟錄製模式 AUTO MANUAL FOCUS 開關被設定為 AUTO A 操作圖示關閉 圖示 方向 功能 頁碼 4 肌膚柔和模式 45 2 漸變 46 ª 1 逆光補償 48 1 3 4 2 5 A LSQT1049 TC_GC book 27 ページ 2005年12月22日 木曜日 午後8時13分 ...

Page 28: ...膚柔和模式 45 2 漸變 46 ª 1 逆光補償 48 2 2 3 手動白平衡設定 當僅選擇手動白平衡調整模式時 57 4 白平衡 56 快門速度 58 光圈或增益值 58 s r 21 白平衡模式選擇 手動調整 55 56 58 光碟播放模式 A 操作圖示關閉 圖示 方向 功能 頁碼 1 3 重播 暫停 59 4 停止重播並顯示縮略圖 59 2 快退 跳躍 重播時 59 2 慢退 格重播 暫停時 60 9 1 快進 跳躍 重播時 59 1 慢進 格重播 暫停時 60 A A LSQT1049 TC_GC book 28 ページ 2005年12月22日 木曜日 午後8時13分 ...

Page 29: ...碼 4 肌膚柔和模式 45 Ø 2 自拍計時器 49 ª 1 逆光補償 48 記憶卡拍攝模式 AUTO MANUAL FOCUS 開關被設定為 MANUAL A 操作圖示關閉 圖示 方向 功能 頁碼 1 2 4 肌膚柔和模式 45 Ø 2 自拍計時器 49 ª 1 逆光補償 48 2 2 3 手動白平衡設定 當僅選擇手動白平衡調整模式時 57 4 白平衡 56 快門速度 58 光圈或增益值 58 s r 21 白平衡模式選擇 手動調整 55 56 58 A A LSQT1049 TC_GC book 29 ページ 2005年12月22日 木曜日 午後8時13分 ...

Page 30: ...播放 時 A 操作圖示關閉 圖示 方向 功能 頁碼 4 停止重播並顯示縮略圖 62 E 2 重播前一幅圖片 62 D 1 重播後一幅圖片 62 記憶卡播放模式 當選擇 投影片播放 時 A 操作圖示關閉 圖示 方向 功能 頁碼 1 3 投影片播放開始 暫停 63 4 停止重播並顯示縮略圖 62 E 2 重播前一幅圖片 暫停時 62 D 1 重播後一幅圖片 暫停時 62 A A LSQT1049 TC_GC book 30 ページ 2005年12月22日 木曜日 午後8時13分 ...

Page 31: ...設定 轉換語言 31 LSQT1049 轉換語言 可以轉換螢幕顯示或功能表螢幕上的語言 1 按 MENU 按鈕 然後選擇 LANGUAGE 並按下操縱 桿 2 選擇 中文 然後按下操縱桿 LSQT1049 TC_GC book 31 ページ 2005年12月22日 木曜日 午後8時13分 ...

Page 32: ...用功能表螢幕 關於功能表資訊 請參閱 功能表列表 l 94 1 當停止時 按 MENU 按鈕 根據模式轉盤的位置不同 功能表顯示也會有所不同 當功能表顯示時 不要切換模式轉盤 2 上下移動操縱桿 選擇需要的總功能表 A 3 向右移動操縱桿或按下操縱桿 顯示子功能表 B 4 上下移動操縱桿 選擇子功能表選項 C 功能表的當前設定 MENU A B C LSQT1049 TC_GC book 32 ページ 2005年12月22日 木曜日 午後8時13分 ...

Page 33: ...設定 使用功能表螢幕 33 LSQT1049 5 向右移動操縱桿或按下操縱桿 6 上下移動操縱桿 選擇需要的選項 7 按操縱桿確認選擇 返回上一螢幕 向左移動操縱桿 結束功能表螢幕 按 MENU 按鈕 拍攝或播放時 不會顯示功能表螢幕 當功能表螢 幕顯示時 不能開始其他操作 MENU LSQT1049 TC_GC book 33 ページ 2005年12月22日 木曜日 午後8時13分 ...

Page 34: ...時間 則請進行調整 轉動模式轉盤以選擇 或 1 按 MENU 按鈕 然後選擇 基本功能 時鐘設 定 是 並按下操縱桿 2 左右移動操縱桿 選擇要設定的選項 然後 上下移動 操縱桿 設定想要的值 年份將按下列順序改變 2000 2001 2099 2000 顯示時間使用的是 24 小時制 3 按下操縱桿確認選擇 按 MENU 按鈕完成設定以後 檢查日期和時間顯示 時鐘功能在 00 秒開始啟動 LSQT1049 TC_GC book 34 ページ 2005年12月22日 木曜日 午後8時13分 ...

Page 35: ...期和時間功能由內置鋰電池驅動 拍攝前一定要檢查時間 當本機開啟後 如果顯示 0 或 則表示內置鋰 電池電量耗儘了 用下列步驟給電池充電以後 設 定時鐘 將 AC 適配器連接到本機或將電池放入本機中 內置 鋰電池會被充電 放置本機約 24 小時 電池將會維 持日期和時間運行約 6 個月 即使 OFF ON 開關 被設定為 OFF 電池仍會被充電 顯示類型 年 月 日 月 日 年 日 月 年 螢幕顯示 15 30 2006 12 15 15 30 12 15 2006 15 30 15 12 2006 日期 日期 時間 關 15 30 15 12 2006 15 12 2006 LSQT1049 TC_GC book 35 ページ 2005年12月22日 木曜日 午後8時13分 ...

Page 36: ...右移動 操縱桿進行調整 滾動條顯示移動 LCD 設定 LCD 顯示屏的亮度 LCD 顯示屏的色彩級別 EVF 設定 取景器的亮度 為了調整取景器的亮度 請關閉 LCD 顯示屏 取景 器將會被啟動 當 LCD 顯示屏朝鏡頭方向旋轉 180 時 不能調整 LCD 顯示屏的亮度 這些設定不會影響實際拍攝的影像 通過滑動目鏡校正旋鈕來調整焦距 可以從功能表調整取景器的亮度 l 上面 EVF EVF EVF 調整視野 15 30 15 12 2006 15 30 15 12 2006 15 30 15 12 2006 15 30 15 12 2006 LSQT1049 TC_GC book 36 ページ 2005年12月22日 木曜日 午後8時13分 ...

Page 37: ...拍攝 拍攝之前 37 LSQT1049 拍攝 拍攝之前 1 用雙手拿著攝錄放影機 2 將手穿過手持帶 3 不要用手擋住麥克風或感測器 4 雙臂靠近身體 5 雙腿稍微分開 當在室外拍攝時 應順光拍攝圖片 如果物體背光 在拍攝時將會變暗 攝錄放影機的基本握持方法 4 5 1 2 3 LSQT1049 TC_GC book 37 ページ 2005年12月22日 木曜日 午後8時13分 ...

Page 38: ... 如果在鏡頭蓋未取下的情況下開啟本機 自動白平衡調整可能無法正常工作 2 轉動模式轉盤以選擇 3 按拍攝開始 停止按鈕開始拍攝 結束拍攝 再次按拍攝開始 停止按鈕暫停拍攝 拍攝時 和 是紅色的 直到 變成綠色 之前 不要移動本機 在按拍攝開始 停止按鈕開始拍攝和再次按它暫 停拍攝之間所拍攝的影像成為一個場景 當 5 分鐘內沒有進行任何操作 則本機自動關閉 以防止電池電量耗儘 當使用本機時 請再次 開啟 該設定也可被設定為 關 l 96 節電 LSQT1049 TC_GC book 38 ページ 2005年12月22日 木曜日 午後8時13分 ...

Page 39: ...要擋住該麥克風 每次本機進入拍攝暫停模式 計時器顯示就會被重 設為 0h00m00s A 剩餘拍攝時間 當剩餘時間小於 1 分鐘時 R 0h00m 閃紅光 B 拍攝模式 C 已經耗用的拍攝時間 當正在拍攝動態影像時 請不要斷開電池或 AC 適配 器 如果這樣做 當再次開啟電源時 可能會顯示 修復光碟訊息 l 100 關於恢復 光碟錄製模式中的螢幕指示 R 0h02m R 0h02m R 0h02m 0h00m10s 0h00m10s 0h00m10s SP A B C 拍攝完成以後 ACCESS PC 指示燈立即點亮 當其點亮時 光碟正在旋轉 光碟資訊正被錄 製 如果您拿著本機跑步或搖擺它 拍攝的影像可能失真 因此不要強烈振動或撞擊它 LSQT1049 TC_GC book 39 ページ 2005年12月22日 木曜日 午後8時13分 ...

Page 40: ...BR 拍攝根據被拍攝物 體自動改變比特率 固定時間內的資料量 這就意味著如果拍攝了帶有劇烈運動的物體 拍攝時 間會下降 在下列情況下 在重播的影像上會出現馬賽克圖案 的噪點 當在背景中有一個複雜的圖案時 當本機移動過多或過快時 當拍攝了劇烈運動的物體時 特別是在拍攝過程中 拍攝模式 被設定為 時 改變動態影像的拍攝模式 適用動態影像的拍攝模式和可拍攝時間 拍攝模式 可拍攝時間 單面上 XP 高質量 約 18 min SP 標準 約 37 min LP 長時間播放 約 75 min 影像質量優先 拍攝時間優先 LP LSQT1049 TC_GC book 40 ページ 2005年12月22日 木曜日 午後8時13分 ...

Page 41: ...像素 關於在 SD 記憶卡上可拍攝靜態圖片的數量 請參閱 l 115 無法錄製聲音 如果 SD 記憶卡上的寫保護開關被設定為 LOCK 則 不能用於拍攝 如果設定 圖片質量 根據圖片的內容 在 重播的影像上可能會出現馬賽克圖案的噪點 當記憶卡存取指示燈點亮時 不要執行下列操作 因為這樣做可能會損壞 SD 記憶卡或記憶卡上的資 料 關閉本機 插入或取出 SD 記憶卡 操作模式轉盤 其他產品可能會降低拍攝的品質或無法重播在本機 上拍攝的靜態圖片 清晰地拍攝靜態圖片 當用 4k 或更高的放大率將物體放大時 手持本機很難減少輕微地抖動 我們建議減小變焦放大 率 並在拍攝時接近被拍攝物體 通過使用三腳架 可以拍攝到穩定無晃動的圖片 LSQT1049 TC_GC book 41 ページ 2005年12月22日 木曜日 午後8時13分 ...

Page 42: ...切換漸進功 能開 關 根據使用的其他功能的情況 漸進功能可能不能使用 l 101 按 MENU 按鈕 然後選擇 基本功能 圖片質量 想要的選項 並按下操縱桿 拍攝具有很高圖片質量的靜態圖片 優先權給了拍攝的靜態圖片數量 以標準圖片質量拍攝的靜態圖片 可以增加模擬快門操作的聲音 按 MENU 按鈕 然後選擇 進階功能 快門效果 開 並按下操縱桿 該功能的默認設定是 開 記憶卡拍攝模式下的螢幕指示 R 3 R 3 R 3 A B C 漸進功能 靜態圖片拍攝的圖片質量 使用快門操作效果拍攝 LSQT1049 TC_GC book 42 ページ 2005年12月22日 木曜日 午後8時13分 ...

Page 43: ...距離鏡頭約 2 釐 米遠的物體對焦 微距功能 變焦速度根據變焦桿移動的範圍變化 當變焦速度很快時 物體可能難以對焦 RAM RW VR RW V R 如果變焦放大率超過 30k 則將啟動數位變焦功能 可以切換由數位變焦提供的最大放大率 轉動模式轉盤以選擇 按 MENU 按鈕 然後選擇 進階功能 數位變焦 想要的選項 並按下操縱桿 數位變焦放大率越大 影像質量降低得越多 本功能不能在記憶卡拍攝模式中使用 放大 縮小功能 T 側 使遠處的人或物體在拍攝時看起來近一些 放 大 W 側 使視覺在拍攝時看起來更遠一些 縮小 數位變焦功能 關 僅有光學變焦 高達 30k 50k 高達 50k 1000k 高達 1000k LSQT1049 TC_GC book 43 ページ 2005年12月22日 木曜日 午後8時13分 ...

Page 44: ...AM RW VR RW V R SD 可以一邊看著 LCD 顯示屏 一邊拍攝自己 可以拍攝本機前的人物 同時將影像呈現給他們 影像 被水平翻轉 彷彿看到一個鏡像 但是所拍攝的影像與正常拍攝時拍攝的影像一樣 轉動模式轉盤以選擇 或 朝鏡頭一側旋轉 LCD 顯示屏 當 LCD 顯示屏開啟時 取景器將會自動關閉 但是如果 LCD 顯示屏接 下來又旋轉到鏡頭一側 則啟動取景器 當 LCD 顯示屏朝鏡頭一側旋轉時 即使按下操縱桿也不會顯示圖示 螢幕上祇會顯示一些指示 當出現 時 將 LCD 顯示屏的方向返回 到正常位置 並檢查警告 報警指示 l 99 使用變焦麥克風功能 自拍 LSQT1049 TC_GC book 44 ページ 2005年12月22日 木曜日 午後8時13分 ...

Page 45: ...RW VR RW V R SD 如果拍攝人物的半身像 這一模式更加有效 轉動模式轉盤以選擇 或 1 按操縱桿顯示圖例中顯示的圖示 2 向下移動操縱桿 選擇 取消肌膚柔和模式 再次選擇 如果場景中的背景或其他任何東西有與肌膚顏色類 似的色彩 這些色彩也會變得柔和 如果亮度不足 效果可能會不明顯 肌膚柔和模式 本模式使肌膚顏色看起來更柔和以使容貌更具吸引力 LSQT1049 TC_GC book 45 ページ 2005年12月22日 木曜日 午後8時13分 ...

Page 46: ...9 RAM RW VR RW V R 轉動模式轉盤以選擇 淡入 1 當拍攝暫停時 按操縱桿顯示圖例中顯示的圖示 2 向左移動操縱桿 選擇 3 按拍攝開始 停止按鈕 開始拍攝 淡入 開始拍攝時 影像 聲音完全消失 然後漸漸出現 淡出 1 拍攝時 按操縱桿顯示圖例中顯示的圖示 淡入 淡出功能 淡入 影像和聲音漸漸出現 淡出 影像和聲音漸漸消失 LSQT1049 TC_GC book 46 ページ 2005年12月22日 木曜日 午後8時13分 ...

Page 47: ...出 影像 聲音逐漸消失 在影像 聲音完全消失後 拍 攝停止 取消漸變 再次選擇 選擇淡入 淡出的顏色 可以選擇在漸變圖片中出現的顏色 按 MENU 按鈕 然後選擇 進階功能 淡入淡出 白色 或 黑色 並按下操縱桿 通過操作 OFF ON 開關 取消淡入 淡出功能 當選擇淡入 淡出功能時 在開始拍攝時 顯示影像 要花費幾秒鐘的時間 暫停拍攝也要花費幾秒鐘的 時間 使用淡入功能拍攝的場景的縮略圖會變黑 或變 白 LSQT1049 TC_GC book 47 ページ 2005年12月22日 木曜日 午後8時13分 ...

Page 48: ...049 RAM RW VR RW V R SD 當光線從物體後面發出 物體看起來很暗時使用本功能 轉動模式轉盤以選擇 或 1 按操縱桿顯示圖例中顯示的圖示 2 向右移動操縱桿 選擇 ª 螢幕上的影像將變得更亮 恢復正常拍攝 再次選擇 ª 通過操作 OFF ON 開關或模式轉盤 取消逆光補償功 能 逆光補償功能 這是用來防止逆光物體變暗 LSQT1049 TC_GC book 48 ページ 2005年12月22日 木曜日 午後8時13分 ...

Page 49: ... Ø2 設定取消 3 按 PHOTO SHOT 按鈕 當 Ø10 或 Ø2 顯示閃爍設定的時間以後 將拍攝一張靜態圖片 拍攝完成後 自拍計時器被取消 中途停止計時器 按 MENU 按鈕 自拍計時器設定被取消 通過操作 OFF ON 開關 取消自拍計時器待機模式 根據物體對焦用去時間的不同 可能拍攝用去的時 間比開始設定的要長 當使用三腳架等設備時 將自拍計時器設定為 Ø2 是防止在按 PHOTO SHOT 按鈕時影像抖動的好方 法 自拍計時器拍攝 這也是用來自拍圖片的 Ø10 10 秒後拍攝 Ø2 2 秒後拍攝 LSQT1049 TC_GC book 49 ページ 2005年12月22日 木曜日 午後8時13分 ...

Page 50: ...果會恢復 RAM RW VR RW V R 拍攝的影像的螢幕上部和下部有一條黑色的帶子 所以看起來就像是劇院裡的電影一樣 轉動模式轉盤以選擇 按 MENU 按鈕 然後選擇 基本功能 寬屏電影模 式 開 並按下操縱桿 取消寬屏電影模式 按 MENU 按鈕 然後選擇 基本功能 寬屏電影模式 關 並按下操縱桿 根據所連接的電視機不同 重播的影像也不相同 請參閱電視機的使用說明書 當在電視機螢幕上重播影像時 在某些情況下 日 期顯示可能會被刪除 根據電視機的情況 圖片質量可能會下降 向個人計算機輸入寬屏電影圖片時 根據使用的軟 體的情況 輸入的圖片可能不能正確顯示 風聲噪音減少功能 這是用來減少拍攝時進入麥克風的風聲噪音 寬屏電影模式 該功能允許您拍攝與寬屏電視機相兼容的影像 LSQT1049 TC_GC book 50 ページ 2005年12月22日 木曜日 午後8時13分 ...

Page 51: ...按鈕 然後選擇 進階功能 夜視 開 並按下操縱桿 結束功能表螢幕以後 本機處於手動對焦模式 左右移動操縱桿 手動使 物體對焦 l 55 如果不顯示手動對焦指示 按操縱桿兩次 然後對物體對焦 取消夜視功能 按 MENU 按鈕 然後選擇 進階功能 夜視 關 並按下操縱桿 夜視功能可使 CCD 的信號充入時間約達到平常的 25k 以上 這樣肉眼看不見的黑暗場景能夠拍攝得 很明亮 因此 可能會看到平常看不見的亮點 但 這不是故障 通過操作 OFF ON 開關或模式轉盤 取消夜視功能 如果在明亮處設定 螢幕會發白一會兒 夜視功能 該功能允許在黑暗處拍攝 LSQT1049 TC_GC book 51 ページ 2005年12月22日 木曜日 午後8時13分 ...

Page 52: ...生晃動的情況 轉動模式轉盤以選擇 按 MENU 按鈕 然後選擇 進階功能 電子穩定系 統 開 並按下操縱桿 取消影像穩定器功能 按 MENU 按鈕 然後選擇 進階功能 電子穩定系統 關 並按下操縱桿 使用三腳架時 我們建議您關閉影像穩定器 在下列情況下 影像穩定器功能可能不能有效地起 作用 當使用數位變焦時 當本機劇烈晃動時 當您追蹤一個移動的物體並對其拍攝時 影像穩定器功能 這是用來在拍攝過程中降低影像抖動 LSQT1049 TC_GC book 52 ページ 2005年12月22日 木曜日 午後8時13分 ...

Page 53: ...下 請手動調 整設定 RAM RW VR RW V R SD 當您在不同情況下拍攝影像時 此模式會自動設定最佳的快門速度和光圈 轉動模式轉盤以選擇 或 1 將 AUTO MANUAL FOCUS 開關設定 為 MANUAL 2 按 MENU 按鈕 然後選擇 基本功能 場景模 式 想要的選項 並按下操縱桿 場景模式 本模式適用於在各種情況下拍攝 顯示 模式 拍攝條件 5 運動 拍攝運動場景或有快速移動的場景 肖像 使人物突出於背景 低光 使暗處的場景更亮 聚光燈 使聚光燈下的物體看起來更引人注目 水上及雪地 用於在亮處拍攝影像 如滑雪場和海灘 LSQT1049 TC_GC book 53 ページ 2005年12月22日 木曜日 午後8時13分 ...

Page 54: ...減少攝錄放影機抖動 在正常重播時 影像的移動可能看起來不會流 暢 由於重播影像的顏色和亮度會有所改變 所以 要避免在熒光燈 水銀燈或鈉燈下拍攝 如果拍攝在強光照射下的物體或是反光性很強 的物體 畫面上可能會出現垂直光線 如果亮度不足 運動模式無法工作 5 顯 示閃爍 如果在室內使用此模式 螢幕可能會閃動 肖像模式 如果在室內使用此模式 螢幕可能會閃動 在 這種情況下 將場景模式設定為 關 低光模式 極暗的場景可能不能被清晰地拍攝 聚光燈模式 如果被拍攝的物體極亮 所拍攝的影像可能會 發白 並且所拍攝影像的四周可能會變得極 暗 水上及雪地模式 如果物體極亮 所拍攝的影像可能會發白 LSQT1049 TC_GC book 54 ページ 2005年12月22日 木曜日 午後8時13分 ...

Page 55: ...將 AUTO MANUAL FOCUS 開關設定 為 MANUAL 2 向下移動開關 將其設定到 FOCUS 位置 顯示手動對焦指示 1MF 3 左右移動操縱桿 使物體對焦 採用廣角對焦時 物體放大時可能不能準確對焦 請首先放大物體 然 後再對其進行對焦 恢復自動調整 再次將 AUTO MANUAL FOCUS 開關向下按到 FOCUS 位置 通過將 AUTO MANUAL FOCUS 開關設定為 AUTO 也可以恢復自動對焦 手動對焦調整 MNL MNL LSQT1049 TC_GC book 55 ページ 2005年12月22日 木曜日 午後8時13分 ...

Page 56: ... 開關設定為 MANUAL 自動顯示圖例中顯示的圖示 2 向下移動操縱桿 選擇白平衡顯示 如 3 左右移動操縱桿 選擇白平衡模式 恢復自動調整 設定白平衡模式為 通過將 AUTO MANUAL FOCUS 開關設定為 AUTO 也可以恢復自動調整 白平衡 這是用來以自然色彩進行拍攝 MNL MNL AWB MNL 顯示 模式 拍攝條件 自動白平衡調整 室內模式 適用於在白熾燈下拍攝 白熾燈 鹵素燈 室外模式 明朗天空下的室外 手動調整模式 水銀燈 鈉燈 某些熒光燈 賓館中婚禮招待宴會上使用的燈光 劇 場中的舞台聚光燈 日出 日落等 AWB AWB LSQT1049 TC_GC book 56 ページ 2005年12月22日 木曜日 午後8時13分 ...

Page 57: ...黑等原因而無法設定白平衡 在 這種情況下 請使用自動白平衡 關於白平衡感測器 A 白平衡感測器會在拍攝時探測光源的類型 拍攝時不要遮蓋白平衡感測器 否則它可能無法正常工作 當 顯示閃白燈時 預先調整的手動白平衡被保 存起來 無論何時 只要拍攝條件發生變化 就要重新設定 白平衡以便進行正確的調整 當在鏡頭蓋未取下的情況下開啟本機時 自動白平 衡調整可能無法正常工作 請在取下鏡頭蓋後開啟 本機 在同時設定白平衡和光圈 增益時 要先設定白平 衡 手動設定白平衡 MNL A LSQT1049 TC_GC book 57 ページ 2005年12月22日 木曜日 午後8時13分 ...

Page 58: ...O MANUAL FOCUS 開關設定為 AUTO 當同時設定快門速度和光圈 增益值時 請先設定 快門速度 然後設定光圈 增益值 手動快門速度調整 由於重播影像的顏色和亮度會有所改變 所以要避 免在熒光燈 水銀燈或鈉燈下拍攝 如果手動增加快門速度 那麼感光度會降低 從而 增益值會自動增加 這將會增加螢幕上的噪點 如果重播很亮的發光物體或是高度反光物體的影像 則在重播影像上會出現垂直的光線 但這不是故障 在正常重播時 影像的移動可能看起來不會流暢 在極亮的地方拍攝時 螢幕可能會改變色彩或閃動 在這種情況下 手動將快門速度調整到 1 50 或 1 100 手動光圈 增益調整 如果增益值增大 螢幕上的噪點會增加 根據變焦放大率的不同 有些光圈值不顯示 手動快門速度 光圈調整 快門速度 當拍攝快速移動的物體時 請調整快門速度 光圈 當螢幕太亮或太暗時 請調整光圈 MNL MNL 1 60 60 O...

Page 59: ...縱桿來顯示後 前 一頁 如果按住操縱桿並上下移動 可以一次前進 8 個場景 這時螢幕不會改 變 但是場景號碼和滾動條顯示將改變 因此當已經到達想顯示場景的頁 時 請鬆開操縱桿 3 按操縱桿 選擇的場景以全螢幕重播 操作圖示自動顯示在螢幕上 4 移動操縱桿進行操作 若不是正常重播時 將不會聽到聲音 如果暫停播放持續 5 分鐘 螢幕會返回到縮略圖 當場景上拍攝的時間很短時 可能不能重播 不能重播的動態影像的縮略圖以藍白圖案陰影顯示 A B 1 重播 暫停 移動 跳躍重播 向後 按住移動 倒帶搜索重播 9 移動 跳躍重播 向前 9 按住移動 快進搜索重播 停止重播並顯示縮略圖 LSQT1049 TC_GC book 59 ページ 2005年12月22日 木曜日 午後8時13分 ...

Page 60: ...以暫停重播 2 按住操縱桿向右移動 當按住操縱桿向左移動時 將會反向重播慢動作影 像 當向上移動操縱桿時 恢復正常重播 動態影像每次前進一格 1 重播時向上移動操縱桿以暫停重播 2 向右移動操縱桿 當向左移動操縱桿時 將會反向每次前進一格 當向上移動操縱桿時 恢復正常重播 重播時調整揚聲器音量 移動音量桿 更改音量級別 指示器 越向右移動 朝 i 端 音量級別變得越高 當調整結束後 音量設定顯示將消失 慢動作重播 逐格重播 調整音量 朝 r 方向 增加音量 朝 s 方向 降低音量 LSQT1049 TC_GC book 60 ページ 2005年12月22日 木曜日 午後8時13分 ...

Page 61: ...天拍攝的場景以縮略圖顯示 3 選擇要重播的場景 即使場景是在同一天拍攝的 在下列情況下 它們也會被單獨分組 當場景數量超過 99 時 RAM RW VR RW V R 當光碟被取出時 RW V R 當光碟被修復時 RW V R 當模式轉盤被切換時 R 當電源被關閉時 R 按 MENU 按鈕 然後選擇 播放設定 恢復播放 開 並按下操縱桿 如果停止一個動態影像的重播 在停止場景的縮略圖檢視上會出現 R 在動態影像重播過程中 當 恢復播放 被設定為 關 時 如果在任意一點 停止重播 則下次重播動態影像時 將從頭開始 如果關閉本機 記憶的恢復位置會被清除 但是功 能表設定沒有被清除 按日期重播動態影像 恢復上一重播 LSQT1049 TC_GC book 61 ページ 2005年12月22日 木曜日 午後8時13分 ...

Page 62: ...條顯示 選擇的檔案將被紅框包圍 當拍攝了 9 個或更多的檔案時 通過移動操縱桿來顯示後 前 一頁 如果按住操縱桿並上下移動 可以一次前進 8 個檔案 這時螢幕不會改 變 但是檔案號碼和滾動條顯示將會改變 因此當已經到達想顯示檔案的 頁時 請鬆開操縱桿 3 按操縱桿 選擇的檔案以全螢幕重播 操作圖示自動顯示在螢幕上 4 移動操縱桿進行操作 A B 1 投影片播放 按數字順序重播 SD 記憶卡上的靜態圖片 開始 暫停 E 重播前一幅圖片 D 重播後一幅圖片 停止重播並顯示縮略圖 LSQT1049 TC_GC book 62 ページ 2005年12月22日 木曜日 午後8時13分 ...

Page 63: ...r Camera File system 本機所支持的檔案格式為 JPEG 並不是所有的 JPEG 格式的檔案都可以重播 如果重播一個不符合規格的檔案 可能不顯示資料夾 檔案號碼 本機可能會降低在其他產品上拍攝或建立的資料的品質 或根本無法重播 反之亦然 投影片播放時不要操作模式轉盤 當存取指示燈點亮時 不要插入或取出 SD 記憶卡 根據檔案的像素數的不同 顯示檔案要花費一些時 間 如果試圖重播以不同格式拍攝的檔案或檔案資料有 缺陷的檔案 則整個顯示會變灰 並會出現錯誤訊 息 當重播在其他設備上拍攝的檔案時 日期和時間顯 示與拍攝時的有所不同 當重播在其他設備上拍攝的檔案時 其尺寸和在本 機上顯示的可能會不一樣 l 98 以投影片播放形式重播靜態圖片 LSQT1049 TC_GC book 63 ページ 2005年12月22日 木曜日 午後8時13分 ...

Page 64: ...編輯 編輯場景 64 LSQT1049 編輯 編輯場景 RAM RW VR 刪除的場景不能恢復 DVD RW 視頻格式 和 DVD R 上的場景不能刪除 轉動模式轉盤以選擇 1 重播時按 鈕 2 當出現確認訊息時 選擇 是 然後按下操縱桿 刪除場景 這是用來刪除拍攝在光碟上的場景 每次刪除一個場景 LSQT1049 TC_GC book 64 ページ 2005年12月22日 木曜日 午後8時13分 ...

Page 65: ...選擇要刪除的場景 然後按下操縱桿 選擇的場景被黃框包圍 當再次按下操縱桿時 選擇的場景將被取消 最多可以連續設定顯示在一頁上的 8 個場景 3 僅當在步驟 1 中選擇 選擇 時 按 鈕 4 當出現確認訊息時 選擇 是 然後按下操縱桿 僅當在步驟 1 中選擇 選擇 時 繼續刪除其他場景 重複步驟 2 4 完成編輯 按 MENU 按鈕 要刪除一個場景中不想要的部分 先分割場景 然 後刪除多餘的部分 l 66 若選擇 全部 如果光碟上有很多場景 刪除可能要 花費一些時間 刪除時不要關閉本機 當刪除場景時 請使用電量充足的電池或使用 AC 適 配器 可能無法刪除被分割過的場景 將分割的場景合併 起來 然後將其刪除 從縮略圖顯示中刪除多個場景 LSQT1049 TC_GC book 65 ページ 2005年12月22日 木曜日 午後8時13分 ...

Page 66: ... 先分割場景 然後再刪除多餘的部分 轉動模式轉盤以選擇 1 按 MENU 按鈕 然後選擇 編輯場景 分割 並按下操縱桿 2 選擇要分割的場景 然後按下操縱桿 重播選擇的場景 3 當到達想分割場景的區域時 向下移動操縱桿設定分割 點 4 當出現確認訊息時 選擇 是 然後按下操縱桿 繼續分割其他場景 重複步驟 2 4 完成編輯 按 MENU 按鈕 分割場景 這是用來將一個場景分割成兩個 LSQT1049 TC_GC book 66 ページ 2005年12月22日 木曜日 午後8時13分 ...

Page 67: ... 按鈕 然後選擇 編輯場景 合併 並按下操縱桿 2 選擇要合併的場景 然後按下操縱桿 選擇的場景和下一個場景被合併 如果想合併不相鄰的場景或者具有不同拍攝日期的場景 請先新增一個播 放列表 然後在播放列表上合併場景 l 69 74 3 當出現確認訊息時 選擇 是 然後按下操縱桿 繼續合併其他場景 重複步驟 2 3 完成編輯 按 MENU 按鈕 合併場景 本功能僅是用來將兩個連續的場景合併成一個 LSQT1049 TC_GC book 67 ページ 2005年12月22日 木曜日 午後8時13分 ...

Page 68: ...中將您喜歡的場景集合起來新增一個播放列表 由於播放列表不是通過複製資料新增的 因此 新增播放列表要消耗光碟一點容量 如果新增或刪除播放列表 原始場景將不會被修改 在播放列表上編輯場景將不會影響原始場 景 每張光碟 每面 的最大項目數量 播放列表 99 播放列表場景 999 如果原始場景被刪除 則用這些場景新增的播放列 表部分也會被刪除 什麼是播放列表 拍攝的場景 播放列表 LSQT1049 TC_GC book 68 ページ 2005年12月22日 木曜日 午後8時13分 ...

Page 69: ...操縱桿 3 選擇要增加到播放列表中的場景 然後按下操縱桿 選擇的場景被黃框包圍 當再次按下操縱桿時 選擇的場景將被取消 最多可以連續設定 8 個場景 場景在播放列表中按照被選擇的順序登記 新增播放列表以後 其中的場 景順序可以用 移動 功能來改變 l 72 4 按 MENU 按鈕 5 當出現確認訊息時 選擇 是 然後按下操縱桿 顯示所新增播放列表的縮略圖檢視螢幕 向同一播放列表中增加另一個場景 選擇 增加 l 71 重播播放列表 選擇場景開始重播 然後按下操縱桿 新增一個新的播放列表 LSQT1049 TC_GC book 69 ページ 2005年12月22日 木曜日 午後8時13分 ...

Page 70: ...然後選擇 播放設定 播放模 式 播放列表 並按下操縱桿 2 選擇要重播的播放列表 然後按下操縱桿 所選播放列表中的場景以縮略圖顯示 3 選擇場景開始重播 然後按下操縱桿 選擇一個不同的播放列表 當在播放列表縮略圖檢視螢幕中選擇第一個場景時 向左移動操縱桿 螢幕返回到檢視播放列表 步驟 2 返回到顯示原始場景 按 MENU 按鈕 然後選擇 播放設定 播放模式 全部檢視 或 按日期 並按下操縱 桿 重播播放列表 LSQT1049 TC_GC book 70 ページ 2005年12月22日 木曜日 午後8時13分 ...

Page 71: ...按下操縱 桿 2 選擇要編輯的播放列表 然後按下操縱桿 3 選擇 增加 然後按下操縱桿 4 選擇要增加的場景 然後按下操縱桿 選擇的場景被黃框包圍 當再次按下操縱桿時 選擇的場景將被取消 最多可以連續設定 8 個場景 場景按照被選擇的順序增加到播放列表中 播放列表中的場景順序可以用 移動 功能來改變 l 72 5 按 MENU 按鈕 6 當出現確認訊息時 選擇 是 然後按下操縱桿 顯示場景所增加到的播放列表的縮略圖檢視螢幕 繼續向播放列表增加場景 重複步驟 1 6 編輯播放列表 向播放列表增加場景 LSQT1049 TC_GC book 71 ページ 2005年12月22日 木曜日 午後8時13分 ...

Page 72: ...模式 l 70 步驟 1 和 2 1 按 MENU 按鈕 然後選擇 編輯列表 並按下操縱 桿 2 選擇要編輯的播放列表 然後按下操縱桿 3 選擇 移動 然後按下操縱桿 4 選擇要移動的場景 然後按下操縱桿 選擇的場景被黃框包圍 以紅色條顯示要插入的位置 5 選擇要插入場景的位置 然後按下操縱桿 繼續移動播放列表中的其他場景 重複步驟 4 5 完成編輯 按 MENU 按鈕 移動場景 EE LSQT1049 TC_GC book 72 ページ 2005年12月22日 木曜日 午後8時13分 ...

Page 73: ...擇播放列表重播模式 l 70 步驟 1 和 2 1 按 MENU 按鈕 然後選擇 編輯列表 並按下操縱 桿 2 選擇要編輯的播放列表 然後按下操縱桿 3 選擇 分割 然後按下操縱桿 4 選擇要分割的場景 然後按下操縱桿 重播選擇的場景 5 當到達想分割場景的區域時 向下移動操縱桿設定分割 點 6 當出現確認訊息時 選擇 是 然後按下操縱桿 繼續分割其他場景 重複步驟 4 6 完成編輯 按 MENU 按鈕 分割場景 LSQT1049 TC_GC book 73 ページ 2005年12月22日 木曜日 午後8時13分 ...

Page 74: ...不會影響原始場景 選擇播放列表重播模式 l 70 步驟 1 和 2 1 按 MENU 按鈕 然後選擇 編輯列表 並按下操縱 桿 2 選擇要編輯的播放列表 然後按下操縱桿 3 選擇 合併 然後按下操縱桿 4 選擇要合併的場景 然後按下操縱桿 選擇的場景和下一個場景被合併 5 當出現確認訊息時 選擇 是 然後按下操縱桿 繼續合併其他場景 重複步驟 4 5 完成編輯 按 MENU 按鈕 合併場景 LSQT1049 TC_GC book 74 ページ 2005年12月22日 木曜日 午後8時13分 ...

Page 75: ...表上刪除場景將不會影響原始場景 每次刪除一個場景 選擇播放列表重播模式 l 70 步驟 1 和 2 1 重播時按 鈕 2 當出現確認訊息時 選擇 是 然後按下操縱桿 從縮略圖顯示中刪除多個場景 選擇播放列表重播模式 l 70 步驟 1 和 2 1 按 MENU 按鈕 然後選擇 編輯列表 並按下操縱 桿 2 選擇要編輯的播放列表 然後按下操縱桿 刪除場景 LSQT1049 TC_GC book 75 ページ 2005年12月22日 木曜日 午後8時13分 ...

Page 76: ... 選擇的場景被黃框包圍 當再次按下操縱桿時 選擇的場景將被取消 最多可以連續設定顯示在一頁上的 8 個場景 5 僅當在步驟 3 中選擇 選擇 時 按 鈕 6 當出現確認訊息時 選擇 是 然後按下操縱桿 僅當在步驟 3 中選擇 選擇 時 繼續刪除其他場景 重複步驟 4 6 完成編輯 按 MENU 按鈕 在播放列表上刪除場景將不會增加剩餘拍攝容量 如果刪除播放列表中的所有場景 播放列表本身也 會被刪除 當刪除一個播放列表時 其後的播放列表的號碼都 會減一 可能無法刪除被分割過的場景 將分割的場景合併 起來 然後將其刪除 LSQT1049 TC_GC book 76 ページ 2005年12月22日 木曜日 午後8時13分 ...

Page 77: ...編輯 編輯靜態圖片 77 LSQT1049 編輯靜態圖片 SD 刪除的檔案不能恢復 轉動模式轉盤以選擇 1 重播時按 鈕 2 當出現確認訊息時 選擇 是 然後按下操縱桿 刪除靜態圖片 這是用來刪除拍攝在 SD 記憶卡上的靜態圖片 每次刪除一個檔案 LSQT1049 TC_GC book 77 ページ 2005年12月22日 木曜日 午後8時13分 ...

Page 78: ...檔案將被取消 最多可以連續設定顯示在一頁上的 8 個檔案 3 僅當在步驟 1 中選擇 選擇 時 按 鈕 4 當出現確認訊息時 選擇 是 然後按下操縱桿 僅當在步驟 1 中選擇 選擇 時 繼續刪除其他檔案 重複步驟 2 4 完成編輯 按 MENU 按鈕 刪除用其他產品拍攝在 SD 記憶卡上的靜態圖片檔案 可以刪除不能在本機上重播的靜態圖片檔案 不是 JPEG 格式的檔案 若選擇 全部 如果 SD 記憶卡上有許多檔案 刪除 可能要花費一些時間 刪除時不要關閉本機 當刪除檔案時 請使用電量充足的電池或使用 AC 適 配器 刪除時不要取出 SD 記憶卡 如果刪除符合 DCF 標準的檔案 與該檔案有關的所 有資料都將被刪除 從縮略圖顯示中刪除多個檔案 LSQT1049 TC_GC book 78 ページ 2005年12月22日 木曜日 午後8時13分 ...

Page 79: ...案 使其不能被錯誤地刪除 但是 即使鎖定 SD 記 憶卡上的某些檔案 格式化該卡也將刪除所有檔案 轉動模式轉盤以選擇 1 按 MENU 按鈕 然後選擇 播放設定 鎖定 是 並按下操縱桿 2 選擇要保護的檔案 然後按下操縱桿 出現 顯示 所選擇的檔案被鎖定 再次按下操縱桿解除鎖定設定 要鎖定其他檔案 請重複步驟 2 完成設定 按 MENU 按鈕 鎖定靜態圖片 這是用來防止靜態圖片檔案被錯誤刪除 LSQT1049 TC_GC book 79 ページ 2005年12月22日 木曜日 午後8時13分 ...

Page 80: ...印表機可以列印出所選圖片數量 要取消設定 請將列印數量設定為 0 要設定其他檔案 重複步驟 2 3 完成設定 按 MENU 按鈕 取消所有 DPOF 設定 按 MENU 按鈕 然後選擇 播放設定 DPOF 設定 全部取消 並按下操縱桿 當出現確認訊息時 選擇 是 然後按下操縱桿 什麼是 DPOF DPOF 指的是 Digital Print Order Format 它能夠將圖片列印資訊寫入到 SD 記憶卡上 這樣就可以 在一個支持 DPOF 的系統上使用了 DPOF 設定最多可以建立 999 個檔案 在其他設備上做成的 DPOF 設定 本機可能不能識 別 請在本機上執行 DPOF 設定 不能向要列印的帶有DPOF設定的圖片上增加拍攝日 期 DPOF 設定 這是用來在 SD 記憶卡上寫列印資料 LSQT1049 TC_GC book 80 ページ 2005年12月22日 木曜日 午後8時1...

Page 81: ...是 並按下操縱桿 當格式化 DVD RAM 時 跳到步驟 3 2 僅當格式化 DVD RW 時 選擇格式化類型 l 14 然後按下操縱桿 3 當出現確認訊息時 選擇 是 然後按下操縱桿 當格式化完成時 按 MENU 按鈕結束訊息螢幕 格式化時 不要關閉本機 當格式化光碟時 請使用電量充足的電池或 AC 適配 器 在使用雙面光碟的情況下 格式化每一面 帶有許多劃傷或污垢的光碟可能不能格式化 這樣 的光碟不能使用 使用本機格式化光碟 本機可能不能識別某些使用 計算機或除本機之外的設備格式化了的光碟 格式化光碟和記憶卡 格式化光碟 這是用來初始化光碟 LSQT1049 TC_GC book 81 ページ 2005年12月22日 木曜日 午後8時13分 ...

Page 82: ...按鈕 然後選擇 設定 記憶卡格式 化 是 並按下操縱桿 2 當出現確認訊息時 選擇 是 然後按下操縱桿 當格式化完成時 按 MENU 按鈕結束訊息螢幕 格式化時 不要關閉本機 當格式化 SD 記憶卡時 請使用電量充足的電池或 AC 適配器 使用本機格式化SD記憶卡 如果SD記憶卡是在其他 產品 比如計算機 上格式化的 則花在拍攝上的 時間可能會變長 並可能無法使用該 SD 記憶卡 根據使用的 SD 記憶卡類型的情況 可能要花一些時 間格式化 格式化時不要取出 SD 記憶卡 格式化 SD 記憶卡 這是用來初始化記憶卡 LSQT1049 TC_GC book 82 ページ 2005年12月22日 木曜日 午後8時13分 ...

Page 83: ...現封存光碟資訊時 新增總功能表 在 DVD 播放機上重播該光碟 封存光碟可能要花一些時間 如果本機變熱或者在封存光碟時受到強烈振動或撞 擊 則封存光碟將失敗 並且光碟可能不能在其他 設備上重播 如果在封存光碟時停止供電 則封存光碟將失敗 即使進行修復光碟 光碟可能也不能在其他設備上 重播 封存光碟 這是用來使光碟可以在其他設備上重播 封存視頻格式光碟 在其他設備上使用之前 一定要在本機上封存此光碟 DVD RW 視頻格式 封存後 光碟僅能播放 進行不 封存 l 84 或格式化 l 81 以後 可 以在光碟上錄製 DVD R 封存後 光碟僅能播放 並且不能再錄製了 封存 VR 格式光碟 DVD RAM 沒有必要封存 DVD RAM DVD RW VR 格式 封存 DVD RW VR 格式 會增大它與其他產品的兼容性 封存後的 DVD RW VR 格式 可以與封存前的 DVD RW VR 格式...

Page 84: ...光碟 是 並按下操縱桿 2 當出現確認訊息時 選擇 是 然後按下操縱桿 當完成未封存光碟時 按 MENU 按鈕結束訊息螢幕 當未封存光碟時 請使用電量充足的電池或 AC 適配 器 DVD RW VR 格式 不能進行未封存 封存後的 DVD RW VR 格式 可以與封存前的 DVD RW VR 格式 同樣地進行錄製和編輯 DVD R 不能進行未封存 未封存 DVD RW 這是用來不封存 DVD RW 視頻格式 這樣它可以用來拍攝 LSQT1049 TC_GC book 84 ページ 2005年12月22日 木曜日 午後8時13分 ...

Page 85: ...到解除保護後 才能在保護的光碟上進行進一步拍攝和編輯 轉動模式轉盤以選擇 1 按 MENU 按鈕 然後選擇 設定 光碟保護 並按下操縱桿 2 當出現確認訊息時 選擇 是 然後按下操縱桿 解除光碟保護 1 按 MENU 按鈕 然後選擇 設定 光碟保護 並按下操縱桿 2 當出現確認訊息時 選擇 是 然後按下操縱桿 如果光碟是在另一個設備上被保護的 則在本機上 可能不能解除保護 在這種情況下 請在設定保護 的設備上將其解除保護 LSQT1049 TC_GC book 85 ページ 2005年12月22日 木曜日 午後8時13分 ...

Page 86: ...光碟和記憶卡的管理 顯示光碟資訊 86 LSQT1049 顯示光碟資訊 RAM RW VR RW V R 顯示例如拍攝場景數量 剩餘空間 光碟是否封存或者是否保護等這類資訊 轉動模式轉盤以選擇 按 MENU 按鈕 然後選擇 設定 資訊 是 並按下操縱桿 結束資訊螢幕 按 MENU 按鈕 LSQT1049 TC_GC book 86 ページ 2005年12月22日 木曜日 午後8時13分 ...

Page 87: ... S 視頻端子 也要將 S 視頻插頭插 進去 這樣可以使您欣賞到更加美麗的圖片 3 在電視機上更改輸入頻道 根據本機所連接的端子不同 頻道設定也將有所不同 4 在本機上開始重播 圖像和聲音都輸出到電視機中 如果影像或聲音沒有從本機輸出到電視機中 檢查插頭是否插得足夠深 檢查連接的端子 檢查電視機的輸入設定 輸入開關 有關更多資訊 請閱讀電視機的使用說明書 在電視機上重播 A AV S 電纜 提供 將插頭插入到足夠深 VIDEO IN S VIDEO IN AUDIO IN A 2 開啟本機 然後轉動模式轉盤以選擇 或 LSQT1049 TC_GC book 87 ページ 2005年12月22日 木曜日 午後8時13分 ...

Page 88: ...明書 DVD RW VR 格式 必須進行封存 在這種情況 下 請在本機上封存此光碟 l 83 您無法在 8 釐米光碟上拍攝允許 僅一次性拍攝 的 影像 RW V R 1 在本機上封存此光碟 l 83 2 將光碟插入到 DVD 錄影機 播放機中 然後重播 不要將還沒有封存的光碟插入到 DVD 錄影機 播放 機中 此光碟可能不能使用 同樣 可能會在 DVD 錄影機上出現一條要求您格式化光碟的資訊 請不 要格式化該光碟 重播可以在支持 8 釐米 DVD Video 的設備上進行 但 是無法保證在所有 DVD 播放機上的重播都正常進 行 在 DVD 錄影機 播放機上重播 重播 DVD RAM 或 DVD RW VR 格式 重播 DVD RW 視頻格式 或 DVD R LSQT1049 TC_GC book 88 ページ 2005年12月22日 木曜日 午後8時13分 ...

Page 89: ...然後複製該光 碟 l 90 1 僅當複製 DVD RW 視頻格式 或 DVD R 時 在本機上封存此光碟 l 83 2 將光碟插入到 DVD 錄影機中 然後將內容複製到硬 盤上 關於如何將影像複製到硬盤上的詳細情況 請參閱 DVD 錄影機的使 用說明書 DVD RW VR 格式 必須進行封存 在這種情況 下 請在本機上封存此光碟 l 83 您無法在 8 釐米光碟上拍攝允許 僅一次性拍攝 的 影像 如果您的 DVD 錄影機有 SD 記憶卡插槽 您可以將用 本機拍攝在 SD 記憶卡上的靜態圖片檔案寫入到光 碟或硬盤上 將拍攝內容複製到 DVD 錄影機的硬盤上 LSQT1049 TC_GC book 89 ページ 2005年12月22日 木曜日 午後8時13分 ...

Page 90: ...配器可以免除電池用光的煩惱 1 連接本機和視頻設備 如果視頻設備有 S 視頻端子 也要將 S 視頻插 頭插進去 這樣可以使您欣賞到更加美麗的圖 片 2 開啟本機 然後轉動模式轉盤以選擇 3 在視頻設備和電視機上更改輸入頻道 根據本機所連接的端子不同 頻道設定也將有所不同 4 在本機上開始重播 然後開始在連接的設備上錄製 有關詳細情況 請參閱視頻設備的使用說明書 停止複製 停止所連接設備上的錄製 然後在本機上停止重播 將影像複製到其他視頻設備上 A AV S 電纜 提供 將插頭插入到足夠深 A VIDEO IN S VIDEO IN AUDIO IN LSQT1049 TC_GC book 90 ページ 2005年12月22日 木曜日 午後8時13分 ...

Page 91: ...說明書 使用 AC 適配器可以免除電池用光的煩惱 將帶有拍攝影像的 SD 記憶卡插入到本機中 開啟本機 然後轉動模式轉盤以選擇 1 按 MENU 按鈕 然後選擇 設定 USB 功能 PictBridge 並按下操縱桿 按 MENU 按鈕結束功能表螢幕 2 連接本機和印表機 出現 指示 如果不出現 指示或者繼續閃爍 請先斷 開 然後重新連接 USB 電纜或檢查印表機 SD 記 憶卡和本機上的設定 3 選擇一個要列印的檔案 然後按下操縱桿 顯示設定圖片的數量 A USB 電纜 不提供 將插頭插入到足夠深 A LSQT1049 TC_GC book 91 ページ 2005年12月22日 木曜日 午後8時13分 ...

Page 92: ...列印 9 張 要取消設定 請將列印數量設定為 0 通過重複步驟 3 和 4 最多可以連續設定顯示在一頁上的 8 個檔案 5 按 MENU 按鈕以顯示 PictBridge 功能表 6 在 日期列印 上選擇日期列印設定 如果印表機不能列印日期 此設定無效 7 在 紙張大小 上選擇紙張大小設定 不能設定印表機不支持的紙張大小 標準 印表機的尺寸規格 4t5 英吋 L 大小 5t7 英吋 2L 大小 4t6 英吋 名信片大小 A4 A4 大小 LSQT1049 TC_GC book 92 ページ 2005年12月22日 木曜日 午後8時13分 ...

Page 93: ... PictBridge 當中途停止列印時 向下移動操縱桿 出現確認訊息 如果選擇 是 則取消設定的列印數量 螢幕返回到步驟 3 如果選擇 否 則保 留所有設定 螢幕返回到步驟 3 列印過程中應避免下列操作 這些操作會使正常列 印無法完成 斷開 USB 電纜 取出 SD 記憶卡 轉換模式轉盤 關閉電源 檢查印表機的紙張大小 列印質量等設定 不能列印在本機上不能播放的圖片 當本機被直接連接到印表機時 不能使用 DPOF 設 定 直接連接印表機到本機上 不能使用 USB 集線器 標準 印表機的編排規格 無邊框列印 有邊框列印 LSQT1049 TC_GC book 93 ページ 2005年12月22日 木曜日 午後8時13分 ...

Page 94: ...電子穩定系統 l 52 夜視 l 51 淡入淡出 l 47 變焦麥克風 l 44 設定 顯示 l 96 日期 時間 l 35 日期格式 l 35 節電 l 96 操作音 l 96 LCD 設定 l 36 EVF 設定 l 36 初始設定 l 96 示範模式 l 96 LANGUAGE l 31 靜態圖片拍攝功能表 關於 設定 項目 請參閱動態影像拍攝功能 表 基本功能 場景模式 l 53 圖片質量 l 42 時鐘設定 l 34 進階功能 快門效果 l 42 LANGUAGE l 31 功能表列表 EVF DEMO LSQT1049 TC_GC book 94 ページ 2005年12月22日 木曜日 午後8時13分 ...

Page 95: ...2 分割 l 73 合併 l 74 刪除 l 75 設定 格式化光碟 l 81 封存光碟 l 83 未封存光碟 l 84 光碟保護 l 85 資訊 l 86 顯示 l 96 日期 l 60 日期格式 l 35 節電 l 96 操作音 l 96 LCD 設定 l 36 EVF 設定 l 36 LANGUAGE l 31 靜態圖片重播功能表 刪除 選擇 l 78 全部 l 78 播放設定 播放模式 l 63 鎖定 l 79 DPOF 設定 l 80 設定 顯示 l 96 日期 時間 l 35 日期格式 l 35 記憶卡格式化 l 82 節電 l 96 操作音 l 96 LCD 設定 l 36 EVF 設定 l 36 USB 功能 l 91 LANGUAGE l 31 EVF EVF LSQT1049 TC_GC book 95 ページ 2005年12月22日 木曜日 午後8時13分 ...

Page 96: ... 2 聲嗶嗶音 4 次 當發生錯誤 例如拍攝沒有開始 時 檢查螢 幕上顯示的句子 l 99 初始設定 是 否 根據功能的結合 當功能表不能選擇時 設定 為 是 可將功能表設定恢復到出廠時的設定狀 況 語言設定不能恢復到出廠時的設定狀態 示範模式 關 開 本項目用於開始本機的示範 僅當在 或 位置使用 AC 適配器和模式 轉盤時 如果把它設定為 開 而沒有插入光碟或 SD 記 憶卡 本機自動設定為示範模式 介紹其功能 如果按下任何按鈕或執行任何操作 示範模式 將被取消 如果大約 10 分鐘未進行任何操作 示範模式將自動開始 要終止示範模式 插入 光碟或 SD 記憶卡 或把它設定為 關 一般 使用時 將該功能設定為 關 USB 功能 PictBridge PC 連接 PictBridge 當通過 USB 電纜將本機連接到印表機上時 PC 連接 當通過 USB 電纜將本機連接到計算機上時 設定功...

Page 97: ...暫停 數位變焦 自動模式 手動模式 MF 手動對焦 2t 變焦放大率指示 ª 逆光模式 影像穩定器 1 100 快門速度 OPEN F2 0 F 值 0dB 增益值 肌膚柔和模式 漸變 白色 漸變 黑色 夜視功能 變焦麥克風 風聲噪音減少 動態影像拍攝模式 AUTO MNL ZOOM XP SP LP 5 運動模式 肖像模式 低光模式 聚光燈模式 水上及雪地模式 自動白平衡 室內模式 在白熾燈下拍攝 室外模式 手動調整模式 光碟類型 DVD RAM DVD RW VR 格式 DVD RW 視頻格式 DVD RW 未格式化 DVD R 漸進拍照模式 Ø10 Ø2 自拍計時器拍攝 靜態圖片的拍攝像素數 640k480 白色 綠色 紅色 可以拍攝的記憶卡 正識別記憶卡 正拍攝 存取記憶卡 靜態圖片質量 R 100 剩餘靜態圖片數量 AWB LSQT1049 TC_GC book 97 ページ 2...

Page 98: ...ictBridge 兼容的印表 機時 1 DPOF 已經設定 到 1 個以上 鎖定靜態圖片 靜態圖片的拍攝像素數 640k480 非本機拍攝的圖片 顯示尺寸取決於水平像素 數 如果該數是 2048 1920 1280 或 640 則不管垂直像素數是多少 都將分別顯示為 或 2048 像素或更大 1600 或更大 小於 2048 像素 1280 或更大 小於 1600 像素 1024 或更大 小於 1280 像素 800 或更大 小於 1024 像素 640 或更大 小於 800 像素 低於 640 像素的尺寸不顯示 0 或 內置電池電量低 l 35 當 LCD 顯示屏向鏡頭一側轉動 時 會出現警告 報警指示 將 LCD 顯示屏的方向返回到正常位 置 並檢查警告 報警指示 無光碟插入 光碟不可用 無 SD 記憶卡插入 記憶卡不可 用 QXGA UXGA SXGA XGA SVGA LSQT1...

Page 99: ...站 http panasonic co jp pavc global cs e_cam 本網站僅為英文 無法錄製 光碟已封存 插入了一張封存的 DVD RW 視頻格式 或 DVD R 封存光碟 後 光碟僅能播放而不能拍攝 如果未封存 DVD RW 視頻格 式 它可以用於拍攝 l 84 不能錄製 光碟已滿 本光碟已滿或者場景數量已經達到最大界限 因此不能再繼續錄 製資料 請刪除多餘的場景 l 64 或插入一張新光碟 不能錄製 場景數量超過最 大上限 機身溫度太高 不能操作 請關機及稍候片刻 本機的溫度很高 因此不能操作 關閉電源 直到等待本機冷 卻 然後再次開啟電源 不能不封存此光碟 DVD R 不能進行未封存 DVD RW VR 格式 不能進行未封存 封存後的 DVD RW VR 格式 可以與封存前的 DVD RW VR 格式 同樣地進行 錄製和編輯 LSQT1049 TC_GC book...

Page 100: ...播拍攝的場景 不要修復在另一個設備上拍攝過的光碟 這樣可能 會導致資料的丟失或光碟的損失 檢查記憶卡 該記憶卡不兼容或者不能被本機識別 記憶卡被鎖定 SD 記憶卡上的寫保護開關被設定為 LOCK l 16 記憶卡已滿 SD 記憶卡已滿 因此不能再繼續錄製資料 請刪除多餘的檔案 l 77 或插入一張新的 SD 記憶卡 請按重設鍵 在本機上發現缺陷 按 RESET 按鈕以重新啟動本機 l 106 更改為手動模式 正試圖使用不能同時使用的功能 取消夜視模式 無法使用 USB 請變更模式 在拍攝模式中連接了 USB 電纜 斷開 USB 電纜 本機不能正確建立與計算機或印表機的連接 請先斷開 然後重 新連接 USB 電纜或者檢查本機上的 USB 功能 設定 關於恢復 光碟發生錯誤 現在修復 LSQT1049 TC_GC book 100 ページ 2005年12月22日 木曜日 午後8時13分 ...

Page 101: ...子 功能 使功能不能使用的 條件 漸進 當亮度不充足時 數位變焦 漸變 在記憶卡拍攝模式中 逆光補償 當使用夜視功能時 當設定光圈 增益時 夜視 在記憶卡拍攝模式中 影像穩定器 當使用夜視功能時 在記憶卡拍攝模式中 功能 使功能不能使用的 條件 場景模式 當將 AUTO MANUAL FOCUS 開關設定為 AUTO 時 當使用夜視功能時 改變白平衡 當使用數位變焦 30k 或更高 時 當使用夜視功能時 調整快門速度 光圈 增益 當使用夜視功能時 當使用場景模式時 LSQT1049 TC_GC book 101 ページ 2005年12月22日 木曜日 午後8時13分 ...

Page 102: ...到另一面進行連續拍 攝 不能從光碟的一面到另一面進行連續拍攝 光碟包裝上標出的 拍攝時間是雙面的總時間 要進行雙面拍攝 需要彈出光碟並 將其翻轉 DVD R 僅能拍攝一次嗎 可以開始和停止拍攝 直到光碟已滿 但是拍攝在 DVD R 上的資料不能被刪除 能否在 DVD 播放機上重播 通過在本機中封存 DVD RW 視頻格式 或 DVD R 就可以 在 DVD 播放機上重播了 DVD RAM 或 DVD RW VR 格式 可以在支持 DVD RAM 或 DVD RW VR 格式 的 DVD 錄影機 DVD 播放機等設備上 重播 請參閱 DVD 錄影機或 DVD 播放機的使用說明書 DVD RW VR 格式 必須進行封存 在這種情況下 請在 本機上封存此光碟 LSQT1049 TC_GC book 102 ページ 2005年12月22日 木曜日 午後8時13分 ...

Page 103: ...給電池充電 l 18 是否是在極冷的地方使用電池 電池受環境溫度的影響 在寒冷的地方 電池的操作時間將 會變短 電池是否已經用壞了 電池有一定的壽命 如果即使在給電池完全充電後 操作時 間仍然很短 則表明電池壽命已到 不能再繼續使用 即使開啟電源 本機也不能 使用 本機不能正常操作 按 RESET 按鈕 l 106 如果還是無法恢復正常條件 請卸下電 池或 AC 適配器 等待約 1 分鐘 然後再次連接電池或 AC 適配 器 然後 大約 1 分鐘后 再次開啟電源 如果在存取指示 燈仍亮著的時候進行以上操作 可能會損壞記憶卡上的資料 螢幕突然變化 是否啟動了示範 在光碟錄製模式或記憶卡拍攝模式中 如果將 示範模式 設定 為 開 而沒有插入光碟或記憶卡 則本機自動設定為示範模 式 介紹其功能 通常應該將其設定為 關 按 MENU 按 鈕 然後選擇 設定 示範模式 關 並按下操縱桿 LSQT104...

Page 104: ...是 在其他設備上被保護的 請在同一設備上解除保護 是否 DVD RW 視頻格式 或 DVD R 已被封存 封存光碟後 光碟僅能播放而不能拍攝 如果未封存 DVD RW 視頻格式 它可以用於拍攝 l 84 是否將 SD 記憶卡的寫保護開關設定成了 LOCK 當寫保護開關被設定為 LOCK 時 無法進行拍攝 l 16 是否光碟或記憶卡的內存已滿 如果光碟或記憶卡上沒有可用內存 通過刪除多餘的場景釋 放一些內存 l 64 77 或使用一張新的光碟或記憶卡 是否將本機設定為光碟錄製模式或記憶卡拍攝模式 除非模式轉盤是處於 或 位置 否則無法進行拍攝 光碟蓋是否開啟 如果蓋子開啟 本機可能無法正常操作 請關閉光碟蓋 拍攝開始 但又立刻停止 重播的圖片中斷一會兒 是否光碟被劃傷或弄髒了 請清潔光碟 l 17 本機變熱 按照顯示的訊息操作 要再次使用本機 請關閉本機 並放置一會兒 LSQT1049 TC...

Page 105: ...進行調整 l 60 儘管本機與電視機正確連 接 重播的影像仍不能看 到 在電視機上是否選擇了視頻輸入 請閱讀電視機的使用說明書 並選擇與連接所使用的輸入相 匹配的頻道 不能刪除或編輯場景 是否 DVD RAM 或 DVD RW VR 格式 被寫保護 解除保護 l 85 如果光碟或者光碟上的內容是在另一個設備上被保護的 請 在同一設備上解除保護 可能無法刪除被分割過的場景 將分割的場景合併起來 然後將其刪除 l 67 在藍白圖案陰影中以縮略圖顯示的場景可能無法刪除 如果場 景是多餘的 請格式化光碟或記憶卡以刪除資料 l 81 82 必 須清楚 如果光碟或記憶卡被格式化 則拍攝在光碟或記憶卡 上的所有資料都將被刪除 SD 記憶卡上的檔案是否被鎖定 鎖定的檔案不能刪除 解除鎖定設定 l 79 如果將 SD 記憶卡的寫保護開關設定為 LOCK 則刪除無效 l 16 LSQT1049 TC_GC b...

Page 106: ...重要 資料保存到計算機或其他產品上 即使光碟或記憶卡被格式 化 還是不能使用 本機光碟或記憶卡可能被損壞 請向經銷商諮詢 指示消失 螢幕凍結 不能進行任何操作 關閉本機的電源 如果電源不能關閉 按 RESET 按鈕 或取下 電池或 AC 適配器 然後重新裝上 這樣做後 再開啟電源 如 果仍不能恢復正常的操作 請斷開電源連接並向購買本機的經 銷商諮詢 顯示 請按重設鍵 本機自動檢測出錯誤 用鏡頭蓋的突出部 分按壓 RESET 按鈕 這樣將重新啟動本 機 如果沒按 RESET 按鈕 本機的電源將在約 一分鐘後自動關閉 即使按下 RESET 按鈕後 指示仍然重複出 現 在這種情況下 本機需要維修 斷開電源連接 並向購買 本機的經銷商諮詢 不要試圖自己維修設備 LSQT1049 TC_GC book 106 ページ 2005年12月22日 木曜日 午後8時13分 ...

Page 107: ...聲音可能會有不利的影 響 一定要使用提供的接線和電纜 如果使用可選 附件 請使用隨之提供的接線和電纜 不要拉伸接線和電纜 不要向本機噴灑殺蟲劑或揮發性化學藥品 如果用此類化學藥品噴灑本機 則機體可能被 損傷並且表面漆會脫落 不要讓橡膠或塑料製品同本機接觸太長的時 間 如果在沙地或塵土較多的地方 例如在沙灘上 使用本機 不要讓沙子或細小的灰塵進入本機 和本機的端子 另外 還要讓本機遠離海水 沙子或塵土可能會損壞本機 在插入和取 出光碟或記憶卡的時候一定要小心 如果讓海水濺到本機上 請用擰幹的布將水擦 掉 然後 用一塊幹布再重新擦拭本機 當拿著本機的時候要小心 不要將其掉落或受 到碰撞 強烈的撞擊可能會打破本機的外殼 使其發生 故障 請不要使用汽油 塗料稀釋劑或酒精來清潔本 機 清潔之前 請將電池取下或從 AC 電源插座上 拔掉 AC 電纜 攝錄放影機機身的顏色可能會褪色 表面漆也 會剝落 請...

Page 108: ...本機電源關 閉 也會有微量電流繼續流動 讓本機保持此 狀態可能會導致電池過度放電 這會導致電池 即使在充電後也無法使用了 外出進行拍攝時 請準備好備用電池 在寒冷的地方 如滑雪場 電池提供的拍攝時 間有可能會縮短 當您外出旅行時 請記得帶上 AC 適配器 提 供 這樣您就可以在抵達目的地後為電池進 行充電 如果不小心將電池跌落 請檢查電池的電極是 否損壞 安裝電極損壞的電池會損壞本機 保存電池的技巧 電池應該保存在乙烯基袋中 這樣不會讓金屬 接觸到電極 電池應被放置在涼爽而乾燥的地方 應儘可能 地使溫度保持恒定 推薦的溫度 15 C 至 25 C 推薦的濕度 40 至 60 過高或過低的溫度 將縮短電池的使用壽命 如果電池被置於溫度高 濕度大或油污煙霧充 斥的環境中 可能會引起電池電極的鏽蝕並導 致故障 如果長時間存儲電池 我們建議您每年對其充 一次電 並在將充滿後的電量完全消耗以後重 新...

Page 109: ...請等到 恢復適當的溫度以後再給電池重新充電 如果 電池仍不能充電 可能電池或 AC 適配器出問 題了 請與經銷商聯繫 當指示燈熄滅時 充電完成 當指示燈熄滅而充電沒有完成時 可能 AC 適 配器或電池出現了故障 請與經銷商聯繫 如果光碟上有灰塵 劃傷或污垢 或者如果光 碟變形了 則會出現下列現象 重播影像中有馬賽克噪音 重播影像的瞬間停止 重播時聲音中斷 或者有不正常的聲音 縮略圖顯示帶有藍白圖案陰影 光碟不能被正確識別 視頻和音頻之間有延遲 當拍攝影像時 本機可以避開由於灰塵 劃傷 等原因而不能進行拍攝的光碟部分 將在這 樣的部分暫停並自動重新開始拍攝 當存取指示燈點亮 光碟存取過程中 時 請 不要開啟光碟蓋 關閉電源或引起任何振動或 撞擊 DVD R 為了在 DVD R 光碟上進行最佳拍攝 本機會 將控制資料寫入到光碟上 以便在插入和拍攝 後彈出時可以自動進行調整 如果光碟沒有空 間用...

Page 110: ...操作 水汽凝結的原因 當周圍溫度或濕度像下列情況那樣變化時 會 發生水汽凝結 當本機被從寒冷地方 如滑雪場 拿到溫暖 的房間裡時 當本機被從有空調的車內 拿到外面時 當寒冷的房間很快變暖時 當來自空調的冷風直接吹向本機時 夏日午後陣雨過後 當本機處於空氣中水汽很重的非常潮濕的地方 時 如熱的游泳池 當本機被拿到溫差很大的地方 比如 從冷地 方到熱地方 時 例如 如果在滑雪場使用本機進行拍攝 又要 將其拿到很熱的房間裡時 請將本機裝在塑料 袋中 儘可能袪除袋中的空氣 然後將袋子密 封 將本機在房間裡放置約 1 個小時 使得本 機溫度與房間的環境溫度接近 然後再使用 怎麼處理被霧化的鏡頭 取下電池或 AC 適配器 將本機放置約 1 小時 當本機溫度接近環境溫度時 霧化自然消失 關於 SD 記憶卡 LCD 顯示屏 取景器 LCD 顯示屏螢幕的製造採用了極高的精密技 術 總像素約達到 105 00...

Page 111: ...陽光 6 白色熒光燈 7 鹵素燈 8 白熾燈 9 日出或日落 10 燭光 在自動白平衡調整的有效範圍外時 影像可能 會變得偏紅或偏藍 即使在自動白平衡調整的 有效範圍內時 如果出現多個光源 自動白平 衡調整也可能不能正常工作 在光線超出自動 白平衡調整的有效範圍時 使用手動白平衡調 整模式 白平衡 本機所拍攝的影像 受某些光源的影響 可能 會變得偏藍或偏紅 為避免這種現象 請調整 白平衡 白平衡調整將測定不同光源下的白色 通過識 別陽光下的白色和在熒光燈下的白色 本機可 以調整不同顏色間的平衡 由於白色是所有色彩 組成光線 的基準 所 以如果本機能夠識別出基準白色 它就可以用 一種自然的色調拍攝影像 10000K 9000K 8000K 7000K 6000K 5000K 4000K 3000K 2000K 1000K 2 1 3 4 5 6 7 8 9 10 LSQT1049 TC_GC...

Page 112: ...拍攝位於肮髒或總是積滿灰塵的窗戶後的物體 時 由於焦點在髒窗戶上 所以不能對窗戶後的物 體進行對焦 類似地 當拍攝車輛很多的馬路對面的物體時 恰巧經過的車也會被對焦 拍攝被光亮表面的物體或者高反光物體圍繞著 的物體 由於對發光或閃光物體對焦 所以很難對所拍 攝的物體對焦 當拍攝物體在海岸上 在夜景 中或者在有煙花或特殊燈光的場景中時 焦點 會變模糊 拍攝黑暗環境中的物體 由於透過鏡頭射入的光線資訊大量減少 本機 將不能正確對焦 拍攝快速移動的物體 由於內部的對焦鏡頭是機械移動的 它無法與 快速移動的物體保持一致 例如 當拍攝有快速移動物體的運動事件時 對焦可能會失去其銳度 拍攝對比度非常小的物體 很容易將對比強烈的物體或垂直線條或條紋對 焦 這就意味著由於本機是根據影像的垂直線 條進行對焦的 一個對比度非常小的物體 如 一面白牆 會變得非常模糊 LSQT1049 TC_GC book 11...

Page 113: ...素 約 800 K 有效像素 動態影像 約 400 K 鏡頭 30k 電動變焦 F1 8 到 F3 9 f 1 90 mm 到 57 0 mm 35 mm 相當於 35 7 mm 到 1072 mm 濾鏡直徑 30 5 mm 變焦 30k 光學變焦 50 1000k 數位變焦 顯示屏 2 5z LCD 顯示屏 約 105 K 像素 取景器 彩色電子取景器 約 123 K 像素 麥克風 立體聲 帶變焦功能 揚聲器 1 個球形揚聲器 20 mm 標準照度 1 400 lx 最低照度 12 lx 夜視模式下 2 lx 視頻輸出標準 1 0 Vp p 75 S 視頻 輸出標準 Y 1 0 Vp p 75 C 0 3 Vp p 75 音頻輸出標準 線路 316 mV 600 USB 記憶卡讀 寫功能 不支持版權保護 適應 USB 2 0 高速 PictBridge 兼容 LSQT1049 TC_GC...

Page 114: ...l Ver 2 0 壓縮 MPEG2 拍攝模式和傳輸率 XP 9 Mbps VBR SP 5 Mbps VBR LP 2 5 Mbps VBR 音頻壓縮 Dolby Digital Dolby AC3 16 位 48 kHz 2 ch 拍攝媒體 SD 記憶卡 8 MB 16 MB 32 MB 64 MB 128 MB 256 MB 512 MB 1 GB 2 GB 最大容量 壓縮 JPEG Design rule for Camera File system 基於 Exif 2 2 標準 對應 DPOF 圖片尺寸 640k480 電源 AC 110 V 到 240 V 50 60 Hz 電流功率 19 W DC 輸出 DC 7 9 V 1 4 A 本機工作時 DC 8 4 V 0 65 A 電池充電時 尺寸 約 61 mm 寬 k 32 mm 高 k 91 mm 深 重量 約 110 g ...

Page 115: ...和所拍攝的物體 表中所列的數值為估計值 SD 記憶卡上可拍攝的圖片數量 圖片尺寸 640k480 圖片質量 8 MB 42 86 16 MB 97 195 32 MB 210 420 64 MB 430 870 128 MB 820 1650 256 MB 1710 3430 512 MB 3400 6790 1 GB 6800 13600 2 GB 13830 27660 LSQT1049 TC_GC book 115 ページ 2005年12月22日 木曜日 午後8時13分 ...

Page 116: ...uipment and easily accessible or the mains plug or an appliance coupler shall remain readily operable IEC 60825 1 2001 CAUTION This product contains a laser diode of higher class than 1 To ensure continued safety do not remove any covers or attempt to gain access to the inside of the product Refer all servicing to qualified personnel CLASS 1 LASER PRODUCT How to replace the Fuse The location of th...

Page 117: ...D Logo is a trademark The Movie Camera uses copyright protected technologies and is protected by the patented technologies and intellectual properties of Japan and the U S To use these copyright protected technologies authorization of the Macrovision Company is required It is prohibited to disassemble or modify the Movie Camera Manufactured under license from Dolby Laboratories Dolby and the doubl...

Page 118: ...sting LCD monitor viewfinder 150 Recording Before recording 151 Recording motion pictures 152 Changing the recording mode of the motion picture 154 Recording still pictures 155 Various recording functions 157 Zoom in out function 157 Recording yourself 159 Soft skin mode 160 Fade in fade out function 161 Backlight compensation function 163 Self timer recording 164 Wind noise reduction function 165...

Page 119: ... a DVD RW 200 Protecting a disc 201 Displaying disc information 202 With other products With a TV 203 Playback on TV 203 With a DVD recorder player 204 Playback on DVD recorder player 204 Copying recordings onto a DVD recorder s hard disk 205 With a VCR 206 Dubbing images onto other video devices 206 With a printer PictBridge 207 Others Menus 210 Menu list 210 Setup menu 212 Indications 213 Indica...

Page 120: ...need to search for the recording start position The new recording will not overwrite any previously recorded scene Easy playback l 175 Recorded scenes are displayed as thumbnails You can easily search for the scenes you want to watch LSQT1049 ENG book 120 ページ 2005年12月20日 火曜日 午後6時45分 ...

Page 121: ...a VCR or a DVD recorder hard disk Using with DVD player recorder l 204 Just insert the disc into a DVD player recorder compatible with 8 cm discs to play back the scenes recorded with this unit on it If you have a DVD recorder with hard disk you can dub scenes recorded on DVD RAM or DVD RW VR format with this unit to the hard disk LSQT1049 ENG book 121 ページ 2005年12月20日 火曜日 午後6時45分 ...

Page 122: ...on of China and Saudi Arabia Optional accessories AC adaptor VW AD11E EB MC protector VW LMC30E Battery pack lithium CGA DU12 1150 mAh Tripod VW CT45E Battery pack lithium CGA DU14 1360 mAh 8 cm DVD RAM disc single sided LM AF30E Battery pack lithium CGA DU21 2040 mAh 8 cm DVD RAM disc double sided LM AF60E Wide conversion lens VW LW3007E 8 cm DVD RW disc single sided LM RW30E Tele conversion lens...

Page 123: ...icator l 136 13 Mode dial l 140 14 Joystick l 141 Move up down left or right to select items Press the centre to enter the selection 15 Delete button l 180 191 193 16 Menu button MENU l 146 17 Battery holder l 133 18 Eyepiece corrector knob l 150 19 Zoom lever W T l 157 Volume lever sVOLUMEr l 176 20 Photo shot button PHOTO SHOT l 155 21 Card access lamp l 139 22 Card slot cover l 139 23 Card slot...

Page 124: ...nt l 137 33 Grip belt l below Adjust the belt length so it fits your hand Adjust the belt length and the pad position 1 Flip the belt 2 Adjust the length 3 Fix the belt Due to limitations in LCD production technology there may be some tiny bright or dark spots on the LCD monitor screen However this is not a malfunction and does not affect the recorded picture 26 28 27 29 30 31 32 33 Using grip bel...

Page 125: ...cap press the knobs firmly If the lens cap cord has come off Pass the end of the lens cap cord through the attached eye on the lens cap Then pass the lens cap through the loop made by itself and pull tight This is a hole for attaching the unit to the optional tripod Please carefully read the operating instructions for how to attach the tripod to the unit When the tripod is used the card slot cover...

Page 126: ...nce It can rotate up to 180o A towards the lens or 90o B towards the viewfinder The brightness and colour level of the LCD monitor can be adjusted from the menu l 150 If it is forcibly opened or rotated the unit may be damaged or fail When the LCD monitor is rotated by 180o towards the lens when recording yourself the LCD monitor and the viewfinder will be simultaneously activated Pull out the vie...

Page 127: ...acteristic Rewritable disc Rewritable disc One time recording disc 1 1 By formatting the disc it can be used repeatedly l 197 One time recording disc Display on the screen Indication in these instructions RAM RW VR RW V R Functions Editing on this unit Playback on other products 2 2 DVD players and DVD recorders that support 8 cm discs 3 3 Playback is possible on compatible products 4 4 Playback i...

Page 128: ...corded on this unit may not be playable on other products Recording on DVD R in DVD Video Recording format is not supported When using DVD RW or DVD R do not perform the following as doing so may make the disc unusable Record on a disc with other products after recording on it with this unit Record on a disc with this unit after recording on it with other products Insert an un finalized disc in an...

Page 129: ...is unit the screen on the right appears Select YES then press the joystick 2 Select format type then press the joystick 3 When the confirm screen appears select YES then press the joystick To change the format type format the disc again l 197 If the disc is formatted then all the data recorded on the disc will be erased When using brand new DVD RW VIDEO DVD Video format VR DVD Video Recording form...

Page 130: ...e recommend that you use a Panasonic brand SD card Be sure to insert miniSD Cards in the dedicated card adaptor before use Inserting a card in this unit without the adaptor may damage the unit or the card Do not insert an empty card adaptor in this unit Do not leave the adaptor in this unit while inserting or removing miniSD Cards This may cause the unit to malfunction When the write protect switc...

Page 131: ...r hard writing implements Do not use record cleaning sprays benzine thinner static electricity prevention liquids or any other solvent Do not use scratch proof protectors or covers Do not expose the terminals of the card to water garbage or dust Do not drop stack or impact discs Do not place objects on them Do not use the following discs Discs with exposed adhesive from removed stickers or labels ...

Page 132: ... up Charging Goes off Charging completed Flashing The battery is over discharged discharged excessively In a while the lamp will light up and normal charging will start When the battery temperature is excessively high or low the CHARGE lamp flashes and the charging time will be longer than normal Battery charging time l 134 We recommend using Panasonic batteries If you use other batteries we canno...

Page 133: ...RY RELEASE lever slide the battery to remove it Hold the battery with your hand so it does not fall Be sure to turn off the power on this unit and check that the status indicator and the access lamp are both off before removing the battery Fitting the battery Removing the battery LSQT1049 ENG book 133 ページ 2005年12月20日 火曜日 午後6時45分 ...

Page 134: ...wn in the table are approximations Charging time and recordable time Battery model number Voltage capacity Charging time Supplied battery CGA DU12 optional 7 2 V 1150 mAh 2 h 25 min CGA DU14 optional 7 2 V 1360 mAh 2 h 45 min CGA DU21 optional 7 2 V 2040 mAh 3 h 55 min Battery model number Voltage capacity Recording mode Maximum continuously recordable time Intermittent recordable time Supplied ba...

Page 135: ...not a malfunction Be aware that the operating time of the battery will become shorter in low temperatures We recommend charging a spare battery for use when recording 1 Connect the AC cable to the AC adaptor and the AC outlet 2 Connect the DC cable to the AC adaptor 3 Connect the DC cable to this unit Do not use the AC cable for other equipment since the AC cable is exclusively designed for this u...

Page 136: ... How to turn off the power A B When the power is turned on for the first time after changing the disc or battery the unit carries out a recognition procedure to check that there are no problems with the disc This takes approximately 25 seconds with DVD RAM If you want to start using the unit as soon as you turn on the power do the following 1 Turn on the power 2 After READING DISC disappears from ...

Page 137: ... after the ACCESS PC lamp blinks the cover of the disc compartment will open slightly 2 Open the cover of the disc compartment by hand and insert remove the disc Inserting disc Fit the disc onto the spindle in the centre A Recording playback side B Pickup lens Removing disc While pressing down on the spindle grasp the edge of the disc and gently lift it out 3 Push the section marked PUSH CLOSE on ...

Page 138: ...playback side facing the inside Do not allow the recording playback side to become dirty or scratched Do not remove the battery pack or disconnect the AC adaptor while removing the disc or until power is completely turned off If you do the cover will not open If this happens reattach the battery pack or reconnect the AC adaptor slide the DISC EJECT lever once and then release it A repair disc mess...

Page 139: ...ard press the centre of the SD card and then pull it straight out 3 Securely close the card slot cover Concerning the SD card Electrical noise static electricity or failure of this unit or the SD card may damage or erase the data stored on the SD card We recommend saving important data on a computer Card access lamp When this unit accesses the SD card reading recording playback erasing etc the acc...

Page 140: ... set the desired mode pictograph to the position shown in the illustration Disc recording mode l 152 Use this to record motion pictures on a disc Disc playback mode l 175 Use this to play back motion pictures on a disc Card recording mode l 155 Use this to record still pictures on an SD card Card playback mode l 178 Use this to play back still pictures on an SD card LSQT1049 ENG book 140 ページ 2005年...

Page 141: ...ick and icons will be displayed on the screen Each press switches the display as follows depending on the mode In the disc playback mode or the card playback mode the icons will be automatically displayed on the screen Basic operations 1 Select by moving up 2 Select by moving down 3 Select by moving left 4 Select by moving right 5 Press the joystick to select the item Joystick and screen display D...

Page 142: ... is selected 173 4 White balance 172 Shutter speed 174 Iris or gain value 174 s r 21 White balance mode selection manual adjustments 171 172 174 Disc playback mode A The operation icon is off Icon Direction Function Page 1 3 Playback pause 175 4 Stop playback and show thumbnails 175 2 Rewind skip during playback 175 2 Reverse slow frame playback during pause 176 9 1 Fast forward skip during playba...

Page 143: ...e AUTO MANUAL FOCUS switch is set to MANUAL A The operation icon is off Icon Direction Function Page 1 2 4 Soft skin mode 160 Ø 2 Self timer 164 ª 1 Backlight compensation 163 2 2 3 Manual white balance set Only when manual white balance adjustment mode is selected 173 4 White balance 172 Shutter speed 174 Iris or gain value 174 s r 21 White balance mode selection manual adjustments 171 172 174 A ...

Page 144: ...8 E 2 Playback previous picture 178 D 1 Playback next picture 178 Card playback mode When SLIDE SHOW is selected A The operation icon is off Icon Direction Function Page 1 3 Slide show start pause 179 4 Stop playback and show thumbnails 178 E 2 Playback previous picture during pause 178 D 1 Playback next picture during pause 178 A A LSQT1049 ENG book 144 ページ 2005年12月20日 火曜日 午後6時45分 ...

Page 145: ...tching the language You can switch the language on the screen display or the menu screen 1 Press the MENU button then select LANGUAGE and press the joystick 2 Select English and press the joystick LSQT1049 ENG book 145 ページ 2005年12月20日 火曜日 午後6時45分 ...

Page 146: ...ng on the position of the mode dial Do not switch the mode dial when the menu is displayed 2 Move the joystick up or down in order to select the desired top menu A 3 Move the joystick right or press the joystick The submenu B is displayed 4 Move the joystick up or down in order to select the submenu item C Current settings on menus MENU A B C LSQT1049 ENG book 146 ページ 2005年12月20日 火曜日 午後6時45分 ...

Page 147: ...he desired item 7 Press the joystick to enter the selection To get back to the previous screen Move the joystick left To exit the menu screen Press the MENU button The menu screen does not appear during recording or playing You cannot start other operations while the menu screen appears MENU LSQT1049 ENG book 147 ページ 2005年12月20日 火曜日 午後6時45分 ...

Page 148: ... Move the joystick left or right to select the item to be set Then move the joystick up or down to set the desired value The year will change as follows 2000 2001 2099 2000 The 24 hour system is used to display the time 3 Press the joystick to enter the selection After pressing the MENU button to finish the setting check the date and time display The clock function starts at 00 seconds LSQT1049 EN...

Page 149: ...re recording If 0 or is indicated when this unit is turned on then the built in lithium battery runs down After charging the battery using the steps below set the clock Connect the AC adaptor to this unit or place the battery on this unit and the built in lithium battery will be recharged Leave this unit as is for approx 24 hours and the battery will save the date and time for approx 6 months Even...

Page 150: ...he LCD monitor EVF SET Brightness of the viewfinder In order to adjust the brightness of the viewfinder close the LCD monitor and the viewfinder will be activated When the LCD monitor is rotated by 180 towards the lens the brightness of the LCD monitor cannot be adjusted These settings will not affect the images actually recorded Adjust the focus by sliding the eyepiece corrector knob You can adju...

Page 151: ...belt 3 Do not cover the microphones or sensors with your hands 4 Keep your arms near your body 5 Slightly open your legs When you are outdoors record pictures with the sunlight behind you If the subject is backlit it will become dark in the recording Basic camera positioning 4 5 1 2 3 LSQT1049 ENG book 151 ページ 2005年12月20日 火曜日 午後6時45分 ...

Page 152: ...rding To end the recording Press the recording start stop button again to pause recording and are red during recording Do not move this unit until is green The images recorded between pressing the recording start stop button to start recording and pressing it again to pause recording become one scene When about 5 minutes has passed without any operation this unit automatically turns off to prevent...

Page 153: ...o 0h00m00s A Remaining time left for recording When the remaining time is less than 1 minute R 0h00m flashes red B Recording mode C Recording time elapsed While motion picture recording is in progress do not disconnect the battery or AC adaptor If you do a repair disc message may be displayed when the power is turned back on l 216 About recovery Screen indications in the disc recording mode R 0h02...

Page 154: ...tern noise may appear on a playback image in the following cases When there is a complicated pattern in the background When the unit is moved too much or too fast When a subject with sharp movements has been recorded Particularly if REC MODE was set to during recording Changing the recording mode of the motion picture Recording modes and recordable time available for the motion picture Recording m...

Page 155: ...the SD card is set to LOCK it cannot be used for recording If set PICT QUALITY mosaic pattern noise may appear on a playback image depending on the picture content While the card access lamp is lit do not perform the following as doing so may damage the SD card or the data on the card Turn the unit off Insert or remove the SD card Operate the mode dial Another product may degrade or not play back ...

Page 156: ... BASIC PICT QUALITY desired item and press the joystick Still pictures with a high picture quality are recorded Priority is given to the number of still pictures recorded Still pictures are recorded in normal picture quality You can add a shutter operation simulating sound Press the MENU button then select ADVANCED SHTR EFFECT ON and press the joystick This function s default setting is ON Screen ...

Page 157: ...ght closer they are focused at about 1 3 m or more When the zoom magnification is 1k this unit can focus on a subject approx 2 cm away from the lens Macro function The zoom speed varies depending on the range over which the zoom lever is moved When the zoom speed is high the subject may not be focused easily Zoom in out function T side To bring distant people or objects appear closer for recording...

Page 158: ...zoom magnification the more the image quality is degraded This function cannot be used in card recording mode RAM RW VR RW V R Interlocked with the zooming operation the microphone will collect sounds clearly far away with the tele shot or those in the vicinity with the wide angle shot Rotate the mode dial to select Press the MENU button then select ADVANCED ZOOM MIC ON and press the joystick Digi...

Page 159: ...Rotate the LCD monitor towards the lens side When the LCD monitor is opened the viewfinder automatically turns off However if the LCD monitor is then rotated towards the lens side the viewfinder is activated When the LCD monitor is rotated towards the lens side the icon will not be displayed even if you press the joystick Only some indications will appear on the screen When appears return the dire...

Page 160: ...hown in the illustration 2 Move the joystick down to select To cancel the soft skin mode Select again If the background or anything else in the scene has colours similar to the skin colour they will also be smoothed If the brightness is insufficient the effect may not be clear Soft skin mode This makes skin colours appear softer for a more attractive appearance LSQT1049 ENG book 160 ページ 2005年12月20...

Page 161: ...lect 3 Press the recording start stop button Start recording Fade in When you start recording the image audio disappears completely and the image audio gradually appears To fade out 1 During recording press the joystick to display the icon shown in the illustration Fade in fade out function Fade in The image and audio gradually appear Fade out The image and audio gradually disappear LSQT1049 ENG b...

Page 162: ... The colour which appears in fading pictures can be selected Press the MENU button then select ADVANCED FADE COLOUR WHITE or BLACK and press the joystick By operating the OFF ON switch the fade in fade out function is cancelled While the fade in fade out function is selected it takes several seconds to display the image when you start recording It also takes several seconds to pause recording The ...

Page 163: ...joystick to display the icon shown in the illustration 2 Move the joystick right to select ª The image on the screen will become brighter To return to normal recording Select ª again By operating the OFF ON switch or mode dial the backlight compensation function is cancelled Backlight compensation function This is for protecting a backlit subject from being darkened LSQT1049 ENG book 163 ページ 2005年...

Page 164: ... be recorded After recording the self timer is cancelled To stop the timer midway through Press the MENU button The self timer setting is cancelled By operating the OFF ON switch the self timer standby mode is cancelled Depending on the time taken to bring the subject into focus the recording may take longer than set to start Setting the self timer to Ø2 is a good way to prevent image shake when t...

Page 165: ...then select BASIC WIND CUT OFF and press the joystick This function s default setting is ON Depending on the wind strength the wind noise is reduced If this function is activated in strong winds the stereo effect may be reduced When the wind weakens the stereo effect will be restored Wind noise reduction function This is for reducing the wind noise coming into the microphone when recording LSQT104...

Page 166: ...ASIC CINEMA OFF and press the joystick Images played back vary depending on the TV connected Please refer to the operating instructions for your TV When images are played back on a TV screen the date display may be erased in some cases Depending on the TV the picture quality may deteriorate When a cinema picture is imported onto a personal computer the imported picture may not be displayed correct...

Page 167: ...71 If the manual focus indication is not displayed press the joystick twice and then focus the subject To cancel the Night view function Press the MENU button then select ADVANCED NIGHT VIEW OFF and press the joystick The Night view function makes the signal charging time of CCD up to approximately 25k longer than usual so that dark scenes invisible to the naked eye can be recorded brightly For th...

Page 168: ...tion Press the MENU button then select ADVANCED SIS OFF and press the joystick When a tripod is used we recommend that you turn the image stabilizer off In the following cases the image stabilizer function may not work effectively When the digital zoom is used When the unit is shaken greatly When you record a moving subject while tracking it Image stabilizer function This is for reducing image sha...

Page 169: ...ter speeds and apertures Rotate the mode dial to select or 1 Set the AUTO MANUAL FOCUS switch to MANUAL 2 Press the MENU button then select BASIC SCENE MODE desired item and press the joystick Scene mode This is for recording in various situations Display Mode Recording conditions 5 Sports To record sports scenes or scenes where there are quick motions Portrait To make people stand out against the...

Page 170: ...mage may change If you record a subject illuminated with strong light or a highly reflective subject vertical lines of light may appear If the brightness is insufficient the sports mode does not function The 5 display flashes If this mode is used indoors the screen may flicker Portrait mode If this mode is used indoors the screen may flicker If so change the scene mode setting to OFF Low light mod...

Page 171: ...cus indication 1MF is displayed 3 Move the joystick left or right to bring the subject into focus When focused with a wide angle the subject may not be in focus when zoomed in First zoom in on the subject and then focus on it To restore to the automatic adjustment Press the AUTO MANUAL FOCUS switch down again to the FOCUS position You can also restore the auto focusing by setting the AUTO MANUAL F...

Page 172: ... select the white balance mode To restore to the automatic adjustment Set the white balance mode to You can also restore the automatic adjustment by setting the AUTO MANUAL FOCUS switch to AUTO White balance This is for recording in natural colours MNL MNL AWB MNL Display Mode Recording conditions Auto white balance adjustment Indoor mode for recording under incandescent lamps Incandescent lights ...

Page 173: ...f light source during recording Do not cover the white balance sensor during recording or it may not function properly When the display flashes white the manual white balance previously adjusted is stored Whenever recording conditions change re set the white balance for correct adjustment When the unit is turned on with the lens cap fitted the automatic white balance adjustment may not function pr...

Page 174: ...r fluorescent light mercury light or sodium light because the colour and brightness of the playback image may change If you increase the shutter speed manually the sensitivity lowers and accordingly the gain value increases automatically which may increase the noises on the screen You may see vertical lines of light in the playback image of a brightly shining subject or highly reflective subject b...

Page 175: ...o release the joystick when you have arrived at the page with the scene you want to display 3 Press the joystick The selected scene is played back on the full screen The operation icon is automatically displayed on the screen 4 Move the joystick to operate No sound will be heard except during normal playback If pause play is continued for 5 minutes the screen returns to the thumbnails When the amo...

Page 176: ... one frame at a time 1 Move the joystick up during playback to pause the playback 2 Move the joystick right The frames will be advanced one at a time in the reverse direction when you move the joystick left Normal playback is restored when you move the joystick up Adjust the speaker volume during playback Move the volume lever to change the volume level The further the indicator moves to the right...

Page 177: ...arately in the following cases When the number of scenes exceeds 99 RAM RW VR RW V R When the disc is removed RW V R When the disc is repaired RW V R When the mode dial is switched R When the power is turned off R Press the MENU button then select PLAY SETUP RESUME PLAY ON and press the joystick If playback of a motion picture is stopped R appears on the thumbnail view of the stopped scene If play...

Page 178: ...own you can advance 8 files at a time The screen will not change at this time but the file numbers and scroll bar display will change so release the joystick when you have arrived at the page with the file you want to display 3 Press the joystick The selected file is played back on the full screen The operation icon is automatically displayed on the screen 4 Move the joystick to operate A B 1 Slid...

Page 179: ...or created on another product and another product may degrade or not play back data recorded on this unit Do not operate the mode dial during the slide show When the access lamp is lit do not insert or remove an SD card It takes time to display the file depending on the number of pixels of the file If you attempt to play back file recorded in a different format or file data is defective the whole ...

Page 180: ... Video format and DVD R cannot be deleted Rotate the mode dial to select 1 Press the button during playback 2 When the confirmation message appears select YES then press the joystick Deleting scenes This is for deleting scenes recorded on discs Deleting scenes one at a time LSQT1049 ENG book 180 ページ 2005年12月20日 火曜日 午後6時45分 ...

Page 181: ... set in succession 3 Only when SELECT is selected in step 1 Press the button 4 When the confirmation message appears select YES then press the joystick Only when SELECT is selected in step 1 To continue deleting other scenes Repeat steps 2 4 To complete editing Press the MENU button To delete an unwanted part of a scene divide the scene first and then delete the unnecessary part l 182 In case of A...

Page 182: ... the scene to be divided then press the joystick The selected scene is played back 3 When you reach the area where you want to divide the scene move the joystick down to set the dividing point 4 When the confirmation message appears select YES then press the joystick To continue dividing other scenes Repeat steps 2 4 To complete editing Press the MENU button Dividing a scene This is for dividing a...

Page 183: ...sh to combine scenes that are not next to each other or scenes with different recording dates first create a playlist and then combine the scenes on the playlist l 185 190 3 When the confirmation message appears select YES then press the joystick To continue combining other scenes Repeat steps 2 3 To complete editing Press the MENU button Combining scenes This function is only for combining two co...

Page 184: ...y making a playlist If you create or delete playlists the original scenes will not be modified Editing scenes on a playlist will not affect the original scenes The maximum number of items on a disc per side Playlists 99 Playlist scenes 999 If original scenes are deleted the portion of playlists created with these scenes is also deleted What is a playlist Recorded scenes Playlist LSQT1049 ENG book ...

Page 185: ...elled Up to 8 scenes can be set in succession The scenes are registered in the playlist in the order that they were selected After creating a playlist the order of the scenes in it can be changed by MOVE function l 188 4 Press the MENU button 5 When the confirmation message appears select YES then press the joystick The thumbnail view screen of the created playlist is displayed To add another scen...

Page 186: ...displayed as thumbnails 3 Select the scene to start playback then press the joystick To select a different playlist When the first scene is selected in the playlist thumbnail view screen move the joystick left The screen returns to the PLAYLIST VIEW step 2 To return to showing the original scenes Press the MENU button then select PLAY SETUP PLAY MODE VIEW ALL or BY DATE and press the joystick Play...

Page 187: ... a yellow frame When the joystick is pressed again the selected scene will be cancelled Up to 8 scenes can be set in succession The scenes are added to the playlist in the order that they were selected The order of the scenes in the playlist can be changed by MOVE function l 188 5 Press the MENU button 6 When the confirmation message appears select YES then press the joystick The thumbnail view sc...

Page 188: ...e joystick 3 Select MOVE then press the joystick 4 Select the scene to be moved then press the joystick The selected scene is encircled by a yellow frame and the position to insert is shown by a red bar 5 Select the position to insert the scene then press the joystick To continue moving other scenes in the playlist Repeat steps 4 5 To complete editing Press the MENU button Moving scenes LSQT1049 E...

Page 189: ... press the joystick 3 Select DIVIDE then press the joystick 4 Select the scene to be divided then press the joystick The selected scene is played back 5 When you reach the area where you want to divide the scene move the joystick down to set the dividing point 6 When the confirmation message appears select YES then press the joystick To continue dividing other scenes Repeat steps 4 6 To complete e...

Page 190: ...stick 2 Select the playlist to be edited then press the joystick 3 Select COMBINE then press the joystick 4 Select the scene to be combined then press the joystick The selected scene and the next scene are combined 5 When the confirmation message appears select YES then press the joystick To continue combining other scenes Repeat steps 4 5 To complete editing Press the MENU button Combining scenes...

Page 191: ...the button during playback 2 When the confirmation message appears select YES then press the joystick Deleting multiple scenes from the thumbnail display Select playlist playback mode l 186 steps 1 and 2 1 Press the MENU button then select EDIT and press the joystick 2 Select the playlist to be edited then press the joystick Deleting scenes LSQT1049 ENG book 191 ページ 2005年12月20日 火曜日 午後6時45分 ...

Page 192: ...when SELECT is selected in step 3 Press the button 6 When the confirmation message appears select YES then press the joystick Only when SELECT is selected in step 3 To continue deleting other scenes Repeat steps 4 6 To complete editing Press the MENU button Deleting scenes on a playlist will not increase the remaining capacity for recording The playlist itself is deleted if you delete all the scen...

Page 193: ...d Rotate the mode dial to select 1 Press the button during playback 2 When the confirmation message appears select YES then press the joystick Deleting still pictures This is for deleting still picture files recorded on SD cards Deleting files one at a time LSQT1049 ENG book 193 ページ 2005年12月20日 火曜日 午後6時45分 ...

Page 194: ...onfirmation message appears select YES then press the joystick Only when SELECT is selected in step 1 To continue deleting other files Repeat steps 2 4 To complete editing Press the MENU button Deleting still picture files recorded on an SD card by other products A still picture file other than JPEG that cannot be played back on this unit may be erased In case of ALL the deletion may take time if ...

Page 195: ...elect 1 Press the MENU button then select PLAY SETUP LOCK YES and press the joystick 2 Select the file to be protected then press the joystick display appears and the selected file is locked Press the joystick again to release the lock setting To lock other files repeat step 2 To complete the settings Press the MENU button Locking still pictures This is for preventing still picture files from bein...

Page 196: ... set other files repeat steps 2 3 To complete the settings Press the MENU button To cancel all DPOF settings Press the MENU button then select PLAY SETUP DPOF SET CANCEL ALL and press the joystick When the confirmation message appears select YES then press the joystick What is DPOF DPOF stands for Digital Print Order Format This enables picture printing information to be written onto an SD card so...

Page 197: ...ge appears select YES then press the joystick When formatting is complete press the MENU button to exit the message screen During formatting do not turn this unit off When you format the disc use a battery with sufficient battery power or the AC adaptor In the case of a double sided disc format each side It may not be possible to format a disc with many scratches or dirt Such discs cannot be used ...

Page 198: ...matting is complete press the MENU button to exit the message screen During formatting do not turn this unit off When you format the SD card use a battery with sufficient battery power or the AC adaptor Use this unit to format SD cards If an SD card is formatted on other products such as a computer the time spent for recording may become longer and you may not be able to use the SD card Depending ...

Page 199: ...is shaken strongly or impacted while finalizing the finalization will fail and the disc may become unplayable on other devices If the power supply stops while finalizing the finalization will fail and the disc may become unplayable on other devices even if disc repair is carried out Finalizing a disc This is for enabling discs to be played on other devices Finalizing video format discs Be sure to ...

Page 200: ...ss the MENU button to exit the message screen When you un finalize the disc use a battery with sufficient battery power or the AC adaptor DVD RW VR format cannot be un finalized DVD RW VR format after finalization can be recorded and edited in the same way as DVD RW VR format before finalization DVD R cannot be un finalized Un finalizing a DVD RW This is for un finalizing a DVD RW Video format so ...

Page 201: ...TUP DISC PROTECT and press the joystick 2 When the confirmation message appears select YES then press the joystick To release disc protection 1 Press the MENU button then select SETUP DISC PROTECT and press the joystick 2 When the confirmation message appears select YES then press the joystick If the disc has been protected on another device it may not be possible to release the protection on this...

Page 202: ...s the number of recorded scenes the remaining space and whether or not the disc is finalized or protected is displayed Rotate the mode dial to select Press the MENU button then select SETUP INFORMATION YES and press the joystick To exit the information screen Press the MENU button LSQT1049 ENG book 202 ページ 2005年12月20日 火曜日 午後6時45分 ...

Page 203: ...nel set will differ depending on the terminal to which the unit is connected 4 Start playback on this unit The image and audio are output on the TV If the image or audio from this unit is not output on the TV Check that the plugs are inserted as far as they go Check the connected terminal Check the TV s input setting input switch For more information please read the operating instructions for the ...

Page 204: ...s unit l 199 You cannot record images that allow One time only recording on a 8cm disc RW V R 1 Finalize the disc on this unit l 199 2 Insert the disc in the DVD recorder player then play it back Do not insert a disc that has not been finalized into a DVD recorde player the disc may be unusable Also a message asking you to format the disc may appear on the DVD recorder Do not format the disc Playb...

Page 205: ...e unit l 199 2 Insert the disc in the DVD recorder then dub the contents onto the hard disk For details on how to dub the images onto the hard disk refer to the operating instructions of the DVD recorder DVD RW VR format may have to be finalized In this case finalize the disc on this unit l 199 You cannot record images that allow One time only recording on a 8cm disc If your DVD recorder has an SD...

Page 206: ...g into it This allows you to enjoy more beautiful pictures 2 Turn on this unit then rotate the mode dial to select 3 Change the input channel on the video device and TV The channel set will differ depending on the terminal to which the unit is connected 4 Start playback on this unit Then start recording on the connected device See the operating instructions of the video device for details To stop ...

Page 207: ...d then rotate the mode dial to select 1 Press the MENU button then select SETUP USB FUNCTION PictBridge and press the joystick Press the MENU button to exit the menu screen 2 Connect this unit and a printer indication appears If the indication does not appear or continues to flash disconnect and then reconnect the USB cable or check the printer SD card and settings on this unit 3 Select a file to ...

Page 208: ...t in succession by repeating steps 3 and 4 5 Press the MENU button to display the PictBridge menus 6 Select the date print setting on DATE PRINT If the printer is not capable of date printing this setting is unavailable 7 Select the paper size setting on PAPER SIZE You cannot set paper sizes not supported on the printer STANDARD Size specific to the printer 4t5 INCH L size 5t7 INCH 2L size 4t6 INC...

Page 209: ...rns to step 3 If NO is selected all the settings are kept and the screen returns to step 3 Avoid the following operations during printing These operations disable proper printing Disconnecting the USB cable Removing the SD card Switching the mode dial Turning off the power Check the settings for the paper size quality of print etc on the printer You cannot print pictures that cannot be played on t...

Page 210: ...l 158 SETUP DISPLAY l 212 DATE TIME l 149 DATE FORMAT l 149 POWER SAVE l 212 BEEP SOUND l 212 LCD SET l 150 EVF SET l 150 INITIAL SET l 212 DEMO MODE l 212 LANGUAGE l 145 Still picture recording menus For SETUP items refer to the motion picture recording menus BASIC SCENE MODE l 169 PICT QUALITY l 156 CLOCK SET l 148 ADVANCED SHTR EFFECT l 156 LANGUAGE l 145 Menu list EVF DEMO LSQT1049 ENG book 21...

Page 211: ...90 DELETE l 191 SETUP FORMAT DISC l 197 FINALIZE l 199 UN FINALIZE l 200 DISC PROTECT l 201 INFORMATION l 202 DISPLAY l 212 DATE l 176 DATE FORMAT l 149 POWER SAVE l 212 BEEP SOUND l 212 LCD SET l 150 EVF SET l 150 LANGUAGE l 145 Still picture playback menus DELETE SELECT l 194 ALL l 194 PLAY SETUP PLAY MODE l 179 LOCK l 195 DPOF SET l 196 SETUP DISPLAY l 212 DATE TIME l 149 DATE FORMAT l 149 FORM...

Page 212: ...ting Check the sentence displayed on the screen l 215 INITIAL SET YES NO When there is a menu that cannot be selected depending on a combination of functions set to YES for changing the menu settings back to the initial shipping condition Language setting cannot be back to the initial shipping condition DEMO MODE OFF ON This item is used to start the unit demonstration Only when using the AC adapt...

Page 213: ...2 0 F number 0dB Gain value Soft skin mode Fade White Fade Black Night view function Zoom microphone Wind noise reduction Motion picture recording mode AUTO MNL ZOOM XP SP LP 5 Sports mode Portrait mode Low light mode Spotlight mode Surf snow mode Auto white balance Indoor mode recording under incandescent lamp Outdoor mode Manual adjustment mode Disc type DVD RAM DVD RW VR format DVD RW Video for...

Page 214: ...tures Number of recording pixels for still pictures 640k480 For pictures not recorded with this unit the size display is determined as follows according to the number of horizontal pixels If this number is 2048 1920 1280 or 640 then or will be displayed respectively regardless of the number of vertical pixels 2048 pixels or more 1600 or more less than 2048 pixels 1280 or more less than 1600 pixels...

Page 215: ...RD THIS DISC IS FINALIZED A finalized DVD RW Video format or DVD R has been inserted After finalizing the discs become play only and cannot record If you un finalize a DVD RW Video format it can be used for recording l 200 CANNOT RECORD DISC IS FULL The disc is full or the number of scenes has reached the maximum limit so no further data can be recorded Delete unnecessary scenes l 180 or insert a ...

Page 216: ... device This may cause the loss of data or the disc CHECK CARD This card is not compatible or it cannot be recognized by the unit CARD LOCKED The write protection switch on the SD Memory Card is set to LOCK l 130 CARD FULL The SD card is full so no further data can be recorded Delete unnecessary files l 193 or insert a new SD card PUSH THE RESET SWITCH An irregularity in the unit has been detected...

Page 217: ...rding mode Backlight compensation When the Night view function is used When the iris gain is set Night view In card recording mode Image stabilizer When the Night view function is used In card recording mode Functions Conditions which disable the functions Scene mode When setting the AUTO MANUAL FOCUS switch to AUTO When the Night view function is used Change of white balance When digital zoom 30k...

Page 218: ...to the other The recording time indicated on the disc package is the total time for both sides You will need to eject the disc and turn it over to record on both sides Can DVD R only be recorded to once only Recording can be started and stopped until the disc is full However the data recorded on the DVD R cannot be erased Is playback possible on a DVD player By finalizing a DVD RW Video format or ...

Page 219: ...n cold places the operating time of the battery becomes shorter Has the battery worn out The battery has a limited life If the operating time is still too short even after the battery is fully charged the battery has worn out and can no longer be used This unit cannot be operated though powered up This unit does not operate normally Press the RESET button l 222 If normal conditions are not restore...

Page 220: ...lizing the discs become play only and cannot record If you un finalize a DVD RW Video format it can be used for recording l 200 Has the SD card s write protect switch been set to LOCK No recording is possible while the write protect switch is set to LOCK l 130 Is the memory of the disc or card full If the disc or card has no more available memory free up some memory by deleting unnecessary scenes ...

Page 221: ...ideo input on the TV Please read the operating instructions of your TV and select the channel that matches the input used for the connection Scenes cannot be deleted or edited Is the DVD RAM or the DVD RW VR format write protected Release the protection l 201 If the disc or the contents on the disc have been protected on another device release the protection on the same device It may not be possib...

Page 222: ...is frozen No operation can be performed Turn off the power to this unit If the power cannot be turned off press the RESET button or remove the battery or AC adaptor and then reattach it After that turn on the power again If normal operation is still not restored detach the power connected and consult the dealer who you purchased this unit from PUSH THE RESET SWITCH is displayed The unit has automa...

Page 223: ...with them Do not extend the cords and the cables Do not spray insecticides or volatile chemicals onto the unit If the unit is sprayed with such chemicals its body may be marred and the surface finish may peel off Do not leave rubber or plastic products in contact with the unit for a long time When you use the unit in a sandy or dusty place such as a beach do not let sand or fine dust get into the ...

Page 224: ...le to use the battery even after it is charged Prepare spare batteries when going out for recording In cold places such as a ski resort the period during which you can record pictures is shortened When you travel do not forget to bring an AC adaptor supplied so that you can recharge the batteries at your destination If you drop the battery accidentally check to see if the terminals are damaged Att...

Page 225: ... dealer When the lamp is off Charging is completed When the lamp is off but charging is not completed trouble may have occurred in the AC adaptor or the battery Contact your dealer If there is dust a scratch or dirt on disc or if it is warped the following phenomena may occur Block noise in playback image Momentary stop of playback image Sound interrupted during playback or abnormal sound Thumbnai...

Page 226: ...room has been warmed up quickly When cool wind from an air conditioner is directly blown onto this unit After summer afternoon showers of rain When this unit is in a very humid place where the air is thick with steam e g a heated swimming pool When this unit is taken to a location with a significant temperature difference such as from a cold place to a hot place If for example you have used this u...

Page 227: ...of the effective range of automatic white balance adjustment the image will become reddish or bluish Even within the effective range of automatic white balance adjustment the automatic white balance adjustment may not function properly if there is more than one light source For light outside the functional automatic white balance adjustment range use the manual white balance adjustment mode White ...

Page 228: ...rly when recording something on the opposite side of a road with heavy traffic a vehicle that happens to pass by may be brought into focus Recording a subject that is surrounded by objects with glossy surfaces or by highly reflective objects Since whatever is shiny or glistens is brought into focus it is hard to focus on the subject to be recorded The focus may become blurry when recording subject...

Page 229: ... approx 400 K Lens 30k power zoom F1 8 to F3 9 f 1 90 mm to 57 0 mm 35 mm equivalent 35 7 mm to 1072 mm Filter diameter 30 5 mm Zoom 30k optical zoom 50 1000k digital zoom Monitor 2 5z LCD monitor approx 105 K pixels Viewfinder Colour electric viewfinder approx 123 K pixels Microphone Stereo with a zoom function Speaker 1 round speaker 20 mm Standard illumination 1 400 lx Minimum required illumina...

Page 230: ...X SPEED 2X 1X 8 cm DVD R for General Ver 2 0 Compression MPEG2 Recording mode and transfer rate XP 9 Mbps VBR SP 5 Mbps VBR LP 2 5 Mbps VBR Audio compression Dolby Digital Dolby AC3 16 bit 48 kHz 2 ch Recording media SD Memory Card 8 MB 16 MB 32 MB 64 MB 128 MB 256 MB 512 MB 1 GB 2 GB Maximum Compression JPEG Design rule for Camera File system based on Exif 2 2 standard DPOF corresponding Picture ...

Page 231: ...being recorded The numbers shown in the table are approximations Number of recordable pictures on an SD card Picture size 640k480 Picture quality 8 MB 42 86 16 MB 97 195 32 MB 210 420 64 MB 430 870 128 MB 820 1650 256 MB 1710 3430 512 MB 3400 6790 1 GB 6800 13600 2 GB 13830 27660 LSQT1049 ENG book 231 ページ 2005年12月20日 火曜日 午後6時45分 ...

Page 232: ...Backcover LSQT1049 A F1205Kz0 6000 A C Matsushita Electric Industrial Co Ltd Web site http www panasonic co jp global LSQT1049 ENG book 232 ページ 2005年12月20日 火曜日 午後6時45分 ...

Reviews: