English
13
[HDMI Auto Setting] (Setup Menu)
Reproduces the image more precisely with the
expanded colour gamut when connecting the 4K
compatible equipment. Select the mode depending on
the equipment.
[Mode1]:
For better compatibility. Set to [Mode1] when the
image or sound in HDMI input is not played properly.
[Mode2]:
For the 4K compatible equipment that has the
function to output the image precisely with the
expanded colour gamut
To change the mode
1. Select the HDMI input mode connected to the
equipment.
2. Display the menu and select [HDMI Auto Setting]
(Setup Menu).
For information about the valid format, refer to
[eHELP] (Watching > 4K resolution > HDMI Auto
Setting).
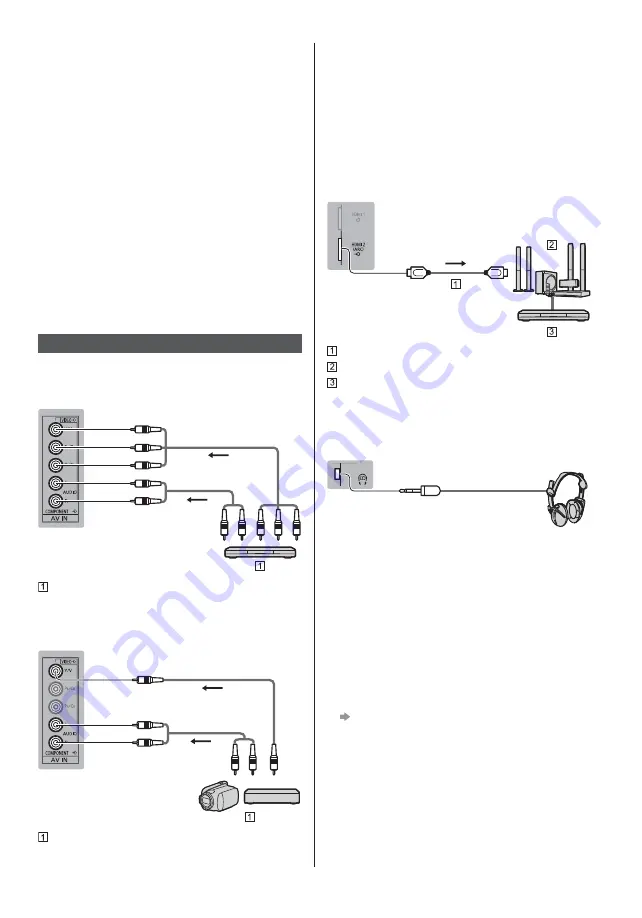
Other connections
DVD Player
(COMPONENT equipment)
TV
(Listening)
(Viewing)
DVD Player
Camcorder / Game equipment
(VIDEO equipment)
TV
(Listening)
(Viewing)
Camcorder / Game equipment
Amplifier
(listening with external speakers)
Use HDMI2 to connect the TV to an amplifier which
has ARC (Audio Return Channel) function.
If connecting to an amplifier without ARC function,
use DIGITAL AUDIO.
To enjoy multi-channel sound from external
equipment (e.g. Dolby Digital 5.1ch), connect the
equipment to the amplifier. For information about the
connections, read the manuals of the equipment and
amplifier.
TV
HDMI cable
Amplifier with speaker system
External equipment (DVD Player, etc.)
Headphones
For information about the volume settings, refer to
[eHELP] (Settings > Sound).
TV
(M3 stereo mini plug)
Common Interface
Turn the TV off with Mains Power On / Off switch
whenever inserting or removing the CI module.
If a smart card and a CI module come as a set, first
insert the CI module, then insert the smart card into
the CI module.
Insert or remove the CI module completely in the
correct direction as shown.
Normally encrypted channels will appear. (Viewable
channels and their features depend on the CI
module.)
If encrypted channels do not appear
[Common Interface] in the Setup Menu
There might be some CI modules in the market
with older firmware versions that do not work fully
interoperable with this new CI+ v1.3 TV. In this case,
please contact your content provider.
For details, refer to [eHELP] (Functions > Common
Interface), read the manual of the CI module, or
check with the content provider.
Summary of Contents for TX50DX800E
Page 61: ...Manual de utilizare TV LED ª ...
Page 62: ... 2 Cuprins 3 4 7 J 9 16 19 Utilizarea televizorului dvs VIERA 20 20 21 Altele 22 23 24 _ J ...
Page 63: ... 3 J _ J J ª _ __ ...
Page 64: ... 4 J J J J J J J J J J ...
Page 65: ... 5 J deschise J _ J _ _ _ _ _ _ _ J 10 10 10 10 J ...
Page 66: ... 6 J J J J J J _ suport tactil J J J J J J _ J J ...
Page 68: ... J _ J ...
Page 69: ... 9 J J 7 2 3 4 5 6 8 9 10 11 12 13 1 _ _ J J J _ ...
Page 70: ... _ J J _ J ...
Page 71: ... _ J _ _ _ J _ _ _ _ J ...
Page 72: ... J _ _ _ ...
Page 73: ... J J J _ J J J J J ...
Page 74: ... Modul CI _ VIERA Link J _ _ ª µ J ...
Page 75: ... J J J _ ...
Page 77: ... 17 J J J 1 _ 7 Butoane colorate 8 Microfon _ 11 HOME 12 Revenire _ 14 APPS ...
Page 78: ... 18 4 1 2 3 5 6 7 3 LED de alimentare Verde Portocaliu _ OK 5 6 _ ...
Page 79: ... 19 _ J 1 2 J J J J J J J J J J ª _ J J J ...
Page 80: ... 20 Vizionarea 1 2 Selectare TV _ _ _ _ 3 J Modul de utilizare eAJUTOR J 1 eAJUTOR 2 ...
Page 81: ... 21 3D _ 1 J 2 _ J _ J ...
Page 82: ... 22 Bateriile sunt introduse corect J J J _ J J J J J ª _ J J ...
Page 83: ... º _ _ J J J J J º ...
Page 85: ... 25 _ J J J Z Z Z _ J J _ ...
Page 86: ... _ J J J C 2 J B A B A _ J J ...
Page 87: ... 4 J J D J J J 5 J º J J J J J ...
Page 88: ... 1 F E 2 2 G 3 4 ...
Page 90: ......
Page 91: ......
Page 92: ... J J J Web Site http www panasonic com Panasonic Corporation 2016 TQB0E2644N ...


