background image

&@

Œ

&š#š"J £# š

…œœ šš}

Jšš š›?¬{‚ šš  œ
œ&š}  š_›

&

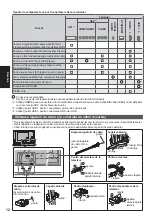
*;!%!_%

†š£# £š

2

Œ

&› £ ›

Œƒ
Œ

&›#$… š*œ# š š

$* ?œ

}#_# š›› š !›

Π
Œ

Ÿ›› š_ ›# š  #›}”Š
 ¤¤¤¤¡ #

|<%% $


@

=&š#šœ››š  

$!š†JŠ{&*
… ›{#šš?  „ ›$"*$" *

$&š›†JŠ{!*
Ÿ_ ›$`#›š*$†›*$…*
†š$…*  š  _›$`#›š*$†›* ›
# š #_£

—"%<+=;!

&›$… *› › 

**%#

3

Œ%=%

&š ›$=*!› › £
 ›_ ›#š$=*
=?@$&=*

=?@$="J*

$=* £#  £  š
%=

Œ`~_;!"$

†š_#››_ _`› ›

ƒ;

"##œ£ ?š›¢š$&<
*"  š$…#*

"##œ£ ›š  ?š
›¤š$œ › *"  š$…#*

}


Œ`Œ#

}š "J £ 


"<`Œ#

}› š


*%`Œ#

Summary of Contents for TX-P60ZT60E

Page 1: ...rantee Card if you need to contact your local Panasonic dealer for assistance English Nederlands For more detailed instructions refer to eHELP Built in Operating Instructions How to use eHELP p 18 Contents Be Sure to Read Important Notice 2 Safety Precautions 3 Quick Start Guide Accessories 6 Connections 8 Identifying Controls 13 First time Auto Setup 16 Using your VIERA Operations 17 How to Use e...

Page 2: ... of DVB C services with this TV This TV may not work correctly with the signal which does not meet the standards of DVB T T2 DVB C or DVB S Not all the features are available depending on the country area broadcaster service provider satellite and network environment Not all CI modules work properly with this TV Consult your service provider about the available CI module This TV may not work corre...

Page 3: ...ent Panasonic has no authority to and does not grant you that permission and explicitly disclaims any right ability or intention to obtain such permission on your behalf It is your responsibility to ensure that your use of this or any other device complies with applicable copyright legislation in your country Please refer to that legislation for more information on the relevant laws and regulation...

Page 4: ...d Controller in any way Built in wireless LAN Caution Do not use the built in wireless LAN to connect to any wireless network SSID for which you do not have usage rights Such networks may be listed as a result of searches However using them may be regarded as illegal access SSID is a name for identifying a particular wireless network for transmission Do not subject the built in wireless LAN to hig...

Page 5: ...ewear Do not use the 3D Eyewear if it is physically damaged If you suffer from any eyesight problems short far sighted astigmatism eyesight differences in left and right ensure that you correct your vision before using the 3D Eyewear The supplied 3D Eyewear can be worn over vision correction glasses Stop using the 3D Eyewear immediately if you experience any redness pain or skin irritation around ...

Page 6: ...rite core for headphones Small size p 11 Use the Ferrite cores to comply with the EMC standard Operating Instructions Pan European Guarantee Card Accessories may not be placed all together Take care not to throw them away unintentionally For the information of optional accessories refer to eHELP Support Optional accessories Installing Removing batteries Remote Control Pull open Hook Note the corre...

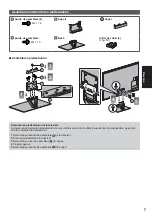
Page 7: ...1 A B E C 2 3 D 4 5 A Removing the pedestal from the TV Be sure to remove the pedestal in the following way when using the wall hanging bracket or repacking the TV 1 Remove the assembly screws from the TV 2 Pull out the pedestal from the TV 3 Remove the assembly screw from the cover 4 Pull out the cover 5 Remove the assembly screws from the bracket ...

Page 8: ... 1 CI slot 1 2 p 11 2 SD Card slot 3 Headphone jack p 11 4 USB 1 3 port 5 HDMI1 3 p 9 11 6 DIGITAL AUDIO 7 AV2 COMPONENT VIDEO p 10 8 AV1 SCART p 9 9 SERVICE PORT This terminal is for special applications used by authorised service dealers 10 Terrestrial cable terminal see below 11 Satellite terminal p 9 12 ETHERNET p 10 Basic connections To ensure your satellite dish or aerial is correctly instal...

Page 9: ...le router Satellite dish DVB S Single tuner TV Satellite cable Satellite dish AV devices DVD Recorder VCR TV DVD Recorder VCR RF cable SCART cable RF cable Terrestrial aerial Cable AV1 SCART adaptor supplied DVD Recorder VCR and Set top box TV Set top box HDMI cable SCART cable SCART cable DVD Recorder VCR Terrestrial aerial RF cable RF Cable AV1 SCART adaptor supplied Cable ...

Page 10: ...the TV p 16 Wired connection TV Internet environment Less than 10 cm LAN cable Unshielded Use the Unshielded Twist Pair UTP LAN cable Ferrite core Large size supplied Installing the Ferrite core Pull back the tabs in two places Wind the cable twice Close Wireless connection Internet environment Access point Built in wireless LAN Other connections DVD player COMPONENT equipment DVD Player Listening...

Page 11: ...multi channel sound e g Dolby Digital 5 1ch connect the equipment to the amplifier For the connections read the manuals of the equipment and amplifier Headphones TV M3 stereo mini plug To adjust volume Headphone Volume in the Sound Menu Less than 10 cm Ferrite core Small size supplied Installing the Ferrite core Pull back the tabs in two places Wind the cable twice Close Common Interface TV CI mod...

Page 12: ...ble when using an amplifier that has ARC Audio Return Channel function 3 Use USB 1 port for connecting the Communication Camera 4 Use USB 3 port for connecting the USB HDD Using the cable tie and cable clamp supplied Do not bundle the Satellite cable RF cable and mains lead together could cause distorted image Fix cables with the cable tie and cable clamp as necessary When using the optional acces...

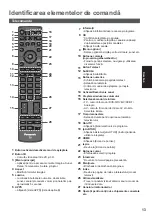
Page 13: ...he selection navigation and operation of various functions 11 Teletext button 12 Subtitles Displays subtitles 13 Numeric buttons Changes channel and teletext pages Sets characters When in Standby mode switches TV on 14 Sound Mute On Off 15 Volume Up Down 16 Input mode selection TV switches to DVB S DVB C DVB T Analogue mode AV switches to AV input mode from Input Selection list 17 Off Timer Sets t...

Page 14: ...Microphone 3 Microphone button 4 Touch pad see below 5 Option Menu 6 HOME Same function of the remote control button 20 p 13 7 Volume Up Down Same function of the remote control button 15 p 13 8 APPS Same function of the remote control button 6 p 13 9 On screen remote control Press to display the remote control GUI Graphical User Interface Press again to move the position of GUI To change the page...

Page 15: ...n menu Move the cursor select from a range of options select the menu item up and down only adjust levels left and right only Access the menu store settings after adjustments have been made or options have been set Return to the previous menu Exit the menu system and return to Home Screen 1 Input mode selection Press repeatedly until you reach the desired mode Main Menu Press and hold for about 3 ...

Page 16: ...uner Single Tuner DVB C Network Settings Normally set Frequency and Network ID to Auto If Auto is not displayed or if necessary enter Frequency and Network ID specified by your cable provider with numeric buttons Register the VIERA Touch Pad Controller to this TV Select Pairing and follow the on screen instructions to use the touch pad controller supplied Confirm the Electronic Touch Pen optional ...

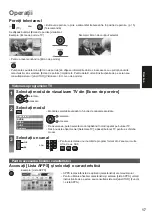
Page 17: ...ower on TV or J _ _ _ _ Watching TV 1 Select the TV viewer from Home Screen 2 Select the mode TV Selection DVB S DVB C DVB T Analogue J J _ J 3 Select a channel or _ To access each feature Access APPS List and select a feature J _ ...

Page 18: ...English 18 How to Use eHELP J_ 1 Display eHELP or Help eHELP J _ 2 Select the category and item ...

Page 19: ...wear with this TV 1 Turn the TV on 2 Press Power button for about 1 second to turn the 3D Eyewear on The lamp lights for about 2 seconds and then flashes The 3D Eyewear will be turned on and start registration Place the 3D Eyewear within 50 cm from the TV while registration in progress 3 After the registration is successfully completed the 3D Eyewear will reconnect with TV automatically when the 3...

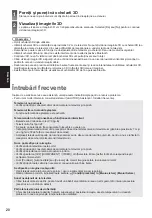
Page 20: ...oes not switch on Check the mains lead is plugged into the TV and the socket outlet The TV goes into Standby mode Auto power standby function is activated The remote control does not work or is intermittent Are the batteries installed correctly p 6 Has the TV been switched on The batteries may be running low Replace them with new ones Point the remote control directly at the TV s remote control si...

Page 21: ...olatile substances This may degrade surface quality or cause peeling of the paint The surface of the display panel is specially treated and may be easily damaged Take care not to tap or scratch the surface with your fingernail or other hard objects Do not allow the cabinet and pedestal to make contact with a rubber or PVC substance for a long time This may degrade surface quality Mains plug Wipe t...

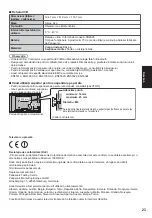
Page 22: ...EO RCA PIN Type 1 1 0 V p p 75 AUDIO L R RCA PIN Type 2 0 5 V rms Y 1 0 V p p including synchronisation PB PR 0 35 V p p HDMI 1 2 3 input TYPE A Connectors HDMI1 3 3D Content Type Deep Colour x v Colour HDMI2 3D Content Type Audio Return Channel Deep Colour x v Colour This TV supports HDAVI Control 5 function Card slot SD Card slot 1 Common Interface slot complies with CI Plus 2 ETHERNET RJ45 IEEE...

Page 23: ...o eHELP Rear of the TV Holes for wall hanging bracket installation 500 mm Depth of screw minimum 14 mm maximum 23 mm Diameter M8 300 mm View from the side Screw for fixing the TV onto the wall hanging bracket not supplied with the TV Plasma Television Declaration of Conformity DoC Hereby Panasonic Corporation declares that this TV is in compliance with the essential requirements and other relevant...

Page 24: ...disposal service or the point of sale where you purchased the items Penalties may be applicable for incorrect disposal of this waste in accordance with national legislation For business users in the European Union If you wish to discard electrical and electronic equipment please contact your dealer or supplier for further information Information on Disposal in other Countries outside the European ...

Page 25: ...elijke Panasonic dealer voor assistentie Nederlands Raadpleeg de eHELP ingebouwde bedieningsinstructies voor gedetailleerde instructies Gebruik van de eHELP p 18 Inhoudsopgave Belangrijke informatie Belangrijke kennisgeving 2 Veiligheidsmaatregelen 3 Quick Start handleiding Accessoires 6 Verbindingen 8 Bedieningsonderdelen 13 Automatisch instellen bij het eerste gebruik 16 Uw VIERA tv gebruiken Be...

Page 26: ...ovider voor de beschikbaarheid van DVB C services met deze tv Deze tv werkt mogelijk niet correct met een signaal dat niet voldoet aan de normen voor DVB T T2 DVB C of DVB S Afhankelijk van het land het gebied de zender de serviceprovider de satelliet en de netwerkomgeving zijn mogelijk niet alle functies beschikbaar Niet alle CI modules werken goed met deze tv Raadpleeg uw serviceprovider over de...

Page 27: ...emming te geven en verleent u deze ook niet en wijst uitdrukkelijk alle rechten mogelijkheden of intenties af om een dergelijke toestemming in uw naam te verkrijgen Het is uw verantwoordelijkheid om ervoor te zorgen dat uw gebruik van dit of elk ander apparaat voldoet aan de toepasselijke wetgeving op auteursrechten in uw land Raadpleeg die wetgeving voor meer informatie over de relevante wetten e...

Page 28: ...il en VIERA touchpadcontroller op geen enkele manier Ingebouwd draadloos LAN Let op Gebruik de ingebouwde draadloze LAN functie niet om toegang de verkrijgen tot een draadloos netwerk SSID waarvoor u geen toegangsrecht hebt Dergelijke netwerken kunnen wel bij de zoekresultaten staan Maar het gebruik van zulke netwerken kan illegaal zijn De SSID is de naam van een draadloos netwerk voor gegevensove...

Page 29: ... in het scharniergedeelte van de 3D bril Gebruik de 3D bril niet als deze beschadigd is Als u gezichtsproblemen hebt bijziend verziend astigmatisme verschil in het gezichtsvermogen links en rechts moet u uw gezichtsvermogen corrigeren voordat u de 3D bril gebruikt De meegeleverde 3D bril kan over een bril voor gezichtscorrectie worden gedragen Stop het gebruik van de 3D bril onmiddellijk als u roo...

Page 30: ...efoon Klein p 11 Gebruik de ferrietkernen om te voldoen aan de EMC norm Gebruiksaanwijzing Europese Garantie De accessoires mogen niet allemaal samen worden geplaatst Zorg dat u ze niet per ongeluk weggooit Raadpleeg de eHELP voor informatie over optionele accessoires Ondersteuning Optionele accessoires De batterijen plaatsen verwijderen Afstandsbediening Opentrekken Haakje Plaats de batterijen op...

Page 31: ... 1 A B E C 2 3 D 4 5 A De standaard van de tv verwijderen Verwijder de standaard op de volgende manier wanneer u de muurbevestigingssteun gebruikt of de tv opnieuw inpakt 1 Verwijder de montageschroeven uit de tv 2 Trek de standaard van de tv 3 Verwijder de montageschroef van het deksel 4 Verwijder het deksel 5 Verwijder de montageschroeven van de steun ...

Page 32: ... 1 3 10 11 12 1 CI sleuf 1 2 p 11 2 SD kaartsleuf 3 Ingang koptelefoon p 11 4 USB poort 1 3 5 HDMI1 3 p 9 11 6 DIGITAL AUDIO 7 AV2 COMPONENT VIDEO p 10 8 AV1 SCART p 9 9 SERVICE PORT Deze aansluiting is bedoeld voor speciale toepassingen die worden gebruikt door erkende servicepunten 10 Aansluiting aardse ingang kabel zie hieronder 11 Satellietaansluiting p 9 12 ETHERNET p 10 Basisaansluitingen Ne...

Page 33: ...et enkele kabel Satellietschotel DVB S Enkele tuner TV Satellietkabel Satellietschotel AV apparaten DVD videorecorder TV DVD videorecorder RF kabel SCART kabel RF kabel Aardse antenne Kabel AV1 SCART adapter meegeleverd DVD videorecorder en set top box TV Set top box HDMI kabel SCART kabel SCART kabel DVD videorecorder Aardse antenne RF kabel RF kabel AV1 SCART adapter meegeleverd Kabel ...

Page 34: ...verbinding TV Internetomgeving Minder dan 10 cm LAN kabel niet afgeschermd Gebruik een niet afgeschermde dubbeldraadse getwist paar LAN kabel UTP Ferrietkern groot formaat meegeleverd De ferrietkern installeren Trek de lipjes achteruit op twee plaatsen Wind de kabel twee keer op Sluiten Draadloze verbinding Internetomgeving Toegangspunt Ingebouwd draadloos LAN Andere verbindingen DVD speler COMPON...

Page 35: ...erne apparaat sluit u het apparaat aan op de versterker Raadpleeg de handleiding van het apparaat en de versterker voor informatie over de aansluiting Hoofdtelefoon M3 stereoministekker Het volume aanpassen Hoofdtel Volume in het menu Geluid Kleiner dan 10 cm TV Ferrietkern klein formaat meegeleverd De ferrietkern installeren Trek de lipjes achteruit op twee plaatsen Wind de kabel twee keer op Slu...

Page 36: ...l 3 Gebruik de USB 1 poort voor verbinding met de communicatiecamera 4 Gebruik de USB 3 poort voor verbinding met de USB HDD De kabelbinder en kabelklem gebruiken meegeleverd Bundel de satellietkabel de RF kabel en het netsnoer niet samen dat kan een vervormd beeld veroorzaken Zet kabels waar nodig met de kabelbinder en kabelklem vast Volg bij gebruik van optionele accessoires de handleiding bij d...

Page 37: ...en ander kanaal of een andere teletekstpagina Tekst invoeren De tv aanzetten vanuit stand by 14 Geluidsuitschakeling aan uit 15 Volume omhoog omlaag 16 Selecteert de ingangsmodus TV Overschakelen tussen DVB S DVB C DVB T analoog AV Overschakelen naar een AV ingangsmodus in de lijst met ingangssignalen 17 Uitschakeltimer Hiermee stelt u in na hoeveel tijd de tv automatisch wordt uitgeschakeld 18 Tv...

Page 38: ... Opties 6 HOME Dezelfde functie als toets 20 van de afstandsbediening p 13 7 Volume omhoog omlaag Dezelfde functie als toets 15 van de afstandsbediening p 13 8 APPS Dezelfde functie als toets 6 van de afstandsbediening p 13 9 Schermafstandsbediening Druk op deze toets om de grafische gebruikersinterface GUI van de afstandsbediening weer te geven Druk opnieuw om de GUI te verplaatsen Schuif met uw ...

Page 39: ... hoofdmenu openen De cursor verplaatsen een optie selecteren een menuonderdeel selecteren alleen omhoog en omlaag het niveau instellen alleen naar links en rechts Het menu openen gewijzigde instellingen of opties opslaan Terugkeren naar het vorige menu Het menusysteem afsluiten en terugkeren naar Beginscherm 1 Selecteert de ingangsmodus Druk zo vaak als nodig om de gewenste stand te selecteren Hoo...

Page 40: ...ewoonlijk stelt u Frequentie en Netwerk ID in op Auto Als Auto niet wordt weergegeven of indien nodig stelt u Frequentie en Netwerk ID met de cijfertoetsen in met de gegevens van uw kabelmaatschappij Registreer de VIERA touchpad controller op de tv Selecteer Koppelen en volg de instructies op het scherm voor het gebruik van de touchpad controller meegeleverd Bevestig het introductiescherm van de e...

Page 41: ... of J J J _ _ _ J Tv kijken 1 Selecteer de tv weergave in Beginscherm 2 Selecteer de stand _ TV keuze DVB S DVB C DVB T Analoog J J _ J 3 Selecteer een kanaal of _ 399 Toegang tot de functies Open APPS lijst en selecteer de gewenste functie J J ...

Page 42: ...Nederlands 18 Gebruik eHELP _ 1 Weergave eHELP of Help eHELP _ J 2 Selecteer de categorie en het onderdeel ...

Page 43: ... 2 Houd de aan uit knop ongeveer 1 seconde ingedrukt om de 3D bril in te schakelen Het lampje brandt 2 seconden en begint daarna te knipperen De 3D bril wordt ingeschakeld en de registratie start Houd de 3D bril tijdens de registratie binnen een afstand van 50 cm van de tv 3 Na de succesvolle registratie wordt altijd automatisch verbinding gemaakt tussen de tv en de 3D bril als deze in de 3D stand...

Page 44: ...gen De tv gaat niet aan Controleer of de stekker van het netsnoer in de tv en in het stopcontact zit De tv schakelt over naar de stand bystand De automatische stand byfunctie is geactiveerd De afstandsbediening werkt niet of slechts af en toe Zijn de batterijen op de juiste manier in de afstandsbediening geplaatst p 6 Is de tv ingeschakeld De batterijen zijn wellicht leeg Vervang deze door nieuwe ...

Page 45: ...de tv in aanraking komen Hierdoor kan de kwaliteit van het oppervlak afnemen of kan de verf afbladderen Het scherm is behandeld en voorzien van een gevoelige oppervlaktelaag Tik en kras niet op het oppervlak met uw vingernagel of een hard voorwerp Zorg dat de behuizing en de standaard niet gedurende langere tijd in contact zijn met rubber of pvc Hierdoor kan de kwaliteit van het oppervlak afnemen ...

Page 46: ...ype 1 1 0 V p p 75 AUDIO L R RCA PIN type 2 0 5 V rms Y 1 0 V p p inclusief synchronisatie PB PR 0 35 V p p HDMI 1 2 3 ingang TYPE A aansluitingen HDMI1 3 3D Content type Deep Colour x v Colour HDMI2 3D Content type Audio Return Channel Deep Colour x v Colour De tv ondersteunt HDAVI Control 5 functionaliteit Kaartsleuf SD kaartsleuf 1 CI sleuf conform CI Plus 2 ETHERNET RJ45 IEEE802 3 10BASE T 100...

Page 47: ...entiële eisen en andere relevante bepalingen van de Richtlijn 1999 5 EG Bezoek de volgende website als u een kopie wenst van de oorspronkelijk eenvormigheidsverklaring van deze tv http www doc panasonic de Bevoegde vertegenwoordiger Panasonic Testing Centre Panasonic Marketing Europe GmbH Winsbergring 15 22525 Hamburg Germany Deze tv is bedoeld voor gebruik in de volgende landen Albanië Andorra Be...

Page 48: ...erwijderingsdiensten of de winkel waar u de goederen gekocht hebt Voor een niet correcte verwijdering van dit afval kunnen boetes opgelegd worden in overeenstemming met de nationale wetgeving Voor zakengebruikers in de Europese Unie Indien u elektrische en elektronische uitrusting wilt vewijderen neem dan contact op met uw dealer voor meer informatie Informatie over de verwijdering in andere lande...

Page 49: ...Manual de utilizare J J J 2 3 6 8 13 16 17 18 J 19 Altele 20 21 21 J J ...

Page 50: ... 2 _ _ _ _ _ _ J _ J J _ J J J J J J J J _ J J _ _ _ _ _ J J _ ...

Page 51: ... 3 _ _ _ _ _ _ _ _ Pentru a preveni _ J _ J J J J J J _ _ _ _ _ _ J J_ ...

Page 52: ... 4 _ _ _ _ _ J _ J J _ J _ J_ J J _ J _ _ _ _ _ _ _ _ _ _ _ J _ J _ _ J _ J _ _ _ _ _ 10 10 10 7 J _ _ ...

Page 53: ... 5 Mutarea televizorului _ _ _ _ _ _ _ _ _ _ _ _ _ _ _ _ _ _ _ _ _ _ _ _ _ _ _ J _ ª _ _ _ _ ...

Page 54: ... 6 J J _ Manual de utilizare _ ...

Page 55: ... 1 A B E C 2 3 D 4 5 A 2 3 4 5 ...

Page 56: ... _ _ J _ _ Terminale 4 6 5 2 3 J 2 3 4 5 6 J J J _ _ _ _ cleme la televizor cleme J ...

Page 57: ... Televizor Televizor Televizor Televizor J _ Televizor J ...

Page 58: ... J J _ Televizor _ Televizor J J J J Televizor J J J ...

Page 59: ... Televizor _ _ _ _ _ Televizor Televizor Modul IO _ ...

Page 60: ... Terminal 1 1 J J J J 2 3 J _ _ _ _ _ televizor _ televizor ...

Page 61: ... _ 2 3 _ _ _ _ 4 5 Lumina _ _ _ 6 OK _ _ J _ _ _ _ J J J J J J eAJUTOR 20 _ 22 23 24 25 26 Ultima vizualizare 23 25 26 2 5 22 3 J 4 6 20 24 ...

Page 62: ... _ _ _ _ _ _ J 2 J 5 3 4 6 _ 2 3 4 5 6 _ _ J OK J _ _ _ ...

Page 63: ... _ Ghid de utilizare 1 2 0 0 11 0 J _ OK 2 3 4 5 6 _ _ _ _ 3 4 2 5 6 ...

Page 64: ... J J _ _ 2 _ _ J J _ _ _ 3 _ J _ _ _ _ J ...

Page 65: ... 17 TV sau J _ _ _ J 1 2 DVB S DVB C _ J J _ J 3 sus jos sau _ _ _ ...

Page 66: ... 18 J 1 _ sau J _ _ 2 _ ...

Page 67: ... 19 Vizionarea imaginilor 3D _ 3D Accesorii p 6 _ _ redate alternativ Ochelari 3D _ _ 3D Prima înregistrare 1 2 A _ 3 _ 1 2 _ _ 3 _ _ _ _ J J _ Imagini 2D convertite în 3D ...

Page 68: ... 20 1 _ 2 _ _ _ _ _ _ _ _ J _ p 6 _ _ J J J J J J _ J _ _ _ _ _ _ _ ...

Page 69: ... 21 _ _ _ _ _ _ _ _ J Date tehnice Televizor J J _ _ J_ µ µ _ _ _ _ J ...

Page 70: ... 22 J J J J J J J J J J J J J J J Conectori _ _ _ Intrare AV2 VIDEO VIDEO _ J _ J Y _ J P R _ J _ _ _ _ _ _ _ J _ J_ J_ _ AUDIO _ LAN wireless integrat _ _ _ _ _ _ _ _ _ _ _ _ _ J ...

Page 71: ... 23 Ochelari 3D _ _ _ µ µ _ _ J _ _ _ _ _ _ _ _ _ _ J _ _ _ _ _ _ _ _ _ _ _ _ _ _ _ _ _ _ _ _ _ _ _ _ _ _ _ _ _ _ _ _ _ _ _ _ ...

Page 72: ... Web Site http panasonic net Panasonic Corporation 2013 _ _ _ _ _ _ _ _ _ _ _ _ _ _ _ _ _ _ _ _ _ ...

Reviews: