Panasonic TX-P42ST60B Operating Instructions Manual Download Page 15

15

 Using the On Screen Displays 

- Operation guide

 Many features available on this TV can be accessed via the On Screen Display menu.


 Operation guide

 Operation guide will help your operation by using the 
remote control.
 Example: [Sound Menu]


1/2

0
0

0

11

0

 Mode

 Standard

 Bass
 Treble
 Equaliser

 Headphone Volume

 Surround

 Auto Gain Control
 Volume Correction

 Off

 Off


 Main Menu

 Picture

 Sound

 Network

 Timer

 Setup

 Select

 Selects your favourite sound 
mode.

 Page up

 Change

 RETURN

 Page down

 Operation guide

Select

Selects your favourite sound 
mode.

Page up

Change

RETURN

Page down

 Balance

 Help

 Bass Boost

 Off


 How to use remote control


 Open the main menu


 Move the cursor / select from a range of options / 
select the menu item (up and down only) / adjust 
levels (left and right only)


 Access the menu / store settings after adjustments 
have been made or options have been set


 Return to the previous menu


 Exit the menu system and return to [Home Screen]

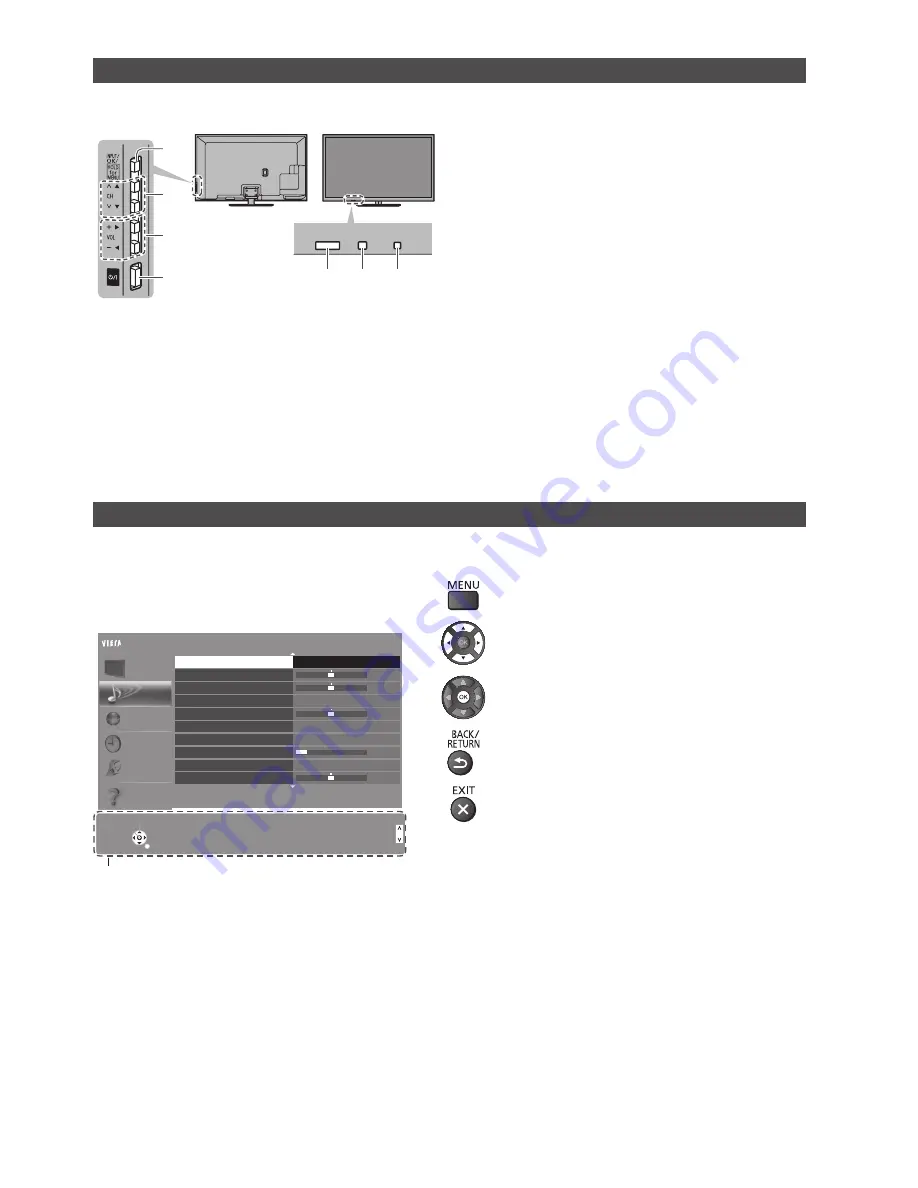
 Indicator / Control panel


 When pressing 1, 2, 3 buttons, the control panel guide appears on the right side of the screen for 3 seconds to 
highlight the pressed button.

 1

 Input mode selection


 Press repeatedly until you reach the desired 
mode.

 [Main Menu]


 Press and hold for about 3 seconds to display 
main menu.

 OK

 (when in the menu system)

 2

 Channel Up / Down
 Cursor Up / Down (when in the menu system)

 3

 Volume Up / Down
 Cursor Left / Right (when in the menu system)

 4

  Mains power On / Off switch


 Use to switch the mains power.

 5

  Remote control signal receiver


 Do not place any objects between the TV remote 
control signal receiver and remote control.

 6

 Ambient sensor


 Senses brightness to adjust picture quality when 
[Ambient Sensor] in the Picture Menu is set to 
[On].

 7

 Power LED

 Red:

 Standby

 Green:

 On


 The LED blinks when the TV receives a command 
from the remote control.

 Rear side of the TV

 3

 1

 4

 2

 5

 6

 7

Summary of Contents for TX-P42ST60B

Page 1: ...Read Important Notice 2 Safety Precautions 3 Quick Start Guide Accessories 6 Connections 8 Identifying Controls 13 First time Auto Setup 16 Using your VIERA Operations 17 How to Use eHELP 18 Viewing 3...

Page 2: ...mage arising from operation and or performance from usage of such other maker s peripheral devices This product is licensed under the AVC patent portfolio license for the personal and non commercial u...

Page 3: ...liquid such as vases must not be placed on top of or above the TV Do not insert foreign objects into the TV through the air vents Do not use an unapproved pedestal mounting equipment Be sure to ask y...

Page 4: ...o not disassemble or alter the TV 3D Eyewear and Electronic Touch Pen in any way Built in wireless LAN Caution Do not use the built in wireless LAN to connect to any wireless network SSID for which yo...

Page 5: ...Pen in a cool and dry place 3D Eyewear Use Caution Use the 3D Eyewear only for the intended purpose and nothing else Do not move around while wearing the 3D Eyewear to avoid falling or accidental inju...

Page 6: ...y with the EMC standard Operating Instructions Production Registration Leaflet Accessories may not be placed all together Take care not to throw them away unintentionally For the information of option...

Page 7: ...is secured should be thick enough and made of hard material Commercially available screw not supplied Diameter 3 mm Length 25 30 mm Removing the pedestal from the TV Be sure to remove the pedestal in...

Page 8: ...may occur or operation of other equipment may be interfered Also read the manual of the equipment being connected Terminals 8 7 9 4 6 5 2 1 3 10 1 CI slot p 11 2 SD Card slot 3 Headphone jack p 11 4 U...

Page 9: ...RT cable RF cable Terrestrial aerial RF cable AV1 SCART adaptor supplied DVD Recorder VCR and Set top box TV Satellite receiver HDMI cable SCART cable SCART cable RF cable DVD Recorder VCR Terrestrial...

Page 10: ...ess connection Setup of the network connection will start when first using the TV p 16 Wired connection TV Internet environment Less than 10 cm LAN cable Unshielded Use the Unshielded Twist Pair UTP L...

Page 11: ...njoy the sound from the external equipment in multi channel sound e g Dolby Digital 5 1ch connect the equipment to the amplifier For the connections read the manuals of the equipment and amplifier Hea...

Page 12: ...he equipment the SCART adaptor supplied is necessary 2 Use HDMI2 for connecting an amplifier This connection is applicable when using an amplifier that has ARC Audio Return Channel function 3 Use USB...

Page 13: ...tion of various functions 10 Volume Up Down 11 Numeric buttons Changes channel and teletext pages Sets characters When in Standby mode switches TV on 12 eHELP Displays eHELP Built in Operating Instruc...

Page 14: ...tip on this side of the Electronic Touch Pen against the TV screen for use 1 Power button To turn on Press once To turn off Press and hold 2 seconds or longer Automatically turned off if unused for 5...

Page 15: ...ments have been made or options have been set Return to the previous menu Exit the menu system and return to Home Screen Indicator Control panel When pressing 1 2 3 buttons the control panel guide app...

Page 16: ...elect your country Select your region Pair the Electronic Touch Pen 3 Select the type of Home Screen The demonstration to explain how to use my Home Screen is displayed Confirm the demonstration by fo...

Page 17: ...efault Home Screen etc For details follow the on screen instructions or refer to eHELP Watching my Home Screen Watching TV 1 Select the TV viewer from Home Screen select access 2 Select DVB or Analogu...

Page 18: ...tion in eHELP If this is not the first time to view eHELP from when the TV is turned on the confirmation screen is displayed to select whether First Page or Last Page 2 Select the category and item Ca...

Page 19: ...with this TV 1 Turn the TV on 2 Press the button for about 1 second to turn the 3D Eyewear on The lamp lights for about 2 seconds and then flashes The 3D Eyewear will be turned on and start registrat...

Page 20: ...eplace it with one of an identical rating p 3 The TV goes into Standby mode Auto power standby function is activated The remote control does not work or is intermittent Are the batteries installed cor...

Page 21: ...of the display panel cabinet or pedestal by using a soft cloth to clean the dirt or fingerprints For stubborn dirt First clean the dust on the surface Dampen a soft cloth with clean water or diluted...

Page 22: ...1 68 PAL 525 60 Playback of NTSC tape from some PAL Video recorders VCR or NTSC disc playback from DVD player and recorder M NTSC Playback from M NTSC Video recorders VCR NTSC AV input only Playback f...

Page 23: ...complies with the EMC standards listed below EN55013 EN61000 3 2 EN61000 3 3 EN55020 EN55022 EN55024 When using the wall hanging bracket For the recommended wall hanging bracket refer to eHELP 42 inc...

Page 24: ...orrect method of disposal Note for the battery symbol bottom two symbol examples This symbol might be used in combination with a chemical symbol In this case it complies with the requirement set by th...

Reviews: