background image

English

11

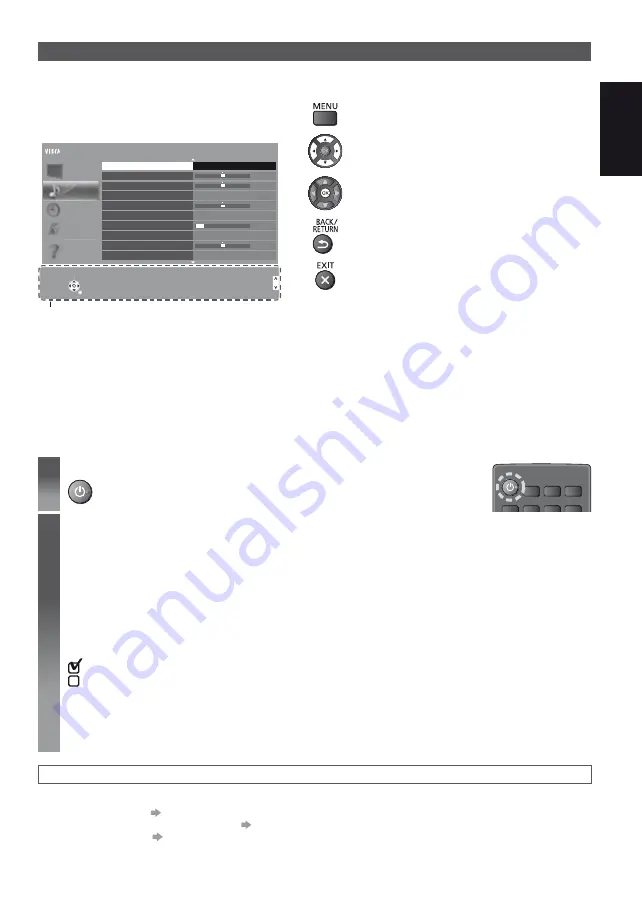
Using the On Screen Displays 

- Operation guide

Many features available on this TV can be accessed via the On Screen Display menu.


Operation guide

Operation guide will help your operation by using the 
remote control.
Example: [Sound Menu]

1/2

0
0

0

11

0

Mode

Standard

Bass
Treble
Equaliser

Headphone Volume

Surround

Auto Gain Control
Volume Correction
Speaker Distance to Wall

Off

Off

Over 30cm

 Main Menu

Picture

Sound

Timer

Setup

Help

Select

Selects your favourite sound 
mode.

Page up

Change

RETURN

Page down

Operation guide

Select

Selects your favourite sound 
mode.

Page up

Change

RETURN

Page down

Balance


How to use remote control

Open the main menu

Move the cursor / select from a range of options / 
select the menu item (up and down only) / adjust 
levels (left and right only)

Access the menu / store settings after adjustments 
have been made or options have been set

Return to the previous menu

Exit the menu system and return to the normal 
viewing screen

First time Auto Setup

Automatically sets up the TV and searches for available TV channels when the TV is turned on for the first time.

These steps are not necessary if the setup has been completed by your local dealer.

Please complete connections (p. 6 - 8) and settings (if necessary) of the connected equipment before starting Auto 
Setup. For details of settings for the connected equipment, read the manual of the equipment.

1

Plug the TV into mains socket and turn power on

Takes a few seconds to be displayed.

2

Select the following items

Set up each item by following the on-screen instructions.

Select the language
Select [Home]

Select [Home] viewing environment to use in your home environment.

[Shop] is for shop display.

To change viewing environment later on, you will need to initialise all settings by accessing Shipping Condition.

Select your country

Depending on the country you select, select your Region or store the Child Lock-PIN number (“0000” cannot 
be stored).

Tick the TV signal mode to tune, and then select [Start Auto Setup]

:  tune (search for the available channels)
:  skip tuning

Auto Setup screen varies depending on the country and the signal mode you select.

[DVB-C Network Settings]
Normally set [Frequency] and [Network ID] to [Auto].
If [Auto] is not displayed or if necessary, enter [Frequency] and [Network ID] specified by your cable provider 
with numeric buttons.

Auto Setup is now complete and your TV is ready for viewing.

If tuning has failed, check the connection of the RF cable, and then follow the on-screen instructions.

To retune all channels 


[Auto Setup] in [Tuning Menu] (Setup Menu)

To add the available TV signal mode later 


[Add TV Signal] in [Tuning Menu] (Setup Menu)

To initialise all settings 


[Shipping Condition] in [System Menu] (Setup Menu)

Summary of Contents for TX-L42B6E

Page 1: ...ontrols 9 First time Auto Setup 11 Using your VIERA Watching TV 12 Using Menu Functions 13 Others Maintenance 13 Specifications 14 English Nederlands For more detailed instructions refer to the Operating Instructions on the CD ROM To view the Operating Instructions on the CD ROM you need a computer equipped with a CD ROM drive and Adobe Reader Version 8 0 or later is recommended installed on your ...

Page 2: ...s granted or shall be implied for any other use Additional information may be obtained from MPEG LA LLC See http www mpegla com ROVI CORPORATION AND OR ITS RELATED AFFILIATES ARE NOT IN ANY WAY LIABLE FOR THE ACCURACY OF THE PROGRAM SCHEDULE INFORMATION PROVIDED BY THE GUIDE PLUS SYSTEM IN NO EVENT SHALL ROVI CORPORATION AND OR ITS RELATED AFFILIATES BE LIABLE FOR ANY AMOUNTS REPRESENTING LOSS OF ...

Page 3: ...ny impact during installation of the pedestal Ensure that children do not climb onto the pedestal Install or remove the TV from the pedestal with at least two people Install or remove the TV by the specified procedure Panasonic does not guarantee operation and performance of peripheral devices made by other manufacturers and we disclaim any liability or damage arising from operation and or perform...

Page 4: ... when the TV is not in use for a prolonged period of time Excessive volume Caution Do not expose your ears to excessive volume from the headphones Irreversible damage can be caused If you hear a drumming noise in your ears turn down the volume or temporarily stop using the headphones Battery for the Remote Control Caution Incorrect installation may cause battery leakage corrosion and explosion Rep...

Page 5: ...ure the base as shown to prevent the TV from falling over Commercially available screw not supplied Diameter 3 mm Length 25 30 mm The place where the base is secured should be thick enough and made of hard material 39 inch model 42 inch model 50 inch model Assembly screw 4 M5 15 Assembly screw 4 M4 12 Bracket Base Assembling the pedestal 1 3 A C D 2 B ...

Page 6: ...T or HDMI cable Keep the TV away from electronic equipment video equipment etc or equipment with an infrared sensor Otherwise distortion of image sound may occur or operation of other equipment may be interfered Also read the manual of the equipment being connected Terminals 7 8 4 6 5 2 1 3 1 CI slot p 8 2 Headphone jack p 8 3 USB port 4 HDMI1 2 p 7 8 5 Terrestrial cable terminal see below 6 AV1 S...

Page 7: ...e DVD Recorder VCR and Set top box TV Set top box HDMI cable SCART cable SCART cable DVD Recorder VCR Terrestrial aerial RF cable RF Cable Cable Other connections DVD player COMPONENT equipment TV DVD Player Listening Viewing Camcorder Game equipment VIDEO equipment TV Viewing Listening Camcorder Game equipment ...

Page 8: ...insert the view card into the card reader Insert the module in the correct direction Features that appear on the screen are dependent on the contents of the selected CI module Normally encrypted channels will appear Follow the on screen instructions If encrypted channel does not appear Common Interface in the Setup Menu For more information read the manual of the CI module or check with the broadc...

Page 9: ...side of the screen for 3 seconds to highlight the pressed button 1 Input mode selection Press repeatedly until you reach the desired mode Main Menu Press and hold for about 3 seconds to display main menu OK when in the menu system 2 Channel Up Down Cursor Up Down when in the menu system 3 Volume Up Down Cursor Left Right when in the menu system 4 Mains power On Off switch Use to switch the mains p...

Page 10: ...e Up Down 10 Numeric buttons Changes channel and teletext pages Sets characters When in Standby mode switches TV on 11 Still Freezes unfreezes the picture 12 Input mode selection TV switches to DVB C DVB T Analogue mode AV switches to AV input mode from Input Selection list 13 TV Guide Displays Electronic Programme Guide 14 Subtitles Displays hides subtitles if available 15 Exit Returns to the nor...

Page 11: ... connected equipment before starting Auto Setup For details of settings for the connected equipment read the manual of the equipment 1 Plug the TV into mains socket and turn power on Takes a few seconds to be displayed 2 Select the following items Set up each item by following the on screen instructions Select the language Select Home Select Home viewing environment to use in your home environment...

Page 12: ...8 BBC Radio Cymru 1 BBC ONE Wales 2 BBC THREE 3 BBCi 4 CBBC Channel All DVB T Channels Z X Note Z_ Aspect Change the aspect ratio image size Auto 16 9 Z 14 9 Z Just X J 4 3 X Zoom Z X 4 3 Full X Sidecut Just Z J Sidecut Zoom Z J Note Information banner Display Information banner 1 ZDF Coronation Street HDTV 20 00 20 55 20 35 45 All DVB T Channels HDTV 2 1 ZDF 1 2 3 6 7 4 5 1 2 3 4 5 6 7 ...

Page 13: ...the slide bar 50 Go to the next screen Enter characters by free input menu A B C D E F G H I J K L M N O P Q R S T U V W X Y Z 0 1 2 3 4 5 6 7 8 9 a b c d e f g h i j k l m n o p q r s t u v w x y z _ User input Maintenance First remove the mains plug from the socket outlet Display panel Cabinet Pedestal Regular care For stubborn dirt Z Z__ Caution Mains plug ...

Page 14: ...only Model No TX L32B6E TX L32B6ES TX L39B6E TX L39B6ES TX L42B6E TX L42B6ES TX L50B6E Sound Speaker 90 mm 25 mm 2 8 100 mm 30 mm 2 8 Audio output 10 W 5 W 5 W 20 W 10 W 10 W Headphones M3 3 5 mm stereo mini Jack 1 Power source AC 220 240 V 50 60 Hz Panel LED LCD panel Operating conditions Temperature 0 C 35 C Humidity 20 80 RH non condensing Connection terminals AV1 input output SCART Audio Video...

Page 15: ...product When using the wall hanging bracket Please contact your local Panasonic dealer to purchase the recommended wall hanging bracket 32 inch model a 200 mm b 100 mm 39 inch model 42 inch model a 200 mm b 200 mm 50 inch model a 400 mm b 400 mm Rear of the TV Holes for wall hanging bracket installation a Depth of screw 32 inch model 39 inch model minimum 10 mm minimum 12 mm maximum 16 mm maximum ...

Page 16: ...ies may be applicable for incorrect disposal of this waste in accordance with national legislation For business users in the European Union If you wish to discard electrical and electronic equipment please contact your dealer or supplier for further information Information on Disposal in other Countries outside the European Union These symbols are only valid in the European Union If you wish to di...

Page 17: ...g 2 Veiligheidsmaatregelen 3 Quick Start handleiding Accessoires 4 Verbindingen 6 Bedieningsonderdelen 9 Automatisch instellen bij het eerste gebruik 11 Uw VIERA tv gebruiken Tv kijken 12 Het gebruik van menufuncties 13 Overige informatie Onderhoud 13 Specificaties 14 Raadpleeg de bedieningsinstructies op de cd rom voor gedetaileerdere instructies Als u de bedieningsinstructies op de cd rom wilt b...

Page 18: ... deze tv Deze TV werkt mogelijk niet correct met een signaal dat niet voldoet aan de normen van DVB T of DVB C Afhankelijk van het land het gebied de zender en de serviceprovider zullen niet alle functies beschikbaar zijn Niet alle CI modules werken goed met deze tv Raadpleeg uw serviceprovider over de beschikbare CI module Deze tv werkt wellicht niet correct met een CI module die niet is goedgeke...

Page 19: ...deren niet op de standaard klimmen Gebruik minstens twee personen om de tv op de standaard te installeren en ervan te verwijderen Installeer en verwijder de tv op de voorgeschreven wijze Panasonic garandeert de werking en prestaties van randapparatuur van derden niet wij wijzen elke vorm van aansprakelijkheid of schade af die voortvloeit uit werking en of prestaties bij gebruik van randapparatuur ...

Page 20: ...tv lange tijd niet wordt gebruikt Hoog geluidsniveau Let op Stel uw gehoor niet bloot aan overmatig hard geluid via de hoofdtelefoon De beschadiging kan onherstelbaar zijn Zet het volume lager of stop met luisteren door de hoofdtelefoon als uw oren suizen Batterij voor de afstandsbediening Let op Batterijen kunnen lekken roesten en exploderen als ze verkeerd geïnstalleerd worden Vervang de batteri...

Page 21: ...wordt aangegeven om te vermijden dat de TV omvalt In de handel verkrijgbare schroef niet meegeleverd Diameter 3 mm Lengte 25 30 mm De plaats waar de steunplaat wordt vastgezet moet voldoende dik zijn en van een hard materiaal gemaakt zijn 39 inch model 42 inch model 50 inch model Montageschroef 4 M5 15 Montageschroef 4 M4 12 Steun Steunplaat De standaard monteren 1 3 A C D 2 B ...

Page 22: ...ledige bedrading Houd de tv uit de buurt van elektronische apparatuur videoapparatuur enz en apparatuur met een infraroodsensor Anders kunnen het beeld en geluid vervormd worden en kan de bediening van andere apparatuur verstoord worden Lees ook de handleiding van het apparaat dat moet worden aangesloten Aansluitingen 7 8 4 6 5 2 1 3 1 CI sleuft p 8 2 Ingang koptelefoon p 8 3 USB poort 4 HDMI1 2 p...

Page 23: ... kabel DVD videorecorder en set top box TV Set top box HDMI kabel SCART kabel SCART kabel DVD videorecorder Aardse antenne RF kabel RF kabel Kabel Andere verbindingen DVD speler COMPONENT apparatuur TV DVD speler Luisteren Kijken Camcorder Spelsysteem VIDEO apparatuur TV Kijken Luisteren Camcorder Spelsysteem ...

Page 24: ...n en vervolgens steekt u de kaart in de kaartlezer Plaats de module in de juiste richting in het apparaat De functies op het scherm zijn afhankelijk van de inhoud van de geselecteerde CI module Gewoonlijk worden gecodeerde kanalen weergegeven Volg de aanwijzingen op het scherm Als het gecodeerde kanaal niet verschijnt Gemeensch Interface in het menu Instellingen Raadpleeg voor meer informatie de h...

Page 25: ...durende 3 seconden rechts op het scherm een hulpaanduiding weergegeven voor de ingedrukte toets 1 Selecteert de ingangsmodus Druk net zo lang totdat u de gewenste modus ziet Hoofdmenu Ongeveer 3 seconden ingedrukt houden om het hoofdmenu weer te geven OK in menu s 2 Kanaal omhoog omlaag Cursor omhoog omlaag in menu s 3 Volume omhoog omlaag Cursor naar links rechts in menu s 4 Hoofdschakelaar Hierm...

Page 26: ...1 Stilstaand beeld Zet het beeld vast en geeft het vrij 12 Selecteert de ingangsmodus TV Overschakelen tussen DVB C DVB T analoog AV Overschakelen naar een AV ingangsmodus in de lijst met ingangssignalen 13 Tv programmagids Opent de elektronische programmagids 14 Ondertitels Ondertitels weergeven verbergen indien beschikbaar 15 Verlaten Terugkeren naar het normale weergavescherm 16 Cursortoetsen V...

Page 27: ...andleiding bij het aangesloten apparaat voor informatie over de instellingen ervan 1 Steek de stekker van de tv in het stopcontact en schakel de tv in Het beeld verschijnt na enkele seconden 2 Selecteer de volgende onderdelen Volg bij ieder onderdeel de aanwijzingen op het scherm Selecteer uw taal Selecteer Thuis Voor gebruik thuis selecteert u de weergaveomgeving Thuis Winkel is bestemd voor demo...

Page 28: ... 2 BBC THREE 3 BBCi 4 CBBC Channel Alle DVB T kanalen Z X Opmerking J J J Beeldverhouding De beeldverhouding beeldgrootte wijzigen Auto J 16 9 Z J 14 9 Z J Juist XJ J 4 3 XJ Zoom Z J XJ 4 3 Volledig XJ J J Sidecut Normaal Z J J J Sidecut Zoom Z Opmerking Informatiebalk De informatiebalk weergeven 1 ZDF Coronation Street HDTV 20 00 20 55 20 35 45 Alle DVB T kanalen HDTV 2 1 ZDF 1 2 3 6 7 4 5 1 J 2 ...

Page 29: ...et volgende scherm gaan Tekst invoeren in een tekstveld A B C D E F G H I J K L M N U V W X Y Z É Ë Ï 0 1 2 3 4 a b c d e f g h i j k l m n u v w x y z é ë ï O P Q R S T 5 6 7 8 9 o p q r s t _ Gebruikersinput Onderhoud Verwijder eerst de stekker van het netsnoer uit het stopcontact Beeldscherm Behuizing Standaard Regelmatig onderhoud Voor hardnekkig vuil Z Z__ Let op Netsnoerstekker Nederlands ...

Page 30: ...n TV Modelnr TX L32B6E TX L32B6ES TX L39B6E TX L39B6ES TX L42B6E TX L42B6ES TX L50B6E Geluid Luidspreker 90 mm 25 mm 2 8 100 mm 30 mm 2 8 Audio uitgang 10 W 5 W 5 W 20 W 10 W 10 W Hoofdtelefoon 3 5 mm M3 stereoministekker 1 Stroomvoorziening 220 240 V wisselstroom 50 60 Hz Paneel Led lcd paneel Bedrijfscondities Temperatuur 0 C 35 C Relatieve vochtigheidsgraad 20 80 RV niet condenserend Aansluitin...

Page 31: ...tact op met uw plaatselijke Panasonic dealer als u de aanbevolen muurbevestigingssteun wilt aanschaffen 32 inch model a 200 mm b 100 mm 39 inch model 42 inch model a 200 mm b 200 mm 50 inch model a 400 mm b 400 mm Achterzijde van de tv Gaten voor installatie met de muurbevestigingssteun a Diepte schroef 32 inch model 39 inch model minimaal 10 mm minimaal 12 mm maximaal 16 mm maximaal 22 mm 42 inch...

Page 32: ...en niet correcte verwijdering van dit afval kunnen boetes opgelegd worden in overeenstemming met de nationale wetgeving Voor zakengebruikers in de Europese Unie Indien u elektrische en elektronische uitrusting wilt vewijderen neem dan contact op met uw dealer voor meer informatie Informatie over de verwijdering in andere landen buiten de Europese Unie Deze symbolen zijn enkel geldig in de Europese...

Page 33: ... L42B6E TX L32B6ES TX L42B6ES TX L39B6E TX L50B6E TX L39B6ES Manual de utilizare Televizor cu ecran LCD J Cuprins 2 3 4 Conexiuni 6 9 11 Utilizarea televizorului dvs VIERA 12 13 Altele 13 14 de utilizare de pe CD ROM Reader ...

Page 34: ... 2 de date _Z J J J J J J J J J LLC ª ª J J J J J X _ X µ µ µ µ _ Z X ...

Page 35: ... 3 J Pentru a preveni Avertisment Piedestal Avertisment J J _ Avertisment _J _ _ _ ude J Avertisment ...

Page 36: ... Z_ Z_ Z_ J Mutarea televizorului Când televizorul nu este utilizat un timp J J J ___ Z R6 Piedestal Model de 32 inci Model de 39 inci Model de 42 inci Model de 50 inci Model de 32 inci Manual de utilizare J ...

Page 37: ... 5 Model de 32 inci _ _ M4 25 Suport 1 A D C 3 2 B J ª X J X_ dur Model de 39 inci Model de 42 inci Model de 50 inci _ M5 15 _ M4 12 Suport 1 3 A C D 2 B ...

Page 38: ... 6 Demontarea piedestalului de la televizor J 1 2 3 Conexiuni J Terminale 7 4 6 5 2 1 3 1 CI slot 2 3 Port USB 4 HDMI1 2 5 6 7 DIGITAL AUDIO _J _ _ _ J ...

Page 39: ... 7 Dispozitive AV Televizor Televizor DVD player Televizor DVD player Televizor ...

Page 40: ... Televizor sistem de difuzoare Z X Televizor Televizor Modul IO Meniul setare Terminal AV1 AV2 DIGITAL AUDIO HDMI 1 2 COMPONENT VIDEO J J ...

Page 41: ... 9 Model de 32 inci J Z X X 1 X OK 2 3 4 5 6 7 LED de alimentare J 3 1 4 2 5 6 7 ...

Page 42: ...13 14 17 19 20 21 2 4 5 16 9 3 6 7 10 12 15 11 10 1 2 VIERA TOOLS PHOTO VIDEO MUSIC ECO NAVIGATION 3 4 Buton Teletext 5 Informatii 6 OK 7 9 10 11 12 J J J J 13 14 15 16 17 19 20 21 Ultima vizualizare Z_ J ...

Page 43: ... 11 1 2 0 0 0 11 0 Surround J X_ Sunet Temporiz Setare Revenire Revenire J J 1 2 ____ J ...

Page 44: ... C DVB T Analogic 3 sus sau X 6 Cartoon Nwk 7 BBC Radio Wales 8 BBC Radio Cymru 1 BBC ONE Wales 2 BBC THREE 3 BBCi 4 CBBC Channel Z X Z_ Z Z X X Z X X Z Z 1 ZDF Coronation Street HDTV 20 00 20 55 20 35 45 HDTV 2 1 ZDF 1 2 3 6 7 4 5 1 2 3 4 5 6 7 ...

Page 45: ... 1 2 Imagine 3 1 2 60 70 50 A B C D E F G H I J K L M N U V W X Y Z Á Â É Î Í Ö Ó a b c d e f g h i j k l m n u v w x y z á â é î í ö ó O P Q R S T ª ğ Ü o p q r s t Ġ ü 0 1 2 3 4 5 6 7 8 9 _ ª Z Z__ _ ª ...

Page 46: ...580 mm 89 mm Numai televizorul 1 139 mm 739 mm 275 mm Cu piedestal 1 139 mm 674 mm 89 mm Numai televizorul Masa 12 0 kg Net Cu piedestal 10 0 kg Net Numai televizorul 18 0 kg Net Cu piedestal 15 0 kg Net Numai televizorul Model nr TX L32B6E TX L32B6ES TX L39B6E TX L39B6ES TX L42B6E TX L42B6ES TX L50B6E Sunet Difuzor 90 mm 25 mm 2 8 100 mm 30 mm 2 8 10 W 5 W 5 W 20 W 10 W 10 W X X º Z Sursa de alim...

Page 47: ..._JXJ Z___JXJX _ _ Z X J X Model de 32 inci a 200 mm b 100 mm Model de 39 inci Model de 42 inci a 200 mm b 200 mm Model de 50 inci a 400 mm b 400 mm Partea din spate a televizorului pentru suspendare de perete a Model de 32 inci Model de 39 inci minim 10 mm minim 12 mm maxim 16 mm maxim 22 mm Model de 42 inci Model de 50 inci minim 35 mm minim 16 mm maxim 45 mm maxim 30 mm Diametru Model de 32 inci...

Page 48: ...Web Site http panasonic net Panasonic Corporation 2013 _ X Z a bateriilor uzate __ __ produsele de eliminare Reprezentant autorizat Panasonic Testing Centre Z ...

Reviews: