background image

15

•  

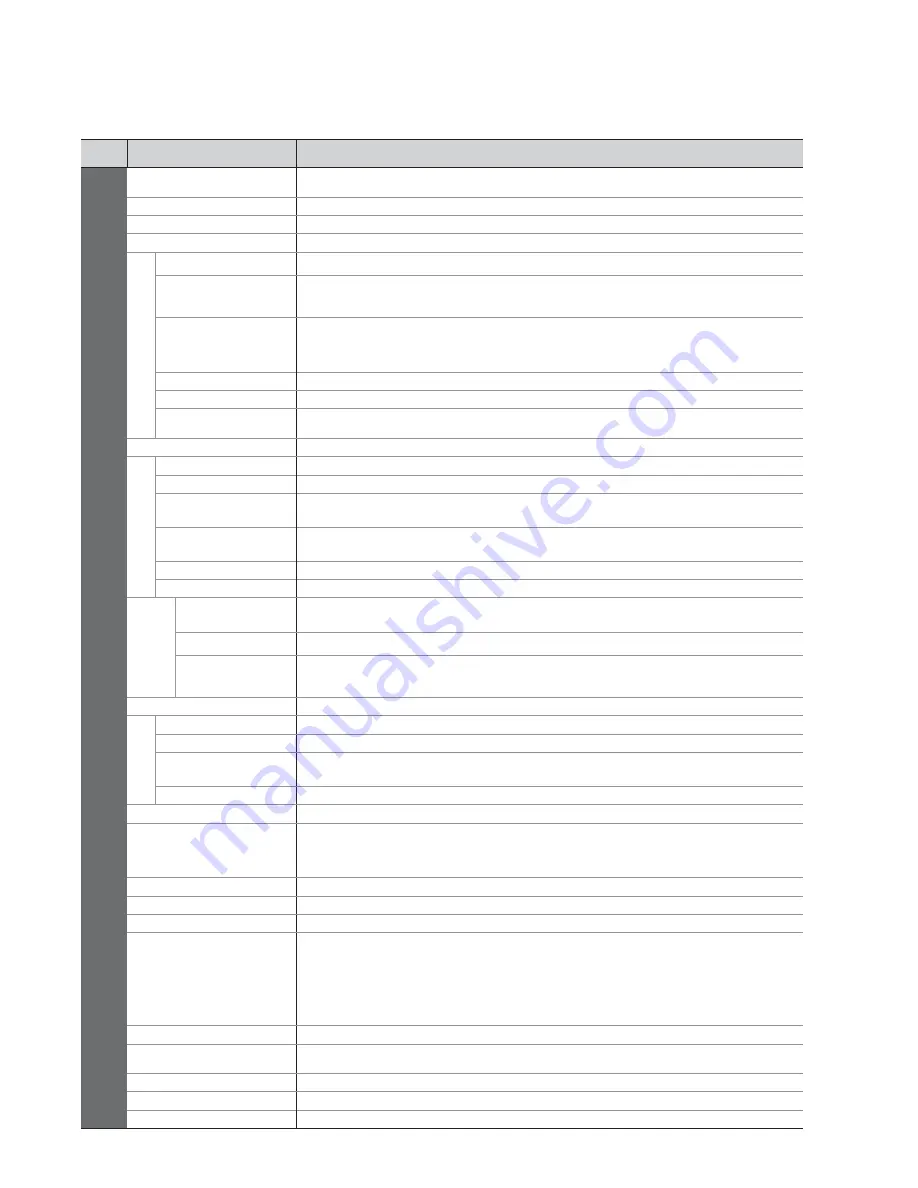
How to Use Menu Functions


Menu list

Menu

Item

Adjustments / Configurations (alternatives)

Setup

AV Colour System

Selects optional colour system based on video signals in AV mode 

(Auto / PAL / SECAM / M.NTSC / NTSC)

DVB Pro le Edit

Creates list of favourite programmes

DVB Service List

Skips the unwanted DVB programmes

Analogue Service List

Skips the unwanted Analogue programmes or edits Analogue programmes

Link Settings

VIERA Link

Sets to use VIERA Link functions 

(Off / On)

Q-Link

Selects which AV terminal is to be used for data communication between this TV and a 
compatible recorder 

(AV1 / AV2)


• 

Select the connected terminal to the recorder even it is not compatible with Q-Link.

AV1 / AV2 out

Chooses the signal to be transmitted from the TV to Q-Link 

(TV / AV1 / AV2 / AV3 / Monitor)

• 

Monitor: Image displayed on screen 

• 

Component, PC and HDMI signals cannot be outputted.

Power off Link

Sets to use Power off Link function 

(No / Set)

Power on Link

Sets to use Power on Link function 

(No / Set)

Download

Downloads programme, language, country / region settings to a Q-Link or VIERA Link 
compatible equipment connected to the TV

Child Lock

Locks a programme / AV input to prevent access to it

T

uning Menu

Auto Setup

Automatically sets the programmes received in the area

DVB Manual Tuning

Sets the DVB programmes manually

Analogue 
Manual Tuning

Sets the Analogue programmes manually

Add New DVB 
Services

Adds new DVB services

New Service Message

Selects whether to give a noti cation message when a new DVB service is found

DVB Signal Condition

Checks the DVB signal condition

GUIDE Plus+ 

Settings

Update

Performs the update of the GUIDE Plus+ schedule and advertising informations for 
GUIDE Plus+ system

Postcode

Sets your postcode for using GUIDE Plus+ system

System 
Information

Displays the system information of GUIDE Plus+

Off Timer

Sets the time the TV automatically turns Off 

(Off / 15 / 30 / 45 / 60 / 75 / 90 minutes)

Language

OSD Language

Changes language for on-screen displays

Preferred Audio 1 / 2

Selects the preferred language for DVB multi audio (depending on the broadcaster)

Preferred Subtitles 
1 / 2

Selects the preferred language for DVB subtitles (depending on the broadcaster)

Preferred Teletext

Selects the preferred language for DVB teletext service (depending on the broadcaster)

Teletext

Teletext display mode 

(TOP (FLOF) / List)

Teletext Character Set

Selects teletext language 

(West / East1 / East2)

• 

West: English, French, German, Greek, Italian, Spanish, Swedish, Turkish, etc.

• 

East1: Czech, English, Estonian, Lettish, Rumanian, Russian, Ukrainian, etc.

• 

East2: Czech, Hungarian, Lettish, Polish, Rumanian, etc.

Shipping Condition

Resets all settings, for example, when moving house

Common Interface

Uses include to watch pay-TV

System Update

Downloads new software to TV

Picture Overscan

Selects the screen area displaying the image 

(Off / On)

On : Enlarged the image to hide the edge of the image.
Off : Displayed the image in the original size.

• 

Set to “On” if noise is generated on the edge of the screen.

• 

This function is available when aspect is set to Auto (16:9 signal only) or 16:9.

• 

This function can be memorized separately for SD (Standard de nition) and HD (High 
de nition) signals.

Input Labels

Labels or skips each input terminal

Banner Display Timeout

Sets how long the information banner stays on screen

• 

0 (No display) to 10 sec. in 1-sec. increments

Time Zone

Adjusts the time data

Software License

Displays the software licence information

System Information

Displays the system information of this TV

• 

A different menu will be displayed while PC or SD Card is used.

• 

Only available items can be selected.

Summary of Contents for TX-D26LQ81F

Page 1: ...n the PDF le under MANUAL PDF manually to view the instructions Please read these instructions before operating your set and retain them for future reference The images shown in this manual are for illustrative purposes only Please refer to Pan European Guarantee Card if you need to contact your local Panasonic dealer for assistance Model No TX 26LXD80F Operating Instructions LCD Television Be Sur...

Page 2: ...o Broadcasting will work in areas where DVB T MPEG2 digital terrestrial broadcasting are received Consult your local Panasonic dealer with coverage areas DVB functions may not be available in some countries Some functions may not be available in some countries This TV has the capability for DVB speci cations But future DVB services cannot be guaranteed ...

Page 3: ...3 media excitement Enjoy rich multi media Camcorder Ampli er with Speaker system VCR DVD player DVD Recorder Personal computer Set top box SD memory Card ...

Page 4: ...e of candle or naked ame on top or near the TV Power source This TV is designed to operate on 220 240 V 50 Hz AC Do not place foreign objects inside the TV Do not allow any objects to drop into the TV through the air vents re or electrical shock may result Do not place the TV on sloped or unstable surfaces The TV may fall off or tip over Keep liquids away from the TV To prevent damage which may re...

Page 5: ...hinner or other volatile substances this may deteriorate the surface by peeling the paint Do not allow the cabinet and pedestal to make contact with a rubber or PVC substance for a long time When cleaning the TV remove the mains plug Cleaning an energized TV may cause electrical shock When the TV is not going to be used for a long period of time remove the mains plug This TV will still consume som...

Page 6: ...ove four screws TX 26LXD80F Rear of the TV Please contact your nearest Panasonic dealer to purchase the recommended wall hanging bracket For additional details please refer to the wall hanging bracket installation manual Using the clamper To tighten Keep the knob pressed Rear of the TV To loosen Do not bundle the RF cable and mains lead together could cause distorted image Fix cables with clampers...

Page 7: ...s Programme Guide or Programme List Option Menu Easy setting for viewing and sound options Main Menu Press to access VIERA Link Picture Sound and Setup Menus Subtitles Displays subtitles Surround Switches Surround sound Input mode selection TV switches DVB Analogue mode AV switches to AV input mode from Input Selection list SD Card Switches to SD Card viewing mode Return Returns to the previous me...

Page 8: ... equipment and cables shown are not supplied with this TV Please ensure that the unit is disconnected from the mains socket before attaching or disconnecting any leads RF cable RF cable TV only TV DVD Recorder or VCR AC 220 240 V 50 Hz AC 220 240 V 50 Hz Note Connect to AV1 AV2 for a DVD Recorder VCR supporting Q Link For HDMI compatible equipment possible to connect to HDMI terminals HDMI1 HDMI2 ...

Page 9: ...RF IN Basic Connection DVD Recorder or VCR Aerial Mains lead Rear of the TV Set top box AC 220 240 V 50 Hz RF cable RF cable TV DVD Recorder VCR and Set top box SCART cable fully wired SCART cable fully wired RF cable RF cable Example 3 Connecting DVD Recorder VCR and Set top box Fully wired HDMI compliant cable ...

Page 10: ...e select your viewing environment Home Shop Plug the TV into mains socket and switch On Takes a few seconds to be displayed 1 Auto Setup Auto Setup is now complete and your TV is ready for viewing You can now use the remote control to turn On the TV or turn the TV to standby mode Power LED On 4 Start Auto Setup If Q Link VIERA Link or similar technology compatible recorder is connected programme l...

Page 11: ...creen Displays MENU Open the main menu Move the cursor select the menu Move the cursor adjust levels select from a range of options Access the menu store settings after adjustments have been made or options have been set RETURN Return to the previous menu EXIT Exit the menu system and return to the normal viewing screen Note If tuning has failed Auto Setup p 15 If downloading has failed Download p...

Page 12: ... access select Adjust or select change example Picture Menu example Picture Menu store or access Required by some functions 1 select Choose from among alternatives To reset the settings To reset the picture settings only Reset to Default in Picture Menu p 14 To reset the sound settings only Reset to Default in Sound Menu p 14 To reset the picture and sound settings together N Also volume level and...

Page 13: ...IERA Link On p 15 Tuning Menu Auto Setup Access DVB Manual Tuning Analogue Manual Tuning Access Add New DVB Services Access Access New Service Message DVB Signal Condition Access On p 15 Only available items can be selected 1 3 AV Colour System Auto Child Lock Access Tuning Menu Off Timer Off Language Teletext TOP Access Access Setup Menu DVB Profile Edit Access Link Settings Access GUIDE Plus Set...

Page 14: ...ing pictures colour patterning may be seen Set to On to display sharper and more accurate colours Off On For PAL or NTSC signal reception only Not valid on RGB S Video Component PC HDMI and SD Card Reset to Default Press the OK button to reset the present Picture Mode to the default settings Sound Mode Basic sound mode Music Speech Bass Increases or decreases level to enhance or minimise lower dee...

Page 15: ...stem Postcode Sets your postcode for using GUIDE Plus system System Information Displays the system information of GUIDE Plus Off Timer Sets the time the TV automatically turns Off Off 15 30 45 60 75 90 minutes Language OSD Language Changes language for on screen displays Preferred Audio 1 2 Selects the preferred language for DVB multi audio depending on the broadcaster Preferred Subtitles 1 2 Sel...

Page 16: ...pality your waste disposal service or the point of sale where you purchased the items Penalties may be applicable for incorrect disposal of this waste in accordance with national legislation For business users in the European Union If you wish to discard electrical and electronic equipment please contact your dealer or supplier for further information Information on Disposal in other Countries out...

Reviews: