background image

English

15

Other connections


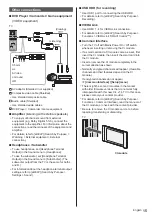
DVD Player / Camcorder / Game equipment

(VIDEO equipment)

TV

a b c d

(Viewing)

(Listening)

3.5 mm

a: L

b: Video

c: Ground

d: R

 AV adaptor (Shielded / not supplied)

 Composite video cable (Shielded)

Use shielded composite cable.

 Audio cable (Shielded)

Use shielded audio cables.

 DVD Player / Camcorder / Game equipment


Amplifier 

(listening with external speakers)

To enjoy multi-channel sound from external 
equipment (e.g. Dolby Digital 5.1ch), connect the 
equipment to the amplifier. For information about the 
connections, read the manuals of the equipment and 
amplifier.

For details, refer to [eHELP] (Search by Purpose > 
Watching > External equipment > External 
connection).


Headphones / Subwoofer

To use headphones, set [Headphone Terminal 
Output] in the Sound menu to [Headphone].

To use the subwoofer, set [Headphone Terminal 
Output] in the Sound menu to [Sub Woofer]. (The 
subwoofer output from the TV is the same for both L 
and R.)

For information about the headphone terminal output 
settings, refer to [eHELP] (Search by Purpose > 
Settings > Sound).


USB HDD (for recording)

Use USB 1 port for connecting the USB HDD.

For details, refer to [eHELP] (Search by Purpose > 
Recording).


VIERA Link

Use HDMI 1 - 4 for VIERA Link connection.

For details, refer to [eHELP] (Search by Purpose > 
Functions > VIERA Link “HDAVI Control™”).


Common Interface

Turn the TV off with Mains Power On / Off switch 
whenever inserting or removing the CI module.

If a smart card and a CI module come as a set, first 
insert the CI module, then insert the smart card into 
the CI module.

Insert or remove the CI module completely in the 
correct direction as shown.

Normally encrypted channels will appear. (Viewable 
channels and their features depend on the CI 
module.)

If encrypted channels do not appear  


[Common Interface] ([Setup] menu)

There might be some CI modules in the market 
with older firmware versions that do not work fully 
interoperable with this new CI+ v1.4 TV. In this case, 
please contact your content provider.

For details, refer to [eHELP] (Search by Purpose > 
Functions > Common Interface), read the manual of 
the CI module, or check with the content provider.

Be sure to remove the CI module card, etc. before 
repairing, transferring or discarding.

TV

CI module

Summary of Contents for TX-55JZ1500E

Page 1: ...before use The images shown in this manual are for illustrative purposes only Please refer to Pan European Guarantee Card if you need to contact your local Panasonic dealer for assistance F0621SR1091 English Operating Instructions OLED TV For more detailed instructions please refer to eHELP Built in Operating Instructions How to use eHELP p 23 English Nederlands image TX 65JZ1500E Model No TX 55JZ...

Page 2: ... Notice 4 Safety Precautions 6 Accessories 10 Installing the TV 10 Installing the wall hanging bracket 12 Connections 13 Identifying Controls 18 First time Auto Setup 22 Watching TV 23 How to Use eHELP 23 FAQs 24 Maintenance 25 Specifications 26 ...

Page 3: ...cense DVB and the DVB logos are trademarks of the DVB Project x v Colour is a trademark DiSEqC is a trademark of EUTELSAT Google is a trademark of Google LLC Amazon Prime Video and all related logos are trademarks of Amazon com Inc or its affiliates This product complies with the UHD Alliance Technical Specification UHDA Specified Reference Mode Version 1 0 FILMMAKER MODE logo is a trademark of th...

Page 4: ...nd MPEG HEVC H 265 digital terrestrial services DVB C MPEG2 MPEG4 AVC H 264 and MPEG HEVC H 265 digital cable services and DVB S MPEG2 MPEG4 AVC H 264 and MPEG HEVC H 265 digital satellite services Consult your local dealer for availability of DVB T T2 or DVB S services in your area Consult your cable service provider for availability of DVB C services with this TV This TV may not work correctly w...

Page 5: ...onic will not be held responsible for collecting or using customer information via application provided by third party on this TV or website When entering your credit card number name etc pay special attention to the trustworthiness of the provider Registered information may be registered in the server etc of provider Before repairing transferring or discarding this TV be sure to erase the informa...

Page 6: ... accessible and risk of electric shock when they are removed There are no user serviceable parts inside Do not expose the TV to rain or excessive moisture This TV must not be exposed to dripping or splashing water and objects filled with liquid such as vases must not be placed on top of or above the TV Do not insert foreign objects into the TV through the air vents If the TV is used in an area whe...

Page 7: ...s away from this product at all times Suffocation Choking Hazard Warning The packaging of this product may cause suffocation and some of the parts are small and may present a choking hazard to young children Keep these parts out of reach of young children Pedestal Warning Do not disassemble or modify the pedestal Caution Do not use any pedestal other than the one provided with this TV Do not use t...

Page 8: ... remote control use the 2 4 GHz radio frequency ISM band Bluetooth To avoid malfunctions or slow response caused by radio wave interference keep the TV and the remote control away from the devices such as other wireless LAN devices other Bluetooth devices microwaves mobile phones and the devices that use 2 4 GHz signal Ventilation Caution Allow sufficient space at least 10 cm around the TV in orde...

Page 9: ...to excessive heat such as sunshine fire or the like Make sure you dispose of batteries correctly Remove the battery from the unit when not using for a prolonged period of time to prevent battery leakage corrosion and explosion OLED TV Declaration of Conformity DoC Hereby Panasonic Corporation declares that this TV is in compliance with the essential requirements and other relevant provisions of th...

Page 10: ...are not to throw them away unintentionally Installing the TV Pedestal Assembly screw 4 M4 15 Cable cover Preparations Do not hold the screen panel part Make sure not to scratch or break the TV Do not place the TV temporarily on the floor or desk Assembling the pedestal Insert the pedestal firmly otherwise it may come off when setting up the TV Do not assemble the pedestal by any method other than ...

Page 11: ...English 11 A B Attaching the cable cover Be careful not to nip the cables between the TV and the cable cover Do not apply load to the cable cover C ...

Page 12: ...all hanging bracket not supplied with the TV Warning Using other wall hanging brackets or installing a wall hanging bracket by yourself have the risk of personal injury and product damage In order to maintain the unit s performance and safety be absolutely sure to ask your dealer or a licensed contractor to secure the wall hanging brackets Any damage caused by installing without a qualified instal...

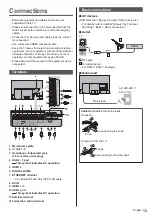
Page 13: ...erminals 6 7 8 10 9 12 11 3 2 5 4 1 1 Model name plate 2 CI slot 1 2 3 Headphone Subwoofer jack 3 5 mm stereo mini plug 4 USB 2 3 port This symbol indicates DC operation 5 HDMI 4 6 DIGITAL AUDIO 7 ETHERNET terminal Use Shielded Twist Pair STP LAN cable 8 AV IN 9 HDMI 1 3 10 USB 1 port This symbol indicates DC operation 11 Satellite terminal 12 Terrestrial cable terminal Basic connections AV device...

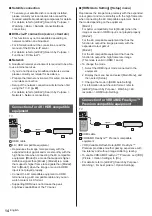
Page 14: ...he image or sound in HDMI input is not played properly Connect the 4K compatible equipment to HDMI terminal using a 4K compatible cable and you can watch content in 4K format Supporting HDR does not increase the peak brightness capabilities of the TV panel HDMI Auto Setting Setup menu Reproduces the image more precisely with the expanded colour gamut and more smoothly with the high frame rate when...

Page 15: ...P Search by Purpose Settings Sound USB HDD for recording Use USB 1 port for connecting the USB HDD For details refer to eHELP Search by Purpose Recording VIERA Link Use HDMI 1 4 for VIERA Link connection For details refer to eHELP Search by Purpose Functions VIERA Link HDAVI Control Common Interface Turn the TV off with Mains Power On Off switch whenever inserting or removing the CI module If a sm...

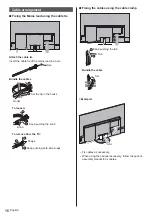
Page 16: ...e Bundle the cables Hooks Set the tip in the hooks To loosen Knob Keep pushing the knob To remove from the TV Keep pushing both side snaps Snaps Fixing the cables using the cable clamp Keep pushing the tab Tab Bundle the cable Set Example Fix cables as necessary When using the optional accessory follow the option s assembly manual to fix cables ...

Page 17: ...aired with the TV When using the remote control for the first time after purchase when you press any button while pointing the remote control at the remote control signal receiver with batteries inserted the remote control is automatically registered paired When registering face the remote control at the remote control signal receiver on the TV within about 50 cm Registration may not be completed ...

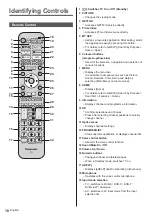
Page 18: ... Timer Setup and Help by selecting Main Menu on the menu bar 8 HOME Displays Home For details refer to eHELP Search by Purpose Read first Features Home 9 Information Displays channel and programme information 10 OK Confirms selections and choices Press after selecting channel positions to quickly change channel 11 Option menu Displays optional settings 12 PROVIDER LIST Starts operator application ...

Page 19: ...moving batteries Slide and lift Note the correct polarity or Close Remote Control Mode setting If another Panasonic TV is near the TV the other TV may be operated when you use the remote control with infrared Change the TV s remote control mode to avoid simultaneous operation Remote control mode 1 is the default setting 1 Display the menu bar and select Main Menu and then select Setup Main Menu Se...

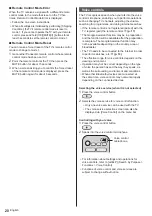
Page 20: ...ol is not registered paired with the TV register pair the remote control p 17 The Google Assistant function may be in preparation and the function will be available after the preparation is complete The Google Assistant function may not be available depending on the country area or broadcaster The TV needs to be connected to the internet in order to perform searches etc p 14 The effective range fo...

Page 21: ...u bar OK when in the menu system 5 Channel Up Down Cursor Up Down when in the menu system 6 Volume Up Down Cursor Left Right when in the menu system 7 Mains power On Off switch Use to switch the mains power To turn Off the apparatus completely you must pull the mains plug out of the mains socket Standby On Panel maintenance Be sure to turn the TV off with the remote control to perform the panel ma...

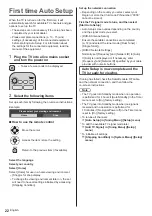
Page 22: ...onnection Depending on the country you select select your Region or store the Child Lock PIN number 0000 cannot be stored Tick the TV signal mode to tune and then select Start Auto Setup Auto Setup screen varies depending on the country and the signal mode you select DVB S Antenna Setup Ensure the satellite connections are completed p 14 and select the tuner mode Dual Tuner Single Tuner DVB C Netw...

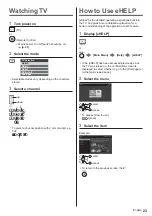
Page 23: ... Use eHELP eHELP is the detailed operating instructions built into the TV and gives a more detailed explanation for a better understanding of the operation of each feature 1 Display eHELP or Main Menu Help eHELP If the eHELP has been accessed previously since the TV was turned on the confirmation screen is displayed to select whether to go to the First page or to the Last viewed page 2 Select the ...

Page 24: ...inance Level Contrast Brightness or Colour in the Picture menu set to the minimum Check all required cables and connections are firmly in place An unusual image is displayed This TV has a built in Self Test Makes a diagnosis of picture or sound problems TV Self Test Help menu Turn the TV off with Mains power On Off switch then turn it on again If the problem persists initialise all settings Shippi...

Page 25: ...not a malfunction Maintenance First remove the mains plug from the mains socket Display panel Cabinet Pedestal Regular care Gently wipe the surface of the display panel cabinet or pedestal by using a soft cloth to remove dirt or fingerprints For stubborn dirt 1 First clean the dust from the surface 2 Dampen a soft cloth with clean water or diluted neutral detergent 1 part detergent to 100 parts wa...

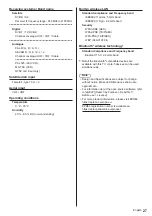
Page 26: ...reo mini jack 1 Connection terminals AV input VIDEO 1 0 V p p 75 AUDIO L R 0 5 V rms HDMI 1 2 3 4 input TYPE A Connectors HDMI 1 4K120Hz VRR Variable Refresh Rate AMD FreeSync Premium Content Type Deep Colour x v Colour HDMI 2 4K120Hz VRR Variable Refresh Rate AMD FreeSync Premium Content Type eARC Enhanced Audio Return Channel ARC Audio Return Channel Deep Colour x v Colour HDMI 3 4 4K Content Ty...

Page 27: ...c 5 GHz band IEEE802 11b g n 2 4 GHz band Security WPA3 SAE AES WPA2 PSK TKIP AES WPA PSK TKIP AES WEP 64 bit 128 bit Bluetooth wireless technology Standard Compliance and Frequency band Bluetooth 5 0 2 4 GHz band Not all the Bluetooth compatible devices are available with this TV Up to 5 devices can be used simultaneously Note Design and Specifications are subject to change without notice Mass an...

Page 28: ...lection and recycling please contact your local authority Penalties may be applicable for incorrect disposal of this waste in accordance with national legislation Note for the battery symbol bottom symbol This symbol might be used in combination with a chemical symbol In this case it complies with the requirement set by the Directive for the chemical involved Customer s Record The model number and...

Page 29: ...aatregelen in deze handleiding De afbeeldingen in deze handleiding dienen slechts als voorbeeld Raadpleeg uw Europese Garantie als u contact wilt opnemen met uw plaatselijke Panasonic dealer voor assistentie F0621SR1091 Nederlands Gebruiksaanwijzing OLED tv Raadpleeg eHELP ingebouwde bedieningsinstructies voor gedetailleerde instructies Gebruik van eHELP p 23 Nederlands afbeelding TX 65JZ1500E Mod...

Page 30: ...g 4 Veiligheidsmaatregelen 6 Accessoires 10 De tv installeren 10 De muurbevestigingssteun monteren 12 Verbindingen 13 Bedieningsonderdelen 18 Automatisch instellen bij het eerste gebruik 22 Tv kijken 23 eHELP gebruiken 23 Veelgestelde vragen 24 Onderhoud 25 Specificaties 26 ...

Page 31: ...n handelsmerken van het DVB Project x v Colour is een handelsmerk DiSEqC is een handelsmerk van EUTELSAT Google is een handelsmerk van Google LLC Amazon Prime Video en alle bijbehorende logo s zijn handelsmerken van Amazon com Inc of dochterondernemingen Dit product voldoet aan de technische specificaties van de UHD Alliance Door UHDA gespecificeerde referentiemodus versie 1 0 Het FILMMAKER MODE l...

Page 32: ...rpen om te voldoen aan de standaarden vanaf juni 2021 van DVB T T2 MPEG2 MPEG4 AVC H 264 en MPEG HEVC H 265 digitale terrestrische diensten DVB C MPEG2 MPEG4 AVC H 264 en MPEG HEVC H 265 digitale kabeldiensten en DVB S MPEG2 MPEG4 AVC H 264 en MPEG HEVC H 265 digitale satellietdiensten Raadpleeg uw lokale dealer voor de beschikbaarheid van DVB T T2 of DVB S services in uw gebied Raadpleeg uw kabel...

Page 33: ...ebruiken van klantinformatie via een applicatie op deze tv of website die wordt geleverd door derden Let er bij het invoeren van uw creditcardnummer naam enz op dat de provider betrouwbaar is Ingevoerde informatie kan worden opgeslagen op de server enz van de provider Voor het repareren overdragen of afdanken van deze tv zorgt u ervoor dat de informatie wordt verwijderd volgens de algemene voorwaa...

Page 34: ...ders kunt u in contact komen met onderdelen die onder spanning staan en loopt u risico op een elektrische schok Er bevinden zich geen door de gebruiker repareerbare onderdelen aan de binnenkant Stel de tv niet bloot aan regen of hoge vochtigheid De tv mag niet blootgesteld worden aan druppelend of spattend water Plaats geen voorwerpen gevuld met vloeistof zoals vazen op de tv of erboven Laat geen ...

Page 35: ... andere bronnen van open vuur in de nabijheid van de televisie Gevaar voor verstikking inslikken Waarschuwing De verpakking van dit product kan verstikking veroorzaken en sommige onderdelen zijn klein en gevaarlijk als ze door kinderen worden ingeslikt Houd deze onderdelen buiten het bereik van jonge kinderen Standaard Waarschuwing De standaard niet demonteren of er wijzigingen in aanbrengen Let o...

Page 36: ...n de ISM frequentieband van 2 4 GHz Bluetooth Houd de tv en de afstandsbediening uit de buurt van toestellen zoals andere draadloze LAN apparaten andere Bluetooth apparaten magnetrons mobiele telefoons en apparaten die 2 4 GHz signalen gebruiken om storing of vertraging door interferentie te vermijden Ventilatie Let op Laat voldoende ruimte ten minste 10 cm vrij rond de tv zodat overtollige warmte...

Page 37: ...treme warmte zoals zonlicht vuur of dergelijke Gooi gebruikte batterijen weg volgens de voorschriften voor afvalverwijdering Verwijder de batterij uit het apparaat als u het gedurende langere tijd niet gaat gebruiken om lekken corrosie en explosie van de batterij te voorkomen OLED tv Verklaring van Overeenstemming vvo Hierbij verklaart Panasonic Corporation dat deze tv in overeenstemming is met de...

Page 38: ...u ze niet per ongeluk weggooit De tv installeren Standaard Montageschroef 4 M4 15 Kabelbescherming Voorbereidingen Houd het schermonderdeel niet vast Zorg dat u de tv niet bekrast of breekt Plaats de tv niet tijdelijk op de vloer of een tafel De standaard monteren Bevestig de standaard stevig anders kan deze loskomen bij het plaatsen van de tv Monteer de standaard niet volgens een andere methode d...

Page 39: ...Nederlands 11 A B De kabelafdekking bevestigen Let op dat de kabels niet tussen de tv en het kabelpaneel klem komen te zitten Leg niets op het kabelpaneel C ...

Page 40: ...et meegeleverd met de tv Waarschuwing Als u andere muurbevestigingssteunen gebruikt of zelf een muurbevestigingssteun probeert te installeren loopt u het risico op lichamelijk letsel en materiële schade Om de veiligheid en goede prestaties te garanderen dient u de muurbevestigingssteunen te laten monteren door uw dealer of een erkende installateur Elke schade die is veroorzaakt door het installere...

Page 41: ...6 7 8 10 9 12 11 3 2 5 4 1 1 Naamplaat van model 2 CI sleuf 1 2 3 Ingang hoofdtelefoon subwoofer 3 5 mm stereoministekker 4 USB 2 3 poort Dit symbool geeft gelijkstroomwerking aan 5 HDMI 4 6 DIGITAL AUDIO 7 ETHERNET aansluiting Gebruik een afgeschermde dubbeldraadse getwist paar STP LAN kabel 8 AV IN 9 HDMI1 3 10 USB 1 poort Dit symbool geeft gelijkstroomwerking aan 11 Satellietingang 12 Ingang aa...

Page 42: ...e HDMI ingang niet goed wordt afgespeeld Sluit met een 4K compatibele kabel de 4K compatibele apparatuur aan op een HDMI aansluiting en u kunt naar content van 4K formaat kijken Ondersteuning van HDR vergroot niet de maximale helderheidsvermogens van het tv paneel HDMI autom Instellen menu Instellingen Reproduceert het beeld preciezer met het uitgebreide kleurengamma en vloeiender met de hoge beel...

Page 43: ...onaansluiting raadpleegt u eHELP Zoeken op doel Instellingen Geluidinstelling USB HDD voor opname Gebruik de USB 1 poort voor verbinding met de USB HDD Raadpleeg eHELP Zoeken op doel Opnemen voor details VIERA Link Gebruik HDMI 1 4 voor VIERA Link verbinding Raadpleeg eHELP Zoeken op doel Functies VIERA Link HDAVI Control voor details Algemene interface CI Zet de tv altijd met de hoofdschakelaar u...

Page 44: ...punt onder de geleiders Losmaken Knop Houd de knop ingedrukt Van de tv verwijderen Houd beide ontgrendelknoppen ingedrukt Ontgrendelknoppen De kabels bevestigen met de kabelklem Houd het lipje ingedrukt Lipje Bundel de kabel Instellen Voorbeeld Bevestig de kabels als nodig Volg bij gebruik van optionele accessoires de handleiding bij de accessoire voor informatie over het bevestigen van kabels ...

Page 45: ...r de eerste keer gebruikt na de aankoop wordt de afstandsbediening automatisch geregistreerd gepaired als u op een willekeurige knop drukt terwijl u de afstandsbediening met geplaatste batterijen richting de ontvanger voor afstandsbedieningssignalen wijst Wijs de afstandsbediening bij het registreren richting de ontvanger voor afstandsbedieningssignalen op de tv binnen een afstand van ca 50 cm Het...

Page 46: ... te krijgen tot menu s zoals Beeld Geluid Netwerk Timer Instellingen en Help door Hoofdmenu te selecteren in de menubalk 8 THUIS Opent Home Raadpleeg eHELP Zoeken op doel Lees dit eerst Functies Home voor details 9 Informatie Geeft kanaal en programma informatie weer 10 OK Bevestigt selecties en keuzes Schakelt over naar de geselecteerde kanaalpositie 11 Menu Opties Geeft optionele instellingen we...

Page 47: ... Plaats de batterijen op de juiste manier of Sluiten De afstandsbedieningsmodus instellen Als er een andere Panasonic tv in de buurt van de tv staat kan de andere tv worden bediend als u de afstandsbediening met infrarood gebruikt Wijzig de afstandsbedieningsmodus van de tv om gelijktijdig gebruik te voorkomen Afstandsbedieningsmodus 1 is de standaardinstelling 1 Geef de menubalk weer en selecteer...

Page 48: ...mma s zoeken en zoeken op het internet Als de afstandsbediening niet is geregistreerd bij gepaird met de tv registreert pairt u de afstandsbediening eerst p 17 De functie Google Assistent kan aan het voorbereiden zijn en de functie komt beschikbaar zodra de voorbereiding is voltooid De functie Google Assistent kan niet beschikbaar zijn afhankelijk van het land gebied of de zender De tv moet verbon...

Page 49: ...enu Houd 3 seconden ingedrukt om de menubalk weer te geven OK in menu s 5 Kanaal omhoog omlaag Cursor omhoog omlaag in menu s 6 Volume omhoog omlaag Cursor naar links rechts in menu s 7 Hoofdschakelaar Hiermee zet u de tv aan of uit Om het apparaat volledig uit te schakelen moet u het netsnoer uit het stopcontact halen Stand by Aan Beeldschermonderhoud Schakel de tv uit met de afstandsbediening vo...

Page 50: ...voor het kinderslot op 0000 kan niet worden opgeslagen Vink het tv signaal aan waarop u wilt afstellen en selecteer Start auto set up Het instelscherm verschilt afhankelijk van het geselecteerde land en tv signaal DVB S antenne instellen Zorg dat de satellietverbindingen zijn voltooid p 14 en selecteer de tunermodus Dual tuner Enkele tuner DVB C Netwerkinstellingen Gewoonlijk stelt u Frequentie en...

Page 51: ...ELP gebruiken eHELP is de naam van de gedetailleerde ingebouwde bedieningsinstructies van de tv Hier vindt u gedetailleerde uitleg over de bediening van de verschillende functies 1 Geef eHELP weer of Hoofdmenu Help eHELP Als eHELP eerder is gebruikt sinds de tv werd aangezet verschijnt een bevestigingsscherm om te selecteren of u naar de Eerste pagina wilt gaan of naar de Laatst bekeken pagina 2 S...

Page 52: ...e juiste ingangsmodus is geselecteerd Is Verlichtingssterkte Kontrast Helderheid of Kleur in het menu Beeld ingesteld op de minimale waarde Controleer of alle vereiste kabels goed zijn aangesloten Er wordt abnormaal beeld weergegeven De tv heeft een ingebouwde zelftestfunctie Deze stelt een diagnose van beeld of geluidsproblemen TV Zelfscan Test menu Help Zet de tv uit en weer aan met de hoofdscha...

Page 53: ...l het beeldscherm wordt afgesteld Dit is normaal Onderhoud Verwijder eerst de stekker van het netsnoer uit het stopcontact Beeldscherm Behuizing Standaard Regelmatig onderhoud Veeg de buitenkant van het beeldscherm de behuizing of de standaard voorzichtig af met een zachte doek om vuil of vingerafdrukken te verwijderen Voor hardnekkig vuil 1 Verwijder eerst het stof van de buitenkant 2 Bevochtig e...

Page 54: ...efoon subwoofer 3 5 mm stereo ministekker 1 Aansluitingen AV ingang VIDEO 1 0 V p p 75 AUDIO L R 0 5 V rms HDMI 1 2 3 4 ingang TYPE A aansluitingen HDMI 1 4K120Hz VRR Variable Refresh Rate AMD FreeSync Premium Content type Deep Colour x v Colour HDMI 2 4K120Hz VRR Variable Refresh Rate AMD FreeSync Premium Content type eARC Enhanced Audio Return Channel ARC Audio Return Channel Deep Colour x v Col...

Page 55: ...11b g n 2 4 GHz band Beveiliging WPA3 SAE AES WPA2 PSK TKIP AES WPA PSK TKIP AES WEP 64 bit 128 bit Bluetooth draadloze technologie Standaardcompliantie en frequentieband Bluetooth 5 0 2 4 GHz band Niet alle Bluetooth compatibele apparaten kunnen met deze tv gebruikt worden Maximaal 5 apparaten kunnen tegelijk gebruikt worden Opmerking Ontwerp en specificaties kunnen zonder voorafgaande kennisgevi...

Page 56: ... recycling kunt u contact opnemen met uw plaatselijke gemeente Afhankelijk van uw nationale wetgeving kunnen er boetes worden opgelegd bij het onjuist verwijderen van dit soort afval Let op het batterijsymbool Onderstaand symbool Dit symbool kan in combinatie met een chemisch symbool gebruikt worden In dit geval volstaan de eisen die zijn vastgesteld in de richtlijnen van de desbetreffende chemisc...

Page 57: ... F0621SR1091 Manual de utilizare _ _ TX 55JZ1500E TX 65JZ1500E ...

Page 58: ... Cuprins 4 6 10 10 12 13 18 22 23 23 24 26 ...

Page 59: ... _ ...

Page 60: ... 4 _ ª ª ª ª ...

Page 61: ... 5 ª ª ª ª ªª ...

Page 62: ... 6 ª ª ª ...

Page 63: ... 7 deschise Piedestal ...

Page 64: ... 8 ª 10 10 10 10 11 ...

Page 65: ... 9 ª ª ªª ª ...

Page 66: ... 10 18 Piedestal 10 19 Manual de utilizare Piedestal ...

Page 67: ... 11 A B C ...

Page 68: ... C 15 15 1 Instalarea prindere pe perete M6 µ ...

Page 69: ... ª 6 7 8 10 9 12 11 3 2 5 4 1 1 4 5 6 7 8 9 10 11 ª ª ...

Page 70: ... 14 ª ª ª ª ª ...

Page 71: ... 15 a b c d ª ª ª ª ...

Page 72: ... 16 ...

Page 73: ... 17 1 Setare ...

Page 74: ... 18 Identificarea 1 7 9 10 11 12 8 14 13 2 3 4 5 6 16 15 17 18 19 28 30 31 29 32 20 21 22 23 24 25 26 27 1 PICTURE 4 5 MY APP 6 7 MENIU 8 HOME 9 10 11 14 15 16 17 eAJUTOR 18 19 ª ª ª ª ...

Page 75: ... 19 APPS EXIT ª PEISAJ 1 Setare 4 ª ª ...

Page 76: ... ª ª 1 1 1 ...

Page 77: ... 1 2 3 5 6 7 4 1 4 Meniu 5 ª 6 ª 7 ª ...

Page 78: ... 13 1 acestuia ª 14 ª ...

Page 79: ... 1 ª eAJUTOR 1 Meniu principal eAJUTOR ª ...

Page 80: ... º 19 º º 19 º 17 º ª 14 17 ...

Page 81: ... ª _ ª _ piedestalul µ µ ...

Page 82: ... Model de 55 inci _ Model de 65 inci _ Model de 55 inci Model de 65 inci Masa Model de 55 inci g g Model de 65 inci g g ª Sunet ª ª ETHERNET ª ª ª ...

Page 83: ... Satelit ª ª ª ª ª ª ª ª ª ª ª ª ª ª ª ª ª Securitate ª ª ª ªª ªª ª ...

Page 84: ... ª Web Site http www panasonic com Panasonic Corporation 2021 ...

Reviews: