English
21
3 Power LED
Red:
Standby
Green:
On
Depending on the ambient brightness,
adjusts the brightness of LED to easy-to-view
levels automatically.
Orange:
Standby with some functions (recording, etc.)
active or panel maintenance in progress
The LED blinks when the TV receives a command
from the remote control.
4 Input mode selection
Press repeatedly until you reach the desired mode.
[Main Menu]
Press and hold for about 3 seconds to display main
menu.
OK
(when in the menu system)
5 Channel Up / Down
Cursor Up / Down (when in the menu system)
6 Volume Up / Down
Cursor Left / Right (when in the menu system)
7
Mains power On / Off switch
Use to switch the mains power.
To turn Off the apparatus completely, you must pull
the mains plug out of the mains socket.
[
]: Standby / On
Panel maintenance
Be sure to turn the TV off with the remote control to
perform the panel maintenance. During the panel
maintenance, LED turns to orange.
During panel maintenance, avoid touching and exerting
any pressure on the screen. (e.g. wiping the screen,
etc.)
There are two types of the maintenance as following.
Normal maintenance automatically starts, and it takes
approx. 10 minutes.
Regular maintenance takes approx. 80 minutes.
When regular maintenance is necessary, the
message appears on the screen after turning the
TV off with the remote control. Follow the on-
screen instructions.
During the panel maintenance, a white horizontal
line appears on the screen for a while. This is not
a malfunction.
For information about panel maintenance, refer to
[eHELP] (Search by Purpose > Watching > For best
picture > Screen Settings).
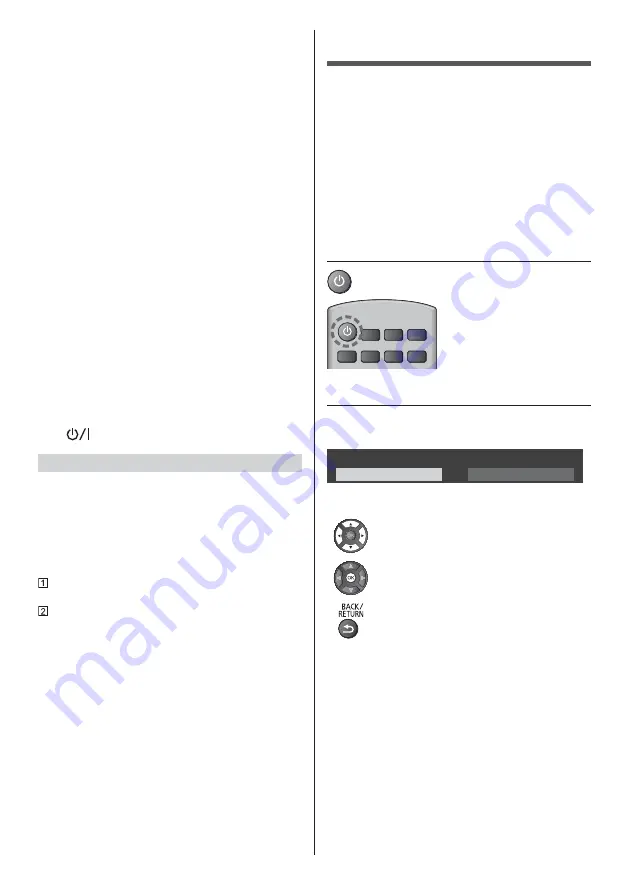
First time Auto Setup
When the TV is turned on for the first time, it will
automatically search for available TV channels and give
options to set up the TV.
These steps are not necessary if the setup has been
completed by your local dealer.
Please complete connections (p. 13 - 17) and
settings (if necessary) of the connected equipment
before starting Auto Setup. For information about
the settings for the connected equipment, read the
manual of the equipment.
1
Plug the TV into a live mains socket
and turn the power on
Takes a few seconds to be displayed.
2
Select the following items
Set up each item by following the on-screen instructions.
Example:
Please select your viewing environment.
Home
Shop
How to use the remote control
Move the cursor
Access the item / store the setting
Return to the previous item (if available)
Select the language
Select your country
Select [Home]
Select [Home] for use in a home viewing environment.
[Shop] is for shop display.
To change the viewing environment later on, the set
will need to have all settings initialised by accessing
Shipping Condition.
Set up the network connection
Depending on the country you select, select your
Region or store the Child Lock-PIN number (“0000”
cannot be stored).
Summary of Contents for TX-55HZ1000E
Page 57: ... F0220HA0 TX 55HZ1000E TX 65HZ1000E Manual de utilizare _ _ _ ...
Page 58: ... Cuprins 3 9 9 22 _ 23 24 ...
Page 59: ... _ _ _ _ _ _ _ ...
Page 60: ... 4 _ _ _ ª ª ...
Page 61: ... 5 ªªª ...
Page 62: ... 6 _ _ _ _ _ _ _ _ _ deschise ...
Page 63: ... 7 Piedestal ª ª ª ª ª ª ª ª ...
Page 64: ... 8 ª ªªª ª _ ª ª ...
Page 65: ... 9 Piedestal Manual de utilizare Piedestal ...
Page 66: ... 10 A B C C C C ...
Page 67: ... 11 C 15 15 1 ...
Page 68: ... Instalarea prindere pe perete A Model de 55 inci Model de 65 inci A 1 2 M6 µ _ ...
Page 69: ... 1 6 7 8 10 9 11 12 3 2 5 4 5 6 8 ...
Page 70: ... 14 _ ª _ ...
Page 71: ... 15 ª ª ...
Page 72: ... 16 _ _ a b c d ...
Page 73: ... 17 _ _ _ ª ª ª _ _ ª _ _ _ ...
Page 74: ... 18 _ ...
Page 75: ... 19 1 6 NETFLIX 10 11 eAJUTOR _ _ 14 15 16 17 EXIT 18 HOME _ 19 ...
Page 76: ... 1 4 _ _ _ 1 _ 1 2 3 5 6 7 4 ...
Page 77: ... Meniu principal _ _ 1 ...
Page 78: ... _ 1 ...
Page 79: ... eAJUTOR _ 1 eAJUTOR _ _ _ ...
Page 80: ... _ º º º º _ _ _ ...
Page 81: ... _ _ _ _ piedestalul µ µ ...
Page 83: ... 2 ª _ ...
Page 84: ... Web Site http www panasonic com Panasonic Corporation 2020 ...


