background image

English

20


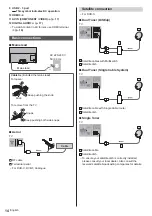
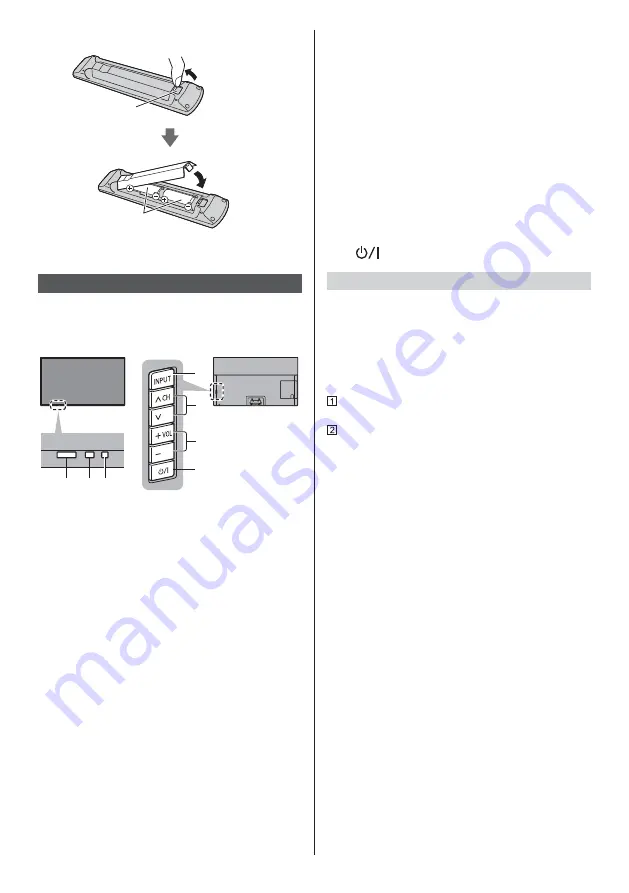
Installing / Removing batteries

Pull open

Hook

Note the correct 

polarity (+ or -)

Close

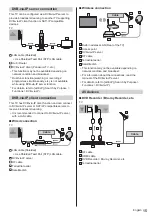
Indicator / Control panel

When pressing 4, 5, 6 buttons, the control panel 
guide appears on the right side of the screen for  
3 seconds to highlight which button has been 
pressed.

1

2 3

5

6

7

4

Rear side of the TV

1  Remote control signal receiver

Do not place any objects between the TV remote 
control signal receiver and remote control.

2 Ambient sensor

Senses brightness to adjust picture quality when 
[Ambient Sensor] in the Picture Menu is set to 
[On].

3 Power LED

Red:

Standby

Green:

On


Depending on the ambient brightness, 
adjusts the brightness of LED to easy-to-view 
levels automatically.

Orange:

Standby with some functions (recording, etc.) 
active or panel maintenance in progress

The LED blinks when the TV receives a command 
from the remote control.

4  Input mode selection

Press repeatedly until you reach the desired mode.

[Main Menu]

Press and hold for about 3 seconds to display main 
menu.

OK

 (when in the menu system)

5  Channel Up / Down

Cursor Up / Down (when in the menu system)

6  Volume Up / Down

Cursor Left / Right (when in the menu system)

7  

Mains power On / Off switch

Use to switch the mains power.

To turn Off the apparatus completely, you must pull 
the mains plug out of the mains socket.

[

]:  Standby / On

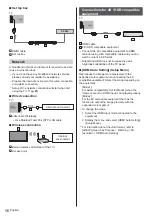
Panel maintenance

Be sure to turn the TV off with the remote control to 
perform the panel maintenance. During the panel 
maintenance, LED turns to orange.

During panel maintenance, avoid touching and exerting 
any pressure on the screen. (e.g. wiping the screen, 
etc.)

There are two types of the maintenance as following.

  Normal maintenance automatically starts, and it takes 

approx. 10 minutes.

  Regular maintenance takes approx. 80 minutes.


When regular maintenance is necessary, the 
message appears on the screen after turning the 
TV off with the remote control. Follow the on-
screen instructions.


During the panel maintenance, a white horizontal 
line appears on the screen for a while. This is not 
a malfunction.

For information about panel maintenance, refer to 
[eHELP] (Search by Purpose > Watching > For best 
picture > Screen Settings).

Summary of Contents for TX-55GZ950E

Page 1: ...e use The images shown in this manual are for illustrative purposes only Please refer to Pan European Guarantee Card if you need to contact your local Panasonic dealer for assistance English Model No TX 55GZ950E TX 55GZ960E TX 65GZ950E TX 65GZ960E Operating Instructions OLED TV For more detailed instructions please refer to eHELP Built in Operating Instructions How to use eHELP p 22 image TX 65GZ9...

Page 2: ...t Notice 3 Safety Precautions 5 Accessories 9 Installing the TV 9 Installing the wall hanging bracket 13 Connections 13 Identifying Controls 19 First time Auto Setup 21 Watching TV 22 How to Use eHELP 22 FAQs 24 Maintenance 25 Specifications 25 ...

Page 3: ... a long period In such cases the still part of the image remains dimly on the screen image retention This is not considered a malfunction and is not covered by the warranty Typical still image parts Still images shown continuously on the same area ex channel number channel logo other logos or title image etc Still or moving pictures viewed in 4 3 or 14 9 aspect ratio etc Video games To avoid image...

Page 4: ... full text of our privacy policy displayed at eHELP Search by Purpose Network Network settings Terms of Service and Settings When using Internet connecting function of this TV after agreeing in the jurisdictions where customer s consent is required to collect personal information under applicable privacy laws to or reviewing Panasonic s terms of service privacy policy hereinafter referred to as te...

Page 5: ...tions To help avoid risk of electrical shock fire damage or injury please follow the warnings and cautions below Mains plug and lead Warning If you detect anything unusual immediately remove the mains plug This TV is designed to operate on AC 220 240 V 50 60 Hz Insert the mains plug fully into the mains socket To turn Off the apparatus completely you must pull the mains plug out of the mains socke...

Page 6: ...ay panel Ensure that children do not climb on the TV Do not place the TV on sloping or unstable surfaces and ensure that the TV does not hang over the edge of the base Warning Never place a TV in an unstable location A TV may fall causing serious personal injury or death Many injuries particularly to children can be avoided by taking simple precautions such as Using cabinets or stands recommended ...

Page 7: ...hem may be regarded as illegal access SSID is a name for identifying a particular wireless network for transmission Do not subject the built in wireless LAN to high temperatures direct sunlight or moisture Data transmitted and received over radio waves may be intercepted and monitored The built in wireless LAN uses 2 4 GHz and 5 GHz frequency bands To avoid malfunctions or slow response caused by ...

Page 8: ...nd manganese batteries Do not use rechargeable batteries Ni Cd etc Do not burn or break up batteries Do not expose batteries to excessive heat such as sunshine fire or the like Make sure you dispose of batteries correctly Remove the battery from the unit when not using for a prolonged period of time to prevent battery leakage corrosion and explosion OLED TV Declaration of Conformity DoC Hereby Pan...

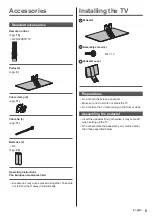
Page 9: ...ther Take care not to throw them away unintentionally Installing the TV Pedestal Assembly screw 4 M4 15 Pedestal cover Preparations Do not hold the screen panel part Make sure not to scratch or break the TV Do not place the TV temporarily on the floor or desk Assembling the pedestal Insert the pedestal firmly otherwise it may come off when setting up the TV Do not assemble the pedestal by any meth...

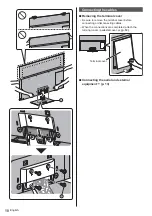
Page 10: ...g the terminal cover Be sure to remove the terminal cover before connecting or disconnecting cables When the connections are completed attach the terminal cover pedestal cover p 12 Terminal cover Connecting the aerial and external equipment p 13 ...

Page 11: ...rt the cable clamp in a hole Hole Bundle the cable Set To release Keep pushing the tab Tab To remove from the TV Keep pushing both side snaps Snaps Fixing the cables using the cable tie Attach the cable tie Insert the cable tie in a hole Hole Bundle the cables Hooks Set the tip in the hooks To loosen Knob Keep pushing the knob To remove from the TV Keep pushing both side snaps Snaps Example Fix ca...

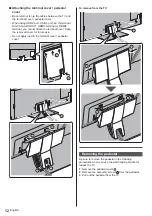
Page 12: ...l or HDMI4 terminal you cannot attach the terminal cover Keep the removed cover for future use Do not apply load to the terminal cover pedestal cover C To remove from the TV C Removing the pedestal Be sure to remove the pedestal in the following procedures when you use the wall hanging bracket or repack the TV 1 Remove the pedestal cover 2 Remove the assembly screws from the pedestal 3 Pull out th...

Page 13: ... carefully during installation since subjecting it to impact or other forces may cause product damage Take care when fixing wall brackets to the wall Always ensure that there are no electrical cables or pipes in the wall before hanging bracket To prevent fall and injury remove the TV from its fixed wall position when it is no longer in use Connections External equipment and cables shown are not su...

Page 14: ...move from the TV Keep pushing both side snaps Snaps Aerial TV Cable RF cable Terrestrial aerial For DVB C DVB T Analogue Satellite connection For DVB S Dual Tuner DiSEqC TV Satellite cables with Multiswitch Satellite dish Dual Tuner Single Cable System TV Satellite cable with Single Cable router Satellite dish Single Tuner TV Satellite cable Satellite dish To ensure your satellite dish is correctl...

Page 15: ... DVB via IP client function and can connect to DVB via IP server or SAT IP compatible servers to receive broadcast streaming It is recommended to connect to DVB via IP server with a LAN cable Wired connection TV Cable LAN cable Shielded Use Shielded Twist Pair STP LAN cable DVB via IP server RF cable Terrestrial aerial Satellite dish Wireless connection Cable Built in wireless LAN Rear of the TV A...

Page 16: ...nt Connect the 4K compatible equipment to HDMI terminal using a 4K compatible cable and you can watch content in 4K format Supporting HDR does not increase the peak brightness capabilities of the TV panel HDMI Auto Setting Setup Menu Reproduces the image more precisely with the expanded colour gamut when connecting the 4K compatible equipment Select the mode depending on the equipment Mode1 For be...

Page 17: ...ipment to the amplifier For information about the connections read the manuals of the equipment and amplifier TV HDMI cable Amplifier with speaker system External equipment DVD Player etc Use HDMI2 to connect the TV to an amplifier which has ARC Audio Return Channel function If connecting to an amplifier without ARC function use DIGITAL AUDIO TV Optical cable DIGITAL AUDIO IN e g Amplifier with sp...

Page 18: ...able channels and their features depend on the CI module If encrypted channels do not appear Common Interface in the Setup Menu There might be some CI modules in the market with older firmware versions that do not work fully interoperable with this new CI v1 4 TV In this case please contact your content provider For details refer to eHELP Search by Purpose Functions Common Interface read the manua...

Page 19: ...ttons Changes channel and teletext pages Sets characters When in Standby mode switches TV on 12 eHELP Displays eHELP Built in Operating Instructions 13 My App Assigns a favourite application After setting starts the application easily by pressing this button For details refer to eHELP Search by Purpose Home Apps 14 Input mode selection TV switches to DVB S DVB C DVB T DVB via IP Analogue AV switch...

Page 20: ...3 seconds to display main menu OK when in the menu system 5 Channel Up Down Cursor Up Down when in the menu system 6 Volume Up Down Cursor Left Right when in the menu system 7 Mains power On Off switch Use to switch the mains power To turn Off the apparatus completely you must pull the mains plug out of the mains socket Standby On Panel maintenance Be sure to turn the TV off with the remote contro...

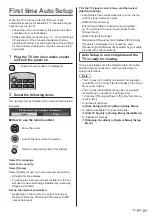
Page 21: ...up the network connection Depending on the country you select select your Region or store the Child Lock PIN number 0000 cannot be stored Tick the TV signal mode to tune and then select Start Auto Setup Auto Setup screen varies depending on the country and the signal mode you select DVB S Antenna Setup Ensure the satellite connections are completed p 14 and select the tuner mode Dual Tuner Single ...

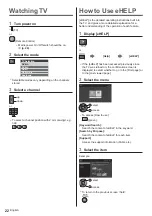
Page 22: ...gives a more detailed explanation for a better understanding of the operation of each feature 1 Display eHELP or Help eHELP If the eHELP has been accessed previously since the TV was turned on the confirmation screen is displayed to select whether to go to the First page or to the Last viewed page 2 Select the menu select access To access How to use green Keyword Search Search the content of eHELP...

Page 23: ...n if more than 1 page While the description is highlighted To open the reference screen To display the menu related to the description only for some descriptions red To check the features of this TV Search by Purpose Read first Features ...

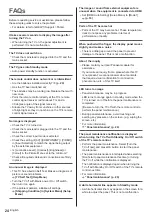
Page 24: ...p Menu The image or sound from external equipment are unusual when the equipment is connected via HDMI Set HDMI Auto Setting Setup Menu to Mode1 p 16 Parts of the TV become hot Parts of the TV may become hot These temperature rises do not pose any problems in terms of performance or quality When pushed with a finger the display panel moves slightly and makes a noise There is a little gap around th...

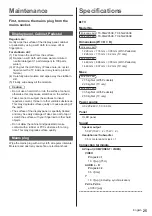
Page 25: ...panel is specially treated and may be easily damaged Take care not to tap or scratch the surface with your fingernail or other hard objects Do not allow the cabinet and pedestal to make contact with a rubber or PVC substance for a long time This may degrade surface quality Mains plug Wipe the mains plug with a dry cloth at regular intervals Moisture and dust may cause fire or electrical shock Spec...

Page 26: ... VHF E2 E12 VHF A H ITALY CATV S01 S05 CATV S11 S20 U1 U10 VHF H1 H2 ITALY UHF E21 E69 CATV S1 S10 M1 M10 CATV S21 S41 Hyperband PAL D K SECAM D K VHF R1 R2 VHF R3 R5 VHF R6 R12 UHF E21 E69 PAL 525 60 Playback of NTSC tape from some PAL Video recorders VCR M NTSC Playback from M NTSC Video recorders VCR NTSC AV input only Playback from NTSC Video recorders VCR Satellite dish input Female F type 75...

Page 27: ...ithout notice Mass and Dimensions shown are approximate For information about the power consumption display resolution etc refer to Product Information Sheet For information about the open source software refer to eHELP Search by Purpose Read first Before use Licence ...

Page 28: ...authority Penalties may be applicable for incorrect disposal of this waste in accordance with national legislation Note for the battery symbol bottom symbol This symbol might be used in combination with a chemical symbol In this case it complies with the requirement set by the Directive for the chemical involved Customer s Record The model number and serial number of this product may be found on t...

Page 29: ...egelen in deze handleiding De afbeeldingen in deze handleiding dienen slechts als voorbeeld Raadpleeg uw Europese Garantie als u contact wilt opnemen met uw plaatselijke Panasonic dealer voor assistentie Nederlands Modelnr TX 55GZ950E TX 55GZ960E TX 65GZ950E TX 65GZ960E Gebruiksaanwijzing OLED tv Raadpleeg eHELP ingebouwde bedieningsinstructies voor gedetailleerde instructies Gebruik van eHELP p 2...

Page 30: ...ng 3 Veiligheidsmaatregelen 5 Accessoires 9 De tv installeren 9 De muurbevestigingssteun monteren 13 Verbindingen 13 Bedieningsonderdelen 19 Automatisch instellen bij het eerste gebruik 21 Tv kijken 22 eHELP gebruiken 22 Veelgestelde vragen 24 Onderhoud 25 Specificaties 25 ...

Page 31: ...p het scherm inbranden Dit verschijnsel is geen defect en wordt niet door de garantie gedekt Stilstaande onderdelen in het beeld komen typisch voor bij Stilstaande afbeeldingen die continu in hetzelfde gedeelte weergegeven worden bv kanaalnummer kanaallogo andere logo s of een titelafbeelding enz Weergave van stilstaand of bewegend beeld in de beeldverhouding 4 3 of 14 9 enz Videogames Om inbrande...

Page 32: ...eze tv of andere apparaten verbinding maakt met het internet uittreksel uit ons privacybeleid We doen dit om onze klanten en de integriteit van onze diensten te beschermen evenals om de eigendomsrechten van Panasonic te beschermen Als u meer informatie wilt over de verwerking van uw informatie in deze context raadpleegt u de volledige tekst van ons privacybeleid dat wordt weergegeven op eHELP Zoek...

Page 33: ...ebruik Ga voor meer informatie naar MPEG LA LLC Zie http www mpegla com Dit teken geeft aan dat het product werkt op wisselstroom Dit tekent geeft een Klasse II of dubbel geïsoleerd elektrisch apparaat aan waarbij het product geen beveiligingsverbinding met de aarde massa nodig heeft Vervoer de tv alleen rechtop Veiligheidsmaatregelen Volg onderstaande waarschuwingen en voorzorgsmaatregelen om het...

Page 34: ...van schokken Zorg dat kinderen niet op de tv klimmen Plaats de tv niet op een schuin aflopende of onstabiele ondergrond en zorg ervoor dat de tv niet over de rand van de standaard hangt Waarschuwing Plaats een tv nooit op een onstabiele plaats Een tv kan vallen wat tot ernstig lichamelijk letsel of de dood kan leiden Veel soorten letsel vooral bij kinderen kunnen worden voorkomen door eenvoudige v...

Page 35: ...n staan Maar het gebruik van zulke netwerken kan illegaal zijn De SSID is de naam van een draadloos netwerk voor gegevensoverdracht Stel de ingebouwde draadloze LAN adapter niet bloot aan hoge temperaturen direct zonlicht of vocht Gegevens die via radiogolven worden verzonden en ontvangen kunnen worden onderschept en gevolgd Het ingebouwde draadloze LAN gebruikt de frequentiebanden 2 4 GHz en 5 GH...

Page 36: ...batterijen Gebruik geen oplaadbare batterijen Ni Cd enz Verbrand batterijen niet en haal ze niet uit elkaar Stel batterijen niet bloot aan extreme warmte zoals zonlicht vuur of dergelijke Gooi gebruikte batterijen weg volgens de voorschriften voor afvalverwijdering Verwijder de batterij uit het apparaat als u het gedurende langere tijd niet gaat gebruiken om lekken corrosie en explosie van de batt...

Page 37: ...aatst Zorg dat u ze niet per ongeluk weggooit De tv installeren Standaard Montageschroef 4 M4 15 Standaardkap Voorbereidingen Houd het schermonderdeel niet vast Zorg dat u de tv niet bekrast of breekt Plaats de tv niet tijdelijk op de vloer of een tafel De standaard monteren Bevestig de standaard stevig anders kan deze loskomen bij het plaatsen van de tv Monteer de standaard niet volgens een ander...

Page 38: ...king aansluiting verwijderen Verwijder het aansluitpaneel voordat u de kabels aansluit of loskoppelt Bevestig als de aansluitingen zijn voltooid het aansluitpaneel de standaardkap p 12 Aansluitpaneel De antenne en externe apparatuur aansluiten p 13 ...

Page 39: ...Voor het losmaken Houd het lipje ingedrukt Lipje Van de tv verwijderen Houd beide ontgrendelknoppen ingedrukt Ontgrendelknoppen Zet de kabels met de kabelbinder vast Bevestig de kabelbinder Steek de kabelbinder in een opening Gat Bundel de kabels Haken Schuif de punt onder de geleiders Losmaken Knop Houd de knop ingedrukt Van de tv verwijderen Houd beide ontgrendelknoppen ingedrukt Ontgrendelknopp...

Page 40: ...HDMI4 aansluiting kunt u het aansluitpaneel niet bevestigen Bewaar het verwijderde paneel voor toekomstig gebruik Leg niets op het aansluitpaneel de standaardkap C Van de tv verwijderen C De standaard verwijderen Verwijder de standaard aan de hand van de volgende procedures wanneer u de muurbevestigingssteun gebruikt of de tv opnieuw inpakt 1 Verwijder de standaardkap 2 Verwijder de montageschroev...

Page 41: ...tallatie heel voorzichtig met de tv om beschadiging te voorkomen Wees voorzichtig als u muurbevestigingssteunen aan de muur bevestigt Controleer altijd of er geen elektrische kabels of buizen door de muur lopen voordat u de steun ophangt Als de tv een langere periode niet wordt gebruikt demonteer deze dan van de vaste muurbevestiging om vallen en verwonding te voorkomen Verbindingen De afgebeelde ...

Page 42: ...ren Houd beide ontgrendelknoppen ingedrukt Ontgrendelknoppen Antenne TV Kabel RF kabel Aardse antenne Voor DVB C DVB T analoog Satellietverbinding Voor DVB S Dual tuner DiSEqC TV Satellietkabels met Multischakelaar Satellietschotel Dual tuner Enkele kabel TV Satellietkabel met router voor een enkele kabel Satellietschotel Enkele tuner TV Satellietkabel Satellietschotel Neem contact op met uw lokal...

Page 43: ...n DVB via IP clientfunctie en kan verbonden worden met een DVB via IP server of SAT IP compatibele servers om gestreamde content te ontvangen Het wordt aanbevolen om een LAN kabel te gebruiken voor verbinding met een DVB via IP server Bekabelde verbinding TV Kabel LAN kabel afgeschermd Gebruik een afgeschermde dubbeldraadse getwist paar STP LAN kabel DVB via IP server RF kabel Aardse antenne Satel...

Page 44: ...le kabel de 4K compatibele apparatuur aan op een HDMI aansluiting en u kunt naar content van 4K formaat kijken Ondersteuning van HDR vergroot niet de maximale helderheidsvermogens van het tv paneel HDMI autom Instellen menu Instellingen Reproduceert het beeld preciezer met het uitgebreide kleurengamma wanneer de met 4K compatibele apparatuur wordt aangesloten Selecteer de modus afhankelijk van de ...

Page 45: ...rker Raadpleeg de handleiding van het apparaat en de versterker voor informatie over de aansluitingen TV HDMI kabel Versterker met luidsprekersysteem Externe apparatuur DVD speler enz Gebruik HDMI2 om de tv aan te sluiten op een versterker met ARC Audio Return Channel functie Gebruik DIGITAL AUDIO als u een versterker zonder ARC functie aansluit TV Optische kabel DIGITAL AUDIO IN bv Versterker met...

Page 46: ...eergegeven Beschikbare kanalen en functies zijn afhankelijk van de CI module Als er geen gecodeerde kanalen verschijnen Gemeensch interface in het menu Instellingen Sommige in de handel verkrijgbare CI modules met een oudere firmwareversie werken mogelijk niet correct met deze nieuwe tv met CI v1 4 Neem in dat geval contact op met uw contentprovider Raadpleeg eHELP Zoeken op doel Functies Gemeensc...

Page 47: ...De tv aanzetten vanuit standby 12 eHELP eHELP weergeven ingebouwde bedieningsinstructies 13 Mijn app Hiermee wordt een favoriete applicatie toegewezen Wanneer dit is ingesteld kan de applicatie gemakkelijk worden gestart door op deze knop te drukken Raadpleeg eHELP Zoeken op doel Home Apps voor details 14 Selectie ingangsmodus TV Overschakelen tussen DVB S DVB C DVB T DVB via IP analoog AV Oversch...

Page 48: ...enste stand te selecteren Hoofdmenu Ongeveer 3 seconden ingedrukt houden om het hoofdmenu weer te geven OK in menu s 5 Kanaal omhoog omlaag Cursor omhoog omlaag in menu s 6 Volume omhoog omlaag Cursor naar links rechts in menu s 7 Hoofdschakelaar Hiermee zet u de tv aan of uit Om het apparaat volledig uit te schakelen moet u het netsnoer uit het stopcontact halen Stand by Aan Beeldschermonderhoud ...

Page 49: ...slaat u de pincode voor het kinderslot op 0000 kan niet worden opgeslagen Vink het tv signaal aan waarop u wilt afstellen en selecteer Start auto set up Het instelscherm verschilt afhankelijk van het geselecteerde land en tv signaal DVB S antenne instellen Zorg dat de satellietverbindingen zijn voltooid p 14 en selecteer de tunermodus Dual tuner Enkele tuner DVB C Netwerkinstellingen Gewoonlijk st...

Page 50: ...eningsinstructies van de tv Hier vindt u gedetailleerde uitleg over de bediening van de verschillende functies 1 Geef eHELP weer of Help eHELP Als eHELP eerder is gebruikt sinds de tv werd aangezet verschijnt een bevestigingsscherm om te selecteren of u naar de Eerste pagina wilt gaan of naar de Laatst bekeken pagina 2 Selecteer het menu selecteren openen Voor toegang tot Gebruik Groene Zoeken op ...

Page 51: ...ijving scrollen indien langer dan één pagina Wanneer de beschrijving wordt gemarkeerd Het referentiescherm openen Het menu bij de beschrijving weergeven alleen bij bepaalde beschrijvingen Rode De functies van deze tv bekijken Zoeken op doel Lees dit eerst Functies ...

Page 52: ... Systeemmenu menu Instellingen Een extern apparaat geeft abnormaal beeld of geluid bij aansluiting via HDMI Stel HDMI autom Instellen menu Instellingen in op Modus 1 p 16 Onderdelen van de tv worden heet Onderdelen van de tv kunnen heet worden Deze temperatuurverhoging vormt geen probleem voor de prestaties en de kwaliteit Als u met uw vinger op het beeldscherm drukt beweegt hij een beetje en maak...

Page 53: ...andeld en voorzien van een gevoelige oppervlaktelaag Tik en kras niet op het oppervlak met uw vingernagel of een hard voorwerp Zorg dat de behuizing en de standaard niet gedurende langere tijd in contact zijn met rubber of pvc Hierdoor kan de kwaliteit van het oppervlak afnemen Netsnoerstekker Maak de netsnoerstekker regelmatig schoon met een droge doek Vocht en stof kunnen brand of een elektrisch...

Page 54: ...ALIË CATV S01 S05 CATV S11 S20 U1 U10 VHF H1 H2 ITALIË UHF E21 E69 CATV S1 S10 M1 M10 CATV S21 S41 Hyperband PAL D K SECAM D K VHF R1 R2 VHF R3 R5 VHF R6 R12 UHF E21 E69 PAL 525 60 NTSC tapes afspelen via sommige PAL videorecorders VCR M NTSC Afspelen via M NTSC videorecorders VCR NTSC alleen AV ingang Afspelen via NTSC videorecorders VCR Ingang satellietschotel Vrouwelijk F type 75 2 Antenne inga...

Page 55: ...ving worden gewijzigd Gewicht en afmetingen bij benadering Raadpleeg het productinformatieblad voor informatie over het energieverbruik de schermresolutie enz Raadpleeg eHELP Zoeken op doel Lees dit eerst Voordat u het product gebruikt Licentie voor informatie over de openbronsoftware ...

Page 56: ...ke gemeente Afhankelijk van uw nationale wetgeving kunnen er boetes worden opgelegd bij het onjuist verwijderen van dit soort afval Let op het batterijsymbool Onderstaand symbool Dit symbool kan in combinatie met een chemisch symbool gebruikt worden In dit geval volstaan de eisen die zijn vastgesteld in de richtlijnen van de desbetreffende chemische stof In te vullen door de eigenaar Het modelnumm...

Page 57: ... TX 55GZ950E TX 55GZ960E TX 65GZ950E TX 65GZ960E Manual de utilizare _ _ _ ...

Page 58: ... Cuprins 3 13 13 21 22 _ 22 24 ...

Page 59: ... 3 _ _ _ _ _ J ...

Page 60: ... 4 _ _ _ _ ...

Page 61: ... 5 ...

Page 62: ... 6 deschise ...

Page 63: ... 7 Piedestal ...

Page 64: ... 8 _ _ _ ª _ ...

Page 65: ... 9 Piedestal Manual de utilizare Piedestal Capac piedestal ...

Page 66: ... A B J ...

Page 67: ... _ _ ...

Page 68: ... capacului pentru piedestal _ _ C C _ 3 ...

Page 69: ...pe perete Model de 55 inci Model de 65 inci minimum 23 mm maximum 28 mm Diametru M6 Avertisment _ Conexiuni Terminale 2 3 4 5 6 7 1 8 9 10 11 12 2 Slot CI 1 2 p 18 p 17 18 4 HDMI1 2 p 15 16 17 5 Port USB 1 _ p 14 7 Terminal de satelit p 14 ...

Page 70: ... 14 8 Terminal ETHERNET p 16 9 Port USB 2 3 _ 10 HDMI3 4 11 _ p 17 12 DIGITAL AUDIO p 17 µ p 16 Conexiune prin satelit Tuner dual DiSEqC Tuner singular ...

Page 71: ... _ _ _ _ _ _ _ ...

Page 72: ... _ _ µ µ µ µ _ µ µ _ µ ...

Page 73: ... _ _ _ _ _ _ _ _ ...

Page 74: ... _ _ _ __ _ _ ...

Page 75: ... Identificarea 3 Meniu principal eAJUTOR _ _ HOME _ ...

Page 76: ... 1 2 3 5 6 7 4 _ Meniu principal J _ _ ...

Page 77: ... acestuia _ ...

Page 78: ... _ _ _ _ 3 eAJUTOR _ eAJUTOR _ _ _ 3 ...

Page 79: ... ...

Page 80: ... J _ _ _ _ _ _ I _ _ J _ _µ _ J J ...

Page 81: ... J piedestalul J _ Model de 55 inci Model de 65 inci _ Model de 55 inci Model de 65 inci Masa Model de 55 inci Model de 65 inci _ ª ª ª _ _ _ Y P R R ...

Page 82: ... _ µ µ ETHERNET _ _ _ _ _ _ _ _ º º 1 ª µ µ ª µ µ ª 2 _ ...

Page 83: ... _ ...

Page 84: ..._ _ Web Site http www panasonic com Panasonic Corporation 2019 ...

Reviews: