English
16
AV devices
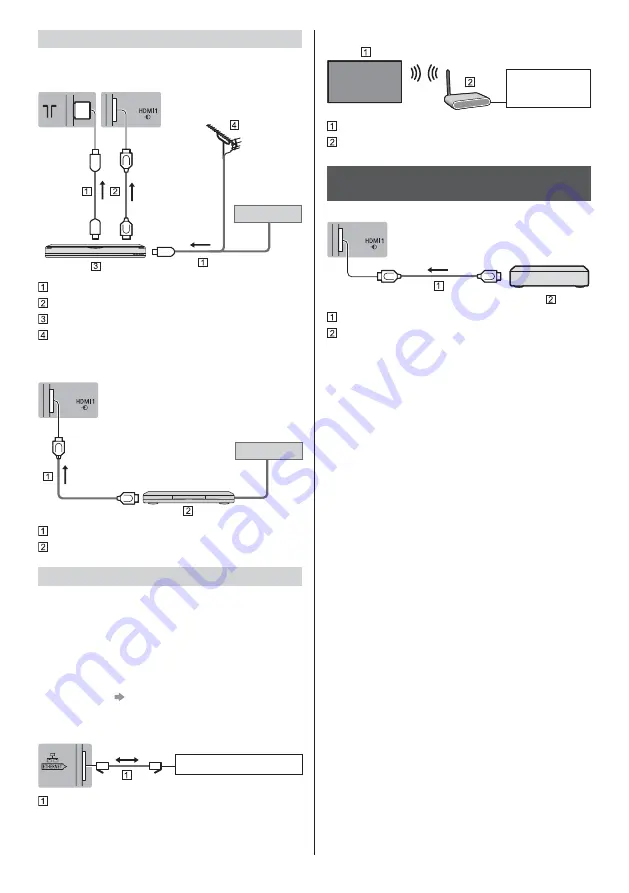
DVD Recorder / Blu-ray Recorder, etc.
TV
Cable
RF cable
HDMI cable
DVD Recorder / Blu-ray Recorder, etc.
Terrestrial aerial
Set top box
TV
Cable
HDMI cable
Set top box
Network
A broadband network environment is required to be able
to use internet services.
If you do not have any broadband network services,
please consult your retailer for assistance.
Prepare the internet environment for wired connection
or wireless connection.
Setup of the network connection will start when first
using the TV.
(p. 21)
Wired connection
TV
Internet environment
LAN cable (Shielded)
Use Shielded Twist Pair (STP) LAN cable.
Wireless connection
Internet
environment
Built-in wireless LAN (Rear of the TV)
Access point
Connections for 4K / HDR compatible
equipment
TV
HDMI cable
4K / HDR compatible equipment
Connect the 4K compatible equipment to HDMI
terminal using a 4K compatible cable and you can
watch content in 4K format.
Supporting HDR does not increase the peak
brightness capabilities of the TV panel.
[HDMI Auto Setting] (Setup Menu)
Reproduces the image more precisely with the
expanded colour gamut when connecting the 4K
compatible equipment. Select the mode depending on
the equipment.
[Mode1]:
For better compatibility. Set to [Mode1] when the
image or sound in HDMI input is not played properly.
[Mode2]:
For the 4K compatible equipment that has the
function to output the image precisely with the
expanded colour gamut
To change the mode
1. Select the HDMI input mode connected to the
equipment.
2. Display the menu and select [HDMI Auto Setting]
(Setup Menu).
For information about the valid format, refer to
[eHELP] (Search by Purpose > Watching > 4K
resolution > HDMI Auto Setting).
Summary of Contents for TX-55GZ2000E
Page 12: ...English 12 Terminal cover C C To remove from the TV C ...
Page 40: ...Nederlands 12 Aansluitpaneel C C Van de tv verwijderen C ...
Page 57: ... TX 55GZ2000E TX 65GZ2000E Manual de utilizare _ _ ...
Page 58: ... 2 Cuprins 3 8 9 13 14 19 ...
Page 59: ... 3 _ Mediul de instalare A B ...
Page 60: ... 4 J _ ª ª ...
Page 61: ... 5 ªªª ...
Page 62: ... 6 Piedestal ...
Page 63: ... 7 ª ª ª ª ª ª ª ª ...
Page 64: ... 8 ª ªªª ª ª ª Piedestal _ _ Manual de utilizare ...
Page 65: ... Piedestal Capac piedestal A B ...
Page 66: ... _ ...
Page 67: ... µ capacului pentru piedestal ...
Page 68: ... C C C ...
Page 69: ... 2 3 Instalarea prindere pe perete ...
Page 70: ... µ 2 3 4 5 6 7 1 8 9 10 11 12 _ µ ...
Page 71: ... ª ...
Page 72: ... ª ª ...
Page 73: ... ...
Page 74: ... ª ª ª ...
Page 75: ... 2 Meniu principal 3 PICTURE _ eAJUTOR 20 HOME ...
Page 76: ... 20 22 APPS 23 24 25 26 5 6 7 4 1 2 3 Meniu principal µ ...
Page 77: ... acestuia 2 ...
Page 78: ... 22 _ 2 3 eAJUTOR eAJUTOR 2 3 ...
Page 79: ... 23 ...
Page 80: ... 24 º _ º º J _ J _ ...
Page 81: ... 25 piedestalul ...
Page 83: ... 27 _ 1 Securitate ª ...
Page 84: ... Web Site http www panasonic com Panasonic Corporation 2019 ...


