background image

English

   - 4 -

Maintenance

First, remove the mains plug from the mains 

socket.

Display panel, Cabinet, Pedestal

Regular care:

Gently wipe the surface of the display panel, cabinet, 

or pedestal by using a soft cloth to remove dirt or 

fingerprints.

For stubborn dirt:
1. 

First clean the dust from the surface.

2. 

Dampen a soft cloth with clean water or diluted 

neutral detergent (1 part detergent to 100 parts 

water).

3. 

Wring out the cloth firmly. (Please note, do not 

let liquid enter the TV inside as it may lead to 

product failure.)

4. 

Carefully wipe moisten and wipe away the 

stubborn dirt.

5. 

Finally, wipe away all the moisture.

Caution

Do not use a hard cloth or rub the surface too hard, 

otherwise this may cause scratches on the surface.

• 

Take care not to subject the surfaces to insect 

repellent, solvent, thinner or other volatile 

substances. This may degrade surface quality or 

cause peeling of the paint.

• 

The surface of the display panel is specially treated 

and may be easily damaged. Take care not to tap 

or scratch the surface with your fingernail or other 

hard objects.

• 

Do not allow the cabinet and pedestal to make 

contact with a rubber or PVC substance for a long 

time. This may degrade surface quality.

Mains plug

Wipe the mains plug with a dry cloth at regular 

intervals.

Moisture and dust may cause fire or electrical shock.

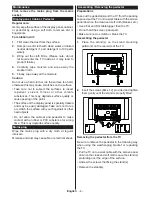
Assembling / Removing the pedestal

Preparations

Take out the pedestal(s) and the TV from the packing 

case and put the TV onto a work table with the screen 

panel down on the clean and soft cloth (blanket, etc.)

• Use a flat and firm table bigger than the TV.
• 

Do not hold the screen panel part.

• 

Make sure not to scratch or break the TV.

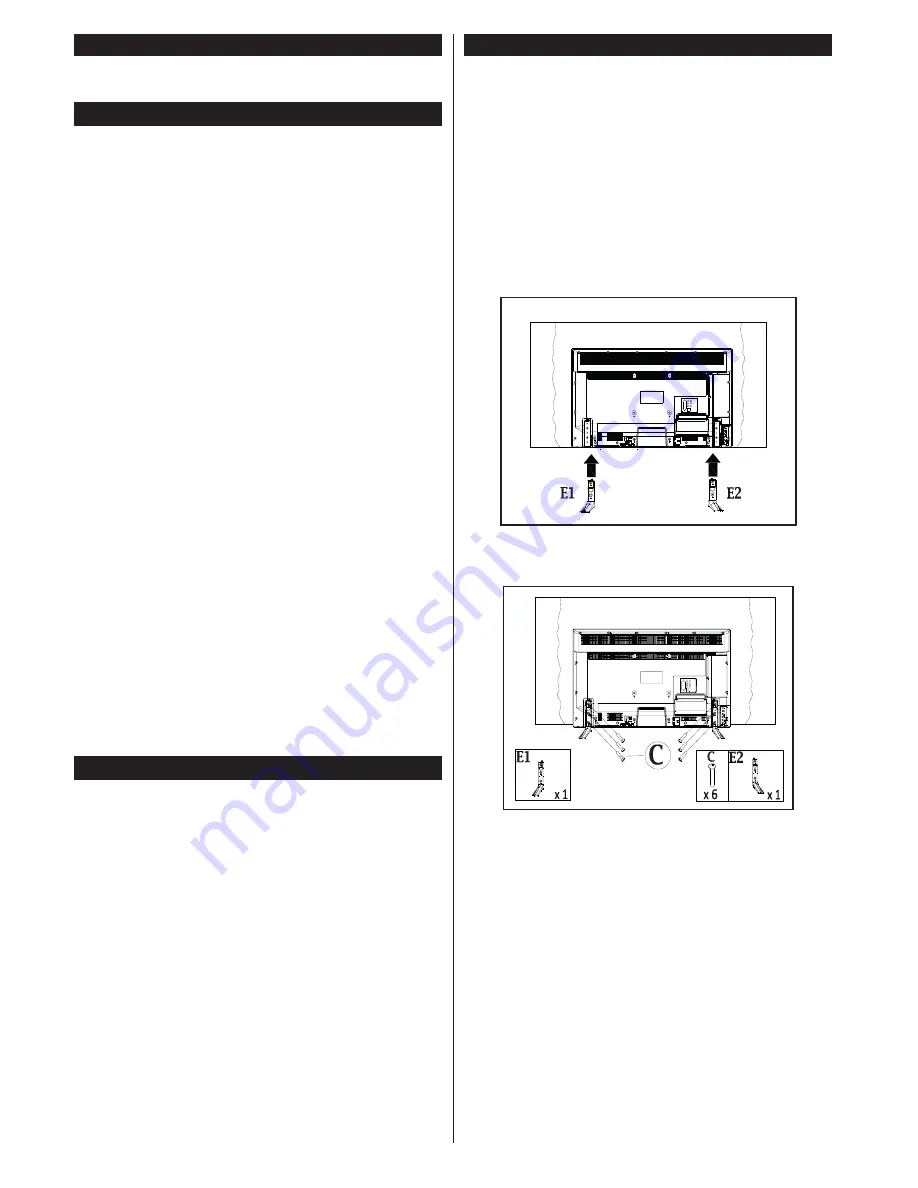
Assembling the pedestal
1. 

Place the stand(s) on the stand mounting 

pattern(s) on the rear side of the TV. 

2. 

Insert the screws 

(M4 x 12)

 provided and tighten 

them gently until the stand is properly fitted.

Removing the pedestal from the TV

Be sure to remove the pedestal in the following way 

when using the wall-hanging bracket or repacking 

the TV.

• 

Put the TV onto a work table with the screen panel 

down on the clean and soft cloth. Leave the stand(s) 

protruding over the edge of the surface.

• Unsrew the screws that fixing the stand(s).
• 

Remove the stand(s).

Summary of Contents for TX-55DS352E

Page 1: ...ENTO INSTRUÇÕES DE UTILIZAÇÃO ISTRUZIONI DI FUNZIONAMENTO TX 55DS352E COLOUR TELEVISION WITH REMOTE CONTROL TÉLÉVISEUR COULEUR AVEC TÉLÉCOMMANDE TELEVISOR A COLOR CON MANDO A DISTANCIA TELEVISÃO A CORES COM CONTROLO REMOTO TELEVISIONE A COLORI CON TELECOMANDO ...

Page 2: ...Media Playback via USB Input 13 Media Player Menu 13 CEC and CEC RC Passthrough 13 TV Menu Contents 14 General TV Operation 18 Using the Channel List 18 Configuring Parental Settings 18 Electronic Programme Guide EPG 18 Teletext Services 19 Software Upgrade 19 Troubleshooting Tips 19 PC Input Typical Display Modes 20 AV and HDMI Signal Compatibility 20 Supported Video File Formats for USB Mode 21 ...

Page 3: ...o dripping or splashing of liquids and do not place objects filled with liquids such as vases cups etc on or over the TV e g on shelves above the unit Do not expose the TV to direct sunlight or do not place open flames such as lit candles on the top of or near the TV Do not place any heat sources such as electric heaters radiators etc near the TV set Do not place the TV on the floor and inclined s...

Page 4: ...GS Read the instructions before mounting your TV on the wall The wall mount kit is optional You can obtain from your local dealer if not supplied with your TV Do not install the TV on a ceiling or on an inclined wall Use the specified wall mounting screws and other accessories Tighten the wall mounting screws firmly to prevent the TV from fall Do not over tighten the screws WARNING Apparatus conne...

Page 5: ...scratch the surface with your fingernail or other hard objects Do not allow the cabinet and pedestal to make contact with a rubber or PVC substance for a long time This may degrade surface quality Mains plug Wipe the mains plug with a dry cloth at regular intervals Moisture and dust may cause fire or electrical shock Assembling Removing the pedestal Preparations Take out the pedestal s and the TV ...

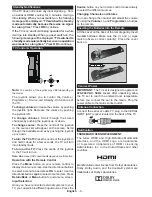
Page 6: ...on is selected or Left button while Custom option is selected Screen will be off in 15 seconds message will be displayed on the screen Select Proceed and press OK to turn the screen off immediately If you don t press any button the screen will be off in 15 seconds Press any button on the remote or on the TV to turn the screen on again Note Screen Off option is not available if the Mode is set to G...

Page 7: ... displayed via control button Operation with the Remote Control Press the Menu button on your remote control to display main menu screen Use the directional buttons to select a menu tab and press OK to enter Use the directional buttons again to select or set an item Press Return Back or Menu button to quit a menu screen Input Selection Once you have connected external systems to your TV you can sw...

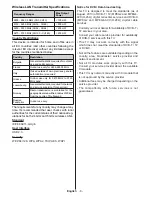
Page 8: ...onal legislation Note for the battery symbol bottom symbol This symbol might be used in combination with a chemical symbol In this case it complies with the requirement set by the Directive for the chemical involved Authorized Representative Panasonic Testing Centre Panasonic Marketing Europe GmbH Winsbergring 11 22525 Hamburg Germany Web Site http www panasonic com Specification TV Broadcasting P...

Page 9: ...at any time It s recommended that user checks with local authorities for the current status of their national reg ulations for both 2 4 GHz and 5 GHz wireless LAN s Standard IEEE 802 11 a b g n Host Interface USB 2 0 Security WEP 64 128 WPA WPA2 TKIP AES WAPI Notice for DVB Data broadcasting This TV is designed to meet the standards as of August 2013 of DVB T T2 MPEG2 and MPEG4 AVC H 264 digital t...

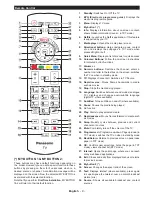
Page 10: ... Pauses the media being played 19 No function 20 Play Starts to play selected media 21 Rapid advance Moves frames forward in media such as movies 22 Swap Quickly cycles between previous and current channels or sources 23 Mute Completely turns off the volume of the TV 24 Programme Programme up down Page up down in TXT mode switches the TV on when in standby mode 25 Back Return Returns to previous s...

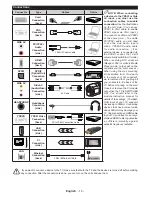
Page 11: ... connection If an external device is connected via the SCART socket the TV will automatically switch to AV mode When receiving DTV channels Mpeg4 H 264 or while in Media Player mode output will not be available via the scart socket When using the wall mounting kit available from third party in the market if not supplied we recommend that you plug all your cables into the back of the TV before moun...

Page 12: ...e selected Search Step Analogue If Analogue broadcast search option is turned on the TV will search for analogue broadcasts after other initial settings are completed Additionally you can set a broadcast type as your favourite one Priority will be given to the selected broadcast type during the search process and the channels of it will be listed on the top of the Channel List When finished press ...

Page 13: ... button and activate All files in the list will be continuously played in the same random order CEC and CEC RC Passthrough This function allows to control the CEC enabled devices that are connected through HDMI ports by using the remote control of the TV The CEC option in the Setup More menu should be set as Enabled at first Press the Source button and select the HDMI input of the connected CEC de...

Page 14: ... of the picture by pressing Left or Right buttons Picture Zoom Sets the desired image size format Film Mode Films are recorded at a different number of frames per second to normal television programmes Turn this feature on when you are watching films to see the fast motion scenes clearly Skin Tone Skin tone can be changed between 5 and 5 Colour Shift Adjust the desired colour tone HDMI Full Range ...

Page 15: ...s AVL Automatic Volume Limiting Sets the sound to obtain fixed output level between programmes Headphone Lineout When you connect an external amplifier to your TV using the headphone jack you can select this option as Lineout If you have connected headphones to the TV set this option as Headphone Please ensure before using headphones that this menu item is set to Headphone If it is set to Lineout ...

Page 16: ...see all available Audio Description menu options This feature is available only if the broadcaster supports it Netflix If this feature is supported by your TV you can view your ESN number and deactivate Netflix ESN number is an unique ID number for Netflix created especially to identify your TV More Displays other setting options of the TV Menu Timeout Changes timeout duration for menu screens Sof...

Page 17: ...rches and stores cable DVB stations Analogue Searches and stores analogue stations Manual channel scan This feature can be used for direct broadcast entry Network channel scan Searches for the linked channels in the broadcast system Digital Aerial Searches for aerial network channels Digital Cable Searches for cable network channels Analogue fine tune You can use this setting for fine tuning analo...

Page 18: ...country option in the First Time Installation is set as France Italy or Austria Maturity Lock s value will be set to 18 as default Child Lock If this option is set to ON the TV can only be controlled by the remote control In this case the control buttons on the TV will not work Internet Lock If this option is set to ON the open browser application in the portal will be disabled Set to OFF to relea...

Page 19: ...OK button Setup Menu will be displayed Then select More and press the OK button Navigate to Software upgrade and press the OK button In Upgrade options menu select Scan for upgrade and press OK button to check for a new software upgrade If a new upgrade is found it starts to download the upgrade After the download is completed confirm the question asking about rebooting the TV by pressing the OK t...

Page 20: ...0 75Hz 32 1280x960 85Hz 33 1280x1024 60Hz 34 1280x1024 75Hz 35 1280x1024 85Hz 36 1400x1050 60Hz 37 1400x1050 75Hz 38 1400x1050 85Hz 39 1440x900 60Hz 40 1440x900 75Hz 41 1600x1200 60Hz 42 1680x1050 60Hz 43 1920x1080 60Hz 44 1920x1200 60Hz AV and HDMI Signal Compatibility Source Supported Signals Available EXT SCART PAL O SECAM O NTSC4 43 O NTSC3 58 O RGB 50 60 O Side AV PAL O SECAM O NTSC4 43 O NTS...

Page 21: ...30fps 10 Mbps Other 1080P 30fps 40 Mbps avi MPEG1 2 MPEG4 Sorenson H 263 H 263 H 264 WMV3 Motion JPEG mkv MPEG1 2 MPEG4 H 263 H 264 WMV3 Motion JPEG asf Sorenson H 263 H 264 WMV3 Motion JPEG flv WMV3 1080P 30fps 40 Mbps swf RV30 RV40 1080P 30fps 40 Mbps wmv H 264 WMV3 VC1 H 264 1080Px2 30fps 62 5 Mbps 1080P 60fps 62 5 Mbps Other 1080P 30fps 40 Mbps mp4 mov 3gpp 3gp MPEG transport stream ts trp tp ...

Page 22: ...2 8Kbps 384Kbps MPEG1 2 Layer3 8Kbps 320Kbps WMA 128bps 320Kbps 8KHz 48KHz WMA 10 Pro M0 192kbps 48KHz WMA 10 Pro M1 384kbps 48KHz WMA 10 Pro M2 768kbps 96KHz mkv mka MPEG1 2 Layer1 32Kbps 448Kbps 16KHz 48KHz MPEG1 2 Layer2 8Kbps 384Kbps MPEG1 2 Layer3 8Kbps 320Kbps AC3 32Kbps 640Kbps 32KHz 44 1KHz 48KHz AAC HEAAC 8KHz 48KHz WMA 128bps 320Kbps 8KHz 48KHz WMA 10 Pro M0 192kbps 48KHz WMA 10 Pro M1 3...

Page 23: ...32Kbps 640Kbps 32KHz 44 1KHz 48KHz AAC HEAAC 8KHz 48KHz swf MPEG1 2 Layer3 8Kbps 320Kbps 16KHz 48KHz ec3 EAC3 32Kbps 6Mbps 32KHz 44 1KHz 48KHz rm rmvb ra AAC HEAAC 8KHz 48KHz LBR cook 6Kbps 128Kbps 8KHz 11 025KHz 22 05KHz 44 1KHz wma wmv WMA 128bps 320Kbps 8KHz 48KHz WMA 10 Pro M0 192kbps 48KHz WMA 10 Pro M1 384kbps 48KHz WMA 10 Pro M2 768kbps 96KHz webm VORBIS Up to 48KHz Supported Subtitle File ...

Page 24: ... HDMI cable not supplied you can refer to the following resolution information 56Hz 60Hz 66Hz 70Hz 72Hz 75Hz 640x400 þ 640x480 þ þ þ þ 800x600 þ þ þ þ þ 832x624 þ 1024x768 þ þ þ þ þ 1152x864 þ þ þ 1152x870 þ 1280x768 þ þ 1360x768 þ 1280x960 þ þ 1280x1024 þ þ 1400x1050 þ þ 1440x900 þ þ 1600x1200 þ 1680x1050 þ 1920x1080 þ ...

Page 25: ... change the setting from Automatic to Manual Now you can enter the Manual IP and or Manual DNS values Select the related item in the drop down menu and enter the new values using the numeric buttons of the remote Press the OK button to save settings when complete Wireless Connectivity To Connect to a Wireless Network The TV cannot connect to the networks with a hidden SSID To make your modem s SSI...

Page 26: ...lished correctly you will be able to access the shared files from your mobile device via the Media Player of your TV Enter the Media Player menu and the playback device selection OSD will be displayed Select your mobile device and press the OK button to continue If available you can download a virtual remote controller application from the server of your mobile device application provider Note Thi...

Page 27: ...en perform the network selection again Or press the Blue button to switch to next media type quickly without changing the network Refer to the Media Player menu section for further information on file playback If a problem occurs with the network please switch your television off at the wall socket and back on again Trick mode and jump are not supported with theAudio Video Sharing feature PC HDD M...

Page 28: ... and the Add to Speed Dial options To navigate the web browser use the directional buttons on the remote or a connected mouse To see the browser options bar move the cursor to the top of the page or press the Back Return button History Tabs and Bookmarks options and the browser bar which contains previous next buttons the refresh button the adress search bar the Speed Dial and the Opera buttons ar...

Reviews: