background image

English

13


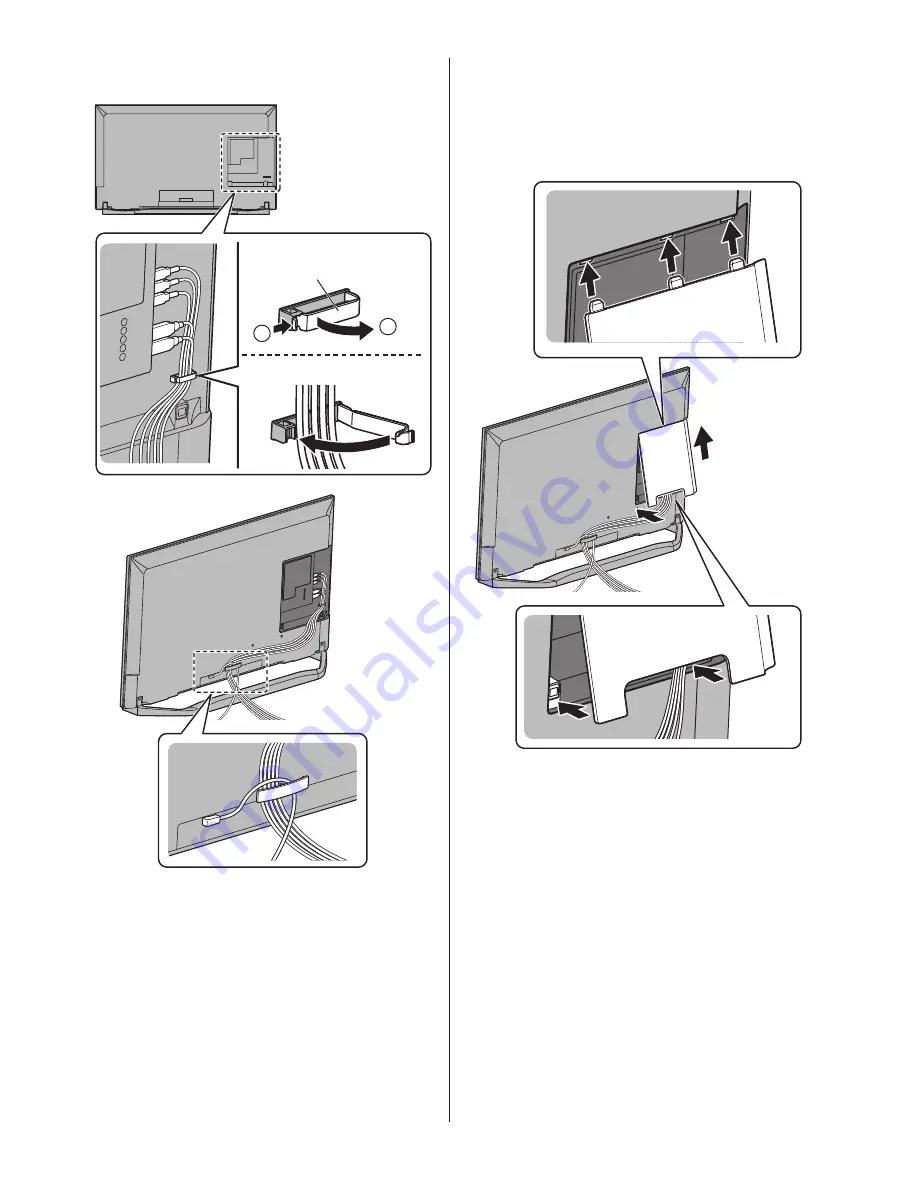
Fixing the cables using the cable clamp and 

cable guide

1

2

Open

Close

Cable clamp

● 

Fix cables as necessary.

● 

When using the optional accessory, follow the option’s 

assembly manual to fix cables.


Attaching the cable cover

● 

Do not apply load to the cable cover.

● 

Be careful not to nip the cables between the TV and 

the cable cover.

● 

When using AV terminal, you cannot attach the cable 

cover. Keep the removed cable cover for future use.

Summary of Contents for TX-50EX750B

Page 1: ...is product and retain them for future reference Please carefully read the Safety Precautions of this manual before use The images shown in this manual are for illustrative purposes only English Model No TX 58DX902B TX 65DX902B For more detailed instructions please refer to eHELP Built in Operating Instructions How to use eHELP p 18 M1115 1125 English ...

Page 2: ...ck Start Guide Accessories 7 Connections 9 Identifying Controls 14 First time Auto Setup 17 Using your VIERA Watching TV 18 How to Use eHELP 18 Viewing 3D images 19 Others FAQs 20 Maintenance 21 Specifications 21 For information about the trademarks refer to eHELP Support Licence ...

Page 3: ... http www mpegla com Transport only in upright position This mark shows that the construction of the product is double insulated Safety Precautions To help avoid risk of electrical shock fire damage or injury please follow the warnings and cautions below Mains plug and lead Warning If you detect anything unusual immediately switch off the mains supply switch and remove the mains plug IMPORTANT THE...

Page 4: ...nsure that children do not climb on the TV Do not place the TV on sloping or unstable surfaces and ensure that the TV does not hang over the edge of the base Warning Never place a TV in an unstable location A TV may fall causing serious personal injury or death Many injuries particularly to children can be avoided by taking simple precautions such as Using cabinets or stands recommended by the man...

Page 5: ...nsmitted and received over radio waves may be intercepted and monitored The built in wireless LAN uses 2 4 GHz and 5 GHz frequency bands To avoid malfunctions or slow response caused by radio wave interference when using the built in wireless LAN keep the TV away from other devices that use 2 4 GHz and 5 GHz signals such as other wireless LAN devices microwave ovens and mobile phones When problems...

Page 6: ... any other uncomfortable sensation or clearly see double images Take an appropriate break before continuing to view When you set the 3D effect by using 3D Adjustment take into account that the vision of 3D images varies among different individuals Do not view 3D images if you have a history of oversensitivity to light heart problems or any other medical conditions When viewing 3D images your sense...

Page 7: ...ther Take care not to throw them away unintentionally Optional accessories 3D Eyewear If you need 3D Eyewear please purchase Panasonic optional accessories Use Panasonic 3D Eyewear supporting Bluetooth wireless technology for active shutter 3D For information about 3D Eyewear http panasonic net viera support Assembling Removing the pedestal When using the pedestal this TV is slightly inclined beca...

Page 8: ...g the pedestal from the TV Be sure to remove the pedestal in the following way when using the wall hanging bracket or repacking the TV 1 Remove the assembly screws from the TV 2 Lift up the TV at a slight angle from the pedestal as shown View from the side 3 Remove the assembly screws from the bracket ...

Page 9: ...und may occur or operation of other equipment may be affected Please also read the manual of the equipment being connected Removing the cable cover from the TV Be sure to remove the cable cover before connecting or disconnecting cables When the connections are completed attach the cable cover p 13 Cable cover Terminals 4 5 6 2 3 1 8 9 10 11 12 7 1 Model name plate 2 CI slot p 12 3 SD Card slot 4 U...

Page 10: ...ellite connection For Freesat Other Sat Satellite Dual Tuner TV Satellite cables Satellite dish Single Tuner TV Satellite cable Satellite dish To ensure your satellite dish is correctly installed please consult your local dealer Also consult the received satellite broadcasting companies for details AV devices DVD Recorder VCR TV RF cable HDMI cable DVD Recorder VCR Terrestrial aerial Cable TV box ...

Page 11: ...ompatible cable and you can watch content in 4K format HDMI Auto Setting Setup Menu Reproduces the image more precisely with the expanded colour gamut when connecting the 4K compatible equipment Select the mode depending on the equipment Mode1 For better compatibility Set to Mode1 when the image or sound in HDMI input is not played properly Mode2 For the 4K compatible equipment that has the functi...

Page 12: ...dule Insert or remove the CI module completely in the correct direction as shown Normally encrypted channels will appear Viewable channels and their features depend on the CI module If encrypted channels do not appear Common Interface in the Setup Menu There might be some CI modules in the market with older firmware versions that do not work fully interoperable with this new CI v1 3 TV In this cas...

Page 13: ...y When using the optional accessory follow the option s assembly manual to fix cables Attaching the cable cover Do not apply load to the cable cover Be careful not to nip the cables between the TV and the cable cover When using AV terminal you cannot attach the cable cover Keep the removed cable cover for future use ...

Page 14: ...in Standby mode switches TV on 13 eHELP Displays eHELP Built in Operating Instructions 14 Light Lights the buttons for about 5 seconds Press again to turn off the button lights 15 Input mode selection TV switches to Freesat DVB Analogue Other Sat Satellite AV switches to AV input mode from Input Selection list 16 Exit Returns to the normal viewing screen 17 Cursor buttons Makes selections and adju...

Page 15: ...infrared sensors You can operate the switch without registration It is recommended to speak within approx 15 cm from the microphone of Touch Pad Controller when using the Voice Control function For details refer to eHELP Functions Touch Pad Controller 1 Standby On Off switch 2 Volume Up Down 3 On screen remote control Press to display the remote control GUI Graphical User Interface 4 Touch pad For...

Page 16: ...al receiver Do not place any objects between the TV remote control signal receiver and remote control 2 Ambient sensor Senses brightness to adjust picture quality when Ambient Sensor in the Picture Menu is set to On 3 Power LED Red Standby Green On Orange Standby with some functions recording etc active The LED blinks when the TV receives a command from the remote control 4 Input mode selection Pr...

Page 17: ...is for shop display To change the viewing environment later on the set will need to have all settings initialised by accessing Shipping Condition Set up the network connection Select your country Auto Setup screen varies depending on the country and the signal mode Satellite Antenna Setup Ensure the satellite connections are completed p 10 and select the tuner mode Dual Tuner Single Tuner Select y...

Page 18: ...umbers are in the 0 99 range How to Use eHELP eHELP is the detailed operating instructions built into the TV and gives a more detailed explanation for a better understanding of the operation of each feature 1 Display eHELP or Help eHELP If the eHELP has been accessed previously since the TV was turned on the confirmation screen is displayed to select whether to go to the First page or to the Last ...

Page 19: ...ce 3D photos and 3D videos taken by 3D compatible Panasonic products Available in Media Player and Network services 2D images converted to 3D Set to 2D 3D mode in 3D Mode Selection Picture 3D Settings 3D Mode Content in 4K format cannot be converted to 3D mode Ensure that the registration of the 3D Eyewear has been completed For details read the manual of the 3D Eyewear 1 Turn the 3D Eyewear on an...

Page 20: ...problems TV Self Test Help Menu Turn the TV off with Mains power On Off switch then turn it on again If the problem persists initialise all settings Shipping Condition in System Menu Setup Menu The image or sound from external equipment are unusual when the equipment is connected via HDMI Set HDMI Auto Setting Setup Menu to Mode1 p 11 Unusual sound from the TV Whirring sound of cooling fan may be ...

Page 21: ...ce for a long time This may degrade surface quality Mains plug Wipe the mains plug with a dry cloth at regular intervals Moisture and dust may cause fire or electrical shock Rear panel Cooling fan The unit is equipped with a cooling fan on the rear side To remove dust or other foreign materials adhering to the fan vacuum it attaching lightly the opening of the suction nozzle of a vacuum cleaner to...

Page 22: ...2 Digital terrestrial services PAL I UHF E21 68 PAL I VHF A J CATV S1 S20 UHF E21 E69 CATV S21 S41 Hyperband PAL 525 60 Playback of NTSC tape from some PAL Video recorders VCR or NTSC disc playback from DVD player and recorder M NTSC Playback from M NTSC Video recorders VCR NTSC AV input only Playback from NTSC Video recorders VCR Satellite dish input Female F type 75 Ω 2 Aerial input UHF VHF UHF ...

Page 23: ...g the TV onto the wall hanging bracket not supplied with the TV Warning Using other wall hanging brackets or installing a wall hanging bracket by yourself have the risk of personal injury and product damage In order to maintain the unit s performance and safety be absolutely sure to ask your dealer or a licensed contractor to secure the wall hanging brackets Any damage caused by installing without...

Page 24: ...289 8333 Monday Friday 9 00am 5 00pm Excluding public holidays For further support on your product please visit our website www panasonic co uk Direct Sales at Panasonic UK Order accessory and consumable items for your product with ease and confidence by phoning our Customer Communications Centre Monday Friday 9 00am 5 00pm Excluding public holidays Or go on line through our Internet Accessory ord...

Reviews: