background image

English

31

This recording may not start if another recording is in 
progress, TV signal condition is bad or there are no 
images displayed.


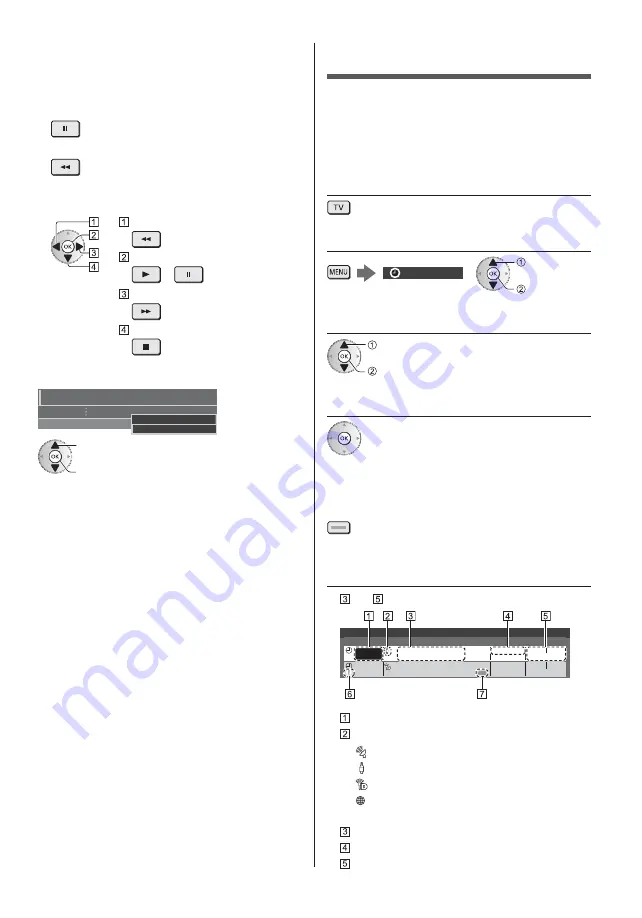
To operate [REW LIVE TV]

To pause

To search backward (up to 90 minutes)

After pausing or searching backward, the following 
buttons are available for operation.

  Search backward

  Playback / Pause

   /  

  Search forward

  Return to the current programme


To stop [REW LIVE TV]

REW LIVE TV

Recording Setup

Auto
Off

select [Off]

store

If you stop [REW LIVE TV], the recorded content for 
[REW LIVE TV] will be deleted.

[REW LIVE TV] is stopped and the recorded content 
is deleted automatically in the following conditions:

(Even if [REW LIVE TV] stops for the following 
conditions, as long as the setting is [Auto], a new 
recording starts automatically in a condition that 
makes the recording available.)


Other channels selected


Locked channel selected


Invalid channel selected


No TV signal


External input selected


When the full-screen application (TV Guide, Media 
Player, eHELP, etc.) is launched


When the TV enters Standby or is turned off

Timer Programming

This function allows you to select programmes that you 
want to record to the USB HDD.

For details, refer to [eHELP] (Recording > Timer 
Programming).

1

  Select DVB-S, DVB-C, DVB-T or  

DVB-via-IP

2

  Display the menu and select [Timer]

Timer

 select

 access

3

  Select [Timer Programming]

 select

 access

4

  Start making the settings

[USB HDD Rec.]:

Records the programme to the USB HDD.

To select the appropriate CI module for the programme 
to record

 (yellow)

5

  Select and set the item  

(channel, date, start time, end time)

 and   can also be entered with numeric buttons.

18:00

20:00

3 ITV1

21:30

22:30

Red Cap

BBC ONE

1

Guide

Timer Programming

Function

No.

Date

Start

End

Channel Name

Wed 21.10.2015 10:46

USB HDD Rec.

USB HDD Rec.

Wed 21.10.2015

(60 min.)

(120 min.)

Thu 22.10.2015

<TIMER>

  Function [USB HDD Rec.]

  TV mode

[

]: DVB-S

[

]: DVB-C

[

]: DVB-T

[ ]: DVB-via-IP

You cannot change the mode within the menu.

  Channel position, channel name, etc.

  Date

  Start time / End time / Duration (automatic display)

Summary of Contents for TX-50DXW804

Page 1: ...refully read the Safety Precautions of this manual before use The images shown in this manual are for illustrative purposes only Please refer to Pan European Guarantee Card if you need to contact your...

Page 2: ...gs 23 Retuning from Setup Menu 24 Tuning and Editing Channels 25 Multi Window 26 Child Lock 26 Watching External Inputs 27 Viewing Teletext 28 Using TV Guide 29 USB HDD Recording 30 Timer Programming...

Page 3: ...ty or damage arising from operation and or performance from usage of such other maker s peripheral devices The recording and playback of content on this or any other device may require permission from...

Page 4: ...V must not be exposed to dripping or splashing water and objects filled with liquid such as vases must not be placed on top of or above the TV Do not insert foreign objects into the TV through the air...

Page 5: ...way Built in wireless LAN Caution Do not use the built in wireless LAN to connect to any wireless network SSID for which you do not have usage rights Such networks may be listed as a result of searche...

Page 6: ...e heat such as sunshine fire or the like Make sure you dispose of batteries correctly Remove the battery from the unit when not using for a prolonged period of time to prevent battery leakage corrosio...

Page 7: ...bania Andorra Austria Belgium Bulgaria Croatia Cyprus Czech Republic Denmark Estonia Finland France Germany Greece Hungary Italy Iceland Latvia Liechtenstein Lithuania Luxembourg Malta Monaco Monteneg...

Page 8: ...etooth wireless technology for active shutter 3D For information about 3D Eyewear English only http panasonic net viera support Installing the TV and speaker Ensure that the TV and speaker do not hang...

Page 9: ...nt may be affected Please also read the manual of the equipment being connected Removing the cable cover terminal cover from the TV Be sure to remove the cable cover terminal cover before connecting o...

Page 10: ...t the cable tie in a hole Hole Bundle the cable recommended direction Hooks Set the tip in the hooks Mains lead AC 220 240 V 50 60 Hz Mains lead Aerial TV Cable RF cable Terrestrial aerial For DVB C D...

Page 11: ...ammes simultaneously etc is not available while using DVB via IP server function For details refer to eHELP Functions DVB via IP DVB via IP client connection This TV has DVB via IP client function and...

Page 12: ...ance Prepare the internet environment for wired connection or wireless connection Setup of the network connection will start when first using the TV p 19 Wired connection TV Internet environment LAN c...

Page 13: ...ction use DIGITAL AUDIO To enjoy multi channel sound from external equipment e g Dolby Digital 5 1ch connect the equipment to the amplifier For information about the connections read the manuals of th...

Page 14: ...arrangement Fix the cables using the cable clamp net tube and cable tie and then attach the cable cover terminal cover to the TV Fixing the mains lead using the cable clamp Attach the cable clamp Ins...

Page 15: ...ssory follow the option s assembly manual to fix cables Attaching the cable cover terminal cover Do not apply load to the cable cover terminal cover Be careful not to nip the cables net tube between t...

Page 16: ...ers When in Standby mode switches TV on 13 eHELP Displays eHELP Built in Operating Instructions 14 Light Lights the buttons for about 5 seconds Press again to turn off the button lights 15 Input mode...

Page 17: ...nfrared sensors You can operate the switch without registration It is recommended to speak within approx 15 cm from the microphone of Touch Pad Controller when using the Voice Control function For det...

Page 18: ...l receiver Do not place any objects between the TV remote control signal receiver and remote control 2 Ambient sensor Senses brightness to adjust picture quality when Ambient Sensor in the Picture Men...

Page 19: ...environment Shop is for shop display To change the viewing environment later on the set will need to have all settings initialised by accessing Shipping Condition Set up the network connection Select...

Page 20: ...ctions built into the TV and gives a more detailed explanation for a better understanding of the operation of each feature 1 Display eHELP or Help eHELP If the eHELP has been accessed previously since...

Page 21: ...ility of this service 3D photos and 3D videos taken by 3D compatible Panasonic products Available in Media Player and Network services 2D images converted to 3D Picture 3D Settings 3D Mode Content in...

Page 22: ...lternatives Screen Display On Off select store Adjust using the slide bar 50 Sharpness Moved change store Go to the next screen Child Lock access Enter characters by free input menu You can enter name...

Page 23: ...can select your favourite mode for each input Standard Provides the suitable sound quality for all types of scenes Music Improves sound quality for watching music videos etc Ambience Improves spatial...

Page 24: ...de and set to On to use dual tuner function 3 Set LNB and Satellite Select IN 1 IN 2 in Signal Input to set for each tuner 4 Store 5 Select Auto Setup select access 6 Set Search Mode Scan Mode After s...

Page 25: ...te channel lists skip unwanted channels etc For details refer to eHELP Watching Tuning and editing channels 1 Select the mode 2 Display the menu and select Setup Setup select access 3 Select DVB S Tun...

Page 26: ...cess 2 Select Child Lock select access 1 Enter the PIN number 4 digits Enter the PIN number twice at first setting Make a note of the PIN number in case you forget it 0000 may be stored as the default...

Page 27: ...th TV s remote control You can operate the content in Media Player media server recording functions or the connected equipment with the following buttons of this TV s remote control How to change the...

Page 28: ...In FLOF mode four differently coloured subjects are situated on the bottom of the screen To access more information about one of these subjects press the appropriate coloured button This facility enab...

Page 29: ...you select Example Landscape 1 BBC ONE 20 00 20 30 DIY SOS We open in the Battersbys BBC ONE Das Erste DIY SOS The Bill Red Cap 19 30 20 00 20 30 21 30 21 00 BBC THREE Hot Wars Holiday Program E4 Emme...

Page 30: ...r this setup Before setting connect the USB HDD and be sure to turn on the USB HDD 1 Display the menu and select Setup Setup select access 2 Select USB Device Setup select access 3 Select the USB HDD...

Page 31: ...nal input selected When the full screen application TV Guide Media Player eHELP etc is launched When the TV enters Standby or is turned off Timer Programming This function allows you to select program...

Page 32: ...d with digital cameras are displayed Video mode Moving pictures recorded with digital video cameras and digital video data are played back Recorded TV mode For exclusive USB HDD TV programmes recorded...

Page 33: ...ollowing buttons during playback Confirm the remote control code is 73 p 27 Using Home Network DLNA This TV is a DLNA Certified product DLNA Digital Living Network Alliance is a standard that makes DL...

Page 34: ...Home Screen and select Devices select access 2 Select the media server select access 3 Select the file select access Depending on the condition of media server you may need to select the folder before...

Page 35: ...ght Contrast Brightness or Colour in the Picture Menu set to the minimum Check all required cables and connections are firmly in place An unusual image is displayed This TV has a built in Self Test Ma...

Page 36: ...epellent solvent thinner or other volatile substances This may degrade surface quality or cause peeling of the paint The surface of the display panel is specially treated and may be easily damaged Tak...

Page 37: ...YPE A Connectors HDMI1 3 4 4K 3D 3D content of 4K format is not supported Content Type Deep Colour x v Colour HDMI2 4K 3D 3D content of 4K format is not supported Content Type Audio Return Channel Dee...

Page 38: ...412 GHz 2 472 GHz Security WPA2 PSK TKIP AES WPA PSK TKIP AES WEP 64 bit 128 bit Bluetooth wireless technology 2 Standard Compliance Bluetooth 3 0 Frequency Range 2 402 GHz 2 480 GHz 1 The frequency a...

Page 39: ...the assembly on it Place the speaker on a flat and vertical surface The wall hanging parts Wall hanging bracket 2 Screw 2 1 Attach a wire optional to the speaker C 2 Attach the wall hanging brackets...

Page 40: ...s or installing a wall hanging bracket by yourself have the risk of personal injury and product damage In order to maintain the unit s performance and safety be absolutely sure to ask your dealer or a...

Page 41: ...he TV Do not lay down the TV with the pedestal on a desk etc 1 Remove the cover 1 F E 2 Remove the assembly screw 2 G 3 Lift up the TV from the pedestal as shown Tilt the TV backwards Lift up the TV 3...

Page 42: ...you stop using the wall hanging bracket 1 Put the TV onto a work table with the screen panel down on a clean and soft cloth blanket etc 2 Use the assembly screw to fasten the bracket to the TV securel...

Page 43: ......

Page 44: ...al municipality Penalties may be applicable for incorrect disposal of this waste in accordance with national legislation Note for the battery symbol bottom symbol This symbol might be used in combinat...

Page 45: ...TX 50DXW804 TX 58DXW804...

Page 46: ...2 J Z 3 4 7 9 16 19 _ 20 20 21 22 23 24 25 26 26 27 28 29 30 31 32 33 35 36 37...

Page 47: ...3 J _...

Page 48: ...4 J J J J J...

Page 49: ...5 J Z J J J J J J J...

Page 50: ...6 10 10 10 10 J J J J J J...

Page 51: ...7 J J J R03...

Page 52: ...J Z J...

Page 53: ...7 2 3 4 5 6 8 9 10 11 12 13 1 _ _ _ _ _ _ _...

Page 54: ...Z J Z...

Page 55: ...Z _ _...

Page 56: ......

Page 57: ..._ Z Z...

Page 58: ..._ _ J...

Page 59: ...J J...

Page 60: ...16 Z J J J J 14 J 24 25...

Page 61: ...17 J J J 10 11 12 13 14...

Page 62: ...18 4 1 2 3 5 6 7 J Z J J...

Page 63: ...19 1 2 Z J...

Page 64: ...20 1 2 J _ 3 1 Z 2...

Page 65: ...21 J J J 1 2 J...

Page 66: ...22 1 Z 2 3 50 _ a 0 1 2 O 3 4 5 6 7 8 9 1 2 J...

Page 67: ...23 J J 1 Z 2 J 3 J J J 1 Z 2 J 3 J...

Page 68: ...24 DVB S 1 2 Z 3 4 1 2 3 4 5 6 J J 7 Z J J J J 1 2 Z 3 4 5...

Page 69: ...25 6 Z J J J J _ 1 _ 2 Z 3 _ 4 5 Z J J J 6 1 2 7 J 8 1 2 3 9 10 J _ J 1 J 2 Z 3 _ Z...

Page 70: ...26 Z J 1 Z 2 1 2 101 BBC 1 Wales 7 BBC THREE 14 E4C VCR 1 BBC1 2 HDMI1 AV...

Page 71: ...27 1 Z 2 J J J J...

Page 72: ...28 J J J J 1 01 02 03 04 05 06 07 TELETEXT INFORMATION 2 Z J...

Page 73: ...d Cap 19 30 20 00 20 30 21 30 21 00 BBC THREE Hot Wars Holiday Program E4 Emmerdal Coronation Street The Bill BBC FOUR 10 O clock News BBC Pepsi Char Good bye BBC 2W Panorama Spring watch Coast BBCi I...

Page 74: ...30 1 Z 2 3 USB Drive A USB Flash Disk 1 Z 2 1 2 _...

Page 75: ...31 J _ _ _ 1 _ 2 Z 3 4 5 18 00 20 00 3 ITV1 21 30 22 30 Red Cap BBC ONE 1 Guide...

Page 76: ...32 6 1...

Page 77: ...33 2 Z 3 4 5 J J J...

Page 78: ...34 J 1 Z 2 1 Z 2 3...

Page 79: ...35 J J J Z J J J _ J...

Page 80: ...J J...

Page 81: ..._ _ _ Y B B _ _ _ _ _...

Page 82: ...J...

Page 83: ...39 C B A B A 3...

Page 84: ...D Z Z 5 J...

Page 85: ...1 F E 2 G 3 3...

Page 86: ...5 5 6 H J I R L R L 3 3 K 5...

Page 87: ......

Page 88: ...Z J Web Site http www panasonic com Panasonic Corporation 2016 TQB0E2645L...

Reviews: