background image

English

3

Important Notice

Notice for DVB / Data broadcasting / 
IPTV functions

This TV is designed to meet the standards (as of 
August, 2014) of DVB-T / T2 (MPEG2 and MPEG4-
AVC(H.264)) digital terrestrial services, DVB-C 
(MPEG2 and MPEG4-AVC(H.264)) digital cable 
services.

Consult your local dealer for availability of DVB-T / T2 
services in your area.

Consult your cable service provider for availability of 
DVB-C services with this TV.

This TV may not work correctly with the signal which 
does not meet the standards of DVB-T / T2 or DVB-C.

Not all the features are available depending on the 
country, area, broadcaster, service provider and 
network environment.

Not all CI modules work properly with this TV. Consult 
your service provider about the available CI module.

This TV may not work correctly with CI module that is 
not approved by the service provider.

Additional fees may be charged depending on the 
service provider.

Compatibility with future services is not guaranteed.

Check the latest information on the available services 
at the following website. (English only)

http://panasonic.net/viera/support

Panasonic does not guarantee operation and 
performance of peripheral devices made by other 
manufacturers; and we disclaim any liability or damage 
arising from operation and/or performance from usage of 
such other maker’s peripheral devices.

This product is licensed under the AVC patent portfolio 
license for the personal and non-commercial use of a 
consumer to (i) encode video in compliance with the 
AVC Standard (“AVC Video”) and/or (ii) decode AVC 
Video that was encoded by a consumer engaged in 
a personal and non-commercial activity and/or was 
obtained from a video provider licensed to provide AVC 
Video. No license is granted or shall be implied for any 
other use.

Additional information may be obtained from MPEG LA, 
LLC.

See http://www.mpegla.com.

Transport only in upright position.

Safety Precautions

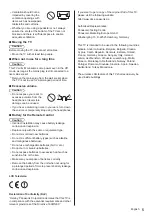
To help avoid risk of electrical shock, fire, damage or 
injury, please follow the warnings and cautions below:


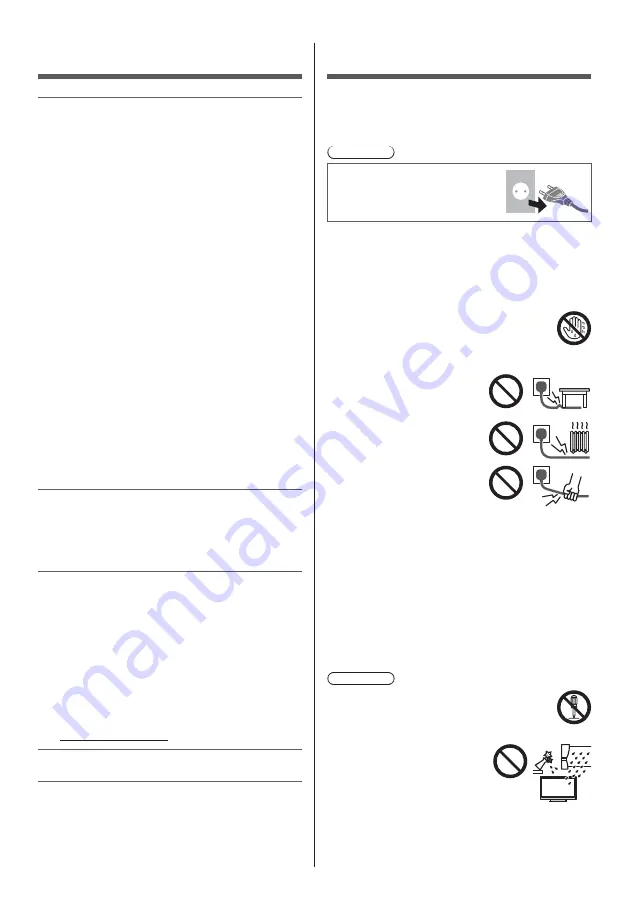
Mains plug and lead

Warning

If you detect anything unusual, 
immediately remove the mains 
plug.

This TV is designed to operate on AC 220-240 V,  
50 / 60 Hz.

Insert the mains plug fully into the mains socket.

Ensure that the mains plug is easily accessible.

Disconnect the mains plug when cleaning the TV.

Do not touch the mains plug with wet 
hands.

Do not damage the mains lead.


Do not place a heavy 
object on the lead.


Do not place the lead near 
a high temperature object.


Do not pull on the lead. 
Hold onto the mains plug 
body when disconnecting 
the plug.


Do not move the TV with the lead plugged into a 
mains socket.


Do not twist the lead, bend it excessively or stretch 
it.


Do not use a damaged mains plug or mains 
socket.


Ensure the TV does not crush the mains lead.

Do not use any mains lead other than that provided 
with this TV.


Take care

Warning

Do not remove covers and never modify 
the TV yourself as live parts are accessible 
when they are removed. There are no user 
serviceable parts inside.

Do not expose the TV to rain 
or excessive moisture. This 
TV must not be exposed to 
dripping or splashing water 
and objects filled with liquid, 
such as vases, must not be 
placed on top of or above 
the TV.

Summary of Contents for TX-40CS610EW

Page 1: ...e carefully read the Safety Precautions of this manual before use The images shown in this manual are for illustrative purposes only Please refer to Pan European Guarantee Card if you need to contact...

Page 2: ...ions 3 Quick Start Guide Accessories 6 Connections 7 Identifying Controls 11 First time Auto Setup 13 Using your VIERA Operation 14 How to Use eHELP 15 Others FAQs 16 Maintenance 17 Specifications 17...

Page 3: ...Standard AVC Video and or ii decode AVC Video that was encoded by a consumer engaged in a personal and non commercial activity and or was obtained from a video provider licensed to provide AVC Video...

Page 4: ...may interfere with the medical equipment and may cause accidents due to malfunction Do not use the TV near any automatic control equipment such as automatic doors or fire alarms Radio waves may inter...

Page 5: ...not mix different battery types such as alkaline and manganese batteries Do not use rechargeable batteries Ni Cd etc Do not burn or break up batteries Do not expose batteries to excessive heat such a...

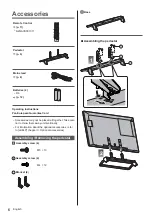
Page 6: ...ropean Guarantee Card Accessories may not be placed all together Take care not to throw them away unintentionally For information about the optional accessories refer to eHELP Support Optional accesso...

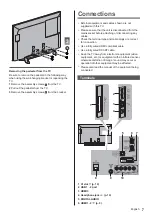
Page 7: ...sconnected from the mains socket before attaching or disconnecting any cables Check the terminal type and cable plugs are correct for connection Use a fully wired HDMI compliant cable Use a fully wire...

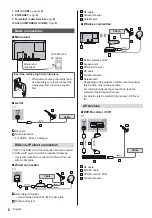
Page 8: ...B via IP server to watch broadcast streaming It is recommended to connect to DVB via IP server with a LAN cable Wired connection TV Cable LAN cable Shielded Use Shielded Twist Pair STP LAN cable DVB v...

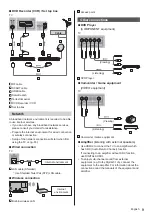
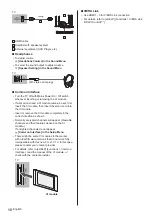
Page 9: ...nment LAN cable Shielded Use Shielded Twist Pair STP LAN cable Wireless connection Internet environment Built in wireless LAN Access point Other connections DVD Player COMPONENT equipment TV Listening...

Page 10: ...Insert or remove the CI module completely in the correct direction as shown Normally encrypted channels will appear Viewable channels and their features depend on the CI module If encrypted channels...

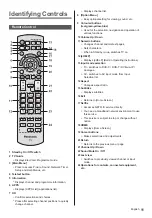
Page 11: ...n 11 Numeric buttons Changes channel and teletext pages Sets characters When in Standby mode switches TV on 12 eHELP Displays eHELP Built in Operating Instructions 13 Input mode selection TV switches...

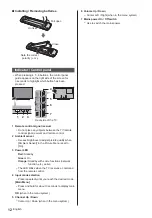
Page 12: ...2 Ambient sensor Senses brightness to adjust picture quality when Ambient Sensor in the Picture Menu is set to On 3 Power LED Red Standby Green On Orange Standby with some functions network function...

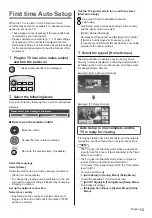
Page 13: ...he Child Lock PIN number 0000 cannot be stored Tick the TV signal mode to tune and then select Start Auto Setup tune search for the available channels skip tuning Auto Setup screen varies depending on...

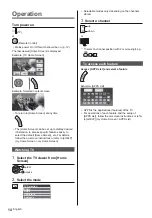
Page 14: ...reen instructions or refer to eHELP my Home Screen my Home Screen Watching TV 1 Select the TV viewer from Home Screen select access 2 Select the mode TV Selection DVB C DVB T DVB via IP Analogue Selec...

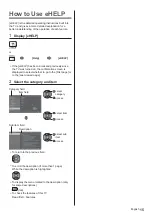
Page 15: ...nfirmation screen is displayed to select whether to go to the First page or to the Last viewed page 2 Select the category and item Category field Item field select category access select item access s...

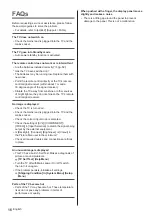
Page 16: ...e TV is turned on Check the mains lead is plugged into the TV and the mains socket Check the correct input mode is selected Check the setting of AV2 COMPONENT VIDEO in Input Selection to match the sig...

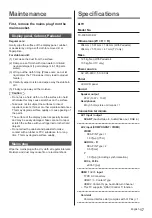
Page 17: ...ecially treated and may be easily damaged Take care not to tap or scratch the surface with your fingernail or other hard objects Do not allow the cabinet and pedestal to make contact with a rubber or...

Page 18: ...0 C 35 C Humidity 20 80 RH non condensing Built in wireless LAN Standard compliance and Frequency range IEEE802 11a n 5 180 GHz 5 320 GHz 5 500 GHz 5 580 GHz 5 660 GHz 5 700 GHz IEEE802 11b g n 2 412...

Page 19: ......

Page 20: ...ion and recycling please contact your local municipality Penalties may be applicable for incorrect disposal of this waste in accordance with national legislation Note for the battery symbol bottom sym...

Page 21: ...Lees v r gebruik aandachtig het gedeelte Veiligheidsmaatregelen in deze handleiding De afbeeldingen in deze handleiding dienen slechts als voorbeeld Zie uw Europese Garantie als u contact wilt opnemen...

Page 22: ...andleiding Accessoires 6 Verbindingen 7 Bedieningsonderdelen 11 Automatisch instellen bij het eerste gebruik 13 Uw VIERA tv gebruiken Bediening 14 Gebruik eHELP 15 Overige informatie Veelgestelde vrag...

Page 23: ...de AVC norm AVC Video en of ii het decoderen van AVC video die werd gecodeerd door een consument voor persoonlijke en niet commerci le doeleinden en of werd verkregen via een videoleverancier die een...

Page 24: ...te installeren en ervan te verwijderen Installeer en verwijder de tv op de voorgeschreven wijze Radiogolven Waarschuwing Gebruik de tv niet in medische instituten of op locaties met medische apparatuu...

Page 25: ...e of een vergelijkbaar type Gebruik geen oude en nieuwe batterijen door elkaar Gebruik geen verschillende batterijtypen door elkaar bijvoorbeeld alkaline en mangaanbatterijen Gebruik geen oplaadbare b...

Page 26: ...arantie De accessoires mogen niet allemaal samen worden geplaatst Zorg dat u ze niet per ongeluk weggooit Raadpleeg de eHELP voor informatie over de optionele accessoires Ondersteuning Optionele acces...

Page 27: ...kabels aansluit of loskoppelt Controleer of u de juiste aansluitingen en connectoren gebruikt voor de verbinding Gebruik een HDMI kabel met volledige bedrading Gebruik een SCART kabel met volledige be...

Page 28: ...d weer te geven Het wordt aanbevolen om een LAN kabel te gebruiken voor verbinding met een DVB via IP server Bekabelde verbinding TV Kabel LAN kabel afgeschermd Gebruik een afgeschermde dubbeldraadse...

Page 29: ...hermde dubbeldraadse getwist paar STP LAN kabel Draadloze verbinding Internetomgeving Ingebouwde draadloze LAN adapter Toegangspunt Andere verbindingen dvd speler COMPONENT apparatuur TV Luisteren Kij...

Page 30: ...s of verwijder de CI module altijd volledig en in de aangegeven richting Gewoonlijk worden gecodeerde kanalen weergegeven Beschikbare kanalen en functies zijn afhankelijk van de CI module Als de gecod...

Page 31: ...Gekleurde toetsen rood groen geel blauw _ _ _ 10 Volume omhoog omlaag 11 Cijfertoetsen _ _ _ _ 12 eHELP _ 13 Selectie ingangsmodus _ _ _ 14 Aspect _ 15 Ondertitels 16 Afsluiten 17 Netflix _ _ 18 HOME...

Page 32: ...gspaneel _ _ 7 1 2 3 5 4 6 _ _ 1 Ontvanger voor afstandsbedieningssignalen _ _ _ _ 2 Sensor omgevingslicht _ _ _ 3 Voedingslampje Rood Groen Oranje _ _ _ 4 Selecteert de ingangsmodus _ Hoofdmenu _ _ O...

Page 33: ...g Thuis Winkel De afstandsbediening gebruiken _ Selecteer uw taal Selecteer Thuis _ _ _ _ _ _ Stel de netwerkverbinding in Selecteer uw land _ _ Vink het tv signaal aan waarop u wilt afstellen en sele...

Page 34: ...oe in Afstemmenu menu Instellingen Fabrieksinstellingen in Systeemmenu menu Instellingen Bediening Schakel de tv in _ _ _ Tv kijken 1 Selecteer de tv weergave in Beginscherm 2 Selecteer de stand TV ke...

Page 35: ...r een kanaal _ Toegang tot de functies Open APPS lijst en selecteer de gewenste functie _ _ _ _ _ _ _ Gebruik eHELP _ _ _ _ _ _ _ 1 Geef eHELP weer Help eHELP _ _ _ 2 Selecteer de categorie en het ond...

Page 36: ...ld weergegeven Controleer of de tv aan staat Controleer of de stekker van het netsnoer in de tv en in het stopcontact zit Controleer of de juiste ingangsmodus is geselecteerd Controleer of de instelli...

Page 37: ...ehandeld en voorzien van een gevoelige oppervlaktelaag Tik en kras niet op het oppervlak met uw vingernagel of een hard voorwerp Zorg dat de behuizing en de standaard niet gedurende langere tijd in co...

Page 38: ...V niet condenserend Ingebouwd draadloos LAN Standaardcompliantie en frequentiebereik IEEE802 11a n 5 180 GHz 5 320 GHz 5 500 GHz 5 580 GHz 5 660 GHz 5 700 GHz IEEE802 11b g n 2 412 GHz 2 472 GHz Bevei...

Page 39: ......

Page 40: ...recycling kunt u contact opnemen met uw plaatselijke gemeente Afhankelijk van uw nationale wetgeving kunnen er boetes worden opgelegd bij het onjuist weggooien van dit soort afval Let op het batterij...

Page 41: ...Manual de utilizare Televizor cu ecran LCD _ _ J...

Page 42: ...2 Cuprins 3 3 6 7 11 13 Utilizarea televizorului dvs VIERA 14 15 Altele _ 16 17 17 _...

Page 43: ...3 _ _ _ _ _ _ _ _ _ _ _ _ _ _ _ _ _ _ _ _ _ _ _ _ _ _ _ _ _ _ _ _ _ _ _ _ _ _ _ _ _ _ _ _ _...

Page 44: ...4 _ _ _ _ _ _ _ _ _ _ _ _ _ _ _ _ _ _ _ _ _ _ Unde radio _ _ _ _ _ _ _ _ _ _ _ _ _ _ _...

Page 45: ...5 _ _ _ _ _ _ _ _ Mutarea televizorului _ _ _ _ _ _ _ _ _ _ _ _ _ _ _ _ _ _ _ _ _ _ _ _ _ _ _...

Page 46: ...6 Accesorii Manual de utilizare J _ _ _ 1 A C D 2...

Page 47: ...7 B 3 _ _ _ 2 _ 3 _ _ _ _ _ _ 2 3 4 1 8 5 6 7 10 9 _...

Page 48: ...J J J J J _ _ _ _ _ _ _ _ _ _ _ _ _ _ _...

Page 49: ..._ _ _ _ _ _ _ _ _ _ _ J _ _ _ _ _...

Page 50: ..._ _ _ _ _ _ _ _ _ _ _ _ _ _ _ _ _ _ Modul CI VIERA Link...

Page 51: ...area elementelor de 2 Ghid TV 4 Buton Teletext _ 6 APPS 7 OK _ 9 Butoane colorate _ _ 10 11 Butoane numerice _ 12 13 _ 14 15 16 _ 17 Netflix _ _ _ _ _ 18 HOME 19 20 Revenire _ 21 22 23 Ultima vizualiz...

Page 52: ...12 _ 7 1 2 3 5 4 6 _ _ _ 3 LED de alimentare _ _ _ OK _ _ _...

Page 53: ...13 _ _ _ _ 1 _ 2 _ _ _ _ _ _ _ _ _ _ _ _ _ _ 3 J _ _ _ _ _ _...

Page 54: ...14 _ _ 1 J...

Page 55: ...15 2 Selectare TV _ 3 _ _ Modul de utilizare eAJUTOR _ 1 _ _ _ _ 2 _ _ _ _...

Page 56: ...16 _ _ _ _ _ _ _ _ Bateriile sunt introduse corect _ _ _ _ _ _ _ _ _ _ _ _ _ _ _ _ _ _ _...

Page 57: ...17 J _ _ _ _ _ _ _ _ _ _ _ _ _ SCART _ _ J J J Y PB B R R _ _...

Page 58: ...18 J J J _ _ _ _ _ J J J _ _ _ _ _ _ _ _ _ _ _ _ _ _...

Page 59: ...19 _ _ _ _...

Page 60: ...J _ _ _ _ _ _ _ _ _ _ _ _ _ _ Web Site http www panasonic com Panasonic Corporation 2015 TQB0E2589N...

Reviews: