background image

English

   - 7 -

button on the remote. If you see 

Add to Home

 option 

you can add it to the 

Home

 menu. Same way you 

can delete or change the position of any item in the 

Home

 menu. Press the Down direction button and 

select 

Delete 

or 

Move

 option and press 

OK

. In order 

to move a menu item use the Right and Left direction 

buttons to select the position that you want the item 

to move to and press 

OK

.

2. TV
2.1. Guide

You can access the electronic programme guide menu 

using this option. Refer to 

Electronic Programme 

Guide

 section for more information.

2.2. Channels

You can access the 

Channels

 menu using this option. 

Refer to 

Using the Channel List

 section for more 

information.

2.3. Timers

You can set timers for future events using the options of 

this menu. You can also review the previously created 

timers under this menu.
To add a new timer select the 

Add Timer

 tab using the 

Left/Right buttons and press 

OK

. Set the sub-menu 

options as desired and when finished press 

OK

.


A new 

timer will be created. 
To edit a previously created timer, highlight that timer,  

select the 

Edit Selected Timer

 tab and press 

OK

Change the sub-menu options as desired and press 

OK

 to save your settings.

To cancel an already set timer, highlight that timer, 

select 

Delete Selected Timer

 tab and press 

OK

. A 

confirmation message will be displayed. Highlight 

Yes


and press 

OK

 to proceed. The timer will be cancelled.

It is not possible to set timers for two or more events 

that will broadcasted in different channels at the same 

time interval. In this case you will be asked to choose 

one of these timers and cancel others. Highlight the 

timer you want to cancel and press 

OK

,

 Options 

menu 

will be displayed. Then highlight 

Set/Cancel

 and press 

OK

 to cancel that timer. You will have to save changes 

after that. In order to do that press 

OK

, highlight 

Save 

Changes

 and press 

OK

 again.

3. Settings

You can manage the settings of your TV using the op-

tions of this menu. Refer to 

Settings Menu Contents 

section for more information.

4. Sources

You can manage your input source references using 

the options of this menu. To change the current source 

highlight one of the options and press 

OK

4.1. Source Settings

Edit  the  names,  enable  or  disable  selected  source 

options.

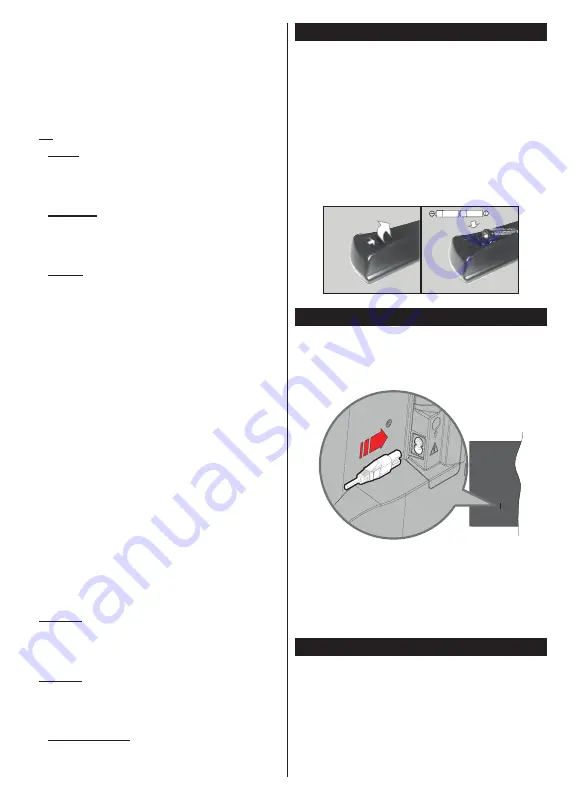
Inserting the Batteries into the Remote

Remove the back cover to reveal the battery compart-

ment. Insert two size 

AA

 batteries. Make sure the (+) 

and (-) signs match (observe correct polarity). Do not 

mix old and new batteries. Replace only with same or 

equivalent type. Place the cover back on. 
A message will be displayed on the screen when the 

batteries are low and must be replaced. Note that when 

the batteries are low, the performance of the remote 

control may be impaired.
Batteries should not be exposed to excessive heat 

such as sunshine, fire or the like.

Power Connection

IMPORTANT

: The TV set is designed to operate on a 

220-240V AC, 50 Hz

 supply. After unpacking, allow the 

TV set to reach the ambient room temperature before 

you connect the set to the mains. 

Plug one end (the two-hole plug) of the supplied 

detachable power cord into the power cord inlet on 

the rear side of the TV as shown above. Then plug 

the other end of the power cord into the mains socket 

outlet.

Note:

 The position of the power cord inlet may differ depending 

on the model.

Power Connection

IMPORTANT

: The TV set is designed to operate on a 

220-240V AC, 50 Hz

 supply. After unpacking, allow the 

TV set to reach the ambient room temperature before 

you connect the set to the mains. Plug the power cable 

to the mains socket outlet.

Summary of Contents for TX-32M330B

Page 1: ...OPERATING INSTRUCTIONS TX 32M330B LED TV...

Page 2: ...C 8 UK Declaration of Conformity DoC 9 Sales and Support Information 9 Specification 9 Notice 10 Remote Control 11 Connections 12 Switching On Off 13 First Time Installation 13 Media Playback via USB...

Page 3: ...ther cords When damaged it must be replaced this should only be done by qualified personnel Do not expose the TV to dripping or splashing of liquids and do not place objects filled with liquids such a...

Page 4: ...be retained and relocated the same considerations as above should be applied Apparatus connected to the protective earthing of the building installation through the MAINS connection or through other...

Page 5: ...rt 1 First clean the dust from the surface 2 Dampen a soft cloth with clean water or diluted neutral detergent 1 part detergent to 100 parts water 3 Wring out the cloth firmly Please note do not let l...

Page 6: ...itch off or disconnect the TV from the mains plug This will also reduce energy consumption Features Remote controlled colour TV Fully integrated digital terrestrial cable satellite TV DVB T T2 C S S2...

Page 7: ...ge volume Increase the volume by pushing the joystick right Decrease the volume by pushing the joystick left To change channel Scroll through the stored channels by pushing the joystick up or down To...

Page 8: ...e displayed Then highlight Set Cancel and press OK to cancel that timer You will have to save changes after that In order to do that press OK highlight Save Changes and press OK again 3 Settings You c...

Page 9: ...ot be mixed with general household waste For proper treatment recovery and recycling of old products and batteries please take them to applicable collection points in accordance with your national leg...

Page 10: ...idays Or go on line through our InternetAccessory ordering application at www pas europe com Most major credit and debit cards accepted All enquiries transactions and distribution facilities are provi...

Page 11: ...cable service provider for availability of DVB C services with this TV This TV may not work correctly with the signal which does not meet the standards of DVB T T2 DVB C or DVB S Not all the features...

Page 12: ...r in the text box on the screen switches the TV on when in standby mode 13 Language Switches among sound modes an alogue TV displays and changes audio subtitle language and turns subtitles on or off d...

Page 13: ...ode When receiving DTV channels Mpeg4 H 264 H 265 or while in Media Browser mode output will not be available via the scart socket When using the wall mounting kit availa ble from a third party in the...

Page 14: ...clear the checkbox by pressing OK after moving the focus on the desired broadcast type option Digital Aerial If D Aerial broadcast search option is turned on the TV will search for digital terrestrial...

Page 15: ...s menu can be accessed via the information bar which is displayed on the bottom of the screen when pressed the Info button while playing back a video file or displaying a picture file Press the Info b...

Page 16: ...r to be used with the TV The volume can be controlled using the remote control of the TV To activate this feature set the Speakers option in the Settings System More menu as Amplifier The TV speakers...

Page 17: ...ion may be available depending on the Picture Zoom setting Highlight and press OK then use directional buttons to shift the picture upwards or downwards Film Mode Filmsarerecordedatadifferentnumberoff...

Page 18: ...AVL Automatic Volume Limiting Sets the sound to obtain fixed output level between programmes Headphone Lineout When you connect an external amplifier to your TV using the headphone jack you can selec...

Page 19: ...currently watched channel is not an analogue channel Satellite Settings Displays satellite settings Satellite list Displays available satellites You can Add Delete satellites or Edit satellite settin...

Page 20: ...latest firmware Press OK to see the menu options Application Version Displays current software version Subtitle Mode This option is used to select which subtitle mode will be on the screen DVB subtit...

Page 21: ...e is inserted into the CI slot of the TV You can change the default PIN of the CI CAM using this option Note Default PIN could have been set to 0000 or 1234 If you have defined the PIN is requested de...

Page 22: ...d OK button The operation method may differ depending on the contents of the digital teletext Follow the instructions displayed on digital teletext screen Press the Text button to returs to television...

Page 23: ...splay modes Your TV may not support all resolutions Index Resolution Frequency 1 640x480 60 Hz 2 800x600 56 Hz 3 800x600 60 Hz 4 1024x768 60 Hz 5 1024x768 66 Hz 6 1280x768 60 Hz 7 1280x960 60 Hz 8 128...

Page 24: ...5kHz 24kHz 8kHz 11 025kHz 12kHz Sampling rate works only with video files AC3 32Kbps 640Kbps Bit rate 32kHz 44 1kHz 48kHz Sampling rate AAC 16Kbps 576Kbps Bit rate 48kHz 44 1kHz 32kHz 24kHz 22 05kHz 1...

Page 25: ...HDMI cable not supplied you can refer to the following resolution information 56Hz 60Hz 66Hz 70Hz 72Hz 75Hz 640x400 x 640x480 x x x x 800x600 x x x x x 832x624 x 1024x768 x x x x x 1152x864 x x x 1152...

Page 26: ...er the new values using the numeric buttons of the remote Highlight Save and press the OK button to save settings when complete Troubleshooting Internet Connection Not Available If the MAC address a u...

Page 27: ...terminal which is marked with the letter E or by the earth symbol or coloured green or green and yellow The wire which is coloured blue or black must be connected to the terminal which is marked with...

Page 28: ......

Reviews: