background image

5

15°

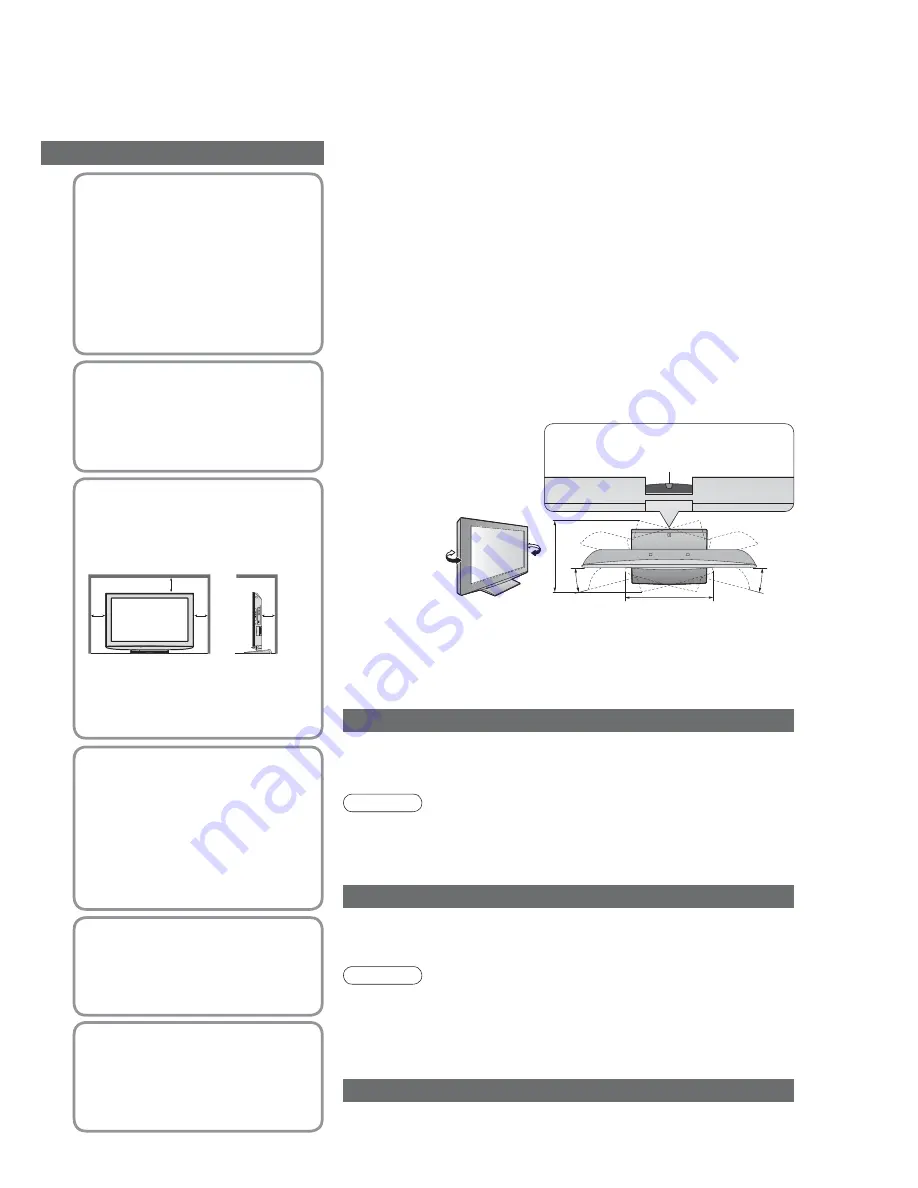
a

b

15°

Notes

10

(View from the top)

Set the mark at the centre as illustrated, 
to have the swivel positioned at the 
centre of the rotation angle.

• 

TX-32LX85L
a: 407 mm / b: 303 mm

• 

TX-37LX85L
a: 463.5 mm / b: 380 mm

Wipe the mains plug with a dry cloth at regular intervals. (Moisture and 
dust may lead to  re or electrical shock.)

 Maintenance

Use only the 
dedicated pedestals / 
mounting equipment

• 

Using an unapproved pedestal or 
other  xtures may make the TV 
unstable, risking injury. Be sure to 
ask your local Panasonic dealer to 
perform setup.

• 

Use approved pedestals / mounts (p. 6).

Do not place foreign 
objects inside the TV

• 

Do not allow any objects to drop 
into the TV through the air vents 
( re or electrical shock may result).


Auto power standby function

• 

If no signal is received and no operation is performed in TV mode for 

30 minutes, the TV will automatically go to standby mode.


Keep the TV away from these types of equipment

• 

Electronic equipment

  In particular, do not place video equipment near the TV 

(electromagnetic interference may distort images / sound).

• 

Equipment with an infrared sensor

  This TV also emits infrared rays (this may affect operation of other 

equipment).


When the TV is not going to be used for a long 

period of time, remove the mains plug.

• 

This TV will still consume some power even in the Off mode, as long 

as the mains plug is still connected to a live socket outlet.


Transport only in upright position


Adjust the LCD panel to your desired angle

• 

Ensure that the pedestal does not hang over the edge of the base 

even if the TV swivels to the full rotation range.

• 

Do not place any objects or hands within the full rotation range.

Allow suf cient space 
around the TV for 
radiated heat

• 

When using the pedestal, keep the 
space between the bottom of the 
TV and the  oor surface.

• 

In case of using Wall-hanging 
bracket, follow the manual of it.

Do not expose to rain 
or excessive moisture

• 

To prevent damage which might 
result in electric shock or  re, do not 
expose this TV to rain or excessive 
moisture. 
This TV must not be exposed to 
dripping or splashing water and 
objects  lled with liquid, such as 
vases, must not be placed on top of 
or above the TV.

Do not block the rear 
ventilation openings

• 

Blocked ventilation by newspapers, 
table cloths, curtains, etc. may 
cause overheating,  re or electrical 
shock.

First, remove the mains plug from the socket outlet.

Display panel

Regular care: Gently wipe the surface clean of dirt by using a soft cloth.

Major contamination: Wipe the surface clean using a soft cloth dampened with 

clean water or diluted neutral detergent (1 part detergent to 100 parts water). 

Then, using a soft dry cloth, evenly wipe the surface clean until it is dry.

Caution

 The surface of the display panel has been specially treated and may be 

easily damaged. 

Do not tap or scratch the surface with your  ngernail or other hard object.

• 

Take care not to subject the surface to insect repellent, solvent, thinner, 

or other volatile substances (this may degrade surface quality).

Cabinet, Pedestal

Regular care: Wipe the surface clean using a soft dry cloth.

Major contamination: Dampen a soft cloth with clean water or water 

containing a small amount of neutral detergent. Then, wring the cloth and 

wipe the surface clean with it. Finally, wipe the surface clean with a dry cloth.

Caution

• 

Take care not to subject the TV’s surfaces to detergent.

(A liquid inside the TV could lead to product failure.)

• 

Take care not to subject surfaces to insect repellent, solvent, thinner, or 

other volatile substances (this may deteriorate the surface by peeling 

the paint).

• 

Do not allow the cabinet and pedestal to make contact with a rubber or 

PVC substance for a long time.

Minimum distance

10

10

10

(cm)

Mains plug

Do not allow children 
to handle SD Card

• 

As with a small object, SD Card 
can be swallowed by young 
children. Please remove SD Card 
immediately after use.

Summary of Contents for TX-32LX85L

Page 1: ...in them for future reference The images shown in this manual are for illustrative purposes only Please refer to Pan European Guarantee Card if you need to contact your local Panasonic dealer for assistance Operating Instructions LCD Television Model No TX 32LX85L TX 37LX85L ...

Page 2: ...2 Turn your own living room into a movie theatre Experience an amazing level of multi ...

Page 3: ...eos and DVDs 16 Advanced Features How to Use Menu Functions 18 picture sound quality etc Editing Programmes 22 Tuning Programmes 24 Control Programme Audience 26 Restore Settings 27 Input Labels 28 Displaying PC Screen on TV 29 Viewing from SD Card Photos 30 Link Functions 32 Q Link VIERA Link External Equipment 38 FAQs etc Technical Information 40 FAQs 44 Licence 46 Speci cations 47 Enjoy rich mu...

Page 4: ... fuse cover the mains plug must not be used until a replacement cover is obtained A replacement fuse cover may be purchased from your local Panasonic dealer If the tted moulded mains plug is unsuitable for the socket outlet in your home then the fuse shall be removed and the mains plug cut off and disposed of safety There is a danger of severe electrical shock if the cut off mains plug is inserted...

Page 5: ... follow the manual of it Do not expose to rain or excessive moisture To prevent damage which might result in electric shock or re do not expose this TV to rain or excessive moisture This TV must not be exposed to dripping or splashing water and objects lled with liquid such as vases must not be placed on top of or above the TV Do not block the rear ventilation openings Blocked ventilation by newsp...

Page 6: ...mended wall hanging bracket For additional details please refer to the wall hanging bracket installation manual Using the clamper To tighten Keep the knob pressed Rear of the TV To loosen Do not bundle the RF cable and mains lead together could cause distorted image Fix cables with clampers as necessary When using the optional accessory follow the option s assembly manual to x cables Pan European ...

Page 7: ... mode OK Con rms selections and choices Press after selecting programme positions to quickly change programme VCR DVD Panasonic equipment operations p 17 Volume Up Down Programme Information p 12 Displays programme information Index p 15 Returns to the teletext index page teletext mode Coloured buttons Used for the selection navigation and operation of various functions Exit Returns to the normal ...

Page 8: ... unit is disconnected from the mains socket before attaching or disconnecting any leads When disconnecting the mains lead be absolutely sure to disconnect the mains plug at the socket outlet rst Example 1 Connecting aerial Example 2 Connecting DVD Recorder VCR RF cable TV only TV DVD Recorder or VCR AC 220 240 V 50 Hz AC 220 240 V 50 Hz Note Connect to AV1 AV2 for a DVD Recorder VCR supporting Q L...

Page 9: ... OUT RF IN Basic Connection Example 3 Connecting DVD Recorder VCR and Set top box TV DVD Recorder VCR and Set top box DVD Recorder or VCR Fully wired HDMI compliant cable Aerial Mains lead supplied Rear of the TV Set top box AC 220 240 V 50 Hz RF cable RF cable SCART cable fully wired SCART cable fully wired RF cable RF cable ...

Page 10: ...etup is now complete and your TV is ready for viewing You can now use the remote control to turn On the TV or turn the TV to standby mode Power LED On To edit programmes Editing Programmes p 22 4 Start Auto Setup If Q Link VIERA Link or similar technology p 32 compatible recorder is connected programme language country region settings are automatically downloaded to the recorder Auto Setup will st...

Page 11: ...en the main menu Move the cursor select the menu Move the cursor adjust levels select from a range of options Access the menu store settings after adjustments have been made or options have been set RETURN Return to the previous menu EXIT Exit the menu system and return to the normal viewing screen Note If tuning has failed Auto Setup p 25 If downloading has failed Download p 21 To initialize all ...

Page 12: ...r useful functions Display the selectable settings for the current programme OPTION Check or change the current programme status instantly To change Teletext Character Set Sets the teletext language Setup Menu p 21 MPX Sound Menu p 20 Volume Correction Adjusts volume of individual programme or input mode Note Also possible to change the settings in Menu list p 20 and p 21 select change To select f...

Page 13: ...tching is only noticeable at the left and right edges 4 3 4 3 Full Displays the image at the standard 4 3 without distortion Displays a 4 3 image enlarged horizontally to t the screen HD signal only Zoom1 Zoom2 Displays a 16 9 letterbox or 4 3 image without distortion Displays a 16 9 letterbox anamorphic image full screen without distortion Zoom3 Displays a 2 35 1 letterbox anamorphic image full s...

Page 14: ... at the bottom of the screen To access more information about one of these subjects press the appropriately coloured button This facility enables fast access to information on the subjects shown What is TOP mode in case of TOP text broadcasting TOP is a particular improvement of the standard teletext service that results in an easier search and effective guide Fast overview of the teletext informa...

Page 15: ... hold View sub page Sub pages The number of sub pages varies depending on the broadcasters up to 79 pages It may take some time for searching during which time you can watch TV Enter the 4 digit number example P6 0 0 0 6 Appears at top of the screen To view speci c sub page MENU blue View sub page Only when teletext is more than one page Watch TV while waiting for update P108 MENU yellow yellow Ap...

Page 16: ...Display the Input select menu Displays the selected mode 1 Turn the TV on When connecting with SCART as example 2 or 3 p 8 and p 9 Receives input signals automatically when playback starts Input signals are automatically identi ed by the SCART pin 8 terminal This function is also available for HDMI connections p 38 If input mode is not switched automatically Perform and Dependant on the setup of t...

Page 17: ...eed PROGRAMME Programme Up Down Select programme Record Start recording Panasonic equipment connected to the TV can be directly operated with the remote control Setting your remote control to operate Panasonic VCR DVD etc Set the VCR DVD switch to the appropriate position Press and hold during the following operations Enter the appropriate code for the equipment to be controlled see table below Pr...

Page 18: ...elect the menu Select the item example Picture Menu Adjust or select example Picture Menu example Picture Menu 1 Changed Number and positions of alternatives Moved Choose from among alternatives Adjust using the slide bar Displays the next screen Go to the next screen To reset the settings To reset the picture settings only Reset to Default in Picture Menu p 20 To reset the sound settings only Res...

Page 19: ...und Off Volume Correction Sound Menu MPX Stereo Speaker Distance to Wall Over 30cm 1 2 2 2 Reset to Default Set Sound Menu HDMI1 Input Auto p 20 Link Settings Power off Link Set Power on Link Set Download Access Q Link AV2 AV2 out TV VIERA Link On p 21 Tuning Menu Auto Setup Access Manual Tuning Access p 24 Only available items can be selected 1 2 AV Colour System Auto Child Lock Access Tuning Men...

Page 20: ... slow moving pictures colour patterning may be seen Set to On to display sharper and more accurate colours Off On For PAL or NTSC signal reception only Not valid on RGB S Video Component PC HDMI and SD Card Reset to Default Press the OK button to reset the present Picture Mode to the default settings Sound Mode Basic sound mode Music Speech Bass Increases or decreases level to enhance or minimise ...

Page 21: ... received in the area p 25 Manual Tuning Sets the programmes manually p 25 Off Timer Sets the time the TV automatically turns Off Off 15 30 45 60 75 90 minutes OSD Language Changes language for on screen displays Teletext Teletext display mode TOP FLOF List p 14 Teletext Character Set Selects teletext language West East1 East2 West English French German Greek Italian Spanish Swedish Turkish etc Ea...

Page 22: ...OSD Language Shipping Condition Teletext Character Set Off Service List Edit Access West MENU 22 Editing Programmes Select Setup Select Service List Edit 3 Display the menu You can skip unwanted programmes or edit programmes To return to TV EXIT 4 Set access select access select OPTION SDCARD INPUT EXIT TV RETURN 2 1 ...

Page 23: ...nd add delete To retune each programme Manual Tuning red p 25 BBC1 Service List Editor 1 2 3 4 5 6 7 Programme position Name Edit To change the name displayed when selecting programmes Select Rename Set characters Edit Service Name Name A B C D E F G H I J K L M N U V W X Y Z 0 1 2 3 4 5 6 a b c d e f g h i j k l m n u v w x y z _ O P Q R S T 7 8 9 o p q r s t maximum ve characters Store RETURN To...

Page 24: ... Setup Menu OPTION SDCARD INPUT EXIT TV RETURN Tuning Menu Auto Setup Access Manual Tuning Access MENU 24 Tuning Programmes Select Setup 2 Select Tuning Menu 3 Display the menu Select a function 4 You can retune all the TV programmes when moving house or search for new services which may have recently started broadcasting To return to TV EXIT 1 5 Set access select access select access select ...

Page 25: ...ea If a Child Lock PIN number p 26 has been set it must be entered Set programme manually Manual Tuning 1 BBC1 CH33 Manual Tuning Sound System Manual Tuning 2 99 41 21 Fine Tuning SC1 Colour System Auto CH33 Fine Tuning Use to make small adjustments to the tuning of an individual programme affected by weather conditions etc Manual Tuning Set programme manually after Auto Setup Set Sound System and...

Page 26: ... Please enter new PIN PIN Child Lock Child Lock List Change PIN Access Child Lock List Services and AV VCR Name BBC1 1 2 3 4 5 AV1 AV2 S Lock TV TV TV TV TV TV AV AV Type VCR 1 3 2 4 6 5 7 9 8 0 To change the PIN number Select Change PIN in and enter a new PIN number twice Appears when the programme input is locked Enter the PIN number 4 digits Select Child Lock List To cancel Select the locked pr...

Page 27: ...when Mains power On Off switch is next turned On p 10 To retune TV programmes only e g after moving house Auto Setup p 25 3 2 4 Select Setup Select Shipping Condition Display the menu Set To return to TV EXIT Restore Settings Resets the TV to its original condition i e no programmes tuned in All settings programmes picture sound quality etc are reset 1 All tuning data will be erased Are you sure A...

Page 28: ...EXIT For easier identi cation and selection of the input mode you can label each input terminals or skip terminal that is not connected to any equipment To select the input mode p 18 1 The labels you set will be displayed in Input Selection menu p 16 or banner If Skip is selected you cannot select the mode set select access select access select User input You can name each input terminals freely S...

Page 29: ...et to the minimum level if noise occurs Sync Chooses another synchronous signal if the image is distorted H V On G H V by the horizontal and vertical signals from your PC On G by the green signal from your PC if available Reset to Default Press the OK button to reset to the default Setup settings Other items p 20 and p 21 OPTION SDCARD EXIT RETURN INPUT Input Selection AV1 AV2 S AV3 S COMPONENT PC...

Page 30: ...o View Mode Operation guide Thumbnail Caution During the operation no signals are output from the monitor output terminals To return to TV EXIT or SDCARD Error display images that could not be loaded etc Selected photo information is displayed The maximum number of characters for Filename is 8 The photo without record of the date is shown To return to thumbnail RETURN All photos in SD Card are dis...

Page 31: ... or Slide show settings operate in step or Slide show Select the photo for the first view Start Slide show Display the menu Select Viewing Setup Select the items and set Picture Menu p 20 Menu Item Adjustments Configurations alternatives Viewing Setup Interval Select slide show interval 5 10 15 30 60 90 120 seconds Repeat Slide show repeat Off On To pause To return to Single view green On screen m...

Page 32: ...Q Link SCART cable DVD Recorder VCR with Q Link function Connect the DVD Recorder VCR supporting Q Link to the TV s AV1 or AV2 terminal via a fully wired SCART cable VIERA Link SCART cable HDMI cable DIGA Recorder HD Video Camera with VIERA Link function Connect the equipment supporting VIERA Link to the TV s AV1 AV2 HDMI1 or HDMI2 terminals via fully wired SCART and HDMI cables together Some func...

Page 33: ...galogic or SMARTLINK Q Link connection p 32 Set up the DVD Recorder VCR Read the manual of the equipment Q Link terminal setup in Setup Menu Q Link p 21 AV1 AV2 out p 21 Download preset programme language country region setting Preset download Download p 21 or Auto Setup p 25 or Auto Setup when first using the TV p 10 Features available Some recorders are not applicable Read the manual of the reco...

Page 34: ...ngs of the recorder might be required For details read the manual of the recorder Download preset programme language country region setting Preset download Download p 21 or Auto Setup p 25 or Auto Setup when first using the TV p 10 Set VIERA Link On in Setup Menu VIERA Link p 21 Set up the TV After connection turn the equipment on and then switch the TV on Select the input mode to HDMI1 HDMI2 or H...

Page 35: ...is What you record HDAVI Control 3 Direct TV Rec Recording the current programme in DIGA Recorder immediately This function is available with DIGA Recorder which has HDAVI Control 3 function Connect DIGA Recorder with both HDMI and SCART cables to use this function If you cannot operate check the settings and the equipment Preparations p 34 Changing programme or turning off the TV is available whi...

Page 36: ...ut you cannot access it Use its own remote control to operate the equipment Direct TV Rec VIERA Link Menu Start VIERA Link Control Speaker Selection Home Cinema Others Pause Live TV When the equipment of other types or manufacturers is connected Others Others is displayed You cannot access it Use its own remote control to operate the equipment Direct TV Rec VIERA Link Menu Start VIERA Link Control...

Page 37: ...few seconds when Input mode is switched Volume function will be displayed when adjusting the volume of the equipment Easy playback is also available by using the remote control for Ampli er or Player theatre Read the manual of the equipment About HDMI cable for connecting Panasonic HD Video Camera read the manual of the equipment If more than one equipment of the same type are connected to the TV ...

Page 38: ...DVDs DVD player To watch camcorder images Video camera To watch satellite broadcasts Set top box To play games Game equipment To use ampli er with speaker system Q Link VIERA Link with HDMI with HDMI Direct TV Recording S VIDEO or VIDEO AUDIO Headphones Camcorder Game equipment To adjust volume Headphone Volume in the Sound Menu p 20 M3 stereo mini plug To watch DVDs Viewing Listening Fully wired ...

Page 39: ...O RGB VIDEO S VIDEO Computer PC Set top box DVD Recorder VCR SCART cable RF cable SCART cable To watch satellite broadcasts To record playback DVD Recorder or HDMI equipment Ampli er with speaker system To listen with speakers Viewing Listening Fully wired HDMI compliant cable RCA cable Conversion adapter if necessary ...

Page 40: ...an enjoy ner images p 13 Auto Auto aspect determines the best aspect ratio to use to ll your screen It does this using a four step process to determine if the picture being viewed is a widescreen picture If Auto aspect detects a widescreen signal it switches into the appropriate 16 9 or 14 9 widescreen mode If Auto aspect does not detect a widescreen signal then this advanced TV enhances the pictu...

Page 41: ...alogue signals The HDMI input terminal can be used with only the following image signals 480i 480p 576i 576p 720p 1080i and 1080p Match the output setting of the digital equipment For details of the applicable HDMI signals see p 43 This TV incorporates HDMITM Version 1 3 with x v ColorTM technology 1 The HDMI logo is displayed on HDMI compliant equipment 2 Enquire at your local digital equipment r...

Page 42: ... earth 17 Red in 15 Red earth 13 Green in 11 Green earth 9 Blue in 7 Blue earth 5 Audio out L 3 Audio out R 1 20 CVBS in video 18 RGB status earth 16 Status RGB 14 Earth 12 10 Q Link data 8 Status CVBS 6 Audio in L 4 Audio earth 2 Audio in R Socket Earth 21 CVBS out video 19 CVBS earth 17 Red in S C in 15 Red earth 13 Green in 11 Green earth 9 Blue in 7 Blue earth 5 Audio out L 3 Audio out R 1 18 ...

Page 43: ...00 1 280 1 024 60 Hz 63 98 60 02 1 366 768 60 Hz 48 39 60 04 Macintosh13 640 480 35 00 66 67 Macintosh16 832 624 49 73 74 55 Macintosh21 1 152 870 68 68 75 06 COMPONENT Y PB PR HDMI Mark Applicable input signal PC D sub 15P PC connection A PC may be connected to this TV so that the PC screen is displayed and sound is heard from the TV PC signals that can be inputted Horizontal scanning frequency 3...

Page 44: ...tact the authorized Service Centre Q Link function does not work Please con rm SCART cable and connection Also please set AV1 AV2 out in the Setup Menu p 21 VIERA Link function does not work and an error message appears Con rm the connection Turn the connected equipment on and then switch the TV on p 34 Recording does not start immediately Check the settings of the recorder For details read the ma...

Page 45: ...ipment p 43 Use an equipment compliant with EIA CEA 861 861B Sound is unusual Set the sound setting of the connected equipment to 2ch L PCM Check the HDMI1 3 Input setting in the Sound Menu p 20 If digital sound connection has a problem select analogue sound connection p 41 Sound level is low or sound is distorted Sound signal reception may be deteriorated Set MPX p 20 in the Sound Menu to Mono No...

Page 46: ...deo Electronics Standard Association Even if no special notation has been made of company or product trademarks these trademarks have been fully respected SDHC Logo is a trademark HDMI the HDMI Logo and High De nition Multimedia Interface are trademarks or registered trademarks of HDMI Licensing LLC HDAVI ControlTM is a trademark of Matsushita Electric Industrial Co Ltd ...

Page 47: ...nals AV1 Scart terminal 21 Pin terminal Audio Video in Audio Video out RGB in Q Link AV2 Scart terminal 21 Pin terminal Audio Video in Audio Video out RGB in S Video in Q Link AV3 VIDEO RCA PIN Type 1 1 0 V p p 75 S VIDEO Mini DIN 4 pin Y 1 0 V p p 75 C 0 286 V p p 75 AUDIO L R RCA PIN Type 2 0 5 V rms COMPONENT VIDEO Y 1 0 V p p including synchronization PB PR 0 35 V p p AUDIO L R RCA PIN Type 2 ...

Page 48: ...ies may be applicable for incorrect disposal of this waste in accordance with national legislation For business users in the European Union If you wish to discard electrical and electronic equipment please contact your dealer or supplier for further information Information on Disposal in other Countries outside the European Union This symbol is only valid in the European Union If you wish to disca...

Reviews: