background image

English

   - 10 -

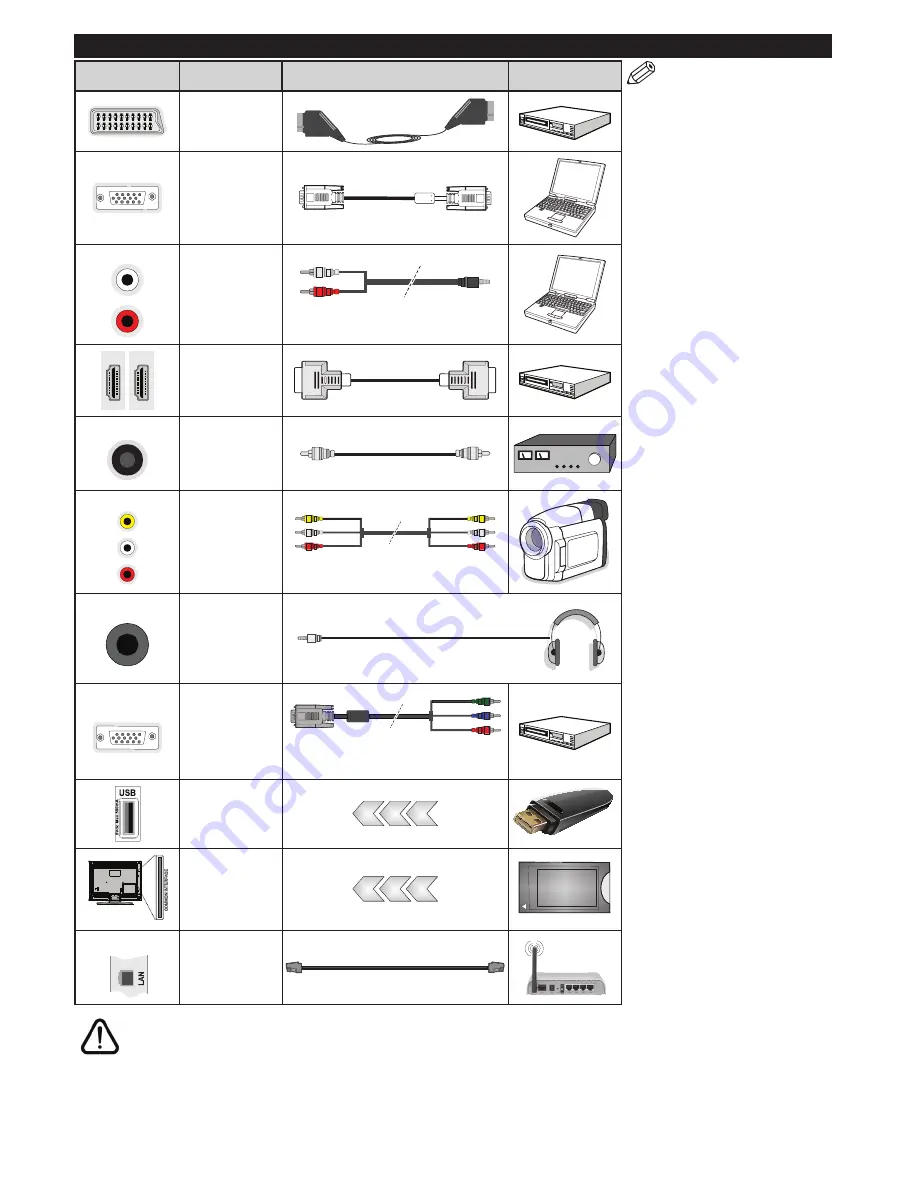
Connections

Connector

Type

Cables

Device

Scart


Connection


(back)

VGA


Connection


(back)

SIDE AV


PC/YPbPr 

Audio


Connection


(side)

YPbPr/PC Audio Cable (not 

supplied)


HDMI


Connection


(back)

SPDIF


SPDIF


(Coaxial Out)


Connection


(back)

SIDE AV


Side AV


(Audio/Video)


Connection


(side)

AV Cable (not supplied)

HEADPHONE

Headphone


Connection


(side)

YPBPR


YPbPr Video


Connection


(back)

PC to YPbPr Connection Cable 

(not supplied)

USB


Connection


(side)

CI


Connection


(side)

CAM 

module

LAN


Ethernet


Connection


(back)

LAN / Ethernet Cable  


NOTE: When connecting 

a device via the YPbPr or Side 

AV input, you must use the 

connection cables to enable 

connection. See the illustrations 

on the left side. | You can use 

YPbPr to VGA cable (not supplied) 

to enable YPbPr signal via VGA 

input. 

|  You  cannot  use  VGA 

and YPbPr at the same time. 

| To enable PC/YPbPr audio, 

you will need to use the side 

audio inputs with a YPbPr/

PC  audio  cable  (not  supplied) 

for audio connection. | If an 

external device is connected via 

the  SCART  socket,  the  TV  will 

automatically switch to AV mode.| 

When  receiving  DTV  channels 

(Mpeg4 H.264) or while in Media 

Browser mode, output will not be 

available via the scart socket. | 

When using the wall mounting 

kit  (available  from  third  party 

in the market, if not supplied), 

we recommend that you plug all 

your cables into the back of the 

TV before mounting on the wall. 

| Insert or remove the CI module 

only when the TV is SWITCHED 

OFF. You should refer to the 

module instruction manual for 

details of the settings. | The/Each 

USB  input  of  your  TV  supports 

devices up to 500mA. Connecting 

devices that have current value 

above 500mA may damage your 

TV. | By connecting an HDMI cable 

to your TV, you have to use only a 

shielded HDMI cable to guarantee 

a sufficient immunity against 

parasitic frequency radiation.

 If you want to connect a device to the TV, make sure that both the TV and the device are turned off before making 

any connection. After the connection is done, you can turn on the units and use them.

Summary of Contents for TX-32C300B

Page 1: ...OPERATING INSTRUCTIONS TX 32C300B COLOUR TELEVISION WITH REMOTE CONTROL...

Page 2: ...n 7 Sales and Support Information 8 Specification 8 Remote Control 9 Connections 10 Switching On Off 11 First Time Installation 11 Media Playback via USB Input 11 Media Browser Menu 12 CEC and CEC RC...

Page 3: ...cord plug can cause fire or give you an electric shock Handle the power cord by the plug do not unplug the TV by pulling the power cord Never touch the power cord plug with wet hands as this could ca...

Page 4: ...cratch the surface with your fingernail or other hard objects Do not allow the cabinet and pedestal to make contact with a rubber or PVC substance for a long time This may degrade surface quality Main...

Page 5: ...tons on the remote Set as Off to turn this setting off Note Available Energy Saving options may differ depending on the selected Mode in the Picture menu The Energy Saving settings can be found in the...

Page 6: ...r a long time Press OK to continue TV Control Switch Operation 1 Up direction 2 Down direction 3 Volume Info Sources List selection and Standby On switch The Control button allows you to control the V...

Page 7: ...se from Dolby Laboratories Dolby and the double D symbol are trademarks of Dolby Laboratories Disposal of Old Equipment and Batteries Only for European Union and countries with recycling systems These...

Page 8: ...es are provided directly by Panasonic UK It couldn t be simpler Also available through our Internet is direct shopping for a wide range of finished products Take a browse on our website for further de...

Page 9: ...edia browsing screen 11 Info Displays information about on screen content shows hidden information reveal in TXT mode 12 My button 1 13 Coloured Buttons Follow the on screen instructions for coloured...

Page 10: ...io cable not supplied for audio connection If an external device is connected via the SCART socket the TV will automatically switch to AV mode When receiving DTV channels Mpeg4 H 264 or while in Media...

Page 11: ...ished press OK to continue You can activate Store Mode option at this point This option will configure your TV s settings for best display quality This option is intended only for store use It is reco...

Page 12: ...of the connected HDMI ports name such as DVD Player Recorder 1 etc The TV remote is automatically able to perform the main functions after the connected HDMI source has been selected To terminate thi...

Page 13: ...ble Increase the warmth or coolness of the picture by pressing Left or Right buttons Picture Zoom Sets the desired image size format Film Mode Films are recorded at a different number of frames per se...

Page 14: ...AVL Automatic Volume Limiting Sets the sound to obtain fixed output level between programmes Headphone Lineout When you connect an external amplifier to your TV using the headphone jack you can selec...

Page 15: ...ports it More Displays other setting options of the TV Menu Timeout Changes timeout duration for menu screens Blue Background Activates or deactivates the blue background system when the signal is wea...

Page 16: ...is setting for fine tuning analogue channels This feature is not available if no analogue channels are stored Installation Settings Displays installation settings menu Standby Search Optional Your TV...

Page 17: ...the First Time Installation is set as France Italy or Austria Maturity Lock s value will be set to 18 as default Child Lock If this option is set to ON the TV can only be controlled by the remote cont...

Page 18: ...button Navigate to Software upgrade and press the OK button In Upgrade options menu select Scan for upgrade and press OK button to check for a new software upgrade If a new upgrade is found it starts...

Page 19: ...0 85Hz 33 1280x1024 60Hz 34 1280x1024 75Hz 35 1280x1024 85Hz 36 1400x1050 60Hz 37 1400x1050 75Hz 38 1400x1050 85Hz 39 1440x900 60Hz 40 1440x900 75Hz 41 1600x1200 60Hz 42 1680x1050 60Hz 43 1920x1080 60...

Page 20: ...384Kbps Bit rate 16KHz 48KHz Sampling rate Layer3 8Kbps 320Kbps Bit rate 16KHz 48KHz Sampling rate wav LPCM WMA ASF WMA WMA Pro WMA 128bps 320Kbps Bit rate 8KHz 48Khz Sampling rate WMA Pro 768kbps Bi...

Page 21: ...g DVI converter cable DVI to HDMI cable not supplied you can refer to the following resolution information 56Hz 60Hz 66Hz 70Hz 72Hz 75Hz 640x400 640x480 800x600 832x624 1024x768 1152x864 1152x870 1280...

Page 22: ...l which is marked with the letter E or by the earth symbol or coloured green or green and yellow The wire which is coloured blue or black must be connected to the terminal which is marked with the let...

Page 23: ...0 5 W Off mode power consumption NA Screen resolution 1366 x 768 1 Energy consumption XYZ kWh per year based on the power consumption of the television operating 4 hours per day for 365 days The actua...

Page 24: ...getica H Consumo di energia in modo stand by e I Consumo di energia in modo spento ceso J Risoluzione dello schermo nno calcolato sulla base del consumo di un televisore in funzione per 4 nsumo effett...

Page 25: ...oj potro nji struje potra ite na nalepnici na pole ini televizora English 20 M Informacij apie vardin energijos suvartojim r etiket je ant televizoriaus galinio gaubto Portugu s A Ficha de produto C I...

Page 26: ......

Reviews: